Page is loading ...

USER MANUAL
Fully programmable combi
steam oven
&
Fully programmable oven with
boiler

2
Table of contents
Safety instructions
3
Quick start 4
Setting of operation modes, temperature and time 5
Fan and exhaust 6
Core temperature: 7-10
- Functions: Core temperature 7
- How to use the core temperature 8
- How to use Delta T 9
- How to use Cook & Hold 10
Operation modes: 11-15
- ClimaOptima
®
11
- Steaming 12
- Reheating 13
- Proving / Rising 13
- Preheating 14
- Cooling 14
- CombiWash
®
15
Programmes: 16-23
- Preprogrammed recipes 16
- Starting programme / recipe 17
- Editing programme 18-23
Main menu: 24-27
- Setting clock 25
- Timer start 26
- Preset values 27
- Oven set-up 28
Counters for detergent and energy 28
Cleaning 29-30
USB key function 31-35
HACCP 36-37
CombiNet
®
38-39
Error codes 40
Recommended core temperatures 41
Low-temperature and long-time roasting 42
Recommended programmes and the recipe library 43-52
DK
For further information on the functions and user interface of the oven, see Service &
Installation Manual.
ENG

3
Safety Instructions
Ready to use….
When the oven is correctly installed, read this manual carefully before the oven comes into
service.
This manual should be kept handy to persons using the oven.
Always place trays filled with hot liquid in the bottom runners of the oven chamber to avoid
spilling the hot liquid on yourself when you take the tray out of the oven chamber.
Some areas on the outside of the oven may get as hot as 60°C or more, therefore, you should
only touch the front of the oven.
Do not open the oven during the automatic cleaning process.
Do not store flammable materials around or under the unit.
When using the roll-in or trolley system, be aware of hot racks sliding out of the oven. Use the
parking brakes on the wheels to prevent trolleys from rolling away on uneven floors.
Maintenance and repair:
Maintenance and repair should only be carried out by trained technicians.
Only use cleaning detergent that matches the specifications from the factory.

4
Quick start
The operation panel is so designed that the modes
are activated by pressing the keys next to the
symbols or digits (6 keys on either side).
In the case of for instance time and temperature,
the left as well as the right side next to the mode
are active. The right key increases time,
temperature, etc. and the left key reduces time,
temperature, etc.
Some of the symbols are shown on one side only
and will lead you to a submenu. When you have
made changes in the submenu, press OK at the
upper right hand corner.
The red circle with the green line at the top of the
panel is the main switch.
The green square with the white line at the lower
right-hand corner is ON/OFF.
The white circle with the small symbol at the
lower left-hand corner gives you access to the
programme menu.

5
Setting of mode, temperature and time
The white digits next to the symbols for TEMPERATURE and TIME show the actual oven
temperature and the actual time remaining. When there is one minute left, the computer
counts down from 59 seconds. The alarm sounds when time is up. The red digits are the preset
time and temperature.
When the oven is on (a program or a function has been activated – the square around the
function flashes), it is still possible to set TIME, TEMPERATURE, FAN and EXHAUST.
Note that the fan wheel is reversible. This means that the wheel can run leftwards as well as
rightwards with a small interval when changing direction.
The core temperature should be set before the program is started.
On the following pages, the above initial display image will be referred to as the “work menu”.
* For continuous operation, press the left key until the indication of time disappears.
Access to main menu
Selects next mode to
the left
Setting of temperature
(this side: temperature
up, left side:
temperature down)
Setting of time (this
side: time down, right
side: time up)*
Core temperature
Access to fan and
exhaust
Manual humidity
pulsing. Only active
when HOT AIR is on.
ON/OFF
Access to preset
programmes
Main switch
Next mode to the right

6
Setting of fan and exhaust
Fan and exhaust can be activated before as well as after start-up.
A fan speed between 20 and 50% is recommended for the baking of puff pastry, Danish
pastry, cakes and small products as well as in the Delta-T and Cook-and-Hold modes. You may
add 1 – 2 minutes’ preparation time for each ½ hour when low fan speed is used.
Fan speeds below 50% cannot be used at temperatures above 200°C.
A fan speed between 50 and 90% are recommended if you want a particularly juicy end
product and can accept a longer cooking time.
Open exhaust is recommended for bread and pastry, roasting of pieces of meat and to achieve
a grill effect.
a) Return to work menu without saving settings of fan and exhaust, if any.
b) Accept settings of fan and exhaust and return to work menu.
It is only possible to set the exhaust function in the hot-air mode. In the other modes, the
exhaust function is controlled automatically by the oven.
The fan function is active in HOT AIR, STEAMING and REHEATING. In the other modes, the fan
is controlled automatically by the oven.
b) OK for settings and
return
a) Return without
saving
Choose fan speed
from 20% to 100%
Choose between
exhaust open or
closed

7
Core temperature
The core temperature sensor offers you the following modes:
Active: This is the mode in which you use the core temperature to determine when the
product is finished. In this mode, you set the oven temperature, the programme and, if actual,
the humidity content.
Delta-T: This is the mode in which you set the desired core temperature. You get the best
result starting with an oven temperature of 30 – 40°C. Subsequently, the oven automatically
controls the temperature in the oven chamber on the basis of the core temperature of the
product. The oven temperature is approx. 20°C higher than the current core temperature
rising gradually as the core temperature of the product rises. This mode offers you very gentle
preparation resulting in a tender and juicy end product and reducing shrinkage by up to 20%
compared to traditional modes of preparation.
Cook & Hold: Cook & Hold is an extension to the Delta-T mode. It starts like Delta-T but ends
up by evening out the temperature in the oven and the core temperature and thus acting as a
warming mode.
Cook & hold is suitable for roasting overnight when there is no staff around.
Start-up
You start core temperature sensor 1 (optional extra for oven models that are fully
programmable with combi steam) by pressing the on/off key once.
You start Delta-T by pressing once more next to the active core temperature sensor 1.
You start Cook & Hold by pressing once more next to the active Delta-T.
To switch off core temperature sensor 1, press the on/off key once more.
Remember always to confirm your setting by pressing OK on the key in the upper right-hand
corner.
You start core temperature sensor 2 (optional extra for oven models that are fully
programmable with boiler & fully programmable with combi steam) by pressing the on/off key
once. Core temperature 2 only holds the mode “active”.

8
Core temperature sensor
The graph illustrates the difference between oven temperature and core temperature. The
graph is fixed and does not change when you set the core temperature. Core temperature
probe 1 is blue and core temperature probe 2 (optional extra) is green. The red line is the
oven temperature.
Cooking with core temperature probe 2
The temperature in the product determines which of the two probes first reaches the desired
core temperature. When one of the probes reaches the core temperature, an alarm sounds and
a message in yellow appears in the display. Take out the product. Close the door and the oven
continues until the second probe reaches the desired core
temperature.
Return without saving
OK for settings and
return
ON/OFF core
temperature probe 1
ON/OFF core
temperature probe 2
(optional extra)
Return without saving
OK for settings and
return
Activate core
temperature probe 2
(optional extra)
Setting of core
temperature
30 – 150°C

9
Delta-T
Delta-T is particularly suitable for cuts of meat that contain a great deal of connective tissue,
for large roasts and for very lean cuts of meat. During this slow preparation process, the tough
connective tissue is gently broken down, which enhances the flavour and increases the
juiciness of the finished product.
The preparation time depends on the thickness of the meat and its contents of connective
tissue, bones and fat. The recommended preparation time is 60 – 75 minutes for each kg of
meet. This means that if the oven is loaded with pieces of meat, the largest of which weighs 3
kg, the preparation time will be 3 – 4 hours.
Note that the aromatic compounds in the meat only become volatile at temperatures above
120°C. This means that the meat does not give off flavour until it has been browned at a high
temperature for a few minutes. This is, however, of no importance if the meat is subsequently
to be cut out. It may be of importance if the meat is to be carved for a buffet.
Recommended core temperatures in Delta-T:
Rare : 52 - 57°C
Medium: 59 - 62°C
Well-done: 72 - 85°C
OK for settings and
return
Return without saving
Delta-T has been
selected
Set core temperature
with arrows
Procedure
1. Cool down the oven to 30 – 40°C
2. Select one of the following modes:
HOT AIR, recommended for very fatty and not too large roasts.
STEAMING, recommended for large hams with bones.
REHEATING, recommended for poultry and other lean pieces of meat.
CLIMAOPTIMA 50%-80%, recommended for all other products.
3. Insert the core temperature probe in the product with the largest diameter.
4. Activate Delta-T and set core temperature. Remember to confirm.
5. Press ON/OFF

10
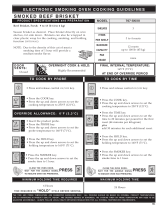
Cook & Hold
COOK & HOLD is a Delta-T mode which, in addition, keeps the food hot when it is done.
COOK & HOLD maintains the core temperature until the program is interrupted (by pressing
ON/OFF, by opening the oven door, or when the time has run out).
Cook & Hold can be activated in HOT AIR, STEAMING, REHEATING (recommended) and
CLIMAOPTIMA.
Recommended holding temperature is 60 – 65°C (at temperatures above 60°C, a gradual
dehydration of proteins takes place, the weight of the meat is reduced and the meat becomes
less juicy).
At the above temperature, the meat can be taken out immediately before carving.
After 5 – 6 hours’ preparation in COOK & HOLD, shrinkage increases.
OK for setting and
return
Return without
changes
Cook & Hold has
been selected
Set core
temperature with
arrows
Fixed graph illustrating
the difference between
oven temperature and
core temperature

11
ClimaOptima
®
When using ClimaOptima correctly, you minimise shrinkage and enhance the appearance and
taste of the products.
ClimaOptima offers you the possibility of adding up to 100% humidity to the oven chamber at
temperatures from 70 to 250°C). The computer automatically operates according to the
desired humidity content by adding or removing humidity.
Many products contain a rather large amount of water and therefore give off a great deal of
humidity during preparation. Therefore, the oven chamber often contains 15 – 50% natural
humidity.
Preheating for 5 minutes with the desired humidity content is recommended.
Depending on the amount of products in the oven and the setting of humidity and
temperature, the correct humidity content has been reached after 1 – 5 min.
Blue bar is the actual amount of humidity in oven chamber
White digits are the humidity set
If bar is all red, oven chamber contains 0% humidity.
If bar is all blue, oven chamber contains 100% humidity.
If you want dry air for grilling, for instance, apply 0% humidity at 200 – 250%C
To produce gravy when braising meat, apply 70 – 80% humidity at 145 – 165°C.
For poaching fish, poultry and crispy vegetables, apply 70 – 95% humidity at 70 – 120°C.
For steaming potatoes, rice, pasta, meat, etc., apply 100% humidity at 100°C.
For quick preparation, we recommend the following combination: 190°C – 70%
humidity.
Despite the short time of preparation, products such as herb-marinated cuts of meat, fresh
vegetables and bread are treated very gently.
Set humidity content
(lower)
Set humidity content
(higher)
If the oven is not connected to a soft water plant, CombiOptima cannot function
properly.

12
Steaming
To get the oven ready for production quickly and to
ensure a perfect start of the steaming process, we
recommend that you cool down the oven chamber to
80°C.
If the oven chamber is too hot, it cools down auto-
matically. It is faster to use the cooling mode, as this
mode allows you to open the door while the mode is
active.
We recommend that you start the steaming process 8
minutes before you place the products in the oven
chamber.
For reasons of hygiene, the oven automatically checks
the water in the steam generator. If the water
temperature is below 65°C, the tank is emptied, refilled
and the water is heated.
Low-temperature steaming at 65 - 90°C is
recommended for delicate products such as fish.
Steaming at 80°C for 5 – 10 min. of small, fresh
vegetables such as carrots, asparagus, and beans
(diameter: 5 – 12 mm) produces end products that
keep their colour and crispness.
Traditional steaming at 98 – 100°C is recommended
for all kinds of root vegetables, potatoes, pasta, rice and
meat.
Forced steaming at 120°C can be used for vegetables
that need further processing and for faster preparation
of for instance pasta, rice, hard root vegetables and
frozen vegetables. Forced steaming should be used with
care.
To achieve a perfect result every time, we recommend
the use of the core temperature probe in all steaming
modes.
In a fully programmable combi steam oven, you boil by
means of injection steam. Select ClimaOptima with
100% humidity at 100°C.
If the oven is not connected to a soft water plant, the steaming modes cannot
function properly.

13
Reheating
Reheating is a very gentle process (20 – 180°C). The
program operates with low fan speed and adds a
carefully calculated amount of humidity which
maintains the nice appearance and taste of the
products.
To get the fastest reheating, the products should not be
covered with a lid or the like.
Use a core temperature probe to reach a perfect end
temperature.
For the reheating of sous-vide products, etc., follow the
recommendations of the supplier.
Recommended times and temperatures for fast reheating:
8 – 12 minutes at 140°C for rice/meat and vegetables arranged on plates
40 – 60 minutes at 120 – 140°C for whole roasts, stews and sauces
20 – 30 minutes at 120°C for pasta, rice and the like
Proving/Rising
The computer is set to maintain the perfect humidity for
all products that need to be proved before they are
baked.
Recommended settings of temperature and time:
Loaves of 400 – 800 g: Low temperature and long
proving time (32°C, 45 min.).
Rolls/baguettes of 60 – 200 g: High temperature and
short proving time (36°C, 25 min.).
We call your attention to the preset ”semiautomatic
bread program”, in which the bread is proved and baked
in the same process (models that are fully
programmable with combi steam & boiler).
Please note the distinction between prebaked (additional
baking only) and preproved (defrosting, proving and
baking).

14
Preheating
PREHEATING ensures that the oven chamber is
thoroughly heated.
If the oven is cold, 2 - 5 minutes’ preheating is
recommended (models 2.10 and 2.14 require 15
minutes’ preheating)
If the oven is hot, 0 – 2 minutes’ preheating is
recommended.
Preheating at a temperature which is approx. 50°C
higher than the desired working temperature is
recommended.
NOTE: When the oven door is opened for loading, the
oven chamber loses 30-50% of the heat.
PREHEATING can be set at 0 – 15 minutes
.
Note that the countdown does not start until the
selected oven temperature is reached.
Cooling
Cooling is used if you need the oven chamber to be
cooler, for instance, when you switch from roasting to
steaming or if you are about to clean the oven.
Cooling is activated in either of the following ways:
a) Oven door closed. Water is used to speed up the
cooling process. Alarm sounds when the
temperature is reached.
b) Oven door open. Fan wheel draws in air to speed
up the cooling process. Programme stops when the
temperature is reached.
It is recommended to set the cooling mode at 20°C
below the desired working temperature.

15
Steps 1 and 2 are used after steaming/roasting at low temperatures.
Steps 3 and 4 are used after roasting at temperatures above 180ºC.
We recommend that CombiWash is used daily/after each production.
* Note that this mode is not active as standard.
CombiWash
®
, Automatic Cleaning System
Press for indication of
level of detergent and
rinsing agent. Reading
and zero setting
(see page 28)*
How to do:
1. Check that the oven is not too hot (max. temperature: 80°C). If the oven is too hot,
use the cooling mode.
2. Check the level of detergent and rinse aid.
3. Select step
4. Close oven door and start programme by pressing the on/off key.
When the programme is over, the oven automatically switches to an energy-saving standby
function.
If the oven is not connected to a soft water plant, CombiWash cannot function
properly.
Step up
Step down

16
Return
Arrow indicates
that there are more
main categories
than those shown.
Preset
P
rogrammes
Press again to scroll
through the pro-
grams of the
category (there are
more categories
than the 5 listed to
the right)
Select main
category
Press key to the left of
ON/OFF

17
Return to previous
menu
Yellow frame moves to
the left (A)
Yellow frame moves to
the right (A)
Temperature up in
current step
Increase time in
current step
Temperature down in
current step
Reduce time in current
step
Access to core tempe-
rature in current step
Start program
me
Return to work menu
Starting program
me
(A) Note the location of the yellow square. Only that particular step in the programme can
now be edited in terms of time, temperature, fan/exhaust, core temperature and possibly
humidity content (ClimaOptima).
Any changes you may have made to the programme are saved in the current run only.
If no changes have been made, press ON and the programme runs according to the settings.
Access to fan and
exhaust in current step
Setting of humidity
content in Clima-
Optima (if mode is
ClimaOptima)

18
Entering and editing programme
Press for access to
main menu
Press for access to
making new
programmes or changing
existing ones
If, when one of the functions in the main menu is activated, a screen appears asking for
a code, this function is blocked and you need a super user code to access. Select enter
code, press 876412 and confirm by pressing OK in the upper right-hand corner.

19
Return to previous
menu
Selecting programme or category
Return to previous
menu
Change text in selected
programme
Dele Delete programme
Change icon
Select programme
Select
main category
Copy programme
Save changes
Change steps
Arrow indicates that
there are more main
categories than
those shown

20
Return to previous
menu
OK for setting and
return to previous
menu
Arrow, move to the
right
2 arrows, move
quickly to the right
Choose between capital
letters and small letters
Write letter in red
square
If you are often entering new programs or changing existing ones and want an overview
of all programs, we recommend that you order CombiNet. Contact your oven supplier for
a price indication.
Delete letter to the left
Entering/changing text in programme
Move cursor to
where the text
should be modified
Arrow, move to the left
2 arrows, move quickly
to the left
Move cursor to where
the text should be
modified
/