Page is loading ...

GENUINE GRACO PARTS AND ACCESSORIES
Two-Piece Bolt-Through
Diaphragm Kits 24B627 and 24F926
406809C
ENG
For use on Husky
®
1050 Diaphragm Pumps.
Kit 24B627 - PTFE/EPDM
Kit 24F926 - PTFE/Santoprene
™
Important Safety Instructions
Read all warnings and instructions in the
Husky
®
1050 Air-Operated Diaphragm Pump
Repair/Parts manual. Save all instructions.
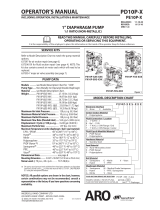
Ref. Description Qty.
101
DIAPHRAGM, PTFE 2
102
DIAPHRAGM, backup, EPDM (Kit 24B627) 2
DIAPHRAGM, backup, Santoprene
(Kit 24F926)
2
103 O-RING, shaft bolt, for 1050A (aluminum),
1050H (hastelloy), and 1050S (stainless
steel) models
2
104 TOOL, diaphragm install 1
105 O-RING, manifold, PTFE (not shown) 8
Rounded side faces diaphragm.
1
Apply lithium-based grease.
2
AIR SIDE markings on diaphragm must face
center housing.
4
ti14021a
1
2
102
101
4
4
104
(Metal
Pumps)
1
103
3
(Plastic
Pumps)
3
Torque to 20-25 ft-lb (27-34 N•m)
at 100 rpm maximum.
3
All brand names or marks are used for identification
purposes and are trademarks of their respective owners.
Graco Inc. P.O. Box 1441 Minneapolis, MN 55440-1441
Original instructions. MM 406809, Rev. C 08/2010
Copyright 2009, Graco Inc. is registered to ISO 9001
See reverse for assembly instructions.

2 406809C
Assembly
1. Follow the steps for your type of pump to assemble
the diaphragms and attach one of the fluid covers.
Metal Pumps (1050A, 1050H, 1050S)
a. Install the o-ring (103) on the shaft bolt.
b. Assemble the fluid side plate, the backup dia-
phragm (102), the diaphragm (101), and the air
side diaphragm plate on the bolt exactly as
shown on page 1.
c. Apply medium-strength (blue) Loctite or equiva-
lent to the bolt threads. Screw the bolt into the
shaft hand tight.
d. Apply lithium-based grease to the shaft u-cups
(in center housing) and the length and ends of
the diaphragm shaft. Slide the shaft into the
housing.
e. Repeat Steps a-c for the other diaphragm
assembly.
f. Hold one shaft bolt with a wrench and torque
the other bolt to 20-25 ft-lb (27-34 N•m) at 100
rpm maximum. Do not over-torque.
g. Reattach the first fluid cover (3). See Torque
Instructions, in the manual. Go to Step 2.
Plastic Pumps (1050C, 1050F, 1050P)
a. Assemble the diaphragm (101), the backup dia-
phragm (102), and the air side diaphragm plate
on the fluid side plate.
b. Apply medium-strength (blue) Loctite or equiva-
lent to the threads of the screw on the fluid side
plate. Screw the assembly into the shaft
hand-tight.
c. Apply lithium-based grease to the shaft u-cups
(in center housing) and the length and ends of
the diaphragm shaft. Slide the shaft into the
housing.
d. Repeat Steps a-b for the other diaphragm
assembly.
e. Hold one of the plates with a wrench, and
torque the other plate to 20-25 ft-lb (27-34 N•m)
at 100 rpm maximum. Do not over-torque.
f. Reattach the first fluid cover. See Torque
Instructions in the manual.
2. To ensure proper seating and extend diaphragm life,
attach the second fluid cover with air pressure on
the pump.
a. Place the supplied tool (104) where the air valve
gasket normally goes. Arrows (A) must face
toward the fluid cover that is already attached.
b. Reattach the air valve.
c. Supply a minimum of 20 psi (0.14 MPa, 1.4 bar)
air pressure to the air valve. Shop air may be
used. The diaphragm will shift so the second
fluid cover will seat properly. Keep air pressure
on until the second fluid cover is attached.
d. Attach the second fluid cover. Follow Torque
Instructions in the manual.
e. Remove the air valve and the tool (104).
NOTE: If you are replacing the diaphragms but not the
air valve, you must remove the air valve and gasket, put
the tool in place of the gasket, and put the air valve back
on to get the air pressure needed for proper installation
of the second fluid cover. Remember to remove the tool
and replace the gasket when finished.
3. Reassemble the ball check valves and manifolds as
explained in the manual.
A
104
ti14120a
/