Page is loading ...

330040-29091-R0-August 21, 2018
Style #:
Lot:
Date:
___________
___________
___________
B
REV
Note: The style of your item may vary from what is pictured in
the instruction sheet.
Remarque : Le modèle de votre article peut être différent de
celui qui est illustré dans le feuillet d’instructions.
Note: El estilo de su artículo puede variar de la ilustración en la
hoja de instrucciones.
Lea todas las instrucciones antes de
ensamblar y usar. MANTENGA LAS
INSTRUCCIONES PARA SU USO FUTURO.
Read all instructions before assembly
and use. KEEP INSTRUCTIONS
FOR FUTURE USE.
ADULT ASSEMBLY
REQUIRED
Due to the presence of small parts during assembly,
keep out of reach of children until assembly is complete.
DEBE SER ENSAMBLADO
POR UN ADULTO
Debido a la presencia de piezas pequeñas durante el ensamblaje,
mantenga fuera del alcance de los niños hasta que complete el
ensamblaje.
Lisez toutes les instructions avant l’assemblage et
l’utilisation. CONSERVEZ LES INSTRUCTIONS
POUR RÉFÉRENCE ULTÉRIEURE.
L’ASSEMBLAGE DOIT ETRE FAIT
PAR UN ADULTE
A cause de la présence de petites piéces, pendant l’assemblage gardez
hors de portée des enfants jusqu'à ce que celui-ci soit terminé.
When contacting Consumer Care please reference the below information. Before contacting Consumer Care please ensure that the
information below matches the information found on the label on the Back Panel, please reference the information found on the
product when contacting Consumer Care.
Lorsque vous contactez le Service client, veuillez faire référence aux informations ci-dessus. Avant de contacter le Service client,
veuillez vous assurer que les informations ci-dessous correspondent aux informations indiquées sur l’étiquette qui se trouve sur
panneau arrière; veuillez faire référence aux informations indiquées sur le produit lorsque vous contactez le Service client.
Al contactar al servicio al cliente, entregue la información anteriormente mencionada. Antes de contactar al servicio de atención al
cliente, asegúrese de que la información abajo calza con la que aparece en la etiqueta en panel trasero; al contactar al centro de
atención al cliente, mencione la información que aparece en el producto.
Need Help?
Please visit www.SimmonsKids.com/assembly-videos to watch our
easy and effective assembly videos
Besoin d’aide?
Veuillez visiter www.SimmonsKids.com/assembly-videos pour
regarder nos vidéos faciles et efficaces concernant l’assemblage
Necesita ayuda?
Por favor, visite www.SimmonsKids.com/assembly-videos para que
vea nuestros videos que muestran como ensamblar de una manera
efectiva y fácil.
To register your product for important safety alerts and updates to your product please visit
www.SimmonsRegistration.com
Pour enregistrer votre produit afin de recevoir des alertes de sécurité et des mises à jour importantes
relatives à votre produit, veuillez visiter le site www.SimmonsRegistration.com
Para registrar su producto a fin de recibir importantes alertas y actualizaciones de seguridad, visite
www.SimmonsRegistration.com
Distributed in Canada by
Distribué au Canada près
Delta Children’s Products
Care of/Soins de:
501 Franklin Boulevard
Cambridge, Ontario N1R8G9
Canada
212-645-9033
Assembly Instructions for your Dresser With Changing Top
Directives de Montage pour votre Commode avec plan à langer
Instrucciones de Ensamble de su Cómoda con el cambiador
Simmons Juvenile Furniture
A Division Of Delta Children's Products Corp.
114 West 26th Street
New York, NY 10001
1-800-218-2741
©2018 Simmons Juvenile Furniture, A Division of Delta Children's Products Corp.

2
The safest place for your baby to sleep is in a
JPMA Certified crib.
Adult beds are not safe for babies: NEVER
co-sleep
Read all warnings and follow all instructions.
Missing or broken parts, any questions?
CALL Simmons Kids Consumer Care
NEVER place the crib near a window or any
wall hangings.
Your baby should sleep on a firm mattress.
DO NOT place any items in the crib.
AAP Recommends: Always lay your baby on its
back to sleep. Consult your doctor.
Pillows and Blankets have caused infants to
suffocate, NEVER use in a crib.
SAFE SLEEP TIPS
“Every baby deserves a safe place to sleep.”
Visit DeltaChildren.com/Safety for more safety information.

5
FURNITURE SAFETY TIPS
Serious or fatal crushing injuries can occur from
furniture tip-over.
DO NOT set TV’s or other heavy objects on the
top of bedroom or nursery furniture.
ALWAYS use provided tipover restraints.
NEVER allow children to climb or hang on
drawers, doors,or shelves.
Place heaviest items in the lowest drawers.
NEVER open more than one drawer at a time.
DO NOT leave drawers open when not in use.
Read all warnings and follow all instructions.
Missing or broken parts, any questions?
CALL Simmons Kids Consumer Care
Visit DeltaChildren.com/Safety for more safety information.

HH. Back Panel Screw x15
Vis pour Panneau Arrière
Tornillo de Panel Trasero
JJ. Φ6x30mm Dowel x34
Cheville Φ6x30mm
Pasador Φ6x30mm
PP. Knob / Bouton / Perilla x6
#27470
PP1. Knob
Bouton
Perilla
PP2. Knob Screw
Vis de Bouton
Tornillo para Perilla
Parts:
Pièces:
Piezas:
Hardware kits Part# 27468
L'ensemble de quincaillerie - pièce n°27468
El kit de herramientas - Pieza #27468
DD. 30mm Bolt x17
Boulon 30mm
Perno 30mm
KK. Crescent Washer x8
Rondelle en croissant
Arandela de media luna
BB. 55mm Bolt x11
Boulon 55mm
Perno 55mm
EE. Plastic Barrel Nut x20
Écrou à portée cylindrique
en plastique
Tuercacilíndricaplástica
GG. 25mm Screw x20
Vis 25mm
Tornillo 25mm
NN.12mm Screw x24
Vis 12mm
Tornillo 12mm
FF. 40mm Screw x23
Vis 40mm
Tornillo 40mm
M4 Allen Wrench (included)
Clé Allen M4 (inclus)
Llave Allen M4 (incluido)
Phillips Screwdriver – Not included
Tournevis Phillips - non inclus
Destornillidor Phillips – no incluido
M4 Ballend Screwdriver
tournevis M4 à tête sphérique
destornillador M4 con cabeza de bola
CAUTION: Do Not use a power screwdriver
they can cause screws to break or strip.
ATTENTION: Ne Pas utiliser un tournevis
électrique car les vis peuvent casser ou
perdre leurs filets.
ATENCIÓN: No use un destornillador
eléctrico ya que puede causar que los
tornillos se rompan o rueden.
11
YY. Short Screw x1
Vis Court
Tornillo corto
XX. Long Screw x1
Vis Longue
Tornillo Largo
TT. Washer x2
Rondelle
Arandela
ZZ. (1) Wall Strap/Sangle murale/Abrazadera

JJ. Φ6x30mm Dowel x4
Cheville Φ6x30mm
Pasador Φ6x30mm
DD. 30mm Bolt x3
Boulon 30mm
Perno 30mm
BB. 55mm Bolt x1
Boulon 55mm
Perno 55mm
14
M4 Allen Wrench
Clé Allen M4
Llave Allen M4
STEP #1
ÉTAPE N°1
PASO #1
Attach Middle Front Rail (Part G), Middle Back Rail (Part H), Top Front Rail (Part E) and Top
Back Rail (Part F) to Center panel (Part D) using (1) 55mm bolt (Part BB), (3) 30mm bolts (Part
DD) and (4) Φ6x30mm Dowels (Part JJ). Tighten bolts with M4 Allen wrench provided.
Fije la Barra Frontal Central (Pieza G), Barra Posterior Central (Pieza H), Barra Frontal Superior
(Pieza E) y Barra Posterior Superior (Pieza F) al Panel Central (Pieza D) utilizando (1) Perno
55mm (Pieza BB), (3) Pernos 30 mm (Pieza DD) y (4) Pasadors Φ6x30mm (Pieza JJ). Apriete
todos los pernos utilizando la llave Allen M4 incluida.
Fixer le Barre Central Avant (Pièce G), Barre Central Arrière (Pièce H), Barre Supérieur avant
(Pièce E) et Barre Supérieur Arrière (Pièce F) aux Panneau Central (Pièce D) à l’aide de (1)
boulon de 55 mm (Pièce BB), (3) boulons de 30 mm (Pièce DD) et (4) Chevilles Φ6x30mm
(Pièce JJ). Serrer les boulons à l’aide de la clé Allen M4 fournie.

DD. 30mm Bolt x2
Boulon 30mm
Perno 30mm
JJ. Φ6x30mm Dowel x10
Cheville Φ6x30mm
Pasador Φ6x30mm
BB. 55mm Bolt x4
Boulon 55mm
Perno 55mm
KK. Crescent Washer x4
Rondelle en croissant
Arandela de media luna
M4 Ballend Screwdriver
tournevis M4 à tête sphérique
destornillador M4 con cabeza de bola
M4 Allen Wrench
Clé Allen M4
Llave Allen M4
16
STEP #2
ÉTAPE N°2
PASO #2
Attach the assembly from Step 1, Bottom Front Rail (Part N) and Bottom Back Rail (Part P) to
the Left Side (Part A) using (10) Φ6x30mm Dowels (Part JJ), (2) 30mm Bolts (Part DD), (4)
55mm Bolts (Part BB) and (4) Crescent Washers (Part KK). Tighten the Bolts with the M4
Ballend Screwdriver and M4 Allen wrench, following the instructions on pages 12 and 13.
Fixer le l’ensemble monté à l’étape 1, Barre Avant Inférieur (Pièce N) et Barre arrière inférieur
(Pièce P) au côté gauche (Pièce A) à l’aide de (10) Chevilles Φ6x30mm (Pièce JJ), (2) boulons 30
mm (Pièce DD), (4) boulons 55 mm (Pièce BB), et (4) rondelles « croissant » (Pièce KK) à l’aide
de dutournevis M4 à tête sphériqueet la clé Allen M4 ensuivant les instructions pages 12 et 13.
Fije el ensamblaje del Paso 1, Barra Frontal Inferior (Parte N) y la Barra trasero inferior (Parte P)
al Lado Izquierdo (Parte A) utilizando (10) Pasadores Φ6x30mm (Pieza JJ), (2) Pernos 30 mm
(Pieza DD), (4) Pernos 55 mm (Pieza BB) y (4) Arandelas de Media Luna (Pieza KK) utilizando el
destornillador M4 con cabeza de bola y la llave Allen M4 siguiendo las instrucciones de
laspáginas 12 y 13.

DD. 30mm Bolt x2
Boulon 30mm
Perno 30mm
JJ. Φ6x30mm Dowel x10
Cheville Φ6x30mm
Pasador Φ6x30mm
KK. Crescent Washer x4
Rondelle en croissant
Arandela de media luna
BB. 55mm Bolt x4
Boulon 55mm
Perno 55mm
M4 Ballend Screwdriver
tournevis M4 à tête sphérique
destornillador M4 con cabeza de bola
M4 Allen Wrench
Clé Allen M4
Llave Allen M4
18
STEP #3
ÉTAPE N°3
PASO #3
Attach the Right Side (Part B) to the assembly from Step 2 using (10) Φ6x30mm Dowels (Part
JJ), (2) 30mm Bolts (Part DD), (4) 55mm Bolt (Part BB) and (4) Crescent Washer (Part KK).
Tighten the Bolts with the M4 Ballend Screwdriver and M4 Allen wrench, following the
instructions on pages 12 and 13.
Fixer le Côté droit (Pièce B) au l’ensemble monté à l’étape 2 à l’aide de (10) Chevilles Φ6x30mm
(Pièce JJ), (2) boulons 30 mm (Pièce DD), (4) boulons 55 mm (Pièce BB), et (4) rondelles
« croissant » (Pièce KK) à l’aide de dutournevis M4 à tête sphériqueet la clé Allen M4 ensuivant les
instructions pages 12 et 13.
Fije el Lado derecho (Pieza B) al ensamblaje del Paso 2 utilizando (10) Pasadores Φ6x30mm
(Pieza JJ), (2) Pernos 30 mm (Pieza DD), (4) Pernos 55 mm (Pieza BB) y (4) Arandelas de Media
Luna (Pieza KK) utilizando el destornillador M4 con cabeza de bola y la llave Allen M4 siguiendo
las instrucciones de laspáginas 12 y 13.

JJ. Φ6x30mm Dowel x2
Cheville Φ6x30mm
Pasador Φ6x30mm
BB. 55mm Bolt x2
Boulon 55mm
Perno 55mm
DD. 30mm Bolt x6
Boulon 30mm
Perno 30mm
M4 Ballend Screwdriver
tournevis M4 à tête sphérique
destornillador M4 con cabeza de bola
M4 Allen Wrench
Clé Allen M4
Llave Allen M4
STEP #4
ÉTAPE N°4
PASO #4
Attach the Top Panel (Part C) to the assembly from Step 3 using (2) Φ6x30mm Dowels (Part JJ), (6) 30mm Bolts (Part
DD) and (2) 55mm Bolts (Part BB). Tighten the Bolts with the M4 Ballend Screwdriver and M4 Allen wrench.
20
Fixer le Panneau Avant (Pièce C) au montage assemblé à l’étape 3 à l’aide de (2) Chevilles Φ6x30mm (Pièce JJ), (6)
Boulons 30 mm (Pièce DD) et (2) Boulons 55mm (Pièce BB) à l’aide de du tournevis M4 à tête sphériqueet la cléAllen M4.
Fije el Panel Superior(Pieza C) al ensamblaje del Paso 3 utilizando (2) Pasadores Φ6x30mm (Pieza JJ), (6) Pernos 30
mm (PiezaDD) y (2) Pernos 55 mm(Pieza BB) utilizando el destornillador M4 con cabeza de bola y la llave Allen M4.

DD. 30mm Bolt x2
Boulon 30mm
Perno 30mm
M4 Allen Wrench
Clé Allen M4
Llave Allen M4
24
STEP #6
ÉTAPE N°6
PASO #6
1. Attach Changing Top Right Side (Part M) to the Changing Top Front (Part Y) using (1) 30mm
Bolt (Part DD) . Tighten with the Allen Wrench.
2. Attach Changing Top Left Side (Part L) in the same manner
1. Fixer le coté droit du plan à langer (Pièce M) à la partie frontale du plan à langer (Pièce Y) à l’aide de
(1) Boulon 30mm (Pièce DD). Serrezavec la Clé Allen.
2. Fixer le coté gauche du plan à langer (Pièce L) de la même façon.
1. Fijar el lado derecho del cambiador (pieza M) con la parte frontal del cambiador (pieza Y) utilizando (1)
perno de 30mm (pieza DD). Apriete con la Llave Allen.
2. Fijar el lado izquierdo del cambiador (pieza L) de la misma manera.

DD. 30mm Bolt x2
Boulon 30mm
Perno 30mm
M4 Allen Wrench
Clé Allen M4
Llave Allen M4
26
STEP #7
ÉTAPE N°7
PASO #7
Attach Changing Top Back (Part J) to the Right and Left Sides using (2) 30mm Bolts (Part DD) . Tighten with the Allen
Wrench.
Fixer la partie postérieure du plan à langer (Pièce J) au cotés droit et gauche à l’aide de (2) Boulons 30mm (Pièce
DD) . Serrezavec la Clé Allen.
Fijar la parte posterior del cambiador (Pieza J) a los lados derecho e izquierdo utilizando (2) pernos de 300mm (Pieza
DD) . Apriete con la Llave Allen.

FF. 40mm SCREW x3
Vis 40mm
Tornillo 40mm
28
STEP #8
ÉTAPE N°8
PASO #8
Phillips Screwdriver – Not included
Tournevis Phillips - non inclus
Destornillidor Phillips – no incluido
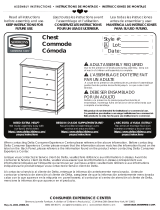
1. Set the Assembled Changing Top on the top of the Dresser as shown.
2. Insert
(3)
40 mm screws (Part FF) through the back of the Changing Top, into the
pre drilled holes the dresser.
3. Tighten with a Phillips Screwdriver.
1. Placer la Table à Langer maintenant assemblée sur ledessusde la commode.
2. Insérer (3) vis 40mm (pièce FF) à partir del’arrière de la table à langer, jusque dans les
trous deguidage que l’onvientde percer dans la commode.
3. Serrer au moyen d’un tournevis phillips.
1. Poner el equipó de ensemblaje ensima del cambiador.
2.Inserta (3) tornillos 40 mm (pieza FF) en laparte de atras en los wecos pil
ót.
3.Apriete
con destornillador phillips.
DRESSER UNIT
LA COMMODE
LA COMMODA
FF
FF
FF

29
Fall Hazard Children have suered serious injuries after falling from changing tables. Falls can happen
quickly.
• STAY within arm’s reach of the child.
•ALWAYS secure this unit to the support surface using the screws provided. See instructions.
•Read all instructions before use of the changing top.
•KEEP THESE INSTRUCTIONS IN A SAFE PLACE FOR FUTURE USE.
•Inspect the changing top periodically. Do not use the changing top if it is damaged or broken. Contact
Delta Children's Products with any questions.
•Tighten all loose screws and bolts before each use.
•The maximum recommended weight of the child is 30lbs for the changing unit.
•Secure the changing unit only to
Simmons Juvenile Furniture
item 330040.
•
The changing pad used should be 34" x 16" with a maximum thickness of 1".
Peligro de caídas. Hay niños que han sufrido lesiones serias al caer de cambiadores. Las caídas pueden
ocurrir en un instante.
•MANTENERSE al alcance de la mano del niño.
•Asegurar SIEMPRE esta unidad a la supercie de soporte utilizando los tornillos provistos. Ver las instruc-
ciones.
•Lea todas las instrucciones antes de usar el cambiador.
•COLOQUE ESTAS INSTRUCCIONES EN UN LUGAR SEGURO PARA SU USO FUTURO.
•Inspeccione este cambiador periodicamente. No use el cambiador si esta dañado o roto. Póngase en
contacto con Delta Children's Products para formular preguntas.
•Apriete los tornillos y pernos ojos antes de cada uso.
•El peso máximo recomendado para los niños que usen el cambiador es 30 libras (13,6 kilos).
•Asegure el cambiador sólo al producto
Simmons Juvenile Furniture
330040.
•La almohadilla usada debe ser 34 x 16 pulgadas con un grosor máximo de 1 pulgada.
Danger de chutes. Des enfants ont souert de sérieuses blessures après être tombés des tables à langer.
Les chutes peuvent arriver rapidement.
•RESTEZ à portée de bras de l'enfant.
•Sécurisez TOUJOURS cette unité à la surface de support à l’aide des vis fournies. Voir les instructions.
•Lisez toutes les instructions avant d’utiliser la table à langer
•CONSERVER CES INSTRUCTIONS DANS UN ENDROIT SÛR POUR RÉFÉRENCE ULTÉRIEURE.
•Inspecter régulièrement la table à langer. Ne pas l’utiliser si elle est endommagée ou brisée. Si vous avez
des questions contactez Delta Children's Products.
•Serrer tous les boulons et vis desserrés avant chaque usage.
•La table à langer ne doit pas être utilisée pour un enfant pesant plus de 13,6 kg (30 lb.).
•La table à langer doit être xé à seulement
Simmons Juvenile Furniture
produit 330040.
•Le coussin à langer doit mesurer 34 po x 16 po et avoir une épaisseur maximale de 1 po
WARNING
AVERTISSEMENT
ADVERTENCIA

30
STEP #9
ÉTAPE N°9
PASO #9
1) Choose BOTTOM or TOP attachment.
2) Locate the through holes in the back of the dresser.
3) Align the hole to be used with the wood wall stud (For Open Bottom Installation, use wood wall stud closest to center)
1) Choisissez une fixation SUPÉRIEURE ou INFÉRIEURE.
2) Repérez les trous percés au dos de la commode.
3) Alignez le trou à utiliser sur le poteau mural en bois (Pour une installation à fond ouvert, utilisez le poteau mural le plus
près du milieu)
1) Seleccione el aditamento SUPERIOR o INFERIOR.
2) Ubique los orificios pasantes en la parte posterior del mueble.
3) Alinee el orificio que utilizará con el pilar de la pared (para una instalación con fondo abierto, utilice el pilar de madera
más cercano al centro)
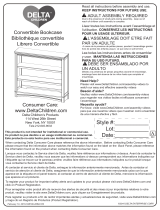
6) Attach the Tip-over restraint strap (ZZ) to the
wall using (1) Long Screw (XX) and (1) washer
(TT) as shown. The screw MUST be installed into
a wood wall stud (See WARNINGS for additional
information).
6) Fixez la sangle du dispositif de
non-renversement (ZZ) au mur à l’aide de (1) vis
longue (XX) et de (1) rondelle (TT) tel qu’illustré.
La vis DOIT être serrez dans un poteau mural en
bois (Pour de plus amples informations, veuillez
vous référer aux AVERTISSEMENTS).
6) Fije la correa de retención contra volcamiento
(ZZ) a la pared utilizando (1) tornillo largo (XX) y
(1) arandela (TT), como se indica. El tornillo
DEBE instalarse en un pilar de madera (para
obtener más información consulte las
ADVERTENCIAS).
ADVERTENCIA
El uso de herramientas de contención
de vuelcos tan solo puede reducir, pero
no eliminar, el riesgo de vuelco.
No intente atornillar a paredes hechas
únicamente de paneles. Debe
atornillar en un pilar u otra estructura
de madera similar, como un zócalo
fijado de manera segura. Si su pared no
tiene vigas de Madera, visite su ferretería o
tienda del ramo más cercana para conseguir un
sistema de anclaje que soporte una fuerza de
tiraje de hasta 50 LBS (22,7 Kgs) para su tipo de
muro. Si no está seguro sobre cómo encontrar
la viga de madera o tiene dudas sobre el tipo de
muro, contacte a un contratista profesional.
5) Drill Ø1/8” hole at Pencil Mark, in
wood wall stud
5) Percez un trou de 1/8 po de
diamètre à l’emplacement de la
marque au crayon, dans le poteau
mural en bois
5) Perfore un orificio de Ø1/8” en la
marca del lápiz, sobre el pilar de
madera
Wood Wall Stud
Poteau mural en bois
Pilar de madera
Pencil Mark
Marque faite au crayon
Marca de lápiz
XX
TT
ZZ
Tipover Restraint
Dispositif de non-renversement
Protección contra volcamiento
WARNING
Use of tip-over restraints may only
reduce, but not eliminate, the risk
of tip-over.
Do not attempt to screw into the
wallboard only. You must screw
into a wood wall stud or other
wood structure such as securely
attached baseboard. If your wall is
not wood stud construction, see your local
hardware store or home center for a wall
anchor system that will hold a pull force of
50 LBS in your wall type. If you are
unsure of how to locate the wood stud, or
of what type of wall you have, contact a
professional contractor.
AVERTISSEMENT
L’utilisation de dispositif anti-renversement
peut uniquement réduire les risques de
renversement, mais ne les élimine pas
totalement.
Ne tentez pas de le visser dans le panneau
de revêtement uniquement. Vous devez
visser dans un poteau mural en bois ou
toute autre structure en bois telle qu’une
plinthe solidement fixée. Si votre mur n'est pas
construit de montants de bois, voyez votre
quincaillerie locale ou centre de rénovation pour une
ancre de mur pouvant supporter 50 livres dans votre
type de mur. Si vous êtes incertain par rapport à
comment localiser le montant ou à quel type de mur
vous avez, contactez un entrepreneur professionnel.
4) Make a pencil mark on the wall using the wood rail as a
guide, pencil mark must be over wood wall stud. Then move
the case away from the wall.
4) Faites une marque sur le mur à l’aide d’un crayon en vous
servant du barre en bois comme guide, la marque au crayon
doit être au-dessus du poteau mural en bois. Ensuite,
déplacez la caisse afin de l’éloigner du mur.
4) Utilizando un lápiz, haga una marca en la pared utilizando
el barra de madera como guía; la marca debe estar sobre el
pilar de madera. Luego, aleje la carcasa de la pared.

Attach the Top Drawer Sides (Part ZZ) to the Top Drawer Fronts (Part U) with (4) 25mm Screws (Part GG). Grooves must
align.Tighten With Phillips Screwdriver. Repeat this step until both Top drawers are complete.
Fixer les Barre de tiroir supérieur (Pièces ZZ) à l’Avant du Tiroir supérieur (Pièce U) à l’aide de (4) vis 25mm (Pièce GG).
Les rainures doivent être alignées. Serrer avec un tournevis Phillips. Répéter cette étape jusqu’à ce que les 2 tiroirs
supérieur soient montés.
Fije los Barra de la gaveta superior (Pieza ZZ) a la Parte frontal de la Gaveta superior (Pieza U) utilizando (4) tornillos
25mm (Pieza GG). Las ranuras deben alinearse. Apriete utilizando un destornillador Phillips. Repitaestepaso hasta haber
completadolas 2 gavetas superior.
Phillips Screwdriver – Not included
Tournevis Phillips - non inclus
Destornillidor Phillips – no incluido
CAUTION: Do Not use a power screwdriver they can cause screws to break or strip.
ATTENTION: Ne Pas utiliser un tournevis électrique car les vis peuvent casser ou perdre leurs filets.
ATENCIÓN: No use un destornillador eléctrico ya que puede causar que los tornillos se rompan o rueden.
32
STEP #10
ÉTAPE N°10
PASO #10
GG. 25mm SCREW x8
Vis 25mm
Tornillo 25mm

GG. 25mm Screw x2
Vis 25mm
Tornillo 25mm
Phillips Screwdriver – Not included
Tournevis Phillips - non inclus
Destornillidor Phillips – no incluido
CAUTION: Do Not use a power screwdriver they can
cause screws to break or strip.
ATTENTION: Ne Pas utiliser un tournevis électrique
car les vis peuvent casser ou perdre leurs filets.
ATENCIÓN: No use un destornillador eléctrico ya que
puede causar que los tornillos se rompan o rueden.
JJ. Φ6x30mm Wood Dowel x4
Cheville en bois Φ6x30mm
Pasador de madera Φ6x30mm
STEP #11
ÉTAPE N°11
PASO #11
EE. PLASTIC BARREL NUT x10
Écrous à Manchon en Plastique
Tuerca de Barril Plásticas
FF. 40mm SCREW x10
Vis 40mm
Tornillo 40mm
.
Slide Top Drawer Bottom (Part Z) into the grooves. Install the Drawer Support (Part W) and Top Drawer Back (Part
R), using (2) Φ6x30mm Wood Dowels ( Part JJ), (1) 25mm Screw (Part GG), (5) 40mm Screws (Part FF) and (5)
Plastic Barrel Nuts (Part EE). Note: Grooves In Bottom Must Align. Repeat this step until both top drawers are
complete.
Glisser le fond du tiroir supérieur (Pièce Z) dans les rainures. Installer le support du tiroir (Pièce W) et l’arrière du
tiroir supérieur (Pièce R), à l’aide de (2) Cheville en bois Φ6x30mm (Part JJ), (1) vis 25mm (Pièce GG), (5) vis
40mm (Pièce FF) et de (5) Écrous à portée cylindriques en plastique (Pièce EE). Remarque: Les rainures
inférieures doiventêtre alignées. Serrer avec un tournevis Phillips. Répéter cette étape jusqu’à ce que les 2 tiroirs
supérieurs soientmontés.
Deslice la parte inferior de la gaveta superior (Pieza Z) hacia las ranuras. Instale el soporte de gaveta (Pieza W) y
parteposterior de la gaveta superior (Pieza R) utilizando (2) Pasadores de madera Φ6x30mm (Pieza JJ), (1) tornillo
25mm(Pieza GG) , (5) tornillos de 40 mm (Pieza FF) y (5) tuercas cilíndricas plásticas (Pieza EE). Nota: Las ranuras
al inferior deben alinearse. Apriete utilizando un destornillador Phillips. Repita este paso hasta haber completado
las 2 gavetas.
34

PP1. Knob x2
Bouton
Perilla
PP2. Knob Screw x2
Vis de Bouton
Tornillo para Perilla
Attach Knob (Part PP1) to Top Drawer Assembly using (1) KnobScrew (Part PP2). Repeat this step until both top drawers
are complete.
Fixer le bouton (Pièce PP1) au montage assemblé du tiroir supérieur à l’aide d’(1) vis de Bouton (Pièce PP2).
Répéter cette étape jusqu’à ce que les 2 tiroirs supérieurs soient montés.
Fije la perilla (Pieza PP1) al ensamblaje de la gaveta superior utilizando (1) tornillo para Perilla (Pieza PP2). Repita
este paso hasta haber completado las 2 gavetas.
CAUTION: Do Not use a power screwdriver they can cause screws to break or strip.
ATTENTION: Ne Pas utiliser un tournevis électrique car les vis peuvent casser ou perdre leurs filets.
ATENCIÓN: No use un destornillador eléctrico ya que puede causar que los tornillos se rompan o rueden.
STEP #12
ÉTAPE N°12
PASO #12
The following tools and parts are required:
Outils et pièces nécessaires:
Se necesitan las siguientes herramientas y piezas:
36

Phillips Screwdriver – Not included
Tournevis Phillips - non inclus
Destornillidor Phillips – no incluido
CAUTION: Do Not use a power screwdriver they can cause screws to break or strip.
ATTENTION: Ne Pas utiliser un tournevis électrique car les vis peuvent casser ou perdre leurs filets.
ATENCIÓN: No use un destornillador eléctrico ya que puede causar que los tornillos se rompan o rueden.
38
STEP #13
ÉTAPE N°13
PASO #13
GG. 25mm SCREW x8
Vis 25mm
Tornillo 25mm
Attach the Bottoom Drawer Sides (Parts RR) to the Bottom Drawer Front (Part T) with (4) 25mm
Screws (Part GG). Note: Grooves in Bottom must align. Tighten With Phillips Screwdriver. Repeat
this step until both bottom drawers are complete.
Fixer les Barre de tiroir inférieur (Pièces RR) à l’avant du tiroir inférieur (Pièce T) à l’aide de (4) vis
25mm (Pièce GG). Remarque: Les rainures inférieures doivent être alignées. Serrer avec un
tournevis Phillips. Répéter cette étape jusqu’à ce que les 2 tiroirs inférieurs soient montés.
Fije los Barra de la gaveta inferior (Pieza RR) a la parte frontal de la gaveta inferior (Pieza T)
utilizando (4) tornillos 25mm (Pieza GG). Nota: Las ranuras al inferior deben alinearse. Apriete
utilizando un destornillador Phillips. Repitaestepaso hasta haber completadolas 2 gavetas
inferiores.

GG. 25mm Screw x2
Vis 25mm
Tornillo 25mm
Phillips Screwdriver – Not included
Tournevis Phillips - non inclus
Destornillidor Phillips – no incluido
CAUTION: Do Not use a power screwdriver they can
cause screws to break or strip.
ATTENTION: Ne Pas utiliser un tournevis électrique
car les vis peuvent casser ou perdre leurs filets.
ATENCIÓN: No use un destornillador eléctrico ya que
puede causar que los tornillos se rompan o rueden.
JJ. Φ6x30mm Wood Dowel x4
Cheville en bois Φ6x30mm
Pasador de madera Φ6x30mm
STEP #14
ÉTAPE N°14
PASO #14
EE. PLASTIC BARREL NUT x10
Écrous à Manchon en Plastique
Tuerca de Barril Plásticas
FF. 40mm SCREW x10
Vis 40mm
Tornillo 40mm
.
Slide Bottom Drawer Bottom (Part X) into the grooves. Install the Drawer Support (Part W) and Bottom Drawer Back
(Part S), using (2) Φ6x30mm Wood Dowels ( Part JJ), (1) 25mm Screw (Part GG), (5) 40mm Screws (Part FF) and
(5) Plastic Barrel Nuts (Part EE). Note: Grooves In Bottom Must Align. Repeat this step until both Bottom drawers
are complete.
Glisser le fond du tiroir inférieur (Pièce X) dans les rainures. Installer le support du tiroir (Pièce W) et l’arrière du
tiroir inférieur (PièceS), à l’aide de (2) Cheville en bois Φ6x30mm (Part JJ), (1) vis 25mm (Pièce GG), (5) vis 40mm
(Pièce FF) et de (5) Écrous à portée cylindriques en plastique (Pièce EE). Remarque: Les rainures inférieures
doiventêtre alignées. Serrer avec un tournevis Phillips. Répéter cette étape jusqu’à ce que les 2 tiroirs inférieurs
soientmontés.
Deslice la parte inferior de la gaveta inferior (Pieza X) hacia las ranuras. Instale el soporte de gaveta (Pieza W) y
parteposterior de la gaveta inferior (Pieza S) utilizando (2) Pasadores de madera Φ6x30mm (Pieza JJ), (1) tornillo
25mm(Pieza GG) , (5) tornillos de 40 mm (Pieza FF) y (5) tuercas cilíndricas plásticas (Pieza EE). Nota: Las ranuras
al inferior deben alinearse. Apriete utilizando un destornillador Phillips. Repita este paso hasta haber completado
las 2 gavetas.
40

PP1. Knob x4
Bouton
Perilla
PP2. Knob Screw x4
Vis de Bouton
Tornillo para Perilla
CAUTION: Do Not use a power screwdriver they can cause screws to break or strip.
ATTENTION: Ne Pas utiliser un tournevis électrique car les vis peuvent casser ou perdre leurs filets.
ATENCIÓN: No use un destornillador eléctrico ya que puede causar que los tornillos se rompan o rueden.
STEP #15
ÉTAPE N°15
PASO #15
The following tools and parts are required:
Outils et pièces nécessaires:
Se necesitan las siguientes herramientas y piezas:
42
Attach (2) Knobs (Part PP1) to Bottom Drawer Assembly using (2) Knob Screws (Part PP2) Repeat this step until both Bottom
drawers are complete.
Fixer (2) boutons (Pièce PP1) au montage assemblé du tiroir inférieur à l’aide d’(2) vis de Bouton (Pièce PP2).
Répéter cette étape jusqu’à ce que les 2 tiroirs inférieur soient montés.
Fije (2) perillas (Pieza PP1) al ensamblaje de la gaveta inferior utilizando (2) tornillos para perilla (Pieza PP2).
Repita este paso hasta haber completado las 2 gavetas.

44
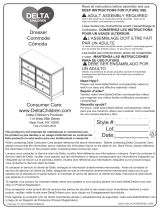
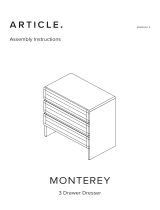
STEP #16
ÉTAPE N°16
PASO #16
x 8
Lift lever on left glide up
Soulevez le levier à gauche
Levantar la palanca a la izquierda
se deslizan hacia arriba
Press lever on right glide down
Glisser sur le levier sur la
droite glisser vers le bas
Empujar la palanca a la derecha
se deslizan por
Allen Wrench
Clé Allen
Llave Allen
OR, OU, O
x 8
1”/25mm
PULL
TIRER
SAQUE
PULL
TIRER
SAQUE
PULL
TIRER
SAQUE
Press & PULL
Glisser & TIRER
Empujar &
SAQUE
1
2
Left/Gauche/Izquiredo
Right/Droite/Derecho
3
/