Page is loading ...

1AccuPoint 2 User’s Guide
CONTENTS
Introduction .......................................................................................................... 2
Parts included ....................................................................................................... 3
Operating guidelines and precautions ................................................................... 3
Preparing the instrument for use ........................................................................... 4
Description of the test screen display .................................................................... 5
Selecting the testing site ....................................................................................... 6
Adjusting the display’s contrast ............................................................................. 7
Record count and test recall ................................................................................. 7
Operating procedure ............................................................................................. 8
Setting the time and date .................................................................................... 10
Powering the AccuPoint 2 system ....................................................................... 10
Recharging the batteries ..................................................................................... 10
Installing new batteries ....................................................................................... 11
Sleep mode ........................................................................................................ 11
Communicating with the Data Manager software ................................................ 11
Downloading test results to the Data Manager software ...................................... 11
Setting thresholds in the instrument ................................................................... 12
Cleaning the instrument ...................................................................................... 12
Troubleshooting .................................................................................................. 13
Regulatory information ....................................................................................... 14
Replacement parts/accessories .......................................................................... 15
Warranty ............................................................................................................. 15
Customer service/contact information ................................................................. 15
Neogen Corporation • 620 Lesher Place • Lansing, MI 48912
AP2 Users Guide1a.indd 1 10/20/2009 3:47:37 PM

AccuPoint 2 User’s Guide
2
INTRODUCTION
Neogen’s AccuPoint 2 ATP Sanitation Monitoring System is a lightweight, handheld
system for validating a sanitation program’s effectiveness by detecting food residue
and microorganisms on surfaces and in liquids. The system’s easy-to-use AccuPoint
samplers automatically mix self-contained reagents to quickly generate results.
When used with the AccuPoint Data Manager V2 software, the AccuPoint instrument can
record the testing results at specific site locations, along with the date, time and user.
The test site information is entered in the Data Manager program and uploaded to the
AccuPoint instrument. The user simply toggles to the correct site and takes the test.
Up to 999 unique testing sites can be tracked with each AccuPoint instrument. Results
from up to 4,000 tests can be retained at any time and are not lost if the instrument
loses power. Four rechargeable nickel metal hydride (NiMH) batteries provide power.
Operating principles and technology
The AccuPoint 2 system utilizes ATP bioluminescence to determine the cleanliness
of test samples. Adenosine triphosphate (ATP) is a chemical compound found in all
living cells, including bacteria, food debris, yeast and mold. Bioluminescence is a
chemical reaction that produces light. ATP bioluminescence occurs when ATP from a
sample comes into contact with luciferase, an enzyme found in fireflies, and luciferin,
a substrate. The amount of light emitted in this reaction is proportional to the amount
of ATP detected in a sample. After a sample is taken the sampler is pressed into its
cartridge, breaking its seal and initiating the mixing of reagents. The cartridge contains
a buffering solution, which flushes the ATP onto a pad containing the reagents. The
reaction takes place within the cartridge and a detector measures the amount of light
produced. The reading is displayed on the LCD display in relative light units (RLU).
According to preset limits, an icon is displayed indicating a pass, marginal or fail result.
These limits are defined by the operator or by using the system presets.
Sampler
Compartment
Eject Button
Toggle Button
Battery
Compartment
Full-color
Display
Power Button
AP2 Users Guide1a.indd 2 10/20/2009 3:47:37 PM

Questions? Call Neogen at 800/234-5333 or 517/372-9200
3
PARTS INCLUDED
Part # Description
9602 AccuPoint 2 ATP Sanitation Monitoring System
12359 AccuPoint 2 Data Communication Cable
9617 AccuPoint Data Manager Software & Guide and AccuPoint 2 User’s Guide
OPERATING GUIDELINES AND PRECAUTIONS
Electrical warnings
The instrument should be used according to the instructions provided in this manual.
If used otherwise, the electrical protection provided may be impaired.
• Thepowersource fortheAccuPoint 2ATPsanitation monitoringsystem must
be adequate and stable. Connect the power supply to an AC line power outlet
that has a protective ground connection. Do not interrupt the protective ground
conductor.
• Donotoperatetheinstrumentinanexplosiveatmosphere.
• Donotoperatetheinstrumentwithanycoversorpartsremoved.
• Donotattempttomakeadjustments,replacementsorrepairstothisinstrument.
Only a Neogen service representative should service the instrument.
Proper use of sampler cartridges
• UseonlyAccuPointsamplercartridgeswiththeAccuPoint2system.
• Refrigeratethesamplercartridgesat2–8°C(35–46°F).Withinthistemperature
range, cartridges may be stored until their expiry.
• Samplercartridgesmustbewarmedtoroomtemperaturepriortouse.
• Afterremovingsamplercartridgesfromthebag,besuretoresealandrefrigerate
thebagat2–8°C.
• Donottouchthetipofthesampler,orletthetiptouchanyothersurfacepriorto
testing. Sampler tips should only come into contact with the test surface.
• DonotsamplepoolsofliquidwithAccuPointSurfaceSamplers.Allowexcessliquid
to dry before testing surfaces. Use AccuPoint Water Samplers for testing liquids.
• Besuretoremoveandproperlydisposeofsamplercartridgesaftereachreading
from the instrument. The sampler reagents and their cartridges are non-toxic, and
may be disposed of without any special considerations.
Proper care of the instrument
• Keepthesamplercompartmentdoorclosedwhentheinstrumentisnotinuse.
• Theinstrumentusesahighlysensitivephotodetectorandshouldbeprotected
from direct sunlight. Do not place the instrument in direct sunlight when the
sampler door is open, or store in sunlight, where it can be exposed to a rapid
increase in temperature.
AP2 Users Guide1a.indd 3 10/20/2009 3:47:37 PM

AccuPoint 2 User’s Guide
4
• Workwithcleanhandswhenusingtheinstrument.
• Avoidcontactwithliquidsontheoutsideorinsideoftheunit.Immediatelywipe
off any liquids to prevent electrical shorting or contamination.
• Besuretheoutersurfaceofthesamplercartridgeiscleananddrybeforeinserting
it in the unit. Do not insert the sampler in the unit without its cartridge.
• Do not attempt to disassemble the instrument.There are no user-serviceable
parts.
• Usethesuppliedlinepowercordforcharging.Theuseofanyotherpowersupply
may damage the unit and invalidate the warranty. The power supply is capable of
using AC voltage of 110 or 240 VAC.
• Thepowersupplyisforindooruseonly.
PREPARING THE INSTRUMENT FOR USE
Labels for the back panel of the instrument are
supplied in different languages. These labels show
a battery replacement diagram and help interpret
the icons on the display. Affix the label in the desired
language to the back of the instrument.
Before the first use of the system, the batteries
should be fully charged. Connect the A/C power cord
to a power supply and allow the batteries to charge
for approximately 90 minutes before use. It is not
necessary to recharge the instrument after each use.
Switch on the instrument using the red power
button located on the front of the instrument. The
instrument will perform a self-test and initialization
routine. A total of 14 tests will be performed and a check mark will appear next to each
confirming that the instrument has passed the test.
After initialization, the instrument will switch to the
user input and records stored screen. If user IDs have
been downloaded from the Data Manager software,
move the toggle button to the appropriate user and
press the button.
The current number of stored records is displayed
on this screen. Each time results are downloaded
to the Data Manager software, the program will
ask whether or not to delete the results from the
instrument. Doing so will reset the stored records
display field to zero.
AP2 Users Guide1a.indd 4 10/20/2009 3:47:37 PM

Questions? Call Neogen at 800/234-5333 or 517/372-9200
5
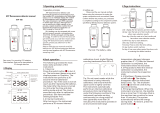
DESCRIPTION OF THE TEST SCREEN DISPLAY
Time: Can be displayed in either a.m./p.m. or 24 hour mode.
Date: MM/DD/YY unless time is set to 24 hour mode—then it will be DD/MM/YY.
Site Number: The number of the site for testing.
User: Established in the Data Manager software and downloaded to the AccuPoint
instrument. This is the user ID of the individual taking the tests.
Site Group: Established in the Data Manager software and downloaded to the AccuPoint
instrument. This is the group of testing sites where this particular site belongs.
Site Name: Established in the Data Manager software and downloaded to the
AccuPoint instrument. This is the name of the location where the test is performed.
Test Result: The relative light unit (RLU) score for this test. This is the result that will
be used to determine whether the test indicates a pass, marginal or fail.
Compared to the thresholds that were established in the Data Manager software for
this site, the results are:
• Pass: The surface or liquid sample is considered clean.
• Marginal: The sample is considered between the pass and fail thresholds.
• Fail: The sample is considered unacceptably dirty and typically signals a need to
clean the area again.
Record Count: The number of tests that have been taken since the instrument was
last powered on.
Battery Charge Indicator: Indicates the charge level of the batteries.
04:22P
01/10/10
Jose001
Line 1
Conveyor Belt 1
135
0011
Time
Site Name
Site Number
Message Icon
Area
Site Group
Date
Record Count
Test Result
User
Battery Charge
AP2 Users Guide1a.indd 5 10/20/2009 3:47:38 PM

AccuPoint 2 User’s Guide
6
Navigating through the fields on the AccuPoint 2 display
Use the toggle button to move between fields on the AccuPoint 2 display.
• Movethetogglebuttonineachdirectiontomovetothedesiredeld.
• Onceattheeldtochange,pressthetogglebuttontoenter.
8 Once in the field, move the toggle button down or up to scroll through the
options.
8 Exit the field by pressing the toggle button.
The AccuPoint Data Manager software
The AccuPoint 2 instrument can be utilized with the Data Manager software to upload
testing site information and to download testing results. Using this combination will
allow for the tracking and analysis of a facility’s testing results. The procedure starts
with the definition of a test plan in the Data Manager software. This test plan identifies
all of the testing sites in your facility that could be tested and assigns pass, marginal
and fail thresholds to each site. Once the test plan is defined uploading the information
to the instrument will allow the user to select the appropriate site before taking each
test. The result along with the time, date, user, site name and site group can then be
downloaded to the software for tracking and analysis.
SELECTING THE TESTING SITE
If a test plan has been uploaded from the Data Manager software, toggle to the
appropriate site through the Site Number, Site Group or Site Name fields.
The Site Name field has an option for selecting an entry at random. When “Random”
appears in the field, pressing the toggle button will cause the instrument to select one
of the Site Groups or Site Names within the displayed Site Group at random.
Sampler type: surface or liquid
The AccuPoint 2 instrument operates in two sampling modes: surface and liquid. Both
the AccuPoint Surface and Access Samplers are designed to be read in surface mode.
The AccuPoint Water Sampler is read in liquid mode.
If utilizing the AccuPoint Data Manager software and the test plan has been uploaded
to the AccuPoint 2 instrument, it will automatically change to the appropriate testing
mode, surface or liquid, when toggling to the testing site.
A symbol, like the one illustrated at left, will appear on the display when the
instrument is in liquid sampling mode.
AP2 Users Guide1a.indd 6 10/20/2009 3:47:38 PM

Questions? Call Neogen at 800/234-5333 or 517/372-9200
7
Setting the Pass, Marginal and Fail thresholds
The AccuPoint 2 instrument comes programmed with default threshold settings of
0–149asPass,150–299asMarginaland300andhigherasFail.Thesesettingscan
be changed through the Data Manager program and downloaded to the instrument.
ADJUSTING THE DISPLAY’S CONTRAST
Move the cursor to the bottom of the display, the contrast icon will appear.
Moving the toggle button to the right will increase the contrast while moving
it to the left will decrease the contrast.
RECORD COUNT AND TEST RECALL
The instrument keeps track of the number of tests that have been taken. The number
of records currently stored in the instrument’s memory is displayed at the User ID
screen when the instrument is powered on. The number of tests that have been taken
since the instrument was last powered on is displayed in the bottom right corner of
the display.
Test results can be reviewed by toggling to the Record Count field. Press the toggle
button and enter the field. Moving the toggle button up or down within the field causes
the results to be displayed for the tests that have been taken since the instrument was
last powered on.
AP2 Users Guide1a.indd 7 10/20/2009 3:47:39 PM

AccuPoint 2 User’s Guide
8
OPERATING PROCEDURE
FOR OPTIMAL RESULTS:
a) Remove sampler cartridges from refrigeration and warm to room temperature
before use. Keep samplers in pouch, protected from light. This can take up to 15
minutes.
b) Turn the instrument on and allow to warm up for 5–10 minutes before taking the
first reading.
1. Check the display to make sure that the instrument is ready. Note: If the instrument
is not ready, there may be a used sampler cartridge inside. Press the eject button
to discard the cartridge, close the sampler door, and turn the instrument off, then
back on to clear the error.
2. Toggle to the appropriate testing site.
3. Grasp a sampler by its handle and pull it out of its cartridge. To ensure accurate
test results, do not touch the tip of the sampler,
or let the tip touch any other surface prior to
testing.
4. Surface sampling. Sample a surface of
approximately 10 cm by 10 cm (4 in. by 4 in.).
Sample by starting in one corner of the square
and forming a continuous line going back and
forth across the square. Repeat the procedure with
slightlylesspressurefromastartingpoint90°from
the first (see illustration). Note: If a sampled area is
a different size, be sure to be consistent whenever retesting the surface.
Liquid sampling. To test liquid, place an AccuPoint water sampler into the liquid
to be sampled so that the sponge tip is completely submerged. Withdraw the
sampler out of the liquid and tilt it slightly to allow excess liquid to drop off.
5. Reinsert the sampler into its cartridge and fully depress. Shake the cartridge twice.
10cm
10cm
AP2 Users Guide1a.indd 8 10/20/2009 3:47:43 PM

Questions? Call Neogen at 800/234-5333 or 517/372-9200
9
6. Press the eject button to open the top door of the instrument. Insert the sampler
with its cartridge into the sampler compartment.
7. Close the top door on the instrument. The reading will begin immediately. An icon
like the one below will appear on the screen along with a progress indicator bar.
8. The reading is displayed along with a symbol indicating the result. The symbols
are identified below:
9. Press the eject button and remove the sampler from the chamber. Samplers
and their cartridges are non-toxic and may be disposed of without any special
considerations.
Pass
Marginal
Fail
AP2 Users Guide1a.indd 9 10/20/2009 3:47:44 PM

AccuPoint 2 User’s Guide
10
SETTING THE TIME AND DATE
Toggle to the time or date field and depress the toggle button. Move the toggle button
to the appropriate digit and increment by moving up or down. The time display can be
set to a.m./p.m. or 24 hour mode. Setting the time field to 24 hour mode causes the
date field to display in the format DD/MM/YY.
POWERING THE ACCUPOINT 2 SYSTEM
The AccuPoint 2 instrument can only be operated from its battery power. The USB
power capability has been disabled to protect the integrity of the electrical circuit.
While the instrument will appear to power on when the A/C power is connected, it
can only operate in charging mode. No readings can take place when the instrument
is charging.
RECHARGING THE BATTERIES
The AccuPoint 2 instrument is supplied with 4 AA rechargeable nickel metal-hydride
(NiMH) batteries, which typically provide up to 16 hours of continuous operation before
requiring recharging. For optimal battery life, the instrument should be operated in
temperatures of 10–35°C, and the batteries should only be recharged when the
battery charge icon appears near depletion.
The AccuPoint 2 instrument can only be recharged through the supplied A/C power
adapter. Full charge takes approximately 90 minutes. After inserting the A/C power
cord, the instrument will display a green battery with the appropriate charge state.
This icon will change and fill in completely as the batteries become fully charged.
The icon will change to black and the instrument will power off when the charge is
complete.
The battery charge icon indicates the charge state of the instrument.
The rechargeable NiMH batteries supplied by Neogen have a normal lifetime of
approximately 1,000 recharging cycles, and are the only batteries warranted for use
in the instrument.
NOTES: For best results, use only rechargeable batteries supplied by Neogen; however,
quality standard alkaline batteries can be used to power the instrument. If using
alkaline batteries, DO NOT attempt to charge them. Attempting to charge standard
alkaline batteries may damage the instrument.
The instrument’s data readings, and marginal and fail limits, will remain stored even
when the batteries have discharged.
Fully charged Fully discharged Charging
AP2 Users Guide1a.indd 10 10/20/2009 3:47:45 PM

Questions? Call Neogen at 800/234-5333 or 517/372-9200
11
INSTALLING NEW BATTERIES
To access the batteries, push
down and slide open the access
door on the top of the instrument.
Replace the batteries according
to the diagram on the label on the
back of the instrument. Use only 4
rechargeable AA-size NiMH batteries
(Neogen part #9610). Old batteries
may be disposed of as nonhazardous
waste. NOTE: If the batteries are
removed for more than 1 minute, the
time and date must be reset, but the
data readings will be retained.
SLEEP MODE
When not being actively used
for more than five minutes, the
AccuPoint 2 instrument will enter
“sleep” mode and dim the color display to conserve power. Depressing the toggle
button causes the instrument to return to active mode.
COMMUNICATING WITH THE DATA MANAGER SOFTWARE
The AccuPoint 2 instrument can communicate with a computer
through the Data Manager software to upload the Test Plan and User
information to the instrument or download the testing results from the
instrument. All communication with the instrument is accomplished
through the supplied USB cable. The USB connection along with the
AC adapter port are located behind the access door on the side of the AccuPoint 2
instrument. When the cable is plugged in and a connection is established, the graphic
above will appear on the instrument’s display.
DOWNLOADING TEST RESULTS TO THE DATA MANAGER SOFTWARE
The AccuPoint 2 instrument can store up to 4,000 data records. The instrument will
display the number of stored data records on the User ID screen at power-up. Once the
limit has been reached, the oldest record will be discarded as each new record is added.
To download data to a computer:
1. Open the AccuPoint Data Manager program on the computer (if necessary, see
the software manual for program installation instructions).
2. Turn on the instrument and plug in the USB cable. If the USB cable is not connected
at the other end to your computer connect it now.
3. In the File menu, select Load Data. A dialog box will be displayed.
Battery access door. Push
down and slide toward back
of the instrument to access
batteries.
04:22P
01/10/2010
Jose001
Line 1
Conveyor Belt 1
135
0011
Pass Marginal Fail
Liquid sampling mode
Display contrast
Reading Sampler
USB connection
established
Sampler not detected
Sampler door open
Date
User
Time
Site
Number
Site
Group
Site
Name
Test
Result
Record
Count
The correct battery
orientation is shown
on the back of the
instrument (below)
AP2 Users Guide1a.indd 11 10/20/2009 3:47:45 PM

AccuPoint 2 User’s Guide
12
4. Click on Load to begin transferring data. The progress bar in the Load Data dialog
box indicates the loading status. When data transfer is complete, a message is
displayed indicating that data has been successfully loaded into the AccuPoint 2
Data Manager program. The program will ask if a printout of the data that has
been transferred is desired and then whether the data in the instrument should
be deleted.
5. To erase the data from the instrument, click Yes in the message box. Once data
has been erased, it cannot be retrieved. Click No to retain the data in the AccuPoint 2
instrument.
6. Turn off the instrument.
SETTING THRESHOLDS IN THE INSTRUMENT
Thedefaultthresholdscomepre-programmedat0–149aspass,150–299asmarginal
and above 300 as fail. Changing them can only be accomplished by uploading through the
Data Manager software. When a Test Plan is established, each site can be programmed to
its unique thresholds. Once the Test Plan is complete, uploading it to the instrument through
the Download Thresholds command will establish the correct thresholds for each site.
If a Test Plan will not be used at a facility, and to simply operate the system in a
pass / fail mode, it will still be necessary to upload a simple test plan to not use the
default thresholds. Simply establish a single test site in the Test Plan Setup routine
with its appropriate thresholds and upload it to the instrument through the Download
Thresholds command. This will change the threshold defaults in the instrument to the
values that have been established.
CLEANING THE INSTRUMENT
Clean the outer surfaces of the instrument with mild detergent and a slightly moistened
cloth. If liquid spills inside the sampler compartment, turn the instrument off and use
the AccuPoint cleaning kit to clean the interior surfaces. Turn the instrument upside-
down when cleaning the sampler compartment with the AccuPoint cleaning kit.
Note: The use of unapproved solvents and swabs inside the sampler compartment
may damage the unit or leave behind swab debris, adversely affecting instrument
performance and test results.
AP2 Users Guide1a.indd 12 10/20/2009 3:47:46 PM

Questions? Call Neogen at 800/234-5333 or 517/372-9200
13
TROUBLESHOOTING
The following icons will appear when attempting to power up the system when a cor-
rective action is required.
Icon Meaning Corrective Action
The instrument is too cold. Allow the instrument to warm to
ambient temperature.
The instrument is too hot . Allow the instrument to cool to
ambient temperature.
The power was turned on Press the Eject button and
while there is still a sampler remove the sampler.
in the chamber.
The battery charge is too low. Recharge the batteries.
The instrument has lost its Contact Neogen support.
serial number.
AP2 Users Guide1a.indd 13 10/20/2009 3:47:47 PM

AccuPoint 2 User’s Guide
14
REGULATORY INFORMATION
Electromagnetic compatibility (EMC):
• United States:Thisproductisclassiedasa digitaldevice used exclusivelyas
industrial or commercial test equipment. It is exempt from the technical standards
specified in Part 15 of the FCC Rules and Regulations, based on Section 15.103 (c).
• EuropeanUnion:AllinformationconcerningEMCstandardsisintheDeclaration
of Conformity and these standards may change as the European Union adds new
requirements.
Specifications and environmental considerations
Size of instrument:
Height x width x depth: 13.7 x 8.5 x 4.8 cm (5.4 x 3.4 x 1.9 in)
Operating conditions:
Optimal operating temperature .......................... 10–35°C(50–95°F)
Safe operating temperature ............................... 5–40°C(41–104°F)
Relative humidity ...................................... 20-80%, non-condensing
Altitude ........................................................................... 0–2,000m
Storage conditions:
Temperature ................................. minus20–60°C(minus4–140°F)
Relative humidity ......................................20–80%,non-condensing
Altitude ......................................................................... 0–12,000m
AccuPoint 2 instrument
• Thepowersupplyisdesignedforindooruseonly.
• AClinevoltage/frequency:110/240VAC,47–63Hz.
• Maximuminputcurrent:1amp.
• Installationcategory:Thisinstrumentisabletowithstandtransientovervoltage
according to Installation Category II as defined in IEC 1010-1.
• Pollutiondegree:Thisequipmentwilloperatesafelyinenvironmentsthatcontain
nonconductive foreign matter up to Pollution Degree 2 in IEC 1010-1.
Certificate of system control
Each AccuPoint 2 System is carefully built and tested in a controlled environment in
accordance with the requirements specified in its applicable Neogen final assembly and
test specification. Each instrument is certified to meet its functional and performance
specification upon release to shipment. The integrity of this quality system is routinely
audited and is certified by an ISO 9001 registrar.
AP2 Users Guide1a.indd 14 10/20/2009 3:47:47 PM

Questions? Call Neogen at 800/234-5333 or 517/372-9200
15
REPLACEMENT PARTS/ACCESSORIES
Part # Description
9605 AccuPoint ATP Surface Samplers (100 samplers)
9606 AccuPoint ATP Water Samplers (100 samplers)
9607 AccuPoint ATP Access Samplers (100 samplers)
9609-2 AccuPoint 2 Holster
9610 NiMH Battery Replacement Pack
9611 AccuPoint Sampler Extender
9612 AccuPointFieldCleaningKit(5swabs)
9614 AccuPoint Hard Shell Carrying Case
9617 AccuPoint Data Manager Software
9619 ATPStandardsKit
12359 AccuPoint 2 USB Cable
WARRANTY
The AccuPoint 2 instrument carries a 12-month limited warranty on defective materials and
workmanship. Buyer assumes all risk and liability resulting from the use of this product.
There is no warranty of merchantability of this product, or of the fitness of the product for
any purpose. Neogen shall not be liable for any damages, including special or consequential
damage, or expense arising directly or indirectly from the use of this product.
CUSTOMER SERVICE/CONTACT INFORMATION
Customer assistance and technical service for this product can be reached by calling
800/234-5333 (U.S./Canada) or 517/372-9200. Training on this product, and all
Neogen testing products, is available by request.
Contact information:
Neogen Corporation
620 Lesher Place
Lansing, MI 48912 USA
800/234-5333 (U.S./ Canada) or 517/372-9200
Fax: 517/372-9004
E-mail: [email protected]
Web: www.neogen.com
AP2 Users Guide1a.indd 15 10/20/2009 3:47:47 PM

AccuPoint 2 User’s Guide
16
NOTES
_______________________________________________________________
_______________________________________________________________
_______________________________________________________________
_______________________________________________________________
_______________________________________________________________
_______________________________________________________________
_______________________________________________________________
_______________________________________________________________
_______________________________________________________________
_______________________________________________________________
_______________________________________________________________
_______________________________________________________________
_______________________________________________________________
_______________________________________________________________
_______________________________________________________________
_______________________________________________________________
_______________________________________________________________
_______________________________________________________________
_______________________________________________________________
_______________________________________________________________
_______________________________________________________________
_______________________________________________________________
_______________________________________________________________
_______________________________________________________________
AP2 Users Guide1a.indd 16 10/20/2009 3:47:47 PM
/