Page is loading ...

• Blixer
®
4
P.O. Box 16625, Jackson, MS 39236-6625
280 South Perkins St., Ridgeland, MS 39157
e-mail: [email protected] - website: www.robotcoupeusa.com - Phone : 1-800-824-1646

WARNING: In order to limit accidents such as electric shocks, personal injury or fire, and in order to limit material damage due to
misuse of the appliance, please read these instructions carefully and follow them strictly. Reading the operating instructions will
help you know your appliance and enable you to use the equipment correctly. The operation manual should be kept within easy
access to all users for reference and should be read completely by all first time users of the machine.
IMPORTANT WARNING
UNPACKING
• Carefully remove the equipment from the packa-
ging and take out all the boxes or packets contai-
ning attachments or specific items.
•WARNING: some of the parts are very sharp e.
g. blades… etc.
INSTALLATION
•We recommend that you install your machine on
a stable solid base at a comfortable working height.
CONNECTION
•Always check that your power supply corres-
ponds to that indicated on the serial number plate
and that it is properly sized.
HANDLING
• Always wear cut-resistant gloves when handling
the cutter blade.
ASSEMBLY PROCEDURES
• Follow the various assembly procedures carefully
(see page 6) and make sure that all the attachments
are correctly positioned.
USE
• Never tamper with, or defeat the purpose of
the locking and safety systems.
• Do not put nonfood objects in the bowl
• Do not leave the machine running unattended.
CLEANING
•Always unplug your machine before cleaning.
• Always clean the machine and attachments at
the end of each use.
• Never place the motor unit in water.
• For parts made of aluminum alloys, use
cleaning detergents suitable for aluminum.
• For plastic parts, do not use detergents that are
too alkaline (i.e., containing too much caustic soda
or ammonia…).
Robot Coupe can in no way be held responsible
for the user’s failure to follow the basic rules of
cleaning and maintenance.
MAINTENANCE
• Always unplug the appliance before servicing.
• Check the seals regularly and ensure that the
safety devices are in good working order.
• It is particularly important to maintain and
check the attachments since certain products
contain corrosive agents e.g. citric acid.
• NOTICE
: Never operate the appliance if the
power cord or plug has been damaged.
• If the machine fails to operate as described in
this manual, or if the machine malfunctions in any
way, remove the machine from use and have it
serviced. Additionally, discard all food processed
at the time of the malfunction.
• Contact your local Authorized Service Agency if
something appears to be wrong.
KEEP THESE INSTRUCTIONS
IN A SAFE PLACE
WARNING

1
ENGLISH
FRANÇAIS
ESPAÑOL
OPERATING INSTRUCTIONS
MANUAL DE INSTRUCCIÓN
NOTICE D’INSTRUCTION
We reserve the right to alter at any time without notice the technical specifications of this appliance.
© All rights reserved for all countries by: ROBOT-COUPE
S
.
N
.
C
.
Nos reservamos el derecho de modificar en todo momento y sin previo aviso las características técnicas de este aparato.
© Todos los derechos para cada pais reservados por: ROBOT-COUPE
S
.
N
.
C
.
Nous nous réservons le droit de modifier à tout moment et sans préavis les caractéristiques techniques de cet appareil.
© Tous droits réservés pour tous pays par : ROBOT-COUPE
S
.
N
.
C
.

3
ENGLISH
SUMMARY
WARRANTY
IMPORTANT WARNING
INTRODUCTION TO YOUR NEW
EMULSIFIER-MIXER Blixer
®
4
SWITCHING ON THE MACHINE
• Advice on electrical connections
• Control panel
ASSEMBLY
USES AND EXAMPLES
CLEANING
• Motor unit
• Blade
• Wiper assembly
MAINTENANCE
• Blade
• Motor seal
• Bowl locating bushings
• Wiper assembly
TECHNICAL SPECIFICATIONS
• Weight
• Dimensions
• Working height
• Noise level
SAFETY
TECHNICAL DATA
(Page 21)
• Parts diagram
• Electrical diagram

4
THE FOLLOWING ARE NOT
COVERED BY THE ROBOT COUPE
U.S.A. INC LIMITED WARRANTY:
1 -
Damage caused by abuse, misuse, drop-
ping, or other similar damage caused by
or resulting from failure to follow assembly, ope-
rating, cleaning, user maintenance or storage
instructions.
2 - Labor to sharpen and/or replacements for
blades that have become blunt, chipped or worn
after a normal or excessive period of use.
3 - Materials or labor to replace or repair
scratched, stained, chipped, pitted, dented or
discolored surfaces, blades, knives, attachments
or accessories.
4 - Any alteration, addition, or repair that has
not been carried out by the company or an ap-
proved service agency.
5 - Transportation of the appliance to or from
an approved service agency.
6 - Labor charges to install or test new
attachments or accessories (i.e., bowls, plates,
blades, attachments), which have been replaced
for any reason.
7 - The cost of changing direction-of-rotation
of three-phase electric motors (Installer is
responsible).
8 - SHIPPING DAMAGES. Visible and/or
hidden damage is the responsibility of the freight
carrier. The consignee must inform the carrier
and consignor immediately, or upon discovery in
the case of hidden defects.
KEEP ALL ORIGINAL CONTAINERS AND PAC-
KING MATERIALS FOR CARRIER INSPECTION.
Neither ROBOT COUPE U.S.A., INC. nor its
affiliated companies or any of its distributors, di-
rectors, agents, employees, or insurers will be
liable for indirect damage, losses, or expenses
linked to the appliance or the inability to use it.
The ROBOT COUPE U.S.A., INC. warranty
is given expressly and in lieu of all other
warranties, expressed or implied, for merchan-
tability and for fitness toward a particular
purpose and constitutes the only warranty
made by ROBOT COUPE U.S.A., INC..
YOUR NEW ROBOT COUPE
PRODUCT IS WARRANTED TO THE
ORIGINAL PURCHASER FOR A
PERIOD OF ONE YEAR FROM THE
DATE OF PURCHASE.
This LIMITED WARRANTY is against
defects in the material and/or
workmanship, and includes labor for
replacement of defective parts,
provided repairs are performed by
an authorized service agency (see
attached list).
The Customer must inform the
Service Agency of the possibility of
warranty coverage and provide a
copy of the dated sales or delivery
receipt BEFORE WARRANTY REPAIRS
ARE BEGUN.
Replacement parts and accessories
are warranted for ninety (90) days
from the date of purchase when
purchased separately and will be
verified by dated sales receipt OR
packing slip which lists that item.
All parts or accessories replaced
under warranty must be returned to
the Service Agency.
ROBOT COUPE U.S.A., INC. LIMITED WARRANTY

5
ENGLISH
WARNING: In order to limit accidents such as electric shocks, personal injury or fire, and in order to limit material damage due to
misuse of the appliance, please read these instructions carefully and follow them strictly. Reading the operating instructions will
help you know your appliance and enable you to use the equipment correctly. The operation manual should be kept within easy
access to all users for reference and should be read completely by all first time users of the machine.
IMPORTANT WARNING
UNPACKING
• Carefully remove the equipment from the packa-
ging and take out all the boxes or packets contai-
ning attachments or specific items.
•WARNING: some of the parts are very sharp e.
g. blades… etc.
INSTALLATION
•We recommend that you install your machine on
a stable solid base at a comfortable working height.
CONNECTION
•Always check that your power supply corres-
ponds to that indicated on the serial number plate
and that it is properly sized.
HANDLING
• Always wear cut-resistant gloves when handling
the cutter blade.
ASSEMBLY PROCEDURES
• Follow the various assembly procedures carefully
(see page 6) and make sure that all the attachments
are correctly positioned.
USE
• Never tamper with, or defeat the purpose of
the locking and safety systems.
• Do not put nonfood objects in the bowl
• Do not leave the machine running unattended.
CLEANING
•Always unplug your machine before cleaning.
• Always clean the machine and attachments at
the end of each use.
• Never place the motor unit in water.
• For parts made of aluminum alloys, use
cleaning detergents suitable for aluminum.
• For plastic parts, do not use detergents that are
too alkaline (i.e., containing too much caustic soda
or ammonia…).
Robot Coupe can in no way be held responsible
for the user’s failure to follow the basic rules of
cleaning and maintenance.
MAINTENANCE
• Always unplug the appliance before servicing.
• Check the seals regularly and ensure that the
safety devices are in good working order.
• It is particularly important to maintain and
check the attachments since certain products
contain corrosive agents e.g. citric acid.
• NOTICE
: Never operate the appliance if the
power cord or plug has been damaged.
• If the machine fails to operate as described in
this manual, or if the machine malfunctions in any
way, remove the machine from use and have it
serviced. Additionally, discard all food processed
at the time of the malfunction.
• Contact your local Authorized Service Agency if
something appears to be wrong.
KEEP THESE INSTRUCTIONS
IN A SAFE PLACE
WARNING

6
INTRODUCTION TO YOUR
NEW EMULSIFIER-MIXER
Blixer
®
4
ROBOT-COUPE has developed a new concept in
appliances: the Blixer
®
.
The Blixer
®
combines the features of two well-known
appliances: the cutter and the blender-mixer.
The Blixer
®
is perfectly geared to professional
needs. It can perform a number of tasks that you
will soon discover as you use it.
The Blixer
®
will make it easy to prepare mixed liquid
or semi-liquid, raw or cooked meals.
The Blixer
®
replaces the blender which has never
been entirely satisfactory because it cannot process
solid foods.
Thanks to its simple design, all components requiring
frequent handling for maintenance or cleaning can
be fitted and removed quickly.
To make things easier for you, this manual gives a
breakdown of all the various fitting operations.
This manual contains important information designed
to help the user get the most out of the emulsifier-
mixer Blixer
®
.
We therefore recommend that you read it carefully
before using your machine.
SWITCHING ON
THE MACHINE
•ADVICE ON ELECTRICAL CONNECTION
Before plugging in, make sure your power supply
corresponds to that indicated on the machine’s
serial number plate.
Your Blixer
®
4 is fitted with a single phase motor :
120 V / 60Hz
• CONTROL PANEL
Red knob = “Off” switch.
Green knob = “On” switch.
Black knob = “Pulse” control.
1 speed 3450 rpm.
ASSEMBLY
1) With the motor base
facing you, place the
bowl onto the motor
base with the handle to-
ward the front. Turn the
bowl just off-center and
to the left as you lower it
onto the base.
2) Then, turn the bowl
back to the right (coun-
terclockwise) locking it
onto the motor base
tabs.
3) Place the blade
assembly onto the motor
shaft. Rotate the blade
assembly until it drops
into place. The bottom
blade should be level
with and just off the
bottom of the bowl.
4) Press the button on the
wiper handle and insert
the wiper shaft through
the underside of the lid
and into the wiper
handle. Then, release the
button on the handle.
It may be necessary to
rotate the parts in order
to align the shaft and
handle. Pull at the parts
a little to make sure they
are locked together.
5) Locate the down-
ward-facing tab on the
bowl lid. Place the lid
on the bowl with the tab
over the bowl handle,
then lock the bowl
clamps over the lid.
W ARNING
This appliance must be plugged into an
grounded socket (risk of electrocution).

7
ENGLISH
USES AND
EXAMPLES
The Blixer
®
will enable you to perform all your
cutting tasks in minimum time; we recommend
therefore that you keep a close eye on the mixture
in order to obtain the desired results.
W ARNING
CLEANING
• MOTOR UNIT
Never immerse the motor unit in water. Clean it
with a damp cloth or sponge.
IMPORTANT
Photo 1
Photo 3
Photo 2
Cleaning of the motor base assembly must be done
with care.
First unplug the unit. A sponging with a cloth lightly
soaked (not dripping) in a mild detergent is acceptable,
making sure the water is not permitted to penetrate
the shaft seal or around the switches. Clean around
the shaft seal with a small brush, taking care to
remove all food. Do not forget to clean the motor
shaft. Rinse the motor base first using a cloth lightly
dampened (not dripping) with water, then with a
sanitizing solution, and dry the machine with a soft
cloth removing all liquids from seal areas.
WARNING: NEVER USE PURE BLEACH.
Always dilute the detergent following the instructions
given by the manufacturer.
Clean per the following instructions or as required by
local health department regulations.
• BLADE
The blade cap should be removed for cleaning.
Wear cut-resistant gloves when removing the cap.
Put a screwdriver or similar tool into the blade
assembly from the bottom, and knock the cap out
the top.
• WIPER ASSEMBLY
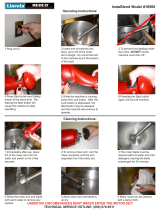
To clean the scraper arm, dismantle it as follows:
- Hold the scraper in one hand and the handle in
the other hand (photo 1).
- Press the metallic knob included in the handle,
pull the handle up (photo 2).
- Then it is possible to dismantle the Wiper assembly
from the lid to clean it (photo 3).
The bowl, blade, cap, lid, and wiper assembly are
dishwasher safe. They can be washed in a dish ma-
chine or three-tank system pot sink. Pre-rinse the at-
tachments before washing to remove any bulk food
on the parts. A stiff bristle brush or power sprayer
faucet attachment is effective in knocking the food
out of the crevices as a pre-rinse procedure. The
washer should have an industry-standard wash,
rinse and sanitization cycle. Allow the parts to air-
dry after sanitizing and before reassembly.
Check that your detergent is suitable for
cleaning plastic parts. Some washing agents
are too alkaline (e.g. high levels of caustic
soda or ammonia) and totally incompatible
with certain types of plastic, causing them to
deteriorate rapidly.
As a precaution, always unplug your appliance
before cleaning it (risk of electrocution).
HOSPITAL USES:
SPOON FEEDING
• Minced foods: meat, fish... • Vegetable purees
• Mousses: vegetables, fish... • Compotes of stewed fruit
SEMI-LIQUID FEEDING
This simply entails diluting spoon-feeding preparations:
• Minced meat + gravy • Puree + liquid (broth, milk...)
• Soups / creamed soups • Fruit compotes + syrup or water
LIQUID FEEDING (for use via tubes)
• Soups and any preparations that can be liquidized.
RESTAURANTS AND DELICATESSEN :
• Butter mixtures: snail butter, salmon butter, anchovie butter…
• Sauces: green sauce, mayonnaise, remoulade, ailloli, emulsify
sauces with tomatoes, cream, parsley…
• Grinding for bisque: lobster, scampi, seashells...
• Grinding: herbs, seeds, powders....
• Mixing: homogeneization of creams, mixed components,
varied ingredients...

8
TECHNICAL
SPECIFICATIONS
•WEIGHT (Lbs)
Net weight Gross weight
Blixer
®
4 29 32,5
• DIMENSIONS (in inches)
Bowl wiper
Lid wiper
Scraper arm
Sraper handle
Handle latch
W ARNING
REMEMBER
• WORKING HEIGHT
We recommend that you position the Blixer
®
on a
stable worktop so that the upper edge of the cutter
bowl is at a height of between 47 and 51 inches.
• NOISE LEVEL
The equivalent continuous sound level when the
Blixer
®
is operating on no-loads is less than
70 dB (A).
SAFETY
The Blixer
®
4 is fitted with a magnetic safety device
and motor braking system. When you open the lid,
the motor stops. To restart the machine, simply close
the lid and press the green switch.
Allow the blades to come to a complete stop
before opening the lid so that liquids will not
splash.
This machine is equipped with a thermal overload.
If the machine is overloaded, the breaker will trip.
If this occurs, first allow the machine to cool for a
period of up to 30 minutes then, press the overload
reset located on the motor base. Try to restart. If the
machine will not start, remove the bowl, reduce the
amount of food being processed, and try again.
NOTE: The high temperatures of dish machines
will tend to shorten the life of the plastic and rub-
ber parts. Hand washing using a three-pot sink
will provide for the longest life of these parts.
Wear cut-resistant gloves when cleaning the
blade.
MAINTENANCE
• BLADE
The quality of the cut depends mainly on the
sharpness of your blades and the degree of wear.
The blades are actually wearing parts, which
should be replaced occasionally to ensure consistent
quality in the final product.
• MOTOR SEAL
An examination should be made periodically to
assure that a seal against liquids is being maintained
around the motor shaft. With proper care and
depending on use, the seal should last for a year
or more. However, it can and should be replaced
whenever wear or erosion is noted or minimally
once every three to six months. It is recommended
that the seal be replaced by an authorized repair
agency.
• BOWL LOCATING PLATES
These bushings are located on the lower inside of
the bowl and hold the bowl in place. If they become
worn, they will need to be replaced.
• SCRAPER ARM
The assembly includes three rubber wipers. They
will need to be replaced when they become worn.
Replacements are available.
Blixer
®
4
A 8
B 18
1
/
8
C 9
D 12
E 10
D
A
E
C
B
Never try to override or defeat the purpose
of, the locking and safety systems.
Never put nonfood objects into the bowl.
Do not overload the machine.
Never leave the machine running unattended.
The blades are extremely sharp. Handle with care.

21
TECHNICAL DATA
DATOS TÉCNICOS
DONNÉES TECHNIQUES

22

23

25

Réf. 407 870 - 03/2004 - Blixer
®
4 - USA
P.O. Box 16625, Jackson, MS 39236-6625
280 South Perkins St., Ridgeland, MS 39157
e-mail: [email protected]
website: www.robotcoupeusa.com
Phone : 1-800-824-1646
/


