MIMAKI JFXplus Operating instructions
- Category
- Print & Scan
- Type
- Operating instructions

MIMAKI ENGINEERING CO., LTD.
URL: http://eng.mimaki.co.jp/
D202017-20

i
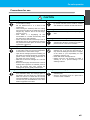
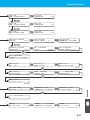
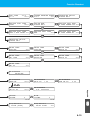
CAUTION ................................................................................. v
CAUTION ............................................................................ v
Requests ............................................................................. v
FCC Statement (USA) ......................................................... v
INTERFERENCE TO TELEVISIONS AND RADIOS ........... v
CDRH REGULATION ..........................................................vi
Foreword .................................................................................vii
On this operation manual ...................................................vii
For safe operation .................................................................. viii
Pictorial signs .................................................................... viii
Position of the warning label ...................................................xv
How to Read This Operation Manual .................................... xvii
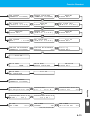
CHAPTER 1 Before Use
Installing the device .............................................................. 1-2
Where to install the device ............................................... 1-2
Configuration and Function ...................................................1-3
Front Side ......................................................................... 1-3
Rear Side .......................................................................... 1-3
Operation Panel ................................................................ 1-4
Carriage ............................................................................ 1-5
EMERGENCY SWITCH ................................................... 1-5
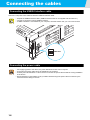
Connecting the cables .......................................................... 1-6
Connecting the USB2.0 interface cable ............................ 1-6
Connecting the power cable ............................................. 1-6
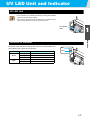
UV LED Unit and Indicator .................................................... 1-7
UV LED Unit ..................................................................... 1-7
Function of indicator ......................................................... 1-7
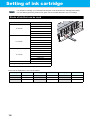
Setting of ink cartridge .......................................................... 1-8
Kinds of ink that can be used ........................................... 1-8
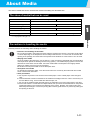
About Media ........................................................................ 1-11
The sizes of media that can be used .............................. 1-11
Precautions in handling the media ................................. 1-11
Menu mode .........................................................................1-12
CHAPTER 2 Basic Operations
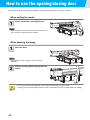
How to use the opening/closing door .................................... 2-2
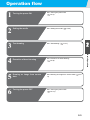
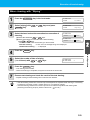
Operation flow ....................................................................... 2-3
Turning the power ON ........................................................... 2-4
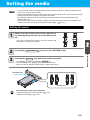
Setting the media ..................................................................2-5
Setting the media .............................................................. 2-5
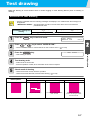
Test drawing ......................................................................... 2-7
Execution of test drawing ................................................. 2-7
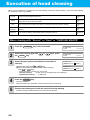
Execution of head cleaning ................................................... 2-8
When cleaning with “Normal” or “Hard” or “SUBTANK
MAINTE” ........................................................................... 2-8
When cleaning with “Wiping” ............................................ 2-9
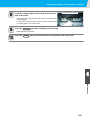
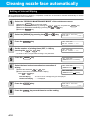
Cleaning automatically when turning the power on ........ 2-10
TABLE OF CONTENS

ii
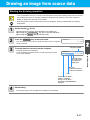
Drawing an image from source data ...................................2-11
Starting the drawing operation ........................................2-11
Interruption of drawing ....................................................2-12
Move the Y-bar ...............................................................2-13
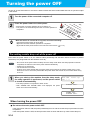
Turning the power OFF .......................................................2-14
Preventing nozzle drop out while power-off ....................2-14
CHAPTER 3 Useful Function
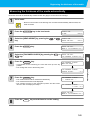
Changing origin .....................................................................3-2
Changing origin with JOG keys ........................................3-2
Changing origin with FUNCTION menu ............................3-3
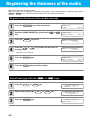
Registering the thickness of the media .................................3-4
Register the thickness of the media manually ..................3-4
Adjust head gap with the or keys .............3-4
Measuring the thickness of the media automatically ........3-5
Registering Head gap value ..................................................3-6
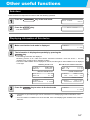
Other useful functions ...........................................................3-7
Data clear .........................................................................3-7
Displaying information of this device ................................3-7
Each setting ..........................................................................3-8
Setting the print method ....................................................3-8
Setting the light intensity of the UV LED .........................3-10
Setting of priority .............................................................3-11
Setting the work change .................................................3-12
Changing language display on the screen ......................3-13
Output the setting list ......................................................3-14
Displaying machine information of this device ................3-15
Other useful settings .......................................................3-16
Initializing set contents ....................................................3-17
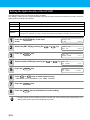
For setting media correctly ..................................................3-18
Adjust the height of the Post Cure Unit ...............................3-19
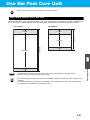
Use the Post Cure Unit ........................................................3-21
Note when using Post Cure Unit .....................................3-21
Note when drawing on thick media .................................3-22
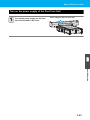
Turn on the power supply of the Post Cure Unit .............3-23
Switch the drawing range when using the post
cure function ...................................................................3-24
Select the use method of the Post Cure Unit
(setting secondary curing) ..............................................3-25
Enlarge the irradiation area of the post cure ...................3-28
Re-irradiate lamp light on the drawn media ....................3-30
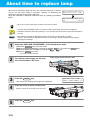
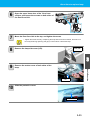
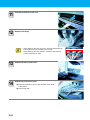
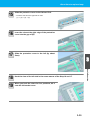
About time to replace lamp ..................................................3-32
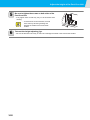
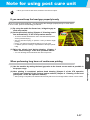
Note for using post cure unit ...............................................3-37
UP
DOWN

iii
CHAPTER 4 Maintenance
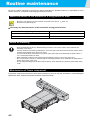
Routine maintenance ............................................................ 4-2
When the device is left unused for a long period of time .. 4-2
Notes on cleaning ............................................................. 4-2
Maintenance of frame component .................................... 4-2
Ink cartridge .......................................................................... 4-3
Replacing with a new ink pack ......................................... 4-3
State of Lamp ................................................................... 4-5
How to shake an ink cartridge .......................................... 4-6
Ink cartridge trouble .......................................................... 4-7
Avoiding dripping of ink droplet at printing ............................ 4-8
Cleaning of the head guard plate ..................................... 4-8
Cleaning nozzle face automatically ..................................... 4-10
Setting of Interval Wiping ................................................ 4-10
Setting of Interval Cleaning ............................................ 4-11
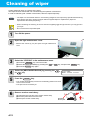
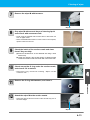
Cleaning of wiper ................................................................ 4-12
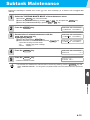
Subtank Maintenance ......................................................... 4-15
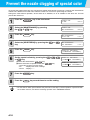
Prevent the nozzle clogging of special color ....................... 4-16
When the waste ink is pooled up ........................................ 4-17
Disposing of the ink in the waste ink tank ....................... 4-17
Disposing of the ink in the wiper tank ............................. 4-18
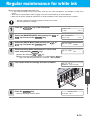
Regular maintenance for white ink ...................................... 4-19
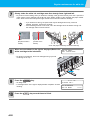
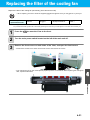
Replacing the filter of the cooling fan .................................. 4-21
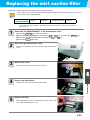
Replacing the mist suction filter .......................................... 4-23
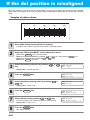
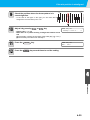
If the dot position is misaligned ........................................... 4-24
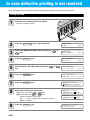
In case defective printing is not resolved ............................ 4-26
Filling the ink ................................................................... 4-26
Replacing water in water heater tank .................................. 4-28
Replacement method of antifreeze liquid water ............. 4-29
Replacing the UV LED Unit filter ......................................... 4-33
Irradiation Time of UV LED Unit .......................................... 4-35
Displaying the irradiation time of the UV LED unit .......... 4-35
Resetting the irradiation time of the UV LED unit ........... 4-35
Checking UV ink curing level .............................................. 4-36
Adjusting UV light level ................................................... 4-37
Setting vacuuming / blowing level of the vacuum unit ........ 4-38
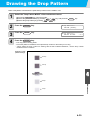
Drawing the Drop Pattern ................................................... 4-39

iv
CHAPTER 5 In Case of Trouble
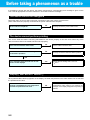
Before taking a phenomenon as a trouble ............................5-2
The device cannot be energized .......................................5-2
The device cannot perform printing ..................................5-2
Display [ WATER NOT READY ] ......................................5-2
If image quality declines ...................................................5-3
Resolving nozzle clogging ................................................5-3
Stopping the unit during the operation ..............................5-3
Even when ink remains, [INK NEAR END] is displayed ...5-4
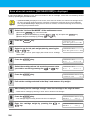
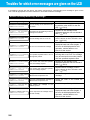
Troubles for which error messages are given on the LCD ....5-6
Errors accompanied by warnings .....................................5-6
Error message ..................................................................5-7
CHAPTER 6 Appendix
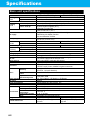
Specifications ........................................................................6-2
Basic unit specifications ....................................................6-2
Specifications for ink .........................................................6-3
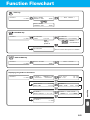
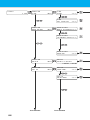
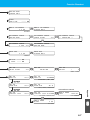
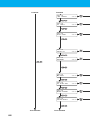
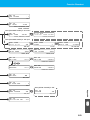
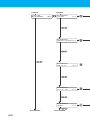
Function Flowchart ................................................................6-5

v
CAUTION
CAUTION
DISCLAIMER OF WARRANTY:
THIS LIMITED WARRANTY OF MIMAKI SHALL BE THE SOLE AND EXCLUSIVE WARRANTY AND IS IN LIEU
OF ALL OTHER WARRANTIES, EXPRESS OR IMPLIED, INCLUDING , BUT NOT LIMITED TO, ANY IMPLIED
WARRANTY OF
MERCHANTABILITY OR FITNESS, AND MIMAKI NEITHER ASSUMES NOR AUTHORIZES DEALER TO
ASSUME FOR IT ANY OTHER OBLIGATION OR LIABILITY OR MAKE ANY OTHER WARRANTY OR MAKE
ANY OTHER WARRANTY IN CONNECTION WITH ANY PRODUCT WITHOUT MIMAKI’S PRIOR WRITTEN
CONSENT. IN NO EVENT SHALL MIMAKI BE LIABLE FOR SPECIAL, INCIDNETAL OR CONSEQUENTIAL
DAMAGES OR FOR LOSS OF PROFITS OF DEALER OR CUSTOMERS OF ANY PRODUCT.
Requests
• This Operation Manual has been carefully prepared for your easy understanding, however, please do not hesitate
to contact a distributor in your district or our office if you have any inquiry.
• Description contained in this Operation Manual are subject to change without notice for improvement.
• Generally, names and designations referred to in this Operation Manual are trade marks or registered trade
marks of the manufacturers or suppliers.
FCC Statement (USA)
This equipment has been tested and found to comply with the limits for a Class A digital device, pursuant to Part
15 of the FCC Rules. These limits are designed to provide reasonable protection against harmful interference
when the equipment is operated in a commercial environment. This equipment generates, uses and can radiate
radio frequency energy and, if not installed and used in accordance with the instruction manual, may cause
harmful interference to radio communications.
Operation of this equipment in a residential area is likely to cause harmful interference in which cause the user
will be required to correct the interference at his own expense.
INTERFERENCE TO TELEVISIONS AND RADIOS
The product covered by this Instruction Manual produces low radio waves while it is in operation. The product
can interfere with radios and televisions if set up or commissioned under improper conditions. The product is not
guaranteed against any damage to specificpurpose radio and televisions.
The product’s interference with your radio or television will be checked by turning on/off the power switch of the
product.
In the event that the product is the cause of interference, try to eliminate it by taking one of the following
corrective measures or taking some of them in combination.
• Change the direction of the receiving antenna or the feeder of your radio/television.
• Change the installing direction of the product.
• Move the receiver away from the product.
• Use a power line for the receiver that is not shared with the product.
• In the case where MIMAKI-recommended cable is not used for connection of this device, limits provided
by FCC rules can be exceeded. To prevent this, use of MIMAKI-recommended cable is essential for the
connection of this device.

vi
CAUTION
CDRH REGULATION
The Center for Devices and Radiological Health for the U.S. Food and Drug Administration Implement
regulations for laser products. The sentence of “This product complies with 21 CFR chapter I and subchapter J”
indicates compliance with the CDRH regulations and is labeled on the product when marketed in the United
States. This Model is equivalent to Class II laser device according to CDRH Regulation.
This product complies with 21 CFR chapter I and subchapter J
• Use of controls, adjustments or performance of procedures other than those specified in this manual
may results in hazardous radiation exposure.

vii
Foreword
Congratulations on your purchase of MIMAKI UV ink jet printer “JFX-1631/1615 , JFX-1631/1615plus”.
UV Inkjet Printer JFX-1631/1615 , JFX-1631/1615plus uses ultraviolet ray curing ink (UV ink).
Read this Operation Manual carefully and make the most effective use of your printer.
In addition, JFX-1631/1615plus includes “Post Cure Unit” to dehydrate UV ink more rapidly at drawing as
standard.
Before starting to operate the printer, be sure to read this Operation Manual carefully .
On this operation manual
• This Operation Manual describes the operation and maintenance of Model JFX-1631/1615 ,
JFX-1631/1615plus
UV Ink Jet Printer (hereinafter referred to as the device).
• Please read and fully understand this Operation Manual before putting the machine into service. It is also
necessary to keep this Operation Manual on hand.
• Make arrangements to deliver this Operation Manual to the person in charge of the operation of this device.
• This Operation Manual has been carefully prepared for your easy understanding, however, please do not hesitate
to contact a distributor in your district or our office if you have any inquiry.
• Description contained in this Operation Manual are subject to change without notice for improvement.
• In the case where this Operation Manual should be illegible due to destruction or lost by fire or breakage,
purchase another copy of the Operation Manual from our office.
• You can also download the latest manual from our website.
Reproduction of this manual is strictly prohibited.
All Rights Reserved. Copyright
© 2014 MIMAKI ENGINEERING CO., LTD.

viii
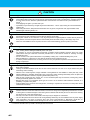
For safe operation
Pictorial signs
Pictorial signs are used in this Operation Manual for safe operation of and in prevention of damages to the
device. Pictorial signs and their meanings are given below. Read and fully understand before reading the text.
Example of pictorial signs
Indicates the case where it is assumed that misuse of the machine, ignoring this sign, as this may
cause fire or poisoning. Be sure to read this manual for proper operation.
Indicates the case where it is assumed that misuse of the machine, ignoring this sign, can cause
damage only to property.
This symbol indicates that the information is helpful in proper operation of the plotter.
The symbol indicates helpful information that will facilitate the use of the device.
Indicates the reference page for related contents.
The symbol “ indicates the case where some phenomenon that requires a CAUTION sign
(including "DANGER" and "WARNING" signs) exists. A concrete precaution (precaution against
an electric shock in the case of the sketch given on the left) is shown in the illustration.
The symbol “ " indicates a prohibited behavior. A concrete illustration of prohibition
(disassembly is prohibited in the sketch given on the left) is shown in or next to the illustration.
The symbol “ " indicates a thing that is forced to be done and instruction that is forced to be
followed. A concrete illustration of instruction (the removal of a plug from the receptacle is
instructed in the sketch given on the left) is drawn in the illustration.

ix
WARNING
• Be sure to setup the appropriate air-moving system in case of using the device in a closed room or a room with
bad ventilation.
Cautions for constructing exhaust outlet
Please observe the following things to prevent the device.
(1) The sharp of the exhaust outlet depends on your building enviroment. The exhouast outlet area is
required more than half of the duct entrance area.
(2) If mounting a valve on the exhaust outlet, be sure to open the valve when using the device.
• The ink used for this device falls into the category of UN No.3082 and UN Class 9. Since the ink is flammable,
never use fire when using the device.
• When cleaning the ink station and head, be sure to wear the supplied goggle and gloves since you may get ink
or washing liquid in your eyes.
• If anyone drinks ink or washing liquid in mistake, get the person to vomit and see a doctor immediately.Do not
allow him or her drink vomit.Then, contact the Poison Control Center.
• If you absorb a lot of vapor and feel bad, immediately move to a location where fresh air is present and then
keep yourself warm and quiet.Then, consult a doctor as soon as possible.
• Discard the waste ink according to the local regulations of the area this unit is used.

x
For safe operation
Never do the following
WARNING
Do not disassemble or remodel the device Handling of ink cartridges
• Never disassemble or remodel the main unit of
the printer and the ink cartridge.Disassembling/
remodeling any of them will result in electric
shocks or breakdown of the device.
• Some of the ingredients (UV Curing initiator)
have toxic consequences to aquatic life.Avoid
leak into water system or sewage containing
water.
• Store ink cartridges and waste ink tank in a
place that is out of the reach of children.
• If ink settles on the skin or clothes, immediately
wash it off with detergent or water.If you get ink
in your eyes, immediately wash your eyes with a
lot of clean water for at least 15 minutes. In this
case, also wash the backside of eyelids to rinse
ink away completely. Then, consult a doctor as
soon as possible.
Do not use the device in damp places
• Avoid damp environments when putting the
device into service. Do not splash water onto the
device.Highhumidity or water will give rise to
fire, electric shocks or breakdown of the device.
Abnormal event occurs
• If the device is used under an abnormal
condition where the device produces smoke or
unpleasant smell, fire or electric shocks can
result.Be sure to turn off the power switch
immediately and detach the plug from the
receptacle.Check first to be sure that the device
no longer produces smoke, and contact a
distributor in your district for repair.
• Never repair your device by yourself since it is
very dangerous for you to do so.
Grounding work
• This unit requires grounding work to prevent
electrical shock.
• Carry out the grounding work.
Wearing protective devices
• When cleaning the suction nozzle, which may
scatter ink, be sure to wear safety glasses and
gloves, or ink and washing liquid might enter
your eyes or ink and washing liquid put on your
hands might make your hands rough.
Handling of the power cable
• Use a power cable attached to this unit.
• Take care not to damage, break or work on the
power cable.If a heavy matter is placed on the
power cable, heated or drawn, the power cable
can break to cause fire or electric shocks.
Opening / closing covers
• This unit is equipped with covers.When opening
or closing the covers, there is a possibility that
your fingers or arms or a part of your body will
be pinched.If it should occur, it may cause
bruises or, in the worst case, crushing to
death.When opening or closing the covers, take
care so that your body or a part of it is never
pinched.
Handling of UV LED Handling of maintenance cover
• Do not use the UV LED in an ambience with a
possibility of catching fire (gasoline,
combustible gas spray, thinner, lacquer, powder
dust, etc.). In addition, do not put paper or cloth
near or on the UV LED, or it may cause fire.or it
may cause electrical shock.
• Hold the maintenance cover and open it. If not,
the cover will fall and cause injury.

xi
WARNING
Power supply and voltage
• This unit contains parts applied high voltage.Carrying out electrical work by those unauthorized for that work is
prohibited.
• Never look at the UV LED being lit with your naked eyes,or it may cause pain in your eyes or visual
impairment.Be sure to wear safety glasses.
• Do not apply ultraviolet (UV) light directly to your skin,or it may cause irritation on your skin.
• To prevent electrical shock, be sure to set OFF the main power circuit breaker and disconnect the power plug
before carrying out maintenance.For some units, capacitors may take one minute for discharging; therefore,
start maintenance work three minutes after setting OFF the main power circuit breaker and disconnecting the
power plug.
• Be sure to carry out grounding work to prevent electrical shock.
• Use the unit under the power specifications given.Be sure to connect the power cable plug to a convenient
outlet grounded, or fire or electric shock might occur.or it may cause electrical shock.
• The main power circuit breaker should be set ON only by personnel with sufficient knowledge about operations
of this unit.
• Be sure to use only the UV LED recommended by Mimaki,or it may cause fire or damages to the unit.Never use
UV LEDs other than those recommended by Mimaki.We would take no responsibility for any troubles caused
through the use of a UV LED not recommended by Mimaki.
• Do not touch the lamp on or right after the lamp off with bare hands to avoid from burn injury.Make sure to
replace the lamp after it cools down completely.
Handling of UV LED
• Do not use the UV LED in an ambience with a possibility of catching fire (gasoline, combustible gas spray,
thinner, lacquer, powder dust, etc.). In addition, do not put paper or cloth near or on the UV LED, or it may
cause fire.or it may cause electrical shock.
Handling the Anti-freezing liquid
• Use the exclusive Anti-freezing liquid by Mimaki ,or the heater may be damaged.
• If the Anti-freezing liquid or mixed soft water with anti-freezing liquid gets on the skin or clothes, immediately
wash it off with soap.
If you get the Anti-freezing liquid or mixed soft water with anti-freezing liquid in your eyes, immediately wash
your eyes with a lot of clean water.
Then, consult a doctor as soon as possible.If high temperature Anti-freezing liquid or mixed soft water with anti-
freezing liquid gets on the skin, immediately wash it off with soap and cool with iced water. Then, consult a
doctor as soon as possible.
• Before using the Anti-freezing liquid, be sure to read the Material Safety Data Sheet (MSDS).
• If you swallowed the Anti-freezing liquid or mixed soft water with antifreezing liquid accidentally, try to get to
vomit, and then consult a doctor as soon as possible.
• When unused the Anti-freezing liquid or used mixed soft water with anti-freezing liquid should discard as
followings,
• Incinerating the fluid which is absorbed to the sawdust or waste cloth.
• Entrust them to an industrial waste disposal contractor, clarifying their contents.
• Avoid ignition such as static electricity and impact spark.
• Be sure to wear goggles and gloves for handling the Anti-freezing liquid.

xii
For safe operation
Precautions for use
CAUTION
Protection against dust Periodic exchange parts
• It is strongly recommended to use the device in
a room that is not dusty.
Set the Refresh level 2 or 3 when in bad
environment.
• When leaving the workshop after the working
hours, be sure to take off any media from the roll
hanger.If any media is left on the roll hanger,
dust can put on it.
• Store media in a bag.Wiping off dust
accumulated on a media will adversely affect
the media due to static electricity.
• Dust in the head will also cause drops of ink to
fall abruptly down on the media during printing.If
this phenomenon takes place, be sure to clean
up the head. ( P.2-8)
• There are some parts which must be replaced
by service men.You have to make a contract
with distributors or dealers for after-sale service.
Adjusting the level
• The level must be adjusted before printing can
start.
Handling of maintenance liquid
• Be sure to store the maintenance liquid in a cold
and dark place.Store the maintenance liquid in a
place that is out of the reach of children.
Ink cartridges
• If the ink cartridge is moved from a cold place to
a warm place, leave it in the room temperature
for three hours or more before using it.
• Open the ink cartridge just before installing it in
the printer.If it is opened and left for an extended
period of time, normal printing performance of
the printer may not be ensured.
• Make sure to store ink cartridges in a cold and
dark place.
• Be sure to thoroughly consume the ink in the ink
cartridge after opened.If an extended period of
time has passed away after opening the
cartridge tank, printing quality would be poor.
• You cannot use any other ink type than the
exclusive one. If you use any other ink type, it
may cause the damage for the device. To repair
of the device is your responsibility as used
instead the exclusive one.
• Never refill the ink cartridge with ink.
• Neither pound the ink cartridge nor shake it
violently so as to prevent leakage of ink
adhering locations.
Warning labels Handling the Anti-freezing liquid
• This device is adhered with a warning label.Be
sure understand firmly the warnings given on
the labels.In the case where any of the warning
label has become so soiled that the warning
message is illegible or has come off, purchase a
new one from your local distributor or our office.
Refer to Appendix for the label
• Be sure to store the Anti-freezing liquid in a cold
and dark place.
• Store the Anti-freezing liquid in a place that is
out of the reach of children.

xiii
CAUTION
About UV light
• A little UV light leaks from the UV LED unit or around the Post Cure Unit. UV light applied to your skin might
cause inflammation and/or skin cancer.Though weak UV light might cause no inflammation, repeated exposure
to it may lead to chronic disorders. (Measured value of this device: 0.1213933 mJ/cm
2
(accumulated for 8
hours)
*1
)
Avoid applying UV light to your skin and eyes.
*1. Maximum allowable value by ICNIRP: Wavelength 365nm/270000J/m
2
• Impairment of eyes caused by UV light may be:Acute disorders ... Pain in eyes, tearing,etc.Chronic disorders ...
Cataract, etc.
When using this device, take protective measures such as gloves, long-sleeve cloth, light-resistant mask,
attached light-resistant glasses, etc.
About hot parts
• The UV LED unit and the Post Cure Unit become very hot. When carrying out maintenance, wait until the
temperature has been sufficiently lowered after the lamp is turned OFF.
• Some parts outside the unit will have a very high temperature.A hightemperature caution label is placed on
such parts.Do not touch the parts with the caution label placed and their vicinity, or burn injury may occur.
• When it is unavoidable to touch hot parts, be sure to wear heat-insulating gloves to protect your hands.
About cleaning
• After using the unit long time, foreign materials and dust may be gathered on the conductive and insulating
parts, causing electric leakage.Periodically clean such parts.
• For cleaning, do not use compressed air because it scatters foreign materials and dust, which may cause
malfunctions when put inside the conductive parts.Be sure to use vacuum cleaner for cleaning of foreign
materials and dust.
• Do not use the unit in a place where there is a possibility of being wet, or electrical leakage may occur.
• Electrical leakage, if it should occur, may lead to electrical shock of personnel or fire.
• In order to prevent accidents from occurring, be sure to carry out periodic inspections and replacement of time-
change components.
About firing and smoking
• Touching hot parts such as the UV LED unit and the Post Cure Unit with combustible materials may cause
firing and/or smoking.
Leaving combustible materials under the UV LED unit and the Post Cure Unit for a couple minutes may also
cause firing and/or smoking.
• After the unit is used long time, foreign materials or dust gathered on the stabilizer or other parts may cause
electrical leakage or insulation deterioration may cause firing and/or smoking.Periodically clean the parts and
measure the insulation resistance, replacing deteriorated parts, if any.
• After the unit is used long time, screws, etc. on the conductive parts may be loosened, causing firing and/or
smoking.Periodically tighten such screws.
• Because this unit is not of explosion proof type,do not use it in an ambience with hazardous materials, or a
possibility of explosion may arise.
• If abnormalities of the unit such as a strange odor, a smoking or a spark burn are found, turn the power off and
call Mimaki immediately.
Notes on UV LED
• When handling the UV LED or the silica glass on the bottom of the irradiation device, be sure to wear the gloves
attached and never touch them with bare hands, or the UV ink curing level is significantly lowered.If the UV LED
or silica glass is contaminated,wipe it with clean gauze moistened with alcohol.(Do not use alcohol for cleaning
the exteriorcover,or the paint will peel off.))
• Securely mount the UV LED to the socket,or the lamp may be dropped or overheated.
• The UV LED performance and service life are significantly affected by the UV irradiation and UV power supply
units used.Never use those UV devices other than those recommended by Mimaki.We would take no
responsibility for any troubles caused through the use of a UV devices not recommended by Mimaki.

xiv
For safe operation
Notices for installation
CAUTION
A place exposed to direct
sunlight
A place that is not horizontal
A place in which temperature and
humidity vary by a great margin
• Use the device under the
following environment.
Operating
• environment :
15 ~ 30 °C
35 ~ 65 % (Rh)
A place that vibrates
A place exposed to direct air
blow from air conditioner, etc.
A place where fire is present

xv
Position of the warning label
This device is adhered with the warning label. Be sure to fully understand the warning given on the labels.
In the case where any of the warning label has become so soiled that the warning message is illegible or has
come off, purchase a new one from your local distributor or our office.

xvi
Position of the warning label
Order No. Label Order No. Label
(1) M901549 (8) M906311
(2) M905980 (9) M906318
(3) M906115 (10) M903764
(4) M903330 (11) M905624
(5) M903226 (12) M903239
(6) M904325 (13) M904121
(7) M906310 (14) M907063

xvii
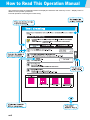
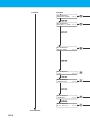
How to Read This Operation Manual
This manual provides the explanation about the displayed characters and used keys on the “Display Panel” in
addition to the operation procedures.
Proceed operations confirming them while using.

This chapter describes the parts name and setting procedures
before use.
Installing the device............................................................. 1-2
Where to install the device ..........................................................1-2
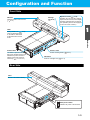
Configuration and Function................................................ 1-3
Front Side ...................................................................................1-3
Rear Side ....................................................................................1-3
Operation Panel ..........................................................................1-4
Carriage ......................................................................................1-5
EMERGENCY SWITCH ..............................................................1-5
Connecting the cables......................................................... 1-6
Connecting the USB2.0 interface cable ......................................1-6
Connecting the power cable .......................................................1-6
UV LED Unit and Indicator .................................................. 1-7
UV LED Unit ................................................................................1-7
Function of indicator ....................................................................1-7
Setting of ink cartridge........................................................ 1-8
Kinds of ink that can be used ......................................................1-8
About Media ....................................................................... 1-11
The sizes of media that can be used ........................................1-11
Precautions in handling the media ............................................1-11
Menu mode ......................................................................... 1-12
CHAPTER 1
Before Use

1-2
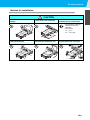
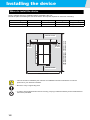
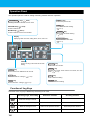
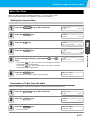
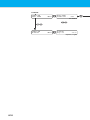
Installing the device
Where to install the device
Secure sufficient space for installation before assembling this unit.
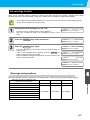
Decide the place considering the size of the device and a space required for execution of drawing.
Machine Type Width Depth Height Total Weight
JFX-1631/JFX-1631plus 4200 mm 4300 mm 1600mm Approx.1600 kg
JFX-1615/JFX-1615plus 4200 mm 2700 mm 1600mm Approx.1300 kg
• This unit cannot be installed by the customer. Its installation should be entrusted to our service
personnel or your electrical contractor.
• Be sure to carry out grounding work.
• In order to prevent electrical shock from occurring, carrying out electrical work by those unauthorized for
that work is prohibited.
500 mm
or more
1000 mm or more
5200 mm or more
JFX-1631/JFX-1631plus : 6300 mm or more
JFX-1615/JFX-1615plus : 4700 mm or more
1000 mm or more
500 mm
or more
Page is loading ...
Page is loading ...
Page is loading ...
Page is loading ...
Page is loading ...
Page is loading ...
Page is loading ...
Page is loading ...
Page is loading ...
Page is loading ...
Page is loading ...
Page is loading ...
Page is loading ...
Page is loading ...
Page is loading ...
Page is loading ...
Page is loading ...
Page is loading ...
Page is loading ...
Page is loading ...
Page is loading ...
Page is loading ...
Page is loading ...
Page is loading ...
Page is loading ...
Page is loading ...
Page is loading ...
Page is loading ...
Page is loading ...
Page is loading ...
Page is loading ...
Page is loading ...
Page is loading ...
Page is loading ...
Page is loading ...
Page is loading ...
Page is loading ...
Page is loading ...
Page is loading ...
Page is loading ...
Page is loading ...
Page is loading ...
Page is loading ...
Page is loading ...
Page is loading ...
Page is loading ...
Page is loading ...
Page is loading ...
Page is loading ...
Page is loading ...
Page is loading ...
Page is loading ...
Page is loading ...
Page is loading ...
Page is loading ...
Page is loading ...
Page is loading ...
Page is loading ...
Page is loading ...
Page is loading ...
Page is loading ...
Page is loading ...
Page is loading ...
Page is loading ...
Page is loading ...
Page is loading ...
Page is loading ...
Page is loading ...
Page is loading ...
Page is loading ...
Page is loading ...
Page is loading ...
Page is loading ...
Page is loading ...
Page is loading ...
Page is loading ...
Page is loading ...
Page is loading ...
Page is loading ...
Page is loading ...
Page is loading ...
Page is loading ...
Page is loading ...
Page is loading ...
Page is loading ...
Page is loading ...
Page is loading ...
Page is loading ...
Page is loading ...
Page is loading ...
Page is loading ...
Page is loading ...
Page is loading ...
Page is loading ...
Page is loading ...
Page is loading ...
Page is loading ...
Page is loading ...
Page is loading ...
Page is loading ...
Page is loading ...
Page is loading ...
Page is loading ...
Page is loading ...
Page is loading ...
Page is loading ...
Page is loading ...
Page is loading ...
Page is loading ...
Page is loading ...
Page is loading ...
Page is loading ...
Page is loading ...
Page is loading ...
Page is loading ...
Page is loading ...
Page is loading ...
Page is loading ...
Page is loading ...
Page is loading ...
Page is loading ...
Page is loading ...
Page is loading ...
Page is loading ...
Page is loading ...
Page is loading ...
Page is loading ...
Page is loading ...
Page is loading ...
Page is loading ...
Page is loading ...
Page is loading ...
Page is loading ...
Page is loading ...
-
 1
1
-
 2
2
-
 3
3
-
 4
4
-
 5
5
-
 6
6
-
 7
7
-
 8
8
-
 9
9
-
 10
10
-
 11
11
-
 12
12
-
 13
13
-
 14
14
-
 15
15
-
 16
16
-
 17
17
-
 18
18
-
 19
19
-
 20
20
-
 21
21
-
 22
22
-
 23
23
-
 24
24
-
 25
25
-
 26
26
-
 27
27
-
 28
28
-
 29
29
-
 30
30
-
 31
31
-
 32
32
-
 33
33
-
 34
34
-
 35
35
-
 36
36
-
 37
37
-
 38
38
-
 39
39
-
 40
40
-
 41
41
-
 42
42
-
 43
43
-
 44
44
-
 45
45
-
 46
46
-
 47
47
-
 48
48
-
 49
49
-
 50
50
-
 51
51
-
 52
52
-
 53
53
-
 54
54
-
 55
55
-
 56
56
-
 57
57
-
 58
58
-
 59
59
-
 60
60
-
 61
61
-
 62
62
-
 63
63
-
 64
64
-
 65
65
-
 66
66
-
 67
67
-
 68
68
-
 69
69
-
 70
70
-
 71
71
-
 72
72
-
 73
73
-
 74
74
-
 75
75
-
 76
76
-
 77
77
-
 78
78
-
 79
79
-
 80
80
-
 81
81
-
 82
82
-
 83
83
-
 84
84
-
 85
85
-
 86
86
-
 87
87
-
 88
88
-
 89
89
-
 90
90
-
 91
91
-
 92
92
-
 93
93
-
 94
94
-
 95
95
-
 96
96
-
 97
97
-
 98
98
-
 99
99
-
 100
100
-
 101
101
-
 102
102
-
 103
103
-
 104
104
-
 105
105
-
 106
106
-
 107
107
-
 108
108
-
 109
109
-
 110
110
-
 111
111
-
 112
112
-
 113
113
-
 114
114
-
 115
115
-
 116
116
-
 117
117
-
 118
118
-
 119
119
-
 120
120
-
 121
121
-
 122
122
-
 123
123
-
 124
124
-
 125
125
-
 126
126
-
 127
127
-
 128
128
-
 129
129
-
 130
130
-
 131
131
-
 132
132
-
 133
133
-
 134
134
-
 135
135
-
 136
136
-
 137
137
-
 138
138
-
 139
139
-
 140
140
-
 141
141
-
 142
142
-
 143
143
-
 144
144
-
 145
145
-
 146
146
-
 147
147
-
 148
148
-
 149
149
-
 150
150
-
 151
151
-
 152
152
-
 153
153
-
 154
154


MIMAKI JFXplus Operating instructions
- Category
- Print & Scan
- Type
- Operating instructions
Ask a question and I''ll find the answer in the document
Finding information in a document is now easier with AI
Related papers
-
MIMAKI UJV55-320 Operating instructions
-
-
-
-
MIMAKI SIJ-320UV Operating instructions
-
-
-
-
-