BURY CC 9068 Owner's manual

Type
Owner's manual

This manual is also suitable for

2
2
Introductory information
Chère cliente, cher client,
Vous venez d’acheter un kit mains-libres de la marque BURY et avez ainsi choisi un produit de haute
qualité ainsi que de confort d‘utilisation le plus élevé.
Gentile clientela,
Avete acquistato un dispositivo vivavoce di marca BURY, optando così per un prodotto di grande qualità
e di massimo comfort di utilizzo.
Estimado Cliente:
Usted ha adquirido un kit de telefonía manos libres de la marca BURY, optando con ello por un producto
de alta calidad y máximo confort de manejo.
Sehr geehrte Kundin, sehr geehrter Kunde,
Sie haben eine Freisprecheinrichtung der Marke BURY erworben und sich so für ein Produkt mit hoher
Qualität sowie höchstem Bedienungskomfort entschieden.
Dear customer,
Congratulations on purchasing a BURY hands-free car kit. You have chosen a high quality product that is
extremely easy to use.
re kunde,
Du har erhvervet et håndfrit installationssæt af mærket BURY og dermed bestemt dig for et produkt af
høj kvalitet med maksimal betjeningskomfort.
Geachte klant,
U heeft een handsfreeset van het merk BURY gekocht en dus gekozen voor een product met hoge kwa-
liteit alsmede maximaal bedieningsgemak.
Vážená zákaznice, vážený zákazníku,
Zakoupili jste si zaříze hands free značky BURY a rozhodli jste se tak pro výrobek vyso kvality
s nejkomfortnější obsluhou.
4
4
Installation of the hands-free car kit CC 9068
8
CC 9068
9
Lieferumfang
Leveringsomfang
Scope of supply
Alcance de suministro
Fourniture
Contenuto della fornitura
Leveringsomvang
Âmbito de fornecimento
Zawartość
Комплектность
Leveransomfattning
Sevkiyatın İçeriği
Rozsah dodávky
5
5
Beschreibung der Komponenten:
1. Elektronikbox
2. Multifunktionsdisplay mit Halterung und
Montagefuß, Schraube für Halterung und
Gummiabdeckung, Klebestreifen
3. Mikrofon
4. ISO-Kabelbaum Anschluss-Kabelbaum
5. Verlängerungskabel
6. AUX-In-Kabel
7. Micro-USB-Ladekabel
8. Kurzanleitung
Optionales Zubehör:
9. Handy- und smartphonespezifische Ladekabel
Scope of delivery:
1. Electronic box
2. Multifunction display with cradle and mount,
screws for the holder and rubber cover, adhe-
sive tape
3. Microphone
4. ISO cable tree
5. Extension cord
6. AUX-In cable
7. Micro USB charging cable
8. Quick user guide
Optional accessories:
9. Mobile phone and Smartphone-specific
charging cable
Medfølger:
1. Elektronikboks
2. Multifunktionsdisplay med holder og
monteringsfod, skrue til holder og
gummipakning, tape
3. Mikrofon
4. ISO ledningsgruppe
5. Forlængerledning
6. AUX-In-kabel
7. Mikro-USB-opladningskabel
8. Betjeningsvejledning
Ekstraudstyr:
9. Ladekabel til specifikke mobiltelefoner og
smartphones
Obsah dodávky:
1. Elektronický box
2. Multifunkční displej s držákem a montážním
podstavcem, šroub pro držák a gumový kryt,
lepicí páska
3. Mikrofon
4. Kabelový svazek ISO
5. Prodlužovací kabel
6. AUX-In-Kabel
7. Nabíjecí kabel Micro USB
8. Strnŷ návod
Volitelné příslušenství:
9. Specifický nabíjecí kabel pro mobily a chyt
telefony
9
9
Installation of the hands-free car kit CC 9068 App
CC 9068 App
8
11
12
9
10
10
10
Installation of the hands-free car kit CC 9068 App
Beschreibung der Komponenten:
1. Elektronikbox
2. Halter - BURY ChargingCradle Universal
3. Justiereinlagen
4. Dash Mount Adapter
5. GSM-Antenne
6. Mikrofon
7. ISO-Kabelbaum Anschluss-Kabelbaum
8. Verlängerungskabel
9. AUX-In-Kabel
10. Micro-USB-Ladekabel
11. Kurzanleitung
Optionales Zubehör:
12. Handy- und smartphonespezifische Ladekabel
Scope of delivery:
1. Electronic box
2. Cradle - BURY ChargingCradle Universal
3. Alignment inserts
4. Dash Mount Adapter
5. Little Flat antenna
6. Microphone
7. ISO cable tree
8. Extension cord
9. AUX-In cable
10. Micro USB charging cable
11. Quick user guide
Optional accessories:
12. Mobile phone and Smartphone-specific
charging cable
Medfølger:
1. Elektronikboks
2. Mobiltelefonspecifik holder - BURY
ChargingCradle Universal
3. Justeringsindlæg
4. Dash Mount Adapter
5. Lille flad antenne
6. Mikrofon
7. ISO ledningsgruppe
8. Forlængerledning
9. AUX-In-kabel
10. Mikro-USB-opladningskabel
11. Betjeningsvejledning
Ekstraudstyr:
12. Ladekabel til specifikke mobiltelefoner og
smartphones
Obsah dodávky:
1. Elektronický box
2. Držák - BURY ChargingCradle Universal
3. Nastavovací výplň
4. Dash Mount Adapter
5. Malá plochá anténa
6. Mikrofon
7. Kabelový svazek ISO
8. Prodlužovací kabel
9. AUX-In-Kabel
10. Nabíjecí kabel Micro USB
11. Stručnŷ návod
Volitelné příslušenství:
12. Specifický nabíjecí kabel pro mobily
a chytré telefony
14
14
Installation of the hands-free car kit
Einbauübersicht
Monteringsoversigt
Installation overview
Plano general de montaje
Vue d’ensemble du montage
Sommario del montaggio
Inbouwoverzicht
Plano geral de montagem
Schemat montu
Монтажная схема
Monteringsöversikt
Montaj hakkında özet bilgi
Nákres instalace
15
15
Connections on the electronics box:
1 Mini-USB
2 Power supply/Muting using Mute via
ISO cable tree
3 Microphone
4 LINE-IN
5 Multifunction display
Anschlüsse an der Elektronikbox:
1 Mini-USB
2 Stromversorgung/Stummschaltung
über ISO-Kabelbaum
3 Mikrofon
4 LINE-IN
5 Multifunktionsdisplay
Tilslutning af elektronikboks:
1 Mini-USB
2 Strømforsyning/Stille radio på lydløs
via ISO-kabelnettet
3 Mikrofon
4 LINE-IN
5 Multifunktionsdisplay
Připojení elektronické síňky:
1 Mini USB
2 Napájení proudem/Ztlumení zvuku
přes svazek kabelů ISO
3 Mikrofon
4 LINE-IN
5 Multifunkční displej
16
16
Installation of the hands-free car kit
Conexiones en la caja electrónica:
1 Mini USB
2 Suministro de corriente/Silenciamiento
a través del mazo de cables ISO
3 Micrófono
4 LINE-IN
5 Pantalla multifuncional
Connexions au boîtier électronique :
1 Mini-USB
2 Alimentation/Mise en sourdine via
le harnais de câbles ISO
3 Microphone
4 LINE-IN
5 Écran multifonctionnel
Podłączenie do boksu elektronicznego:
1 Mini-USB
2 Zasialnie/Wyciszanie przez wiązkę kabli
ISO
3 Mikrofon
4 LINE-IN
5 Monitor wielofunkcyjny
Attacchi della scatola elettronica:
1 Mini-USB
2 Alimentazione di corrente /Attivazione
funzione Mute tramite cablaggio ISO
3 Microfono
4 LINE-IN
5 Display multifunzionale
Aansluitingen aan de elektronicabox:
1 Mini-USB
2 Stroomvoorziening / Volumedemping
via ISO-kabelboom
3 Microfoon
4 LINE-IN
5 Multifunctioneel display
Ligão da caixa electrónica:
1 Mini-USB
2 Alimentão de corrente /Modo silencioso
através da cablagem ISO
3 Microfone
4 LINE-IN
5 Visor multifunções
18
18
Installation of the hands-free car kit CC 9068
Montage des Systems
Installation af systemet
Installation of the system
Montage du système
Montaggio del sistema
Montage van het systeem
Montagem do sistema
Montaż systemu
Монтаж системы
Montering av handsfree-enheten
Montaje del sistema
1 2 3 4
Eller serbest araç kitinin montajı
Monž systému
22
22
Installation of the hands-free car kit CC 9068 App
6. Um einen sicheren Halt zu gewährleisten, passen Sie nun noch die Eckelemente an die Höhe an.
5. Stellen Sie nun die gewünschte Höhe oder Tiefe Ihres Handys ein. Lösen Sie dann die Entriegelungsstifte, um
die Positionen beizubehalten.
8
9
1
2
3
4
23
23
1. Select appropriate corner inserts and adjust out to depth of phone. 20
To be able to select the suitable type of corner fastener for a certain model of mobile phone / smartphone,
please familiarize yourself with the corresponding compatibility list. This list is available on our internet site in
the download area for the product at www.bury.com.
Important:
Every corner fastener set is equipped with a letter notation which is positioned on the interior X
side of the corner fastener.
20
2. Important: Close the cradle.
20
3. Push in three locking buttons then extend corners outwards.
21
4. Insert the smartphone into the cradle.
21
5. Adjust all corners to fit length and width of the phone. Release the three locking buttons to set position.
22
6. Adjust corners to the appropriate depth for tight and secure fit.
22
8
9
Adapting the BURY ChargingCradle Universal to the mobile phone
35
35
Den BURY ChargingCradle Universal mit dem Dash Mount Adapter verbinden.
Für die Befestigung des Dash Mount Adapters - abhängig vom Fahrzeug-Typ und der Fahrzeug-Marke - nnen
bestimmte Einbau-Systeme (Konsolen oder andere Montagehilfen) beim Fachhändler erworben werden.
Setzen Sie den BURY ChargingCradle Universal auf den Dash Mount Adapter, bis der Halter spürbar ein-
rastet.
Connecting the BURY ChargingCradle Universal with the Dash Mount Adapter.
For the fixing of the Dash Mount Adapter, depending on the type and brand of your car, specific attach-
ment systems (consoles or other assembly aids) can be purchased from local retailers.
Push the BURY ChargingCradle Universal in the Dash Mount Adapter until you can feel it click into place.
BURY ChargingCradle Universal spojte s Dash Mount Adapter.
Pro upevnění adaptéru Dash Mount - v závislosti na typu a značce vozidla - si můžete u specializovaného
obchodníka zakoupit určité montážní sysmy (konzoly nebo jiné montážní pomůcky). Umístěte BURY
ChargingCradle Universal do Dash Mount Adapter, dokud se znatelně nezasune.
36
36
Installation of the hands-free car kit CC 9068 App
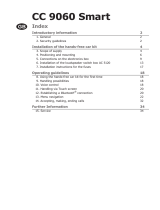
BURY ChargingCradle Universal met Dash Mount Adapter verbinden
Voor de bevestiging van de Dash Mount Adapter - naargelang het type en het merk van de auto - kunnen be-
paalde inbouwsystemen (consoles of andere montagehulpen) bij plaatselijke handelaren worden aangeschaft.
Plaats de BURY ChargingCradle Universal in de Dash Mount Adapter, tot hij voelbaar vastklikt.
Raccorder BURY ChargingCradle Universal à Dash Mount Adapter.
Pour fixer l’adaptateur Dash Mount, quel que soit le type ou la marque du véhicule, vous pouvez faire
l’acquisition de certains sysmes d’installation (consoles ou autres aides au montage) aups de votre
revendeur. Insérer le BURY ChargingCradle Universal dans le système Dash Mount Adapter jusqu’à ce qu’il
s’enclenche.
Conecte el ChargingCradle Universal de BURY con el Dash Mount Adapter.
Para sujetar el Dash Mount Adapter, dependiendo del tipo y de la marca del vehículo, se pueden adquirir
determinados sistemas de montaje (consolas u otros medios auxiliares de montaje) en los comercios espe-
cializados. Coloque el ChargingCradle Universal sobre el Dash Mount Adapter hasta que oiga cómo encaja
el soporte.
Abbinare BURY ChargingCradle Universal a Dash Mount Adapter.
Per fissare il Dash Mount Adapter - a seconda del tipo di veicolo e del marchio del veicolo - possono essere
acquisiti dei sisitemi di montaggio precisi (console o altri ausili di montaggio) presso un rivenditore specia-
lizzato. Inserire BURY ChargingCradle Universal nel Dash Mount Adapter fincquesto scatta sensibilmen-
te in posizione.
Forbinde BURY ChargingCradle Universal med Dash Mount Adapter.
Til fastgørelse af Dash Mount adapteren kan der bes bestemte indbygningssystemer - afhængig af bi-
lens type og mærke (konsoller eller anden montagehjælp) i fagbutikken.
t BURY ChargingCradle Universal i Dash Mount Adapter, til det falder mærkbart i hak.
37
37
Ligar o BURY ChargingCradle Universal com o Dash Mount Adapter.
No vendedor especializado pode adquirir certos sistemas de montagem (consolas ou outras ajudas de
montagem) para a fixar o Dash Mount Adapter,dependentemente do tipo e marca da viatura. Coloque
o BURY ChargingCradle Universal no Dash Mount Adapter até que engate perceptivelmente.
Соедините BURY ChargingCradle Universal с адаптером Dash Mount Adapter.
Для крепления адаптера Dash Mount Adapter – в зависимости от типа и марки автомобиля – опре-
деленные системы монтажа (консоли или другие вспомогательные монтажные приспособления)
можно приобрести в специализированных магазинах. Установите BURY ChargingCradle Universal на
адаптер Dash Mount Adapter так, чтобы держатель зафиксировался с ощутимым щелчком.
BURY ChargingCradle Universal’ın ön panel montaj adaptörüne bağlanma.
Ön panel montaj adaptörünün montajı in - artipine ve markasına bağlı olarak - uzman satıcılardan
belirli montaj sistemleri (konsollar ya da başka montaja yardımcı gerler) alınabilir. ‘BURY ChargingCrad-
le Universal’ı, tutucu hissedilir bir tıklamayla yerine oturana kadar adaptörün üstüne bastırın.
Połączyć BURY ChargingCradle Universal z adapterem Dash Mount.
Do montu adaptera Dash Mount - zależnie od rodzaju i modelu pojazdu - można zastosować różne
systemy montażowe (konsole lub inne pomoce montażowe) dostępne w sklepach specjalistycznych.
BURY ChargingCradle Universal umieścić na adapterze Dash Mount, aż do momentu zablokowania.
Förbind BURY ChargingCradle Universal med Dash Mount-adaptern.
För att fästa Dash Mount-adaptern - beroende på fordonstyp och fordonsmärke - kan vissa inbyggnads-
system (konsoler eller andra monteringshjälpredor) köpas hos fackhandlare. Sätt BURY ChargingCradle
Universal på Dash Mount-adaptern tills den märkbart klickar i.
38
38
Installation of the hands-free car kit
PWR/LSP/LINE OUT
Schritt 1:
Ziehen Sie die ISO-Stecker hinten am Radio ab und ersetzen Sie diese durch die Stecker des ISO-Kabelbaums.
Die nun freien ISO-Stecker verbinden Sie bitte mit den beiden Buchsen vom ISO-Kabelbaum (siehe Abbildung).
40
40
Installation of the hands-free car kit
- 12V Power
- 12/24V Ignition
- Ground
- Line-out 1 - Line-out 2
1-Line L + / Phone L + 1-Line R + / Phone R +
2-Line L - / Phone L - 2-Line R - / Phone R -
Anschlussplan für ISO-Kabelbaum
41
41
- Micro Molex 24 - ISO - connection to the electronic box (HFCK)
- connection to the vehicle’s speakers
- connection to the vehicle’s power supply
- connection to the car radio
1 - Mute 3
2 - Mute 2
3 - Mute 1
4 - Ignition
5 - Antenna
6 - Illumination
7 - Power
8 - Ground
1 - C RR-
2 - C RF-
3 - C LF-
4 - C LR-
5 - R LR-
6 - R LF-
7 - R RF-
8 - R RR-
9 - LINE R+
10 - LINE L+
11 - R-Mute
12 - Ground
13 - C RR+
14 - C RF+
15 - C LF+
16 - C LR+
17 - R LR+
18 - R LF+
19 - R RF+
20 - R RR+
21 - LINE R-
22 - LINE L-
23 - Ignition
24 - Power
42
42
Installation of the hands-free car kit
Step 1:
Pull the ISO jacks at the back of the radio off and replace them with the jacks at the ISO cable harness. Connect
the now free ISO jacks with both sockets from the ISO cable harness (see picture). 38
If you want music or voice signals to be fed via the four LINE cables, you must adjust them accordingly to the
respective type of radio and its connections (PHONE-IN or AUX-IN). Appropriate adapters are available from
specialists shops.
Step 2:
The hands-free car kit supports the radio mute function, if this function is also supported by the radio. The mute
signal is then fed to the radio via the yellow cable of the ISO cable harness. The cable is labelled with “mute”
and must be connected to one of the three sockets (mute1, mute2, mute3). Please observe the notes on this
topic in the instruction manual of the radio concerning “Pin allocation for mute / radio mute. Then, connect the
mute cable to the corresponding socket. 39
Step 3:
Insert the 24-pole molex jack (A) into the connection of the electronic box (see picture). 39
Connection diagram for ISO cable harness 40
PWR/LSP/LINE OUT
Operating guideline
54
54
Operating guideline
1
2
3
4
5
6
7
9
*
#
PIN: 1234
„CC 9068“
Navázání spojení pomocí technologie
Bluetooth
Oprettelse af
Bluetooth
-forbindelse
Establecer una conexión
Bluetooth
Etablir une connexion
Bluetooth
Stabilire un attacco
Bluetooth
Het totstandbrengen van een
Bluetooth
verbinding
Estabelecer uma ligação
Bluetooth
Nawiązanie pączenia
Bluetooth
Создать соединение
Bluetooth
Ansluta
Bluetooth
Bluetooth
bağlansı kurma
Eine
Bluetooth
Verbindung herstellen
Establishing a
Bluetooth
connection
55
55
Hier können Sie eine Telefonnummer eingeben
You can enter a telephone number here
Zde můžete zadat telefonní číslo
Her kan indtastes et telefonnummer
Aquí puede introducir un número de teléfono
Ce sous-menu vous permet de saisir un numéro
de téléphone
Qui è possibile immettere un numero di telefono
Hier kunt u een telefoonnummer opgeven
Hier können Sie das Telefonbuch öffnen
You can open the telephone book here
Zde můžete otevřít telefonní seznam
Her åbnes telefonbogen
Aquí puede abrir la agenda de teléfonos
Ce sous-menu vous permet d‘ouvrir le répertoire
Qui è possibile aprire l’agenda telefonica
Hier kunt u naar andere functies bladeren
  • Page 1 1
  • Page 2 2
  • Page 3 3
  • Page 4 4
  • Page 5 5
  • Page 6 6
  • Page 7 7
  • Page 8 8
  • Page 9 9
  • Page 10 10
  • Page 11 11
  • Page 12 12
  • Page 13 13
  • Page 14 14
  • Page 15 15
  • Page 16 16
  • Page 17 17
  • Page 18 18
  • Page 19 19
  • Page 20 20
  • Page 21 21
  • Page 22 22
  • Page 23 23
  • Page 24 24
  • Page 25 25
  • Page 26 26
  • Page 27 27
  • Page 28 28
  • Page 29 29
  • Page 30 30
  • Page 31 31
  • Page 32 32
  • Page 33 33
  • Page 34 34
  • Page 35 35
  • Page 36 36
  • Page 37 37
  • Page 38 38
  • Page 39 39
  • Page 40 40
  • Page 41 41
  • Page 42 42
  • Page 43 43
  • Page 44 44
  • Page 45 45
  • Page 46 46
  • Page 47 47
  • Page 48 48
  • Page 49 49
  • Page 50 50
  • Page 51 51
  • Page 52 52
  • Page 53 53
  • Page 54 54
  • Page 55 55
  • Page 56 56
  • Page 57 57
  • Page 58 58
  • Page 59 59
  • Page 60 60
  • Page 61 61
  • Page 62 62
  • Page 63 63
  • Page 64 64
  • Page 65 65

BURY CC 9068 Owner's manual

Type
Owner's manual
This manual is also suitable for

Ask a question and I''ll find the answer in the document

Finding information in a document is now easier with AI