American Spa Owner’s Manual
LTR50001143, Rev. D
Clear Water Plan
16
This section is intended for new spa owners with no
experience with water chemistry. Everyone’s experi-
ence with maintaining water quality is different, but
there are some general concepts you need to know.
Water maintenance is not difcult, although it re-
quires regular attention. The most important thing
to understand about taking care of your spa water is
that preventive action is much easier than correcting
water quality issues.
Filtration
Ing et augait alit esto dolut dio doleniam quat am vel etue
vendiam quis duip ea ating et utem quam, sendit, velesequi-
sit am dunt niscil ilit alit nonumsan utatin utat num voloreril
in ut pratie dionull umsandio consed dolumsandit at. Rat,
consequi tinim ilisi bla feuis euguerc ilisi.
Em verit iliqui endiam nulluptat lamcore minibh elestio num-
sandip eraesectem diatio ercing ea cortis delissed dunt
utpatisi.
Ut vel ut wis atis nonullut augiam augait lore dolore erci te ea
consequat.
Met prate er sit dolor iriureetuer si.
Feummy nullamcore magna ad dio er
sequamconum nis eu feugiamet, vent
et wisis ero dolore dip exeraestie estie
vel inisci elisl ut diat, cons aut alit lut
lore tin hent adiam iustrud molor
sustis essit wiscilit wisi.
Regularity
Ing et augait alit esto dolut dio doleniam quat am vel etue
vendiam quis duip ea ating et utem quam, sendit, velesequi-
sit am dunt niscil ilit alit nonumsan utatin utat num voloreril
in ut pratie dionull umsandio consed dolumsandit at. Rat,
consequi tinim ilisi bla feuis euguerc ilisi.
Em verit iliqui endiam nulluptat lamcore minibh elestio num-
sandip eraesectem diatio ercing ea cortis delissed dunt
utpatisi.
Ut vel ut wis atis nonullut augiam augait lore dolore erci te ea
consequat.
Met prate er sit dolor iriureetuer si.
Feummy nullamcore magna ad dio er
sequamconum nis eu feugiamet, vent
et wisis ero dolore dip exeraestie estie
vel inisci elisl ut diat, cons aut alit lut
lore tin hent adiam iustrud molor
sustis essit wiscilit wisi.
Sanitation
Ing et augait alit esto dolut dio dole-
niam quat am vel etue vendiam quis
duip ea ating et utem quam, sendit,
velesequisit am dunt niscil ilit alit non-
umsan utatin utat num voloreril in ut
pratie dionull umsandio consed
dolumsandit at. Rat, consequi tinim ilisi bla feuis euguerc ilisi.
Em verit iliqui endiam nulluptat lamcore minibh elestio num-
sandip eraesectem diatio ercing ea cortis delissed dunt
utpatisi.
Ut vel ut wis atis nonullut augiam augait lore dolore erci te ea
consequat.
Met prate er sit dolor iriureetuer si. Feummy nullamcore
magna ad dio er sequamconum nis eu feugiamet, vent et
wisis ero dolore dip exeraestie estie vel inisci elisl ut diat, cons
aut alit lut lore tin hent adiam iustrud molor sustis essit wis-
cilit wisi.
Chemical Balance
Ing et augait alit esto dolut dio dole-
niam quat am vel etue vendiam quis
duip ea ating et utem quam, sendit,
velesequisit am dunt niscil ilit alit non-
umsan utatin utat num voloreril in ut
pratie dionull umsandio consed
dolumsandit at. Rat, consequi tinim
ilisi bla feuis euguerc ilisi.
Em verit iliqui endiam nulluptat lamcore minibh elestio num-
sandip eraesectem diatio ercing ea cortis delissed dunt
utpatisi.
Ut vel ut wis atis nonullut augiam augait lore dolore erci te ea
consequat.
Met prate er sit dolor iriureetuer si. Feummy nullamcore
magna ad dio er sequamconum nis eu feugiamet, vent et
wisis ero dolore dip exeraestie estie vel inisci elisl ut diat, cons
aut alit lut lore tin hent adiam iustrud molor sustis essit wis-
cilit wisi.
F
i
l
t
r
a
t
i
o
n
R
e
g
u
l
a
r
i
t
y
C
h
e
m
i
c
a
l
B
a
l
a
n
c
e
S
a
n
i
t
a
t
i
o
n
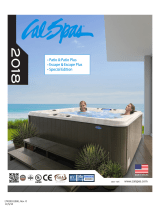
Your Key
To Clear
Water
Regularity
Clear water requires regular maintenance.
Establish a routine based on a regular
schedule for your spa water maintenance.
Maintaining your water quality helps the en-
joyment of your spa and extends your spa’s
life by preventing damage from neglect and
chemical abuse.
See page 20 for the sched-
ule of recommended main-
tenance.
Sanitation
Sanitizers kill bacteria and
viruses and keep the water
clean. A low sanitizer level
will allow microbes to grow
quickly in the spa water.
We recommend using either chlorine or
bromine as your sanitizer.
See page 18 for learn how to use sanitizer.
Filtration
Cleaning your lter regularly is the easiest
and most effective single thing you can do
to keep your water clear.
A clogged or dirty lter will cause the heater
and pump to work harder than they need
to, possibly causing them to fail.
The spa’s heating system will only function
with the proper amount
of water ow through the
system.
See page 19 for lter
cleaning instructions.
Chemical Balance
You will need to test and
adjust the chemical balance
of your spa water. Although
this is not difcult, it needs
to be done regularly.
Depending on your choice of sanitizer, you
need to test the level of calcium hardness,
total alkalinity, and pH.
See page 17 for learn how to balance your
spa water.
Contents of this section:
Testing and Adjusting Spa Water
Sanitation
Filtration
Bather Load
Starting the Spa with Fresh Water
Maintenance Schedule
Troubleshooting Water Clarity Problems
Excellent water quality is a simple matter of four things:
Clear Water Plan
The Key to Clear Water