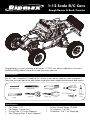
Ripmax C-RMX27315 User manual
- Category
- Remote controlled toys
- Type
- User manual

• Car Scale: 1:12
• Car Battery: Lithium (Inc.)
• Driving Time: 10-15min (Approx)
• Car Charging Time: 3 Hours (Approx)
• Tx Max Control Range: 30-40M
• Tx Frequency: 2.4GHz
• Tx Batteries: ‘AA’ 1.5V (Required)
Specifications
Specifications
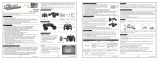
Congratulations on your purchase of a Ripmax 1:12 R/C car, please read these instructions
carefully and fully before use and we hope you enjoy your car.
Your R/C car is supplied in ‘Ready to Run’ format so you do not need any tools to operate it.
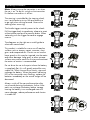
Over time you may require the tools below to perform more indepth maintainance and repairs.
1:12 Scale R/C Cars
Rough Racers & Rock Crawler
2mm Allen Key Hobby Knife
Phillips Screwdriver
Small
Side Cutters
Phillips Screwdriver
Large
Scissors
Pliers Set
Cross Spanner
Thread
Lock

Make sure you read this safety information and the instructions before using your model.
Follow exactly the recommended procedures and settings given in the instructions.
If you are operating a radio-controlled model car for the first time, we recommend that you
enlist the help of an experienced modeler to guide you. There are also special clubs or
modeling associations that offer training services and assistance.
Safety Information
Radio-controlled models are not toys in the usual sense, and young people under 14 years of
age should not operate them unless supervised by an experienced adult. You are allowed to
operate them for sports and recreational purposes, but sometimes authorisation from the local
council may be required to use a model in certain locations.
The building and operating of models requires technical expertise, manual skill, a careful
attitude and use of safety-conscious behavior. Errors, negligence and omissions in building
these models can result in serious personal injury or damage to property. Changes to the
construction and deviating from the operating manual will invalidate any warranty or liability
claims.
Since the manufacturers and vendors of the equipment have no means of checking that your
models are built and operated correctly, we explicitly bring your attention to these risks and
deny all further liability.
A properly constructed model may still be dangerous if used incorrectly.
Never reach into moving parts as this may cause serious injuries. Note
that motors & controllers can reach high temperatures during operation. Avoid
all contact with such parts.
The tools needed for assembly can also cause injuries. Even metal or plastic parts which
are broken or untrimmed can cause injuries. Adhesives and paints may contain hazardous
substances like solvents etc. Please observe the manufacturer’s information and wear safety
equipment (goggles, gloves etc.) when necessary. Rubber parts (e.g. rubber bands) may
become old and brittle and fail. Such parts have to be checked before use.
Keep well clear of the electric motors and all moving components when the battery is
connected. Mistakes happen and in spite of all safety precautions and there is always a
risk of damage and injury from moving parts. For example, by you may unintentionally move
the throttle stick on the transmitter during setup. Also ensure that other hazards such as pets are
not able to come in contact with moving parts!
Always keep yourself at a safe distance from your model and pay particular attention
while jumping for obstacles.
Observe the instructions of the battery and charger manufacturer.
Use only recommended battery chargers and recharge your battery only for the specified
charging time/level. Excess or incorrect charging methods can lead to the battery exploding.
Pay extra attention to ensure correct polarity.
Protect your equipment from dust, dirt and moisture. Do not expose the device to excessive
heat, cold or vibration. The remote control operation may be performed only within the
specified temperature range, avoid unusually hot/cold days.
Check your equipment regularly for damage and always replace damaged components with
original spare parts.
Important R/C Modelling Safety Notices

Don’t re-use any equipment or devices which have been subject to crash or water damage.
Either return to the Service Department for repair or replace. Hidden problems may occur after
crash or water damage which can lead to problems or total failure later in operation.
Use only recommended components and accessories. On remote control systems no changes
may be made.
Routine Pre-Flight Checks
• Before switching on the receiver, ensure that the throttle control on the transmitter is in the
motor stop position.
• Always switch on the transmitter first and then the receiver.
• Always switch off the receiver first, then the transmitter.
• Before use perform a range test.
• Check if the correct model memory is selected (if appropriate).
• Perform a function test before each use, ensuring to check the direction of travel, movement
and all other functions including mixing functions and default switch positions.
• Ensure all batteries are fully charged.
Operating the Model
• Never operate your car towards spectators and maintain a safe distance at all times.
• Never endanger people or animals!
• Do not operate your model in the vicinity of canals, locks or open waterways.
• Do not operate your model from public roads, busy paths and squares etc.
• Do not operate your models in thunderstorms as they could interfere with
the radio remote control systems.
Aerial Position
Never “point” the transmitter aerial straight at the model when in operation. The signal
generated by the transmitter is at its weakest in an imaginary line extending straight from the
aerial. It is always best for the user to stand in a position where the long side of the aerial
points towards the model.
Insurance
Ground-based models are usually covered by standard personal third-party insurance policies.
Check your insurance policy that you are suitably covered and abide by its guidelines.
Liability Exclusion:
We have no control over the use of this product outside of the parameters of the instructions,
regarding methods of assembly/installation, operation, misuse and poor maintenance of the
product or it’s components. Therefore, we assume no liability for any loss, damage or costs
arising from the improper use/operation. Ripmax shall not be liable for any loss, consequential
loss, damage or expense arising from the improper use or operation in anyway.
In as far as legally permitted, compensation shall be limited to the invoice value of the Ripmax
products directly involved in the damage-causing event. This does not affect your statutory
rights.

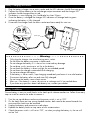
1. Plug the battery charger into a mains socket and the LED indicator should illuminate green.
2. Connect the lithium battery to the red charger output connector and the charger LED
indicator should change colour to red.
3. The battery is now charging, this should take less than 3 hours.
4. Once the battery is charged the charger LED indicator will change back to green
indicating the battery is fully charged.
5. Disconnect the charger from the mains socket and store ready for next use.
The car battery is easy to install thanks to the hatch quick release mechanism. Follow these easy
steps to install or reverse the order to remove it.
1. Turn the car upside down and ensure the power switch is set to ‘OFF’.
2. On the hatch there are two sprung loaded catches, both need to be moved towards the
centre and the hatch can be removed.
3. Unplug the battery and remove to a safe place.
4. Replace the battery hatch to stop water or dirt contamination.
5. Check the power switch is still set to ‘OFF’, so when you plug the battery in, the car will
not be ‘live’.
• Only plug the charger into a conforming mains socket.
• Do not force the battery connector in backwards.
• Do not charge the battery if it is hot or has sustained any damage.
• Do not drop, crush, puncture or set fire to the battery.
• Do not leave the battery in direct sunlight for an extended period.
• Do not leave the charger unattended while charging.
• Do not over-charge the battery.
• If the battery is hot or smells, stop charging immediately and move it to a safe location.
• Disconnect the battery after use and store fully charged.
• Do not store the battery near a heat source.
• After use, if the battery is warm, do not use or recharge until it has cooled down.
• If you have any questions about safe battery use, contact your dealer.
Battery Charging Instructions
Battery Installation
< < < < < < < < < < < - - - - - - Warning - - - - - - > > > > > > > > > > >
Alignment interpolation
Indicator light
Black line
White Logo
Red Black Black
EU Plug Shown

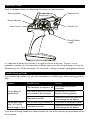
Study the diagram below to understand the controls on your transmitter.
It is important to always ensure there is a signal to the car at all times. The car is on so
remember to always turn the transmitter on before you turn on the car and always turn the car
off before you turn off the transmitter. This way there is always a control signal going to the car.
Transmitter Guide
Steering Wheel
Steering Trim
Power Indicator
Power Switch
Throttle Trim
Throttle/Brake
Trigger
If you are having troubles with your car then please try the following trouble shooting guide for
help:
Problem Possible Cause Solution
The car does not
operate at all.
The Transmitter or receiver is off.
Turn on both the car and
transmitter.
The batteries are not the correct
way around in the transmitter.
Remove and re-insert the
batteries checking polarity.
The batteries are flat.
Replace the transmitter batteries
and recharge the car battery.
The car does not do
what I ask and the
control range is short.
You are near large interference. Try the car in a different location.
The batteries are flat.
Replace the transmitter batteries
and recharge the car battery.
If you are still having trouble then please contact the staff at the location you purchased the car
for assistance.
Trouble Shooting Guide

Note: Always ensure the transmitter is on when
the car is on. To do this switch on the transmitter
first before use and turn it off last.
The steering is controlled by the steering wheel,
turn it anti-clockwise to turn left and clockwise
to go right when driving forward. Reverse the
steering when reversing.
The throttle trigger controls power to the wheels.
Pull the trigger back to accelerate, release to coast
without power and push forward to brake. When
stationary push the trigger forward to engage
reverse.
The diagrams on the right are a useful guide to
what each control does.
This product is suitable for use on or off road on
surfaces such as tarmac, carpet, concrete, short
grass and compacted dirt. Do not use on sand or
loose gravel as this may be ingested into the motor
and cause damage. Long grass or other extreme
surfaces may cause excessive friction and overheat
the motor so caution is recommended.
Do not drive the car to the point where the battery
is completely flat, this will greatly extend the cars
usable life. When the car drives slowly, stop and
recharge the battery. When the power indicating
LED on the transmitter starts flashing, replace the
batteries immediately as the control range will be
decreased.
Always switch off the car and transmitter after
use to avoid draining the batteries further. After
each use re-charge the battery before storage.
Leaving the battery in an uncharged state will
cause damage, reduce performance and shorten
its usable life.
Operating Instructions

Rough Racer Buggy Spare Parts
Z-GE959-54/57 Z-GE959-65 P-GE303V2
Z-GE303-03 Z-GE303-04
Z-GE303-07
Z-GE303-08
Z-GE303-09/10 Z-GE303-11
Z-GE303-13 Z-GE303-14
Z-GE303-15 Z-GE303-16
Z-GE303-17/18 Z-GE303-19
Z-GE303-22
Z-GE303-23/24 Z-GE303-25 Z-GE303-26
O-GE303-27
P-GE303-34 Z-GE303-35
O-GE303-36
Z-GE303-01/02
Z-GE939-49
Z-GE959-14
Z-GE303-06
Z-GE303-05/12
Z-GE303-20/21
Z-GE303-28/29 Z-GE303-30/31/32
Z-GE303-33/44/82
Z-GE929-73/43/07
Self Taping Screws (2 Pack) M4 Locknut 2.4G Transmitter Front & Rear Tires
Bodyshell Chassis Suspension Arms and Hubs
Battery Door
Shock Absorbers
Front Bumper and Rear Support Suspension Frame
Transmission Gears Differential
Buggy Front Mount Servo
Ball Links Long & Short
Suspension Plate Front & Rear
Knuckle Spindle
Axle Shaft & Dog Bones Transmission Shaft Suspension Pivot
Hex Adaptors
390 Brushed Motor Screw Sets
Self Tapping Screws (3 Pack)
Bearing Set (3 Pack)
Receiver Unit Differential Drive CupsLithium BatteryR-Clip Set Screws M2.5* x 15
Gearbox Case
Screw Set (3 Pack)

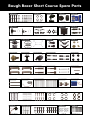
Rough Racer Short Course Spare Parts
Z-GE303-05/12
Z-GE959-65 P-GE303V2 Z-GE313-01 Z-GE313-02
Z-GE313-03/04
Z-GE303-04
Z-GE303-07 Z-GE303-08
Z-GE959-54/57
Z-GE303-06
Z-GE313-05/06
Z-GE303-11
Z-GE303-13
Z-GE303-14
Z-GE303-15 Z-GE303-16
Z-GE303-17/18 Z-GE303-19
Z-GE303-20/21
Z-GE303-22 Z-GE303-23/24 Z-GE303-25
Z-GE303-26
P-GE303-27 Z-GE303-28/29
P-GE303-34
Z-GE303-35 O-GE303-36
Z-GE929-73/43/07
Z-GE939-49 Z-GE959-14
Z-GE303-30/31/32
Z-GE303-33/44/82
Self Tapping Screws (2 Pack) M4 Locknut 2.4G Transmitter Tyre Set
Body Shell
Front & Rear Bumper
Chassis
Gearbox Case
Battery Door Shock Absorbers
Front & Rear Support
Suspension Frame
Transmission Gears
Differential
Front Mount Servo
Ball Links Long & Short
Suspension Plate Front & Rear
Knuckle Spindle Axel Shaft & Dog Bones Transmission Shafts
Hex Adaptors
Upper & Lower Suspension Arms and Hubs
Suspension Pivot
390 Brushed Motor Screw Sets
2.4G Receiver
Differential Drive Cups Lithium Battery
Screw Set (3 Pack)
R-Clip Set Screws M2.5 x 15
Self Tapping Screws (3 Pack)
Bearing Set (3 Pack)

Rough Racer Monster Spare Parts
Z-GE303-04 Z-GE303-06 Z-GE303-07 Z-GE303-08
Z-GE323-01 Z-GE323-02 Z-GE303-11
Z-GE303-12 Z-GE303-13 Z-GE303-14
Z-GE303-15 Z-GE303-16
Z-GE303-19
Z-GE303-22
Z-GE303-25 Z-GE303-50
O-GE323-03
P-GE303-34 Z-GE303-35 O-GE303-36
Z-GE939-49
Z-GE959-14
Z-GE959-65
P-GE303V2
Z-GE313-03/04
Z-GE959-54/57
Z-GE303-20/21
Z-GE303-23/24
Z-GE303-28/29
Z-GE929-73/43/07
Z-GE303-30/31/32
Z-GE303-33/44/82
M4 Locknut 2.4G Transmitter
Chassis
Tire Set Body Shell Suspension Frame
Steering Hubs Transmission Gears Differential
Front Mount Servo
Knuckle Spindle
Transmission Shafts Front Suspension Pivot
Z-GE313-06 Z-GE323-04
390 Brushed Motor
2.4G Receiver Differential Drive Cup Lithium Battery
R-Clip Set
Screws M2.5 x 15
Screw Set (3 Pack)
Front & Rear Bumper
Self Tapping Screws (2 Pack)
Suspension Plate Front & Rear
Axle Shaft & Dog Bones
Screw Sets
Self Tapping Screws (3 Pack)
Bearing Set (3 Pack)
Rear Support Gearbox Case Battery Door Front Shock AbsorbersUpper & Lower Arms
Hex AdaptorBall Links
Z-GE323-05/06

Across Rock Crawler Spare Parts
Z-GERC0021 Z-GERC0022 Z-GERC0023 Z-GERC0024
Z-GERC0040 Z-GERC0041 Z-GERC0042 Z-GERC0043
Z-GERC0030Z-GERC0025 Z-GERC0026 Z-GERC0031
Z-GERC0032 Z-GERC0033 Z-GERC0034 Z-GERC0035
Z-GERC0039Z-GERC0036 Z-GERC0037 Z-GERC0038
Arm lever B Rear axle rod Rear Suspension Arms Rear Drive Sleve
Rear Drive Shaft Bumper
Battery Holder Battery layering
Servo Mount
Servo Steering Arms
Flap Body Mount Posts A
Body Mount Posts B
Left/Right Rear
Suspension Frames
Left/Right Shell
Column Brackets
Left/Right Lever
Position Brackets
Z-GERC0059
Z-GERC0065 Z-GERC0066 Z-GERC0067 Z-GERC0068
Z-GERC0069 Z-GERC0070 Z-GERC0071 Z-GERC0072
Z-GERC0073 Z-GERC0074
Z-GERC0075 Z-GERC0076
Z-GERC0077 Z-GERC0078
Hex Adaptors
Wheel Hub
Wheel Hub Cover Wheel Hub Plate
Sponge
Motor Mount
Gasket
12 * 5.2 * 0.2
Shock
Adjustment Ring
Shock Bracket
M2 * 4 screws
Locating Pins
Left Tyre Assembly
Right Tyre Assembly
Differential Shafts
Ball Screws 4.8*11.5
Ball C Ball B
Ball A
Axle Cup
Universal
Bushings
Propeller Shaft
Rollcage Left
Rollcage Right Rollcage in A
Bumper
Receiver
Headlights
Rollcage Centre Driver Helmet
Left Tires
Right Tires
Body Shell
Z-GERC0001 Z-GERC0002 Z-GERC0003 Z-GERC0004
Z-GERC0005 Z-GERC0006 Z-GERC0007 Z-GERC0008
Z-GERC0009 Z-GERC0010 Z-GERC0011 Z-GERC0012
Z-GERC0013 Z-GERC0014 Z-GERC0015 Z-GERC0016
Z-GERC0017 Z-GERC0018 Z-GERC0019 Z-GERC0020
Chassis
Rear Axle Case Pt1 Rear Axle Case Pt2 Left/Right Arm
Front Left/Right Hubs Left/Right Block C Gearbox Case Floor Board
Dust Cover Steering
Connectors
Differential
Planet Teeth
12T Drive Gear
Differential
Planetary Gears
Asterold
Differential Gear
Reduction Gear Front Shocks
Rear Shocks Steering Rods Steering rod Arm Lever A
Z-GERC0044 Z-GERC0045 Z-GERC0046 Z-GERC0047
Z-GERC0048 Z-GERC0049 Z-GERC0050 Z-GERC0051
Z-GERC0052 Z-GERC0053 Z-GERC0054 Z-GERC0055
Z-GERC0056 Z-GERC0057 Z-GERC0058
Z-GERC0079 Z-GERC0080
Rear Axle Joints
Differential Case
Left/Right Rear
Swingarm Brackets
Left/Right
Pivots

Across Rock Crawler Spare Parts
Z-GERC00113 Z-GERC00114
Z-GERC00115 Z-GERC00116
Z-GERC00109 Z-GERC00110 Z-GERC00111 Z-GERC00112
Z-GERC00085
Z-GERC00086
Z-GERC00087
Z-GERC00088
Z-GERC00089 Z-GERC00090
Z-GERC00091 Z-GERC00092
Z-GERC00093 Z-GERC00094 Z-GERC00095 Z-GERC00096
Z-GERC00097 Z-GERC00098
Z-GERC00099 Z-GERC00100
Z-GERC00105 Z-GERC00106
Z-GERC00107 Z-GERC00108
Z-GERC00117 Z-GERC00118
Z-GERC00119 P-GERC00120
Z-GERC00122
O-GERC00123 O-GERC00124
Rear Axle Pinion
Gimbal Rear Axle Shafts Motor Gear
Steering Damper Spring
Front-Wheel
Dive Shaft
Front Differential Bearing 5*9*3
Bearing 8*12*3.5
Bearing 7*11*3 Bearing 5 * 11 * 4 Screw M2.5*40
Pan Head Screws
M3*10
Pan Head screws
M3*14
Grub Screws
M3*2.5
Dome Head
Screws M2*8
Pan Head Screw
M2.5*8
Pan Head Screw
M2.5*10
Pan Head Screw
M2.5*12
Pan Head Screw
M2.5*14
Pan Head Screw
M2.5*16
Pan Head Screw
M2.5*20
Pan Head
Screw M4*12
Pan Head Screw
M3*7
Pan Head Screw
M2*8
Pan Head Screw
M2*10
Pan HeadScrew
M2*12
Pan Head Screw
M2 * 20
Flat Head Screw
M2.5*6
Flat Head Screw
M2.5*8
Flat Head Screw
M2.5*10
Flat Head Screw
M2 * 8
Flat Head Screw
M3*8
M.25 nut M4 nut
25g Servo
540 Motor
Headlight Battery Battery Charger
Dome Head
Screws M2.5*8
Transmitter
Z-GERC00060 Z-GERC00062 Z-GERC00063 Z-GERC00064
Z-GERC00081 Z-GERC00082
Z-GERC00083 Z-GERC00084
R-Clip Set
Arm Bracket Rear Arm Bracket Front
Drive Cups
Drive Shaft
Shaft Cup Reduction Pinion
Interior
Z-GERC00101 Z-GERC00102
Z-GERC00103 Z-GERC00104
O-GERC00121
Z-GERC00125
Z-GERC00129
P-GERC00126 Z-GERC00127 Z-GERC00128
Dome Head
Screws M2.3*8
Cup Spring
Grub screws M4 * 4

All Ripmax products are supplied with the legally prescribed 24 month warranty. If you want
to make a warranty claim please consult with your dealer directly as they are a great source of
knowledge and will be responsible for handling and dealing with Ripmax on your behalf. We
will work to correct any operating deficiencies in manufacturing or material defects that are not
related to over or incorrect use. Further claims such as consequent damage are not included in
the warranty.
You are responsible for the transportation of the product to an approved service centre. Prepaid
shipments will not be accepted. We cannot assume liability for damage in shipping or the loss
of your shipment. We therefore recommend an appropriate insurance.
To process your warranty claim please ensure the following:
• Please include a copy of your proof of purchase (receipt / invoice).
• You have used the product correctly in the non-commercial sector.
• You have only used the recommended power source and/or recommended accessories.
• The product is free of moisture damage, tampering, reversed polarity, overloads and
mechanical damage.
• Please include a note with a concise report of the fault or defect to help our customer service
team.
We have no control over the use of this product outside of the parameters of the instructions
regarding methods of assembly/installation, operation, misuse and poor maintenance of the
product or it’s components. Therefore, we assume no liability for any loss, damage or costs
arising from the improper use/operation. Ripmax shall not be liable for any loss, consequential
loss, damage or expense arising from the improper use or operation or in any way as permitted
by law. Ripmax are only liable to pay compensation, regardless of the legal reason, an amount
limited to the invoice value of product affected directly in the event of any damage occurred.
Made in China
Distributed to your local model shop by:
Ripmax Ltd., 241 Green Street, Enfield, EN3 7SJ. United Kingdom.
Warranty
Disclaimer
-
 1
1
-
 2
2
-
 3
3
-
 4
4
-
 5
5
-
 6
6
-
 7
7
-
 8
8
-
 9
9
-
 10
10
-
 11
11
-
 12
12


Ripmax C-RMX27315 User manual
- Category
- Remote controlled toys
- Type
- User manual
Ask a question and I''ll find the answer in the document
Finding information in a document is now easier with AI
Related papers
Other documents
-
Kyosho MZW404�@Carbon Rear Sus Plate User manual
-
Kmart 42475910 User manual
-
-
-
-
-
REDCAT BACKDRAFT 8E Owner's manual
-
 Jovial JRC30 Owner's manual
-
Losi LOS05016T1 Owner's manual
-
Extreme Networks DRIFT-2.4G User manual
