17
ENGLISHen
8Setting wheel for preselecting rotational speed
and tightening torque
9Battery pack *
10 Battery pack release button
11 Capacity indicator button *
12 Capacity and signal indicator *
13 Belt hook (attach as shown) *
* depending on the features / model
Remove the battery pack from the machine
before any adjustment or maintenance is
carried out. Before fitting the battery pack, make
sure that the machine is switched off.
6.1Battery pack
Charge the battery pack before use (9).
If performance diminishes, recharge the battery
pack.
Instructions on charging the battery pack can be
found in the operating instructions of the Metabo
charger.
"Li-Power, LiHD" li-ion battery packs have a
capacity and signal indicator: (12)
-Press the button (11), the LEDs indicate the
charge level.
-If one LED is flashing, the battery pack is almost
flat and must be recharged.
Removal:
Press the battery pack release (10) button and pull
the battery pack (9) forwards.
Inserting:
Slide in the battery pack (9) until it engages.
6.2Setting the direction of rotation, engag-
ing the transporting safety device
(switch-on lock)
Do not actuate the rotation selector switch or
engage the transportation lock (4) unless the
motor has stopped completely!
Actuate the rotation selector switch / Engage the
transportation lock (4)
R =Right rotation set
(insert screws)
L = Left rotation set
(remove screws)
0 =Central position: transportation lock setting
(switch-on lock)
6.3Switching on and off
Switching on: press the trigger switch (5).
Switching off: release the trigger switch (5).
6.4Speed / tightening torque
The speed and tightening torque are connected
directly. The lower the speed, the lower the
tightening torque.
The tightening torque is influenced in two ways:
1) Preselect operating mode/desired
tightening
torque at the setting wheel (7):
= max. tightening torque (power mode)
= adjustable tightening torque
= especially for self-cutting screws: at the
beginning high speed (for drilling) and later low
speed (for tightening the screw).
2) Stepless adjustment of the tightening torque:
The speed and tightening torque can be adjusted
steplessly in any position of the setting wheel by
pressing the trigger (5) firmly or lightly, thus
adapting to working conditions.
Recommendation: determine the correct setting
by carrying out trial screwdriving.
6.5
Changing screwdriving bit
for
SSD...
Inserting screwdriving bit: Slide locking sleeve
(3) forward and insert screwdriving bit as far as the
stop. Release locking sleeve (3).
Pull on the screwdriver bit to check that it is
correctly seated.
Removing screwdriving bit: Slide locking sleeve
(3) forward and remove screwdriving bit.
Only use screwdriving bits with such plug-in
ends:
The screwdriving bit used must match the
screw.
Damaged screwdriving bits must not be used.
6.6
Changing
SSW... screwdriving bits
Inserting screwdriving bit: Fit the tool on the
square attachment (1) until the limit stop.
Removing screwdriving bit: Pull the tool from the
square attachment (1).
The screwdriving bit used must match the
screw.
Damaged screwdriving bits must not be used.
Mount the machine on the screw, ensuring it is
aligned straight.
The screwdriving process has two elements:
inserting the screw and
tightening the screw with the percussion mech-
anism.
The tightening torque depends on the impact dura-
tion.
6. Initial Operation/Setting
7. Use
P
.
.
.
ENGLISH en
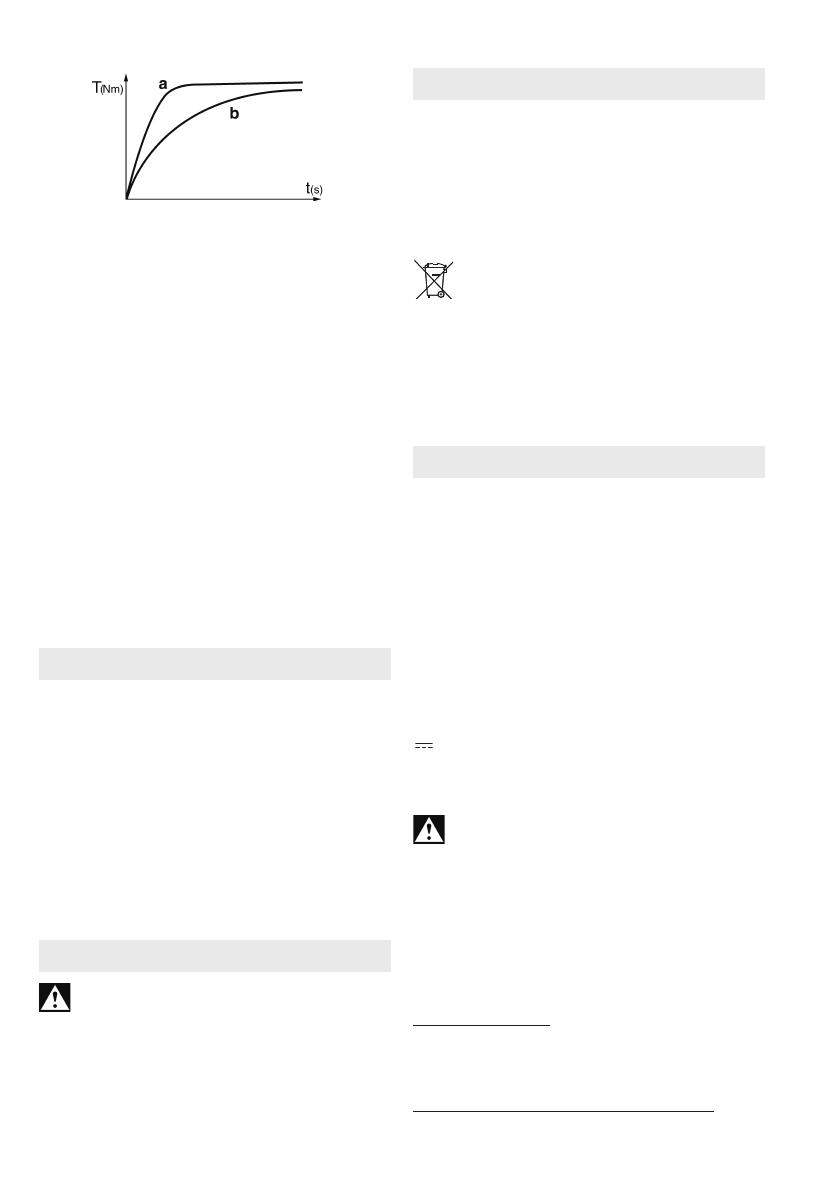
With an impact duration of approx. 5 seconds, the
maximum tightening torque has been reached.
The torque curve depends on the type of applica-
tion:
With a hard screwdriving application (screw-
couplings in hard material such as metal), maximum
tightening torque is already reached after a short
impact duration (a).
With a soft screwdriving application (screw-
couplings in soft material such as wood), a longer
impact duration (b) is required.
Recommendation: determine the correct impact
duration by carrying out trial screwdriving.
Caution! With small screws, maximum torque can
be reached even below an impact duration of 0.5
seconds.
-This is why the duration of the screwdriving
process must be monitored exactly.
-Set a suitable position on the setting wheel (7)
(see chapter 6.4).
-Adjust the tightening torque by pressing firmly or
lightly on the trigger (5), ensuring that the screw is
not damaged or that the screw head does not tear
off.
Only use original Metabo battery packs and Metabo
accessories.
Use only accessories that fulfil the requirements
and specifications listed in these operating instruc-
tions.
See page 4.
AChargers
BBattery packs with different capacity
Only use battery packs with the appropriate
voltage for your power tool.
CScrewdriving bits
For a complete range of accessories, see
www.metabo.com or the catalogue.
Repairs to electrical tools must be carried out
by qualified electricians ONLY!
If you have Metabo electrical tools that require
repairs, please contact your Metabo service centre.
For addresses see www.metabo.com.
You can download spare parts lists from
www.metabo.com.
Observe national regulations on environmentally
compatible disposal and on the recycling of disused
machines, packaging and accessories.
Battery packs must not be disposed of with regular
waste. Return faulty or used battery packs to your
Metabo dealer!
Do not allow battery packs to come into contact with
water!
Only for EU countries: Never dispose of
power tools in your household waste! In
accordance with European Guideline 2012/
19/EU on used electronic and electric equipment
and its implementation in national legal systems,
used power tools must be collected separately and
handed in for environmentally compatible recycling.
Before disposal, discharge the battery pack in the
power tool. Prevent the contacts from short-
circuiting (e. g. by protecting them with adhesive
tape).
Explanatory notes on the specifications on page 3.
Changes due to technological progress reserved.
U=Voltage of battery pack
n
0
=No-load speed
S=Impact frequency
H=Machine tool attachment
m=Weight (with smallest battery pack)
M
P
= max. tightening torque (power mode)
Measured values determined in conformity with
EN 62841.
Permitted ambient temperature during operation: -
20 °C bis 50 °C (limited performance with
temperatures below 0°C). Permitted ambient
temperature for storage: 0°C to 30 °C
Direct current
The technical specifications quoted are subject to
tolerances (in compliance with the relevant valid
standards).
Emission values
Using these values, you can estimate the
emissions from this power tool and compare these
with the values emitted by other power tools. The
actual values may be higher or lower, depending on
the particular application and the condition of the
tool or power tool. In estimating the values, you
should also include work breaks and periods of low
use. Based on the estimated emission values,
specify protective measures for the user - for
example, any organisational steps that must be put
in place.
Vibration total value
(vector sum of three directions)
determined in accordance with EN 62841:
a
h
=Vibration emission value(screwdriving with
impact)
K
h
= Uncertainty (vibration)
Typical A-effective perceived sound levels:
:
L
pA
=Sound pressure level
L
WA
=Acoustic power level
8. Accessories
9. Repairs
10. Environmental Protection
11. Technical specifications


