Page is loading ...

OWNER’S MANUAL
MANUAL DEL PROPIETARIO
GUIDE DU PROPRIÉTAIRE
Model/Modelo/Modèle: GI490KM
120V., 60 Hz., 1700 Watts
Electronic 1700 Watt Iron
Plancha Electrónica de 1700 Vatios
Fer Électronique de 1700 Watts
EURO-PRO Operating LLC
U.S.: 94 Main Mill Street, Door 16 Canada: 4400 Bois-Franc
Plattsburgh, NY 12901 St-Laurent, QC H4S 1A7
Tel. : 1 (800) 798-7398
www.euro-pro.com
Copyright © EURO-PRO OPERATING LLC 2007

DÉPANNAGE
PROBLÈME
CAUSE PROBABLE ET
SOLUTIONS POSSIBLES
Le fer ne chauffe pas
Une odeur et de
petites particules
s’échappent du
nouveau fer
Le fer n’émet
pas de vapeur
Des gouttelettes d’eau
s’échappent
des ouvertures de
vaporisation
• Le fer devrait être branché à une prise électrique
120 V CA seulement. Assurez-vous que la fiche est
bien insérée dans la prise.
• Température trop faible. Réglez à une température
plus élevée.
• Ceci est normal. Suivez les instructions de la
première utilisation et laissez la vapeur s’écouler pour
2 à 3 remplissages. Appuyez sur le bouton de jet de
vapeur occasionnellement afin d’éliminer les
particules blanches.
• Le réservoir est peut-être vide ou son niveau d’eau est
très bas. Ajoutez de l’eau.
• Assurez-vous que le réglage du tissu / température et
que le contrôle de vapeur sont corrects. Pour une
vapeur maximale (réglage « MAX » du contrôle de
vapeur), la température doit être réglée à •••.
• Le cadran de contrôle de vapeur variable est à « 0 ».
Laissez toujours le fer atteindre la température
sélectionnée avec réglage du cadran à « 0 ». Assurez-
vous que le réglage de température est dans la bonne
zone de vapeur •, et que le contrôle de vapeur n’est
pas
à « 0 ». Pour plus de vapeur, tournez le cadran de
température sir •••, et le contrôle de vapeur à « MAX ».
• Si les réglages de température et de contrôle de
vapeur sont corrects et qu’il n’y a pas de vapeur,
cognez doucement
la plaque du fer sur la planche à
repasser, à quelques reprises. Déplacez le contrôle de
« 0 » à « MAX » à quelques reprises.
• Le fer n’est peut-être pas assez chaud. Réglez le
thermostat à la position « MAX ». Laissez le temps au
fer de réchauffer avant d’activer le contrôle de vapeur
variable.
• Sur utilisation du jet de vapeur. Attendez davantage
entre chaque jet.
• Le fer est peut-être trop plein. Éteignez le fer, videz
l’eau et suivez les instructions de remplissage.
• La performance du vaporisateur peut être faible si le
fer nécessite un nettoyage. Pour nettoyer, utilisez de
l’eau du robinet dans 1 ou 2 réservoirs jusqu’à ce que
la performance s’améliore.
IMPORTANT SAFETY INSTRUCTIONS
1. Read all instructions carefully.
2. Use iron only for its intended use.
3. To protect against risk of electrical shock,
do not immerse the iron in water or other
liquids.
4. Never yank cord to disconnect from outlet.
Grasp plug and pull to disconnect.
5. Do not allow cord to touch hot surfaces.
Let iron cool completely before putting
away.
6. Always disconnect iron from electrical
outlet when filling with water, emptying, or
when not in use.
7. Do not operate iron with a damaged cord,
or after the iron has been dropped or
damaged in any manner. To avoid the risk
of electric shock, do not disassemble the
iron. Return the iron to the nearest service
facility for examination and repair.
Incorrect reassembly can cause the risk of
electric shock when the iron is used.
8. Close supervision is necessary for any
appliance being used by or near children.
Do not leave iron unattended while
connected or on an ironing board.
9. Burns can occur from touching hot metal
parts, hot water or steam. Use caution
when you turn a steam iron upside down;
there may be hot water in the reservoir.
10. Never use or rest iron on an unstable
surface.
11. While the iron is hot, never set iron on an
unprotected surface - even if it is on its
heel rest.
12. CAUTION! TO PREVENT ELECTRIC
SHOCK OR OTHER INJURY, before
filling the iron with water, make sure
that the plug is removed from the
outlet.
32
SAVE THESE INSTRUCTIONS
1
POLARIZED PLUG: This appliance has a polarized plug (one blade is wider than
the other). As a safety feature, this plug will fit into a polarized outlet only one way.
If the plug does not fit fully into the outlet, reverse the plug. If it still does not fit,
contact a qualified electrician. Do not attempt to defeat this safety feature.
13. WARNING: Never fill the iron with
fabric conditioner, starches or any
other solution, as these will damage
the steam mechanism. Do not use
contaminated water.
14. CAUTION! TO AVOID FIRE, never
leave iron unattended while it is
plugged in.
15. CAUTION! TO PREVENT ELECTRIC
SHOCK, never use the iron in a
location where it can fall or be pulled
into water or another liquid. If the iron
falls into water or other liquid, unplug
it immediately. DO NOT reach into the
water or liquid.
16. WARNING: Never use scouring pads,
abrasive or chemical cleaners, or
solvents to clean the exterior or
soleplate of your iron. Doing so will
scratch and/or damage the surface.
17. CAUTION! DO NOT aim iron at face,
towards yourself, or anyone else while
using or adjusting steam. Burns or
serious injury may occur.
18. Always store your iron standing upright,
not on the soleplate. If stored face down,
even the smallest amount of moisture will
cause the soleplate to corrode and stain.
19. This appliance is for household use
only.
SPECIAL INSTRUCTIONS
1. To avoid a circuit overload, do not
operate another high-wattage appliance
on the same circuit.
2. If an extension cord is absolutely
necessary, use a 15-ampere cord. Cords
rated for less amperage may overheat.
Use care to arrange the cord so that it
cannot be pulled or tripped over.
When using your iron, basic safety precautions should always be followed, including the following:
For Household Use Only
Rev. 08/07

12
11
13
14
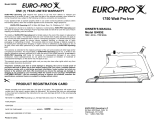
Display Panel
GETTING TO KNOW YOUR ELECTRONIC IRON
Before using your Electronic Iron,
remove any labels, stickers or tags that
may be attached to the body or
soleplate of the iron.
When turned on for the first time, your
new iron may emit an odor for up to 10
minutes. This is due to the initial
heating of the materials used in making
the iron.
The odor is safe and should not reoccur
after initial heating.
Also, before ironing with steam for the
first time, allow iron to heat, hold in a
horizontal position and hit the burst of
steam button several times. The iron
may emit some small particles from the
steam holes. This is normal and will
clear after pressing the burst of steam
button several times.
1. Electronic Temperature Control
2. Display Panel
3. Atomizer Spray Button
4. Burst of Steam/X-Tended
Steam Burst
TM
Button
5. Variable Steam Control
6. Water Inlet Door
7. Spray Nozzle
8. Water Level Window
9. Stainless Steel Soleplate
10. Handle
11. Auto-Off Light
12. Power Light
13. Fabric & Steam Settings
14. Temperature Indicators
15. Water Flask
2
Technical Specifications
Voltage: 120V., 60Hz.
Power: 1700 Watts
31
CHARTE DE REPASSAGE
REMARQUE: Consultez toujours l’étiquette d’entretien du vêtement pour les
instructions de repassage. Avant le repassage de tissus délicats, faites un essai de la
température du fer sur un ourlet ou une couture interne.
INSTRUCTIONS
DE
L’ÉTIQUETTE
TISSU
PANNEAU
D’AFFICHAGE
À DEL
COMMAND
DE
VAPEUR
JET DE
VAPEUR
VAPORISATEUR
V
e
u
i
l
l
e
z
p
r
e
n
d
r
e
n
o
t
e
q
u
e
s
u
r
l
’
é
t
i
q
u
e
t
t
e
s
i
g
n
i
f
i
e
«
C
E
T
A
R
T
I
C
L
E
N
E
P
E
U
T
Ê
T
R
E
R
E
P
A
S
S
É
!
»
COTON
LIN
FIBRES
SYNTHÉTI-
QUES, ex. :
acrylique,
nylon,
polyester
SOIE
LAINE
MIN
•
•• •• •
MAX
0
VAPEUR
MAXIMALE
0
Illustrations may differ slightly from actual product.

CONSIGNES D’UTILISATION
REMARQUE: La fonction anti-goutte
réduit l’égouttage de l’eau et les taches
d’eau. Elle ne prévient pas l’égouttage
et les taches d’eau si vous appuyez sur
le bouton de jet d’eau trop souvent, ou
si la température est trop faible. La
quantité de gouttelettes d’eau diminuera
éventuellement après avoir vidé 2 ou 3
réservoirs durant la vaporisation et le
repassage.
30
RANGEMENT
1. Tournez toujours le cadran de
contrôle de vapeur variable à « 0 »
après avoir vidé le réservoir.
2. Laissez le fer refroidir.
3. Rangez toujours le fer en position
debout afin de protéger la plaque.
4. Nettoyez régulièrement la surface
externe du fer à l’aide d’un linge
humide et essuyez-la.
5. Si vous utilisez de l’amidon à
vapeur, essuyez la plaque avec un
tissu doux et humide afin d’éviter
l’accumulation de dépôts.
6. Si le fer n’a pas été utilisé pendant
quelques semaines, tenez-le à
l’horizontale et laissez la vapeur
s’écouler pendant 2 minutes avant le
repassage.
FEATURES OF YOUR ELECTRONIC IRON
1 2
3
LED Display Panel
6. LED DISPLAY PANEL
Displays the fabric setting
(left) and the temperature
indicators (right).
1. BURST OF STEAM/X-TENDED
STEAM BURST
TM
BUTTON
Turn the button all the way to the left
for quick bursts of steam to aid in
removing stubborn wrinkles from
fabrics such as denim, cotton or
linen.
Turn the button all the way to right to
get prolonged bursts of steam. The
iron in the X-Tended steam position
can be used vertically as well as
horizontally.
2. ATOMIZER SPRAY
BUTTON
Pressing this button provides a
defined jet of spray which gently
moistens fabric.
7. WATER FILLING INLET
The cover prevents dust and
foreign matter from entering
the water tank. It also stops
any water from spilling during
ironing.
3. VARIABLE STEAM
CONTROL
Minimum to maximum steaming for
different materials. Self cleaning
feature flushes internal sole plate
with water.
9. STAINLESS STEEL
SOLEPLATE
Provides maximum glide-
ability and heat retention.
3
4
4. ELECTRONIC
TEMPERATURE CONTROL
Select the fabric setting and
temperature indicator by
pressing on this button.
8. BUILT-IN ANTI-CALCIUM
FILTER
Prevents calcium build-up
and prolongs the life of the
iron.
5. Anti-Drip Function
Cuts off water when the
iron temperature is too
low.
10. PIVOT CORD
For left or right handed use.
Pivots up and down;
prevents dragging along the
fabric. The flexible cord
protector protects the cord
from fraying.

OPERATING INSTRUCTIONS
NOTE: Because of the soleplate
design, ordinary tap water may be used
with this iron. However, in very hard
water areas, we recommend using
distilled or demineralized water.
WARNING: Never fill the iron with
fabric conditioner, starches or any
other liquid, as these will damage the
steam mechanism. Do not use
contaminated water.
1. Open the water filling inlet cover.
Holding the iron at a slight angle,
pour water slowly into the water
filling inlet. See Figure 1. Fill tank to
desired level or to the “MAX” water
level marking using the water filling
flask. (When the iron is upright, the
see-through water tank allows you to
gauge the amount of water.) DO
NOT overfill the tank. When finished
filling the iron with water, close the
water inlet cover before continuing.
DRY IRONING
For dry ironing, turn the variable steam
control dial all the way to the right to “0”.
This will cut off the steam flow if water is
in the water tank. All marked fabric
settings on the LED Display Panel can
be used for dry ironing.
4
This appliance is for HOUSEHOLD USE
ONLY and may be plugged into any
120V AC polarized electrical outlet. Do
not use any other type of outlet.
1. Plug the cord into a polarized, 120V
AC electrical outlet. The power “ON”
light will come on, indicating that the
iron is receiving power.
2. Press on the electronic temperature
control button to select the desired
fabric/temperature setting. Turn the
variable steam control dial to “0”.
(See “Ironing Guide” for a guide to
temperature selection.)
3. Place iron on its heel (on a stable,
protected surface) while iron is
warming to desired temperature.
STEAM IRONING
CAUTION!
DO NOT aim iron at face,
towards yourself, or anyone else
while using or adjusting steam.
Burns or serious injury may occur.
2. Plug the cord into a polarized, 120V
AC electrical outlet.
3. Press on the electronic temperature
control button to select the desired
fabric and temperature setting. Turn
the variable steam control dial to
the desired steam setting. (See
“Ironing Guide” for a guide to
temperature selection.)
Fig. 1
WARNING! Before filling the iron
with water, be sure the iron is not
plugged into the electrical outlet. The
iron may be filled with water while it
is hot.
CAUTION! TO PREVENT THE RISK
OF BURNS, use caution when filling
iron with water. Burns can occur
from touching hot metal parts, hot
water, or steam.
FABRIC & TEMPERATURE
INDICATORS
Press on the Electronic Temperature
Control to select the desired fabric
setting. The red lights at the left of the
LED Display Panel will light up.
At the same time, the temperature
indicator lights on the right side of the
LED Display Panel will start to flash.
They will stop flashing when the iron
reaches the selected temperature.
CONSIGNES D’UTILISATION
1. Videz le fer après chaque utilisation.
2. Lorsque vous en avez fini avec le
fer, tournez le cadran de contrôle de
vapeur variable à « 0 » et appuyez
sur le bouton de contrôle
électronique de la température
jusqu’à ce que le témoin
d’alimentation s’illumine.
3. Débranchez le fer de la prise
électrique.
4. Tournez le fer à l’envers au-dessus
de l’évier, la pointe vers le bas, et
laissez l’eau s’écouler de l’ouverture.
5. Placez le fer debout et laissez-le
refroidir avant de le ranger.
MISE EN GARDE! Soyez prudent
lorsque vous videz le fer. Toucher
les pièces métalliques, l’eau ou la
vapeur chaudes peut entraîner des
blessures.
ARRÊT AUTOMATIQUE
ÉLECTRONIQUE
Le fer électronique intelligent est doté
d’un arrêt automatique électronique. L’arrêt
automatique électronique éteint le fer s’il
est immobile, peu importe sa position (de
côté, à plat ou debout), pendant environ 7
à 9 minutes. Un témoin rouge sur le
panneau d’affichage à DEL clignote
lorsque le fer s’éteint. (Fig. 7) Pour
rallumer le fer, déplacez-le latéralement à
quelques reprises.
AUTO-NETTOYAGE
Il est important d’« auto-nettoyer » le fer
à toutes les deux semaines afin
d’éliminer la calamine, le calcium, etc.
Le plus dure est l’eau, le plus fréquent
sera l’auto-nettoyage.
1. Réglez le cadran de contrôle de
vapeur variable au besoin.
2. Remplissez le réservoir au niveau
«MAX».
3. Mettez le fer debout sur son pied.
Branchez le fer dans la prise
électrique.
4. Appuyez sur la commande
électronique de température jusqu’à
ce que le réglage de température
« MAX » s’affiche sur le panneau
d’affichage et laissez-le fer se
réchauffer, jusqu’à ce que les témoins
cessent de clignoter.
5. Tournez cadran de vapeur variable
entièrement à droite à la position
d’auto-nettoyage et tenez le fer à
l’horizontale au-dessus de l’évier.
(Fig. 8)
6. L’eau bouillante et la vapeur seront
éjectées des ouvertures de la plaque.
Les impuretés et le tartre sont
éliminés.
7. Déplacez le fer vers d’avant en arrière
pendant le rejet.
8. S’il reste de l’eau dans le réservoir
quand la vapeur s’arrête, videz l’eau
dans l’évier selon les instructions de
vidage du fer.
9. Tournez le cadran de contrôle de
vapeur variable à la position « 0 »
lorsque le réservoir est vide.
10.Mettez le fer debout sur son pied afin
qu’il refroidisse avant de le ranger.
VIDAGE DU FER
29
Fig. 8
Fig. 7
Clignotement

CONSIGNES D’UTILISATION
SÉLECTION DE TEMPÉRATURE DE
REPASSAGE
Lisez toujours les étiquettes des
vêtements et suivez les instructions de
repassage du fabricant. Consultez la
« Charte de repassage » à la page 31
pour les recommandations de
température :
• Utilisez les basses températures
pour le nylon et autres tissus
synthétiques.
•• Utilisez les températures moyennes
pour la laine, la soie et les tissus
mélangés.
••• Utilisez les hautes températures
pour le coton et le lin.
1. Mettez le fer debout sur son pied.
2. Branchez le cordon dans la prise
électrique polarisée de 120 V CA.
3. Appuyez sur la commande
électronique de température afin de
sélectionner le tissu et température.
4. Le témoin à droite du panneau
d’affichage à DEL cesse de clignoter
lorsque la température désirée est
atteinte. (Fig. 6)
TRUCS DE REPASSAGE
AVERTISSEMENT!
Afin d’éviter les
incendies, ne laissez pas le fer sans
surveillance s’il est branché.
• Triez les pièces à repasser selon le
type de tissu. Ceci réduira les
réglages de température à chaque
changement de vêtement.
• Si vous n’êtes pas certain du tissu,
vérifiez-le en repassant une petite
zone, telle qu’une couture ou un
ourlet intérieur, avant de repasser
les parties visibles. Commencez à
basse température et augmentez
graduellement jusqu’au meilleur
réglage.
• Lorsque vous réduisez la
température sur les tissus délicats,
laissez le fer refroidir environ 2
minutes.
• Apposez un linge à repasser sur les
tissus tels que le velours, la laine, le
lin et la soie afin d’éviter de marquer
les tissus.
Fig. 5
28
BEC VAPORISATEUR
Le bec vaporisateur est pratique sur les
tissus présentant des plis tenaces.
Appuyez sur le bouton vaporisateur et
un jet d’eau asperge le tissu repassé.
(Fig. 5) La fonction de jet d’eau peut
être utilisée en mode de repassage sec
ou à vapeur, au besoin.
Fig. 6
5
OPERATING INSTRUCTIONS
4. Place the iron on its heel on a stable,
protected surface and allow the iron
to heat for approximately two (2)
minutes or until the temperature
settings on the right side of the LED
display panel have stopped flashing.
5. Turn the variable steam control dial
to the right to increase the amount of
steam. When using extra steam, the
iron uses more water and it may be
necessary to fill the water tank more
often. (Fig. 2)
BURST OF STEAM/X-TENDED
STEAM BURST
TM
BUTTON
Fig. 3
NOTE: If the tank runs dry, remove the
plug from wall outlet. Then, fill the iron
with water and re-prime the pump. The
iron may be filled with water while it is
hot.
To use the X-Tended Steam Burst
TM
feature:
1. Set the variable steam control dial
to the desired steam setting.
2. Press the electronic temperature
control button until you get to the
desired fabric setting.
3. Turn the steam button all the way to
the right to the X-Tended steam
position. (Fig. 4)
4. To maintain a constant flow of
steam, make sure that the water
tank is at least half full.
Fig. 2
Fig. 4
CAUTION! DO NOT aim iron at face,
towards yourself, or anyone else
while using or adjusting steam.
Burns or serious injury may occur.
The burst of steam position is useful
when ironing denim, cotton, and linens.
It provides quick bursts of steam which
aid in removing stubborn wrinkles.
The burst of steam feature can be used
with Dry or Steam ironing as desired.
1. Make sure the water tank is at least
1/2 filled with water.
2. Select the desired fabric and
temperature setting. Place the iron
on its heel (on a stable, protected
surface) and allow it to heat for
approximately 2 minutes.
3. Turn the steam button all the way to
the left to the burst of steam
position. (Fig. 3)
4. With the iron in a horizontal position,
press the steam button several times
to prime the pump.
Réglages
de
température

OPERATING INSTRUCTIONS
SELECTING IRON TEMPERATURES
Always read garment labels and follow
the manufacturer’s ironing instructions.
Refer to the “Ironing Chart” on page 9
for temperature recommendations:
• Use low settings for nylon and other
synthetics.
•• Use moderate settings for wool,
silks, and blends.
••• Use high settings for cottons and
linens.
1. Stand the iron upright on its heel.
2. Plug the cord into a polarized, 120V
AC electrical outlet.
3. Press the electronic temperature
control until you get the desired
fabric/temperature setting.
4. The light on the right side of the LED
display panel will stop flashing when
the desired temperature has been
reached. (Fig. 6)
IRONING HINTS
WARNING!
To prevent fire, do not
leave iron unattended while
connected.
• Sort articles to be ironed according
to the type of fabric. This will reduce
the need to adjust the temperature
for different types of garments.
• If you are not sure of the fiber
content of a garment, test fabric by
ironing a small area such as a seam
or inside hem section before ironing
a visible area. Start with a low
temperature setting and gradually
increase to find the best setting.
• When reducing the temperature to
iron sensitive fabrics, allow
approximately 2 minutes for the iron
to cool to the new temperature
setting.
• Fabrics such as velour, wool, linen
and silk are best ironed with an
ironing cloth to prevent shine marks.
Fig. 5
6
ATOMIZER SPRAY NOZZLE
The atomizer spray nozzle is useful on
fabrics with stubborn wrinkles. Press the
spray button and a jet of water will spray
onto the fabric being ironed. (Fig. 5) The
water spray can be used with dry or
steam ironing as desired.
Fig. 6
Temp.
settings
27
CONSIGNES D’UTILISATION
4. Placez le fer sur son pied sur une
surface stable et protégée et laissez-le
chauffer durant environ deux (2)
minutes, ou jusqu’à ce que les témoins
de température à droite du panneau
d’affichage à DEL cessent de
clignoter.
5. Tournez le cadran de contrôle de
vapeur variable à la droite afin
d’augmenter la quantité de vapeur. Le
fer utilise plus d’eau lorsque vous
utilisez plus de vapeur. Il pourra être
nécessaire de remplir le réservoir plus
souvent. (Fig. 2)
BOUFFEE DE VAPEUR « X-TENDED
STEAM BURST
MC
»
Fig. 3
3. Tournez bouton de vapeur
entièrement à gauche à la position
de jet de vapeur. (Fig. 3)
4. Le fer à l’horizontale, appuyez sur le
bouton de vapeur à quelques
reprises afin de comprimer la
pompe.
REMARQUE: Si le réservoir se vide,
retirez la fiche de la prise murale.
Remplissez le fer d’eau et re-
compressez la pompe. Le fer peut être
rempli d’eau pendant qu’il est chaud.
Afin d’utiliser la fonction « X-Tended
Steam Burst
MC
:
1. Réglez le cadran de contrôle de
vapeur variable au besoin.
2. Appuyez sur la commande
électronique de température
jusqu’aux bons tissu et température.
3. Tournez bouton de vapeur
entièrement à droite à la position de
« X-Tended Steam Burst
MC
».
(Fig. 4)
4. Assurez-vous que le réservoir est à
moitié plein afin d’assurer un jet de
vapeur constant.
Fig. 2
Fig. 4
MISE EN GARDE! NE DIRIGEZ PAS
LE FER vers un visage, vers vous, ou
vers quelqu’un lors que vous utilisez
ou réglez la vapeur. Vous pourriez ainsi
causer de graves brûlures ou
blessures.
La position de jet de vapeur est pratique
pour le repassage du denim, du coton et
du lin. Ses jets de vapeur rapides aident à
éliminer les plis tenaces.
La fonction de jet de vapeur peut être
utilisée en mode de repassage sec ou à
vapeur, au besoin.
1. Assurez-vous que le réservoir d’eau
est à moitié plein.
2. Sélectionnez la température et le tissu
désirés. Placez le fer sur son pied sur
une surface stable et protégée et
laissez-le chauffer environ 2 minutes.

CONSIGNES D’UTILISATION
REMARQUE: La conception de la
plaque de ce fer permet d’utiliser de
l’eau du robinet. Cependant, dans les
zones d’eau très dure, l’utilisation d’eau
distillée ou déminéralisée est
recommandée.
AVERTISSEMENT: Ne remplissez
jamais le fer de revitalisant à tissu,
de fécule ou autre solution qui
pourraient endommager le
mécanisme de vapeur. N’utilisez pas
d’eau contaminée.
1. Ouvrez le couvercle de l’entrée
d’eau. Tenez le fer à un angle léger,
versez l’eau doucement dans
l’entrée d’eau. Consultez la Figure 1.
Remplissez le réservoir au niveau
désiré ou au niveau « MAX » à l’aide
du godet de remplissage (lorsque le
fer est debout, le réservoir
transparent vous permet d’évaluer la
quantité d’eau). NE FAITES PAS
DÉBORDER le réservoir. Lorsque le
fer est rempli, refermez le couvercle.
REPASSAGE À SEC
Pour le repassage à sec, tournez le cadran
de contrôle de vapeur entièrement à droite, à
« 0 ». Ceci bloque le débit de vapeur, même
s’il y a de l’eau dans le réservoir. Tous les
réglages de tissu identifiés sur le panneau
d’affichage à DEL peuvent être utilisés pour
le repassage à sec.
1. Branchez le cordon dans la prise
électrique polarisée de 120 V CA. Le
témoin « ON » s’illumine, indiquant que le
fer est alimenté.
2. Appuyez sur la commande électronique
de température afin de sélectionner le
tissu et température. Tournez le cadran
de contrôle de vapeur variable à « 0 »
(consultez le « Guide de repassage »
pour la sélection de température).
3. Placez le fer sur son pied (sur une
surface stable et protégée) pendant qu’il
réchauffe.
REPASSAGE À VAPEUR
MISE EN GARDE!
NE DIRIGEZ PAS LE
FER vers un visage, vers vous, ou vers
quelqu’un lors que vous utilisez ou réglez
la vapeur. Vous pourriez ainsi causer de
graves brûlures ou blessures.
2. Branchez le cordon dans la prise
électrique polarisée de 120 V CA.
3. Appuyez sur la commande
électronique de température afin de
sélectionner le tissu et température.
Tournez le cadran de contrôle de
vapeur variable au réglage désiré
(consultez le « Guide de
repassage » pour la sélection de
température).
Fig. 1
AVERTISSEMENT ! Avant de remplir le
fer d’eau, assurez-vous qu’il n’est pas
branché à la prise électrique. Le fer peut
être rempli d’eau pendant qu’il est chaud.
MISE EN GARDE! AFIN D’ÉVITER LES
BRÛLURES, soyez prudent lorsque vous
remplissez le fer d’eau. Toucher les
pièces métalliques, l’eau ou la vapeur
chaudes peut entraîner des blessures.
26
Cet appareil est à USAGE DOMESTIQUE
SEULEMENT et peut être branché à une
prise polarisée de 120 V CA. N’utilisez
aucun autre type de prise.
TÉMOINS DE TISSUS ET DE
TEMPÉRATURE
Appuyez sur la commande électronique de
température afin de sélectionner le tissu.
Les lumières rouges à la gauche du
panneau d’affichage à DEL s’illuminent.
Au même moment, les témoins de
température sur la droite du panneau
d’affichage à DEL clignotent. Ils cessent de
clignoter lorsque le fer atteint la
température sélectionnée.
OPERATING INSTRUCTIONS
EMPTYING THE IRON
1. Always empty iron after each use.
2. When finished using the iron, turn
the variable steam control dial to
“0” and press the electronic
temperature control button until the
power light is lit.
3. Unplug the iron from the electrical
outlet.
4. Turn the iron upside down over the
sink with the tip pointing downward
and allow the water to flow from the
opening.
5. Place iron upright and allow to cool
before storing.
CAUTION! Use caution when
emptying the iron. Burns may occur
from touching hot metal surfaces,
hot water or steam.
ELECTRONIC AUTO-OFF
The ELECTRONIC Iron is equipped with
an electronic auto-off. The electronic
auto-off switches the iron off if it has been
left standing unmoved in any position
(sideways, flat or upright) for
approximately 7-9 minutes. A red light on
the LED display panel will flash when the
iron switches itself off. (Fig. 7) To switch
the iron back on, just shake the iron side-
to-side several times.
7
SELF CLEANING
It is important to “Self Clean” the iron at
least every two weeks to remove scale,
calcium, etc. The harder the water, the
more often the iron should be self
cleaned.
1. Set the variable steam control dial
to any steam position.
2. Fill the water tank up to the “MAX”
level.
3. Stand the iron on its heel. Plug the
iron into the electrical outlet.
4. Press the electronic temperature
control button until you get the
“MAX” temperature setting on the
display panel and wait until the iron
heats up and temperature setting
light stops flashing.
5. Turn the variable steam control dial
all the way to the right to the self-
cleaning position and hold the iron
horizontally over the sink. (Fig. 8)
6. Boiling water and steam will now be
ejected from the holes in the
soleplate. The impurities and scale
are washed away with it.
7. Move the iron back and forth as this
happens.
8. If there is any water left in the water
tank after the iron stops steaming,
just empty the remaining water in a
sink following the instructions for
emptying the iron.
9. Turn the variable steam control dial to
the “0” position when the water tank
is empty.
10.Place the iron back upright on its
heel to cool down before storing.
Fig. 8
Fig. 7
Flash

OPERATING INSTRUCTIONS
STORAGE
1. Always turn the variable steam
control to “0” after you have emptied
the water tank.
2. Allow the iron to cool down.
3. Always store the iron in the upright
position to protect the soleplate.
4. From time to time, clean the exterior
of the iron with a damp cloth and
wipe dry.
5. If you use spray starch, wipe the
soleplate occasionally with a soft
damp cloth to prevent the build-up of
deposits.
6. If the iron has not been used for a
few weeks, hold the iron horizontally
and allow to steam for 2 minutes
before ironing.
NOTE: The anti drip function reduces
water dripping and water stains. It does
not prevent water dripping and water
stains if you press the steam burst
button too often or if the temperature is
too low. The amount of water droplets
will eventually decrease after the iron is
used for 2 to 3 tankfuls of steaming and
ironing.
8
FONCTIONS DU FER ÉLECTRONIQUE INTELLIGENT
1 2
3
Panneau d’affichage à DEL
2. BOUTON VAPORISATEUR
Ce bouton permet d’obtenir un jet
de vapeur doux qui humidifie le
tissu.
3. COMMANDE DE VAPEUR
VARIABLE
Vaporisation minimale à maximale
pour différents tissus. La fonction
auto-nettoyante remplit la plaque
interne d’eau.
6. PANNEAU D’AFFICHAGE À
DEL
Affiche le réglage de tissu (gauche) et
les témoins de température (droite).
7. PORTIÈRE DE L’ENTRÉE
D’EAU
Le couvercle empêche la poussière et
les corps étrangers de pénétrer le
réservoir d’eau. Il permet aussi
d’éviter que l’eau ne s’échappe
durant le repassage.
9. PLAQUE D’ACIER
INOXYDABLE
Offre une glisse et une rétention de la
chaleur maximales.
25
4
4. CONTRÔLE
ÉLECTRONIQUE DE LA
TEMPÉRATURE
Sélectionnez le tissu et le témoin
de température en appuyant sur
ce bouton.
5. FONCTION ANTI-GOUTTE
Arrête le débit d’eau lorsque la
température du fer est trop
faible.
1. BOUFFEE DE VAPEUR
« X-TENDED STEAM BURST
MC
»
Tournez le bouton entièrement à
gauche afin d’éliminer les plis tenaces
du denim, du coton ou du lin à l’aide
de jets de vapeur rapide.
Tournez le bouton entièrement à
droite pour obtenir des jets de vapeur
prolongés. La position de vapeur
étendue du fer peut être utilisée
verticalement ou horizontalement.
8. FILTRE ANTI-CALCIUM
INTÉGRÉ
Prévient l’accumulation de calcium et
prolonge la durée de vie du fer.
10. CORDON PIVOTANT
Pour gaucher ou droitier. Pivote
verticalement; empêche de traîner le
tissu. Le protecteur de cordon
flexible empêche le cordon de
s’emmêler.

TROUBLESHOOTING
PROBLEM POSSIBLE REASONS & SOLUTIONS
Iron does not heat
Some odor or small
particles come out of
steam vents of new
iron
Iron does not steam
Water droplets coming
from steam vents
• Iron should be plugged into a 120V AC electrical
outlet only.
Make sure that the plug is securely in the socket.
• Temperature setting too low.
Turn to higher setting.
• This is normal.
Follow instructions for first use and allow iron to steam
through 2-3 fillings & press the steam burst button
occasionally to eliminate small white particles.
• Water tank may be empty or water level is very low.
Add water.
• Make sure that the fabric/temperature setting and
the variable steam control are correctly set. For
maximum steam, (setting ‘Max’ on steam control),
temperature setting should be set on ‘•••’.
• Variable steam control dial is set on “0”.
Always allow the iron to reach the selected
temperature with the variable steam control setting
at ‘0’. Make sure the temperature setting is set in
the correct steam area, e.g. ‘•’, and the steam control is
not
on ‘0’. For more steam, turn temperature dial to
higher setting, e.g. ‘•••’, and the steam control to ‘Max’.
• If temperature setting and steam control setting are
correct and there is no steam, gently
tap the
soleplate on the ironing board a few times. Move
the variable steam control from ‘0’ to ‘Max’ a few
times.
• Iron may not be hot enough. Set thermostat to the
‘Max’ position. Always allow iron sufficient time to
heat up before activating the variable steam control.
• Overuse of steam burst. Allow more time between
each burst.
• Iron may have been overfilled. Turn iron off,empty
water and follow instructions for filling.
• Steam performance may be low if iron requires
seasoning. To season, use regular tap water for 1or 2
tanks until steam performance improves.
10
CONSIGNES DE SÉCURITÉ IMPORTANTES
1. Lisez attentivement toutes les instructions.
2. N’utilisez l’appareil qu’aux fins pour lesquelles
il est conçu.
3. Pour éviter le risque de choc électrique, évitez
d’immerger le fer dans l’eau ou autres liquides.
4. Ne tirez jamais sur le cordon pour débrancher.
Agrippez la fiche et tirez-la pour débrancher.
5. Évitez que le cordon touche des surfaces
chaudes. Laissez le fer refroidir complètement
avent de le ranger.
6. Débranchez toujours le fer de la prise
électrique avant de le remplir d’eau, de le
vider, ou lorsqu’il n’est pas utilisé.
7. N’utilisez pas le fer si sa fiche ou son cordon
sont endommagés, ou s’il a été échappé ou
endommagé. Pour éviter tout risque de choc
électrique, ne démontez pas le fer. Retournez
le fer au centre de service le plus près pour
tout examen ou réparation. Un mauvais
assemblage augmente le risque de chocs
électriques lors de l’utilisation du fer.
8. Une surveillance étroite est nécessaire lors de
l’usage de tout appareil par des enfants ou à
proximité. Évitez de laisser l’appareil sans
surveillance s’il est branché ou sur la planche à
repasser.
9. Toucher les pièces métalliques, l’eau ou la
vapeur chaudes peut entraîner des blessures.
Soyez prudent en retournant le fer à l’envers;
de l’eau chaude pourrait se trouver dans le
réservoir.
10. N’utilisez pas et ne laissez pas le fer sur une
surface instable.
11. Ne déposez jamais le fer sur une surface non
protégée lorsqu’il est chaud, même s’il repose
sur son pied.
12. MISE EN GARDE! AFIN D’ÉVITER LES
CHOCS ÉLECTRIQUES ET LES
BLESSURES, assurez-vous que le
fer est débranché avant de le remplir
d’eau.
INSTRUCTIONS PARTICULIÈRES
1. Afin d’éviter une surcharge électrique,
n’utilisez pas un autre appareil à haute
puissance sur le même circuit électrique.
2. Si vous devez absolument utiliser une
rallonge, utilisez un cordon de 15 ampères.
Les rallonges de calibre moindre pourraient
surchauffer. Disposez les rallonges de façon
à ce que personne ne puisse les tirer ou y
trébucher.
CONSERVEZ CES INSTRUCTIONS
23
FICHE POLARISÉE: Cet appareil est doté d’un cordon à fiche polarisée (une lame
est plus large que l’autre). Par sécurité, cette fiche ne s’insère que dans un seul sens
dans une prise polarisée. Si la fiche ne s’insère pas dans la prise, retournez la fiche.
Si elle ne s’adapte toujours pas, contactez un électricien qualifié. Ne contournez pas
cette mesure de sécurité.
Pour usage domestique seulement
V. 08/07
13. AVERTISSEMENT : Ne remplissez
jamais le fer de revitalisant à tissu,
d’amidon ou autre solution qui
pourraient endommager le mécanisme
de vapeur. N’utilisez pas d’eau
contaminée.
14. MISE EN GARDE! AFIN D’ÉVITER UN
INCENDIE, ne laissez jamais le fer sans
surveillance lorsque branché.
15. MISE EN GARDE! AFIN D’ÉVITER LES
CHOCS ÉLECTRIQUES, n’utilisez jamais
le fer dans un endroit d’où il pourrait
tomber à l’eau ou autre liquide. Si le fer
tombe à l’eau ou autre liquide,
débranchez-le immédiatement. NE
PLONGEZ PAS LA MAIN dans l’eau ou
l’autre liquide.
16. AVERTISSEMENT: N’utilisez jamais de
tampon à récurer, de nettoyant abrasif
ou chimique ou de solvants pour
nettoyer l’extérieur ou la plaque de votre
fer. Vous risqueriez d’égratigner ou
d’endommager la surface.
17. MISE EN GARDE! NE DIRIGEZ PAS LE
FER vers un visage, vers vous, ou vers
quelqu’un lors que vous utilisez ou
réglez la vapeur. Vous pourriez ainsi
causer de graves brûlures ou blessures.
18. Rangez toujours votre fer debout et non pas
sur sa plaque. Si le fer est rangé face vers
le bas, la plus petite quantité de moisissure
pourrait rouiller et tacher la plaque.
19. Cet appareil est conçu pour un usage
domestique seulement.
Certaines consignes de sécurité de base doivent toujours être respectées lors de l’utilisation de
votre fer électrique, incluant :

Por favor llene esta tarjeta y remítala dentro de los diez (10) días de compra. El registro nos
permitirá contactarlo en el poco probable caso de tener que enviarle una notificación de
seguridad. Al enviar esta tarjeta, usted está aceptando haber leído y entendido las instrucciones
para el uso y las advertencias en el instructivo que se acompaña.
EN Canadá: EURO-PRO Operating LLC, 4400 Bois Franc, St. Laurent, QC, H4S 1A7
COMPRADOR: ………………………………………………………………………………………….……
DIRECCIÓN: ………………………………………………………………………………………………….
FECHA DE COMPRA: …………………….. MODELO: ………………. No. de SERIE: .………….….
NOMBRE Y DIRECCIÓN DE LA TIENDA: ………………………………………………………………..
UN (1) AÑO DE GARANTÍA LIMITADA
EURO-PRO Operating LLC garantiza que este artefacto no presentará defectos de materiales ni
de fabricación por un (1) año a partir de su fecha original de compra cuando se le da uso
doméstico normal, sujeto a las siguientes condiciones, exclusiones y excepciones.
Si este artefacto dejase de funcionar apropiadamente mientras se encuentre en uso normal
doméstico dentro del periodo de la garantía, devolverlo completo con sus accesorios y con flete
prepagado a:
En EE.UU: EURO-PRO Operating LLC, 94 Main Mill Street, Door 16, Plattsburgh NY 12901
En Canadá: EURO-PRO Operating LLC, 4400 Bois Franc, St. Laurent, QC, H4S 1A7
Si EURO-PRO Operating LLC le encontrase algún defecto de material o de fabricación, lo
reparará o reemplazará sin cargo. El cliente debe incluir el documento que pruebe la fecha de
compra y un cheque por $9.95 para cubrir el costo de manipuleo, reembalaje y flete de retorno al
cliente*.
La responsabilidad de EURO-PRO Operating LLC se limita únicamente al costo de la reparación
o reemplazo del artefacto a criterio de EURO-PRO Operating LLC. Esta garantía no cubre las
piezas sujetas a desgaste por el uso normal y no se aplica a artefacto alguno que haya sido
alterado, intervenido físicamente o usado comercialmente. Tampoco cubre daños causados por
maltrato, mal uso, manipulación negligente, o daños por empaquetamiento defectuoso o
manipulación en tránsito; ni cubre daños o defectos causados por o resultantes del transporte o
reparaciones, servicios o alteraciones del artefacto o de alguna de sus partes por personas no
autorizadas por EURO-PRO.
Esta garantía se extiende al comprador original del artefacto y excluye toda otra garantía legal y/o
convencional. La responsabilidad de EURO-PRO Operating LLC, si alguna, se limita a las
obligaciones específicas expresamente asumidas bajo los términos de esta garantía limitada. En
ningún caso será EURO-PRO Operating LLC responsable por daños incidentales o
consecuenciales, o de ninguna otra naturaleza. Algunos Estados no permiten la exclusión o la
limitación de daños incidentales o consecuenciales, por lo que lo antedicho podría no aplicarse a
usted.
Esta garantía le otorga derechos específicos y también podría tener otros derechos que varían de
un Estado a otro.
*Importante: Empaque el artefacto cuidadosamente para evitar que se dañe durante el
transporte. Antes de empaquetar el artefacto, asegúrese de incluir el documento que
demuestre la fecha de compra, un rótulo con su nombre completo, dirección y teléfono,
una nota con los datos de la compra, modelo, número de serie y una explicación de lo que
usted cree que sea el problema. Recomendamos asegurar el paquete (porque los daños
durante su transporte no están cubiertos por esta garantía). En el exterior del paquete,
además de la dirección arriba indicada, marque “ATTENTION CUSTOMER SERVICE”. Nos
esforzamos constantemente por mejorar nuestros productos, por lo que las
especificaciones indicads en este documento podrían variar sin previo aviso.
TARJETA DE REGISTRO DE PROPIEDAD DE LA UNIDAD
SÓLO PARA CLIENTES CANADIENSES
Modelo
GI490KM
Impreso en China
GI490KM
22
Please complete and return within ten (10) days of purchase. The registration will
enable us to contact you in the event a product defect is discovered. By returning this
card you acknowledge to have read and understood the instructions for use, and
warnings set forth in the accompanying instructions.
RETURN TO: EURO-PRO Operating LLC, 4400 Bois Franc, St. Laurent, Quebec H4S 1A7
PURCHASER: ……………………………………………………………………………………………
ADDRESS: ……………………………………………………………………………………………….
DATE OF PURCHASE: …………………….. MODEL: ………………. SERIAL NO: .…………….
NAME AND ADDRESS OF STORE: …………………………………………………………………..
PRODUCT REGISTRATION CARD
Model
GI490KM
GI490KM
ONE (1) YEAR LIMITED WARRANTY
EURO-PRO Operating LLC warrants this product to be free from defects in material and
workmanship for a period of one (1) year from the date of the original purchase, when utilized for
normal household use, subject to the following conditions, exclusions and exceptions.
If your appliance fails to operate properly while in use under normal household conditions within
the warranty period, return the complete appliance and accessories, freight prepaid to:
In U.S.: EURO-PRO Operating LLC, 94 Main Mill Street, Door 16, Plattsburgh, NY 12901
In Canada: EURO-PRO Operating LLC, 4400 Bois Franc, St. Laurent, Quebec H4S 1A7
If the appliance is found by EURO-PRO to be defective in material or workmanship, EURO-PRO
will repair or replace it free of charge. Proof of purchase date and $ 9.95 to cover the cost of return
shipping and handling must be included. *
The liability of EURO-PRO Operating LLC is limited solely to the cost of the repair or replacement
of the unit at our option. This warranty does not cover normal wear of parts and does not apply to
any unit that has been tampered with or used for commercial purposes. This limited warranty does
not cover damage caused by misuse, abuse, negligent handling or damage due to faulty
packaging or mishandling in transit. This warranty does not cover damage or defects caused by
or resulting from damages from shipping or repairs, service or alterations to the product or any of
its parts, which have been performed by a repair person not authorized by EURO-PRO.
This warranty is extended to the original purchaser of the unit and excludes all other legal and/or
conventional warranties. The responsibility of EURO-PRO Operating if any, is limited to the
specific obligations expressly assumed by it under the terms of the limited warranty. In no event is
EURO-PRO Operating LLC liable for incidental or consequential damages of any nature
whatsoever. Some states do not permit the exclusion or limitation of incidental or consequential
damages, so the above may not apply to you.
This warranty gives you specific legal rights, and you may also have other rights which vary from
state to state.
*Important: Carefully pack item to avoid damage in shipping. Be sure to include proof of
purchase date and to attach tag to item before packing with your name, complete address
and phone number with a note giving purchase information, model number and what you
believe is the problem with item. We recommend you insure the package (as damage in
shipping is not covered by your warranty). Mark the outside of your package “ATTENTION
CUSTOMER SERVICE”. We are constantly striving to improve our products, therefore the
specifications contained herein are subject to change without notice.
FOR CANADIAN CONSUMERS ONLY
Printed in China
11
/