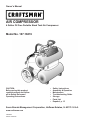
Craftsman 4 Gallon Twin Tank Compressor Owner's manual
- Category
- Air compressors
- Type
- Owner's manual

Owner’s Manual
Model No. 107.16874
4 Gallon Oil Free Portable Stack Tank Air Compressor
1/20/2014
Part No. 9041183
CAUTION:
Before using this product,
read this manual and follow
all its Safety Rules and
Operating Instructions.
AIR COMPRESSOR
• SafetyInstructions
• Assembly&Operation
• Maintenance
• TroubleshootingGuide
• Storage
• PartsList
• Español,p.15
SearsBrandsManagementCorporation,HoffmanEstates,IL60179U.S.A.
www.craftsman.com

2
TABLE OF CONTENTS
WARRANTY
WARRANTY ............................................................................ 2
SPECIFICATIONS ................................................................... 2
SAFETY SYMBOLS ................................................................ 3
GENERAL SAFETY INSTRUCTIONS .................................. 3-4
SPECIFIC SAFETY INSTRUCTIONS .................................. 4-5
ELECTRICAL SAFETY ............................................................ 6
Extension Cords ............................................................... 6
Electrical Connection ....................................................... 6
Speed and Wiring ............................................................. 6
Grounding Instructions ..................................................... 6
GLOSSARY ............................................................................. 7
ASSEMBLY ............................................................................. 7
Packing list ....................................................................... 7
Unpacking ........................................................................ 7
OPERATION ............................................................................ 8
Know your Air Compressor .............................................. 8
Attaching hose ................................................................. 9
Breaking in the pump ....................................................... 9
Transport and Lifting ....................................................... 10
Applications .................................................................... 10
How to use your Air Compressor ................................... 10
Draining the Tank ............................................................11
Checking the Safety Valve ..............................................11
MAINTENANCE .................................................................... 12
General Maintenance ..................................................... 12
Lubrication ...................................................................... 12
STORAGE ............................................................................. 12
TROUBLESHOOTING .......................................................... 13
PARTS LIST .......................................................................... 14
CRAFTSMANONEYEARLIMITEDWARRANTY
FOR ONE YEAR from the date of purchase, this product is warranted against defects in material or workmanship. With
proof of purchase, a defective product will be repaired or replaced at option of seller.
For warranty coverage details to obtain free replacement, visit the web page: www.craftsman.com/warranty
This ONE YEAR warranty is void if this product is ever used while providing commercial services or if rented to another
person. For 90 DAY commercial or rental use terms, see the Craftsman warranty web page.
This warranty gives you specic legal rights, and you may also have other rights which vary from state to state.
Sears Brands Management Corporation, Hoffman Estates, IL 60179 U.S.A.
SPECIFICATIONS
Air Tank Capacity ........................................................... 4 gallons
Air Pressure ............................................................ 155 PSI max.
Air Delivery .................................................. 2.8 SCFM @ 90 PSI
...................................................................... 3.5 SCFM @ 40 PSI
Lubrication ....................................................................... Oil-Free
Gauges .......................................................... 2.0/1.5 in. diameter
Input ........................................... 120 V, 60 Hz, AC only, 12 Amps
Net Weight (compressor only) ........................................... 44 lbs.

3
SAFETY SYMBOLS
The information listed below should be read and understood by the operator. This information is given to protect the user while
operating and storing the air compressor. We utilize the symbols below to allow the reader to recognize important information about
their safety.
Indicates an imminently hazardous situation, which, if not
avoided, will result in death or serious injury.
Indicates a potentially hazardous situation, which, if not avoided,
may result in minor or moderate injury.
Indicates a potentially hazardous situation, which, if not avoided,
could result in death or serious injury.
(Without Safety Alert Symbol) Indicates a situation that may
result in property damage.
DANGER
CAUTION
WARNING
CAUTION
GENERAL SAFETY INSTRUCTIONS
Read and understand all instructions. Failure to follow all
instructions listed below may result in electric shock, re, and/or
serious personal injury.
WARNING
SAVE THESE INSTRUCTIONS
WORKAREA
Keepyourworkareacleanandwelllit. Cluttered benches
and dark areas invite accidents. The oor must not be slippery
from wax or dust.
Donotoperatepowertoolsinexplosiveatmo-spheres,
suchasinthepresenceofammableliquids,gases,or
dust. Power tools create sparks which may ignite the dust or
fumes.
Keepbystanders,children,andvisitorsawaywhile
operating tools. Distractions can cause you to lose control.
Operate the air compressor in an open area at least 18 in.
awayfromanywallorobjectthatcouldrestricttheowof
freshairtoventilationopenings.
ELECTRICALSAFETY
Avoidbodycontactwithgroundedsurfacessuchaspipes,
radiators, ranges, and refrigerators. There is an increased risk
of electric shock if your body is grounded.
Don’texposepowertoolstorainorwetconditions. Water
entering a power tool will increase the risk of electric shock.
Donotabusethecord.Neverusethecordtocarrythe
toolorpulltheplugfromanoutlet.Keepthecordaway
fromheat,oil,sharpedges,ormovingparts.Replace
damaged cords immediately. Damaged cords increase the
risk of electric shock.
Whenoperatingapowertooloutside,useanoutdoor
extensioncordmarked“W-A”or“W”. These cords are
rated for outdoor use and reduce the risk of electric shock.
PERSONALSAFETY
EyeprotectionwhichconformstoANSIspecications
andprovidesprotectionagainstyingparticlesboth
fromtheFRONTandSIDEshouldALWAYSbewornby
the operator and others in the work area when loading,
operating,orservicingthistool. Eye protection is required
to guard against ying fasteners and debris, which could
cause severe eye injury.
The employer and/or user must ensure that proper eye
protection is worn. We recommend a Wide Vision Safety
Mask for use over eyeglasses or standard safety glasses
that provide protection against ying particles both from the
front and side. Always use eye protection which is marked to
comply with ANSI Z87.1.
Additionalsafetyprotectionwillberequiredinsome
environments. For example, the working area may include
exposure to a noise level which can lead to hearing damage.
The employer and user must ensure that any necessary
hearing protection is provided and used by the operator and
others in the work area. Some environments will require
the use of head protection equipment. When required, the
employer and user must ensure that head protection marked
to comply with ANSI Z89.1 is used.
Stay alert, watch what you are doing, and use common
sensewhenoperatingapowertool.Donotusetools
whiletiredorundertheinuenceofdrugs,alcohol,or
medication. A moment of inattention while operating power
tools may result in serious personal injury.
Dressproperly.Donotwearlooseclothingorjewelry.
Containlonghair.Keepyourhair,clothing,andgloves
awayfrommovingparts. Loose clothes, jewelry, or long hair
can be caught in moving parts.
Donotoverreach.Keepproperfootingandbalanceatall
times. Proper footing and balance enables better control of
the tool in unexpected situations.
Usesafetyequipment.Alwaysweareyeprotection.A dust
mask, nonskid safety shoes, hard hat, or hearing protection
must be used for appropriate conditions.
Donotuseonaladderorunstablesupport. Stable
footing on a solid surface enables better control of the tool in
unexpected situations.
TOOLUSEANDCARE
Donotexceedthepressureratingofanycomponentin
the system.
Protect material lines and air lines from damage or
puncture. Keep the hose and power cord away from sharp
objects, chemical spills, oil, solvents, and wet oors.
The brass components of this product contain lead, a chemical
known to the state of California to cause birth defects (or other
reproductive harm).
(California health & safety code § 25249.5, et seq.)
WARNING

4
Check hoses for weak or worn condition before each use,
making certain all connections are secure. Do not use if
a defect is found. Purchase a new hose or take to a qualied
service center for examination and repair.
Release the pressure within the system slowly. Dust and
debris may be harmful.
Store idle tools out of the reach of children and other
untrained persons. Tools are dangerous in the hands of
untrained users.
Maintain tools with care. Follow maintenance instructions.
Properly maintained tools are easier to control.
Checkformisalignmentorbindingofmovingparts,
breakage of parts, and any other condition that may
affectthetool’soperation.Ifdamaged,havethetool
servicedbeforeusing. Many accidents are caused by poorly
maintained tools.
Neverpointanytooltowardyourselforothers.
Keeptheexterioroftheaircompressordry,clean,and
free from oil and grease. Always use a clean cloth when
cleaning. Never use brake uids, gasoline, petroleum-based
products, or any strong solvents to clean the unit. Following
this rule will reduce the risk of deterioration of the enclosure
plastic.
SERVICE
Toolservicemustbeperformedonlybyqualiedrepair
personnel. Service or maintenance performed by unqualied
personnel may result in a risk of injury.
Disconnectthepowersupply,openthedrainvalveto
decompress the tank and allow water to drain, and allow
the air compressor to become cool to the touch before
servicing. Turn the pressure regulator knob fully counter
clockwise after shutting off the compressor.
Whenservicingatool,useonlyidenticalreplacement
parts.SeePartsListinthismanual.Followthe
instructions in the Maintenance section of this manual.
Use of unauthorized parts or failure to follow the Maintenance
instructions may create a risk of injury.
SPECIFIC SAFETY INSTRUCTIONS
Read the operator’s
manual
Know your power tool. Read the operator’s manual carefully. Learn its applications and limita-
tions, as well as the specic potential hazards related to this tool. Following this rule will reduce
the risk of electric shock, re, or serious injury.
Eye protection
The operation of any power tool can result in foreign objects being thrown into your eyes, which
can result in severe eye damage. Before beginning power tool operation, always wear safety
goggles, safety glasses with side shields, or a full face shield when needed. We recommend
Wide Vision Safety Mask for use over eyeglasses or standard safety glasses with side shields.
Always use eye protection which is marked to comply with ANSI Z87.1.
RiskofFireorExplo-
sion
Do not spray ammable liquid in a conned area. The spray area must be well ventilated. Do
not smoke while spraying or spray where sparks or a ame is present. Keep compressors as
far from the spraying area as possible, at least 15 feet from the spraying area and all explosive
vapors.
Risk of Bursting
Do not adjust the regulator to result in output pressure greater than the marked maximum pres-
sure of the attachment. Do not use at a pressure greater than the rated maximum pressure of
this compressor.
Risk of Electrical
Shock
Hazardous voltage: Disconnect from the power source before servicing. The compressor must
be grounded.
Hot Surface To reduce the risk of injury or damage, avoid contact with any hot surface.
Risk to Hearing Always wear ear protection when using this tool. Failure to do so may result in hearing loss.
Risk to Breathing
Air obtained directly from the air compressor should never be used to supply air for human
consumption.
DrainTank
Drain the tank of moisture after each day’s use. If the unit will not be used for a while, it is best
to leave the drain valve open until such time as it is to be used. This will allow moisture to com-
pletely drain out and help prevent corrosion on the inside of tank.
WARNING

5
If connected to a circuit protected by fuses, use time-delay
fuses with this product.
To reduce the risk of electric shock, do not expose to rain.
Store indoors.
Inspect the tank yearly for rust, pin holes, or other
imperfections that could cause it to become unsafe. Never
weld or drill holes in the air tank.
Make sure the hose is free of obstructions or snags.
Entangled or snarled hoses can cause loss of balance or
footing and may become damaged.
Usetheaircompressoronlyforitsintendeduse.Do
not alter or modify the unit from the original design or
function.
Always be aware that misuse and improper handling of
this tool can cause injury to yourself and others.
Neverleaveatoolunattendedwiththeairhoseattached.
Donotoperatethistoolifitdoesnotcontainalegible
warning label.
Donotcontinuetouseatoolorhosethatleaksairor
does not function properly.
Always disconnect the air supply and power supply before
making adjustments, servicing a tool, or when a tool is not in
use.
Donotattempttopullorcarrytheaircompressorbythe
hose.
Yourtoolmayrequiremoreairconsumptionthanthisair
compressoriscapableofproviding.
Always follow all safety rules recommended by the
manufacturer of your tool, in addition to all safety rules
for the air compressor. Following these rules will reduce the
risk of serious personal injury.
Neverdirectajetofcompressedairtowardpeopleor
animals. Take care not to blow dust and dirt towards
yourself or others. Following this rule will reduce the risk of
serious injury.
Protect your lungs. Wear a face or dust mask if the operation
is dusty. Following this rule will reduce the risk of serious
personal injury.
Donotusethisaircompressortospraychemicals. Your
lungs can be damaged by inhaling toxic fumes. A respirator
may be necessary in dusty environments or when spraying
paint. Do not carry while painting.
Inspect tool cords and hoses periodically and, if
damaged,haverepairedataqualiedservicecenter.
Constantly stay aware of cord location. Following this rule
will reduce the risk of electric shock or re.
Neveruseanelectricaladaptorwiththisgroundedplug.
Check damaged parts. Before further use of the air
compressor or air tool, a guard or other part that is
damaged should be carefully checked to determine
that it will operate properly and perform its intended
function.Checkforalignmentofmovingparts,binding
ofmovingparts,breakageofparts,mounting,andany
other conditions that may affect its operation. A guard or
other part that is damaged should be properly repaired or
replacedbyaqualiedservicecenter. Following this rule
will reduce the risk of shock, re or serious injury.
Makesureyourextensioncordisingoodcondition.
Whenusinganextensioncord,besuretouseoneheavy
enough to carry the current your product will draw. A wire
gaugesize(A.W.G.)ofatleast14isrecommendedforan
extensioncord50feetorlessinlength.Acordexceeding
100feetisnotrecommended.Ifindoubt,usethenext
heaviergauge.Thesmallerthegaugenumber,theheavier
the cord. An undersized cord will cause a drop in line voltage
resulting in loss of power and overheating.
Savetheseinstructions. Refer to them frequently and use
them to instruct others who may use this air compressor. If
you loan someone this tool, load them these instructions also.
CAUTION

6
ELECTRICAL SAFETY
EXTENSIONCORDS
NOTE: Avoid use of extension cords.
1. For optimum performance, plug the compressor power cord
directly into a grounded wall socket. Do not use an extension
cord unless absolutely necessary. Instead, use a longer air
hose to reach the area where the air is needed.
2. If use of an extension cord cannot be avoided, the cord should
be no longer than 50 feet and be a minimum wire size of 12
gauge (AWG). Do not use a 16 or 14 gauge extension cord.
3. Use only a 3-wire extension cord that has a 3-blade grounding
plug, and a 3-slot receptacle that will accept the plug on the
product. Make sure your extension cord is in good condition.
An undersized cord will cause a drop in line voltage, resulting
in loss of power and overheating. The smaller the gauge
number, the heavier the cord.
4. When working with the air compressor outdoors, use an
extension cord that is designed for outside use. This is
indicated by the letters “WA” on the cord’s jacket.
5. Before using an extension cord, inspect it for loose or exposed
wires and cut or worn insulation.
Keep the extension cord clear of the working
area. Position the cord so that it will not get caught on lumber,
tools, or other obstructions while you are working with a power
tool. Failure to do so can result in serious personal injury.
Check the extension cords before each use.
If damaged, replace immediately. Never use the air compres-
sor with a damaged cord since touching the damaged area
could cause electrical shock resulting in serious personal
injury.
NOTE: Use longer air hoses instead of long extension cords.
Your air compressor will run better and last longer.
ELECTRICALCONNECTION
1. This air compressor is powered by a precision built electric
motor. It should be connected to a power supply that is 120
volts, 60 Hz, AC only (normal household current).
2. Do not operate this tool on direct current (DC). A substantial
voltage drop will cause a loss of power and the motor will
overheat. If the air compressor does not operate when
plugged into an outlet, double check the power supply.
SPEEDANDWIRING
1. The no-load speed of the electric motor varies by model and
specication. The motor speed is not constant and decreases
under a load or with lower voltage. For voltage, the wiring in a
shop is as important as the motor’s horsepower rating.
2. A line intended only for lights cannot properly carry a power
tool motor. Wire that is heavy enough for a short distance will
be too light for a greater distance. A line that can support one
power tool may not be able to support two or three tools.
GROUNDINGINSTRUCTIONS
1. In the event of a malfunction or breakdown, grounding
provides a path of least resistance for electric current to
reduce the risk of electric shock. This air compressor is
equipped with an electric cord having an equipment-grounding
conductor and a grounding plug. The plug must be plugged
into a matching outlet that is properly installed and grounded
in accordance with all local codes and ordinances.
2. Do not modify the plug provided. If it will not t the outlet, have
the proper outlet installed by a qualied electrician.
3. The conductor with insulation having an outer surface that
is green with or without yellow stripes is the equipment-
grounding conductor. If repair or replacement of the electric
cord or plug is necessary, do not connect the equipment-
grounding conductor to a live terminal.
4. Check with a qualied electrician or service personnel if the
grounding instructions are not completely understood, or if in
doubt as to whether the tool is properly grounded.
5. Replace a damaged or worn cord immediately.
Improper connection of the equipment-
grounding conductor can result in a risk of electric shock.
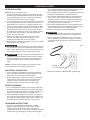
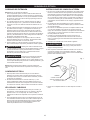
6. This air compressor is intended for use on a circuit that
has an outlet like the one shown in the gure 1. It also has
a grounding pin like the one shown. This product must be
grounded.
7. Never use an electrical adapter with this grounded plug.
WARNING
WARNING
WARNING
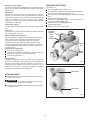
Grounding pin
120V Grounded outlet
Fig. 1

7
GLOSSARY
Air Filter
Porous element contained within a metal or plastic housing
attached to the compressor cylinder head which removes
impurity from the intake air of the compressor.
Air Tank
Cylindrical component which contains the compressed air.
CheckValve
Device that prevents compressed air from owing back from the
air tank to the compressor pump.
Cut-InPressure
The low pressure at which the motor will automatically restart.
This compressor cut-in pressure is 125 ± 5 PSI.
Cut-OffPressure
The high pressure at which the motor will automatically shut off.
This compressor cut-off pressure is 155 ± 5 PSI.
Electric Motor
Device which provides the rotational force necessary to operate
the compressor pump.
On/Off Power Switch
Control which turns the air compressor on or off. The pressure
switch will not automatically start and control the compressor
unless the manual on/off switch is in the ON ( l ) position.
NPT(NationalPipeThread)
National Pipe Thread is a U.S. standard for tapered (NPT) or
straight (NPS) threads used to join pipes and ttings.
A thread sealing tape must be used to provide a leak-free seal on
pipe threaded connections.
PressureRegulatorKnob
Regulates the outgoing pressure from the air outlet to the tool. It
is possible to increase or decrease the pressure at the outlet by
adjusting this control knob.
Pressure Switch
Automatically controls the on/off cycling of the compressor. It
stops the compressor when the cut-off pressure in the tank is
reached and starts the compressor when the air pressure drops
below the cut-in pressure.
PSI(PoundsPerSquareInch)
Measurement of the pressure exerted by the force of the air. The
actual psi is measured by a pressure gauge on the compressor.
Pump
Produces the compressed air with a reciprocating piston
contained within the cylinder.
RegulatorPressureGauge(Outletpressure)
Displays the current line pressure. Line pressure is adjusted by
rotating the pressure regulator knob.
SafetyValve
Prevents air pressure in the air tank from rising over a
predetermined limit.
SCFM(StandardCubicFeetPerMinute)
A unit of measure of air delivery.
L/min(LiterPerMinute)
A unit of measure of air delivery.
Tank Pressure Gauge
Indicates the pressure in the air tank.
ThermalOverloadSwitch
Automatically shuts off the compressor if the temperature of the
electric motor exceeds a predetermined limit.
DutyCycle
Duty Cycle refers to a percentage of time which the air
compressor can run continuously while performing a task before
needing to rest or cool down. Example: A 50% duty Cycle
compressor must rest for 5 minutes after running continuously for
5 minutes.
UNPACKING
This product has been shipped completely assembled.
Carefully remove the compressor from the box. Make sure
that all items listed in the packing list are included.
Inspect the compressor carefully to make sure no breakage
or damage occurred during shipping.
Do not discard the packing material until you have carefully
inspected and satisfactorily operated the tool.
If any parts are missing do not operate the
compressor or air tools until the missing parts are replaced.
Failure to do so could result in possible serious personal
injury.
Do not attempt to modify this tool or create
accessories not recommended for use with this tool. Any
such alteration or modication is misuse and could result in
a hazardous condition leading to possible serious personal
injury.
WARNING
WARNING
ASSEMBLY
PACKINGLIST
Air compressor
Owner’s manual

8
OPERATION
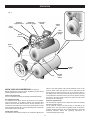
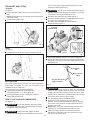
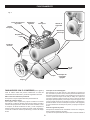
KNOWYOURAIRCOMPRESSOR(see gure 2)
Before attempting to use this product, familiarize yourself with all
operating features and safety rules.
Oil-freeuniversalmotor
Your air compressor features permanently lubricated bearings.
Air compressor pump
To compress air, the piston moves up and down in the cylinder.
On the down stroke, air is drawn in through the air intake valve
while the exhaust valve remains closed. On the upstroke, air is
compressed, the intake valve closes and compressed air is forced
out through the exhaust valve, into the discharge line, through the
check valve and into the air tank.
On/Off power switch
This switch is used to start or stop the air compressor. Moving the
switch to the (ON) position will provide automatic power to the
pressure switch which will allow the motor to start when the air
tank pressure is below the factory set cut-in pressure. When in
the (ON) position, the pressure switch stops the motor when the
air tank pressure reaches the factory set cut-out pressure. Moving
the switch to the (OFF) position will remove power from the motor
and stop the air compressor.
Pressure regulator knob
Use the pressure regulator knob to adjust the amount of air being
delivered through the hose.
The air pressure coming from the air tank is controlled by the
regulator knob. Turn the pressure regulation knob clockwise to
increase discharge pressure, and counterclockwise to decrease
discharge pressure. Follow tool operating instructions for
recommended pressure range.
Fig. 2
Drain
valve
On/Off
power
switch
Power
cord
Telescopic
handle
Carry
handle
Rubber
foot
Tank
Tank
Quick
couplers
Pressure
regulator knob
Regulator
pressure gauge
Tank
pressure
gauge
Safety
valve

9
Regulator pressure gauge
The current line pressure is displayed on the regulator pressure
gauge. This pressure can be adjusted by rotating the pressure
regulator knob.
Safetyvalve
This valve is designed to prevent system failures by relieving
pressure from the system when the compressed air reaches a
predetermined level. The valve is preset by the manufacturer and
must not be modied in any way. To verify the valve is working
properly, pull on the ring. Air pressure should escape. When the
ring is released, it will reset.
Tank pressure gauge
The tank pressure gauge indicates the pressure of the air in the
tank.
Drainvalve
The drain valve is used to remove moisture from the air tank after
the air compressor is shut off.
Motorthermaloverloadprotector
This air compressor is equipped with a thermal overload device
which will turn the air compressor off automatically, if the air
compressor becomes overheated. If the motor turns OFF
repeatedly, check for the following possible causes first: Low
Voltage from the outlet. Lack of proper ventilation or outside air
or room temperature too high. Extension cord too long or wrong
gauge wire used.
To reset the air compressor:
Turn the air compressor off.
Unplug the air compressor, and allow it to cool for 30 minutes.
Plug the air compressor into an approved outlet.
Turn the air compressor on.
Airlterintake
This lter is designed to clean air coming into the pump and
requires no maintenance when operated in accordance with the
warnings and operating instruction outlined in this manual. To
ensure the pump continually receives clean, cool, dry air do not
operate this compressor in dust lled atmosphere. Ventilation
openings must be kept free from obstructions.
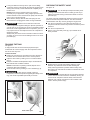
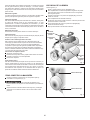
ATTACHING HOSE
Insert the hose into the quick coupler already installed on the
compressor (see g. 3).
Do not attach any tools to the open end of
the hose until start-up has been completed.
Firmly grasp the open end of the hose; hold facing away from
yourself and others.
WARNING
BREAKINGINTHEPUMP
See gures 3 - 4.
Check and tighten all bolts, ttings, etc.
Turn the pressure regulator knob fully clockwise to open the
air ow. Turn the locking nut clockwise to lock.
Place the switch in the OFF(O) position and plug in the power
cord.
Open the drain valves completely.
Turn the air compress ON(l) and run the air compressor for
10 minutes to break in pump parts.
Place the switch in the OFF(O) position.
Close the drain valves.
Allow the unit to cool for 30 minutes.
Fig. 4
Drainvalve
Drainvalve
Fig. 3
Quick
couplers
On/Off
switch
Locking
nut
Pressure
regulator
knob

10
APPLICATIONS
Air compressors are utilized in a variety of air system applications.
Match hoses, connectors, air tools, and accessories to the
capabilities of the air compressor.
You may use this tool for purposes listed below:
Operating air powered tools requiring less than
2.8 SCFM @ 90 PSI or 3.5 SCFM @ 40 PSI.
Powering pneumatic nail guns, inating tires, cleaning /
blowing with pressurized air.
HOWTOUSEYOURAIRCOMPRESSOR
See gures 7 - 8.
Do not allow familiarity with tools to make
you careless. Remember that a careless fraction of a second
is sufcient to inict serious injury.
Always wear safety goggles or safety
glasses with side shields when operating power tools. Failure
WARNING
WARNING
Always ensure the switch is in the OFF(O)
position and the regulator pressure gauge reads zero before
changing air tools or disconnecting the hose from the air outlet.
Failure to do so could result in possible serious personal injury.
Connect the power cord to the power supply.
Turn the ON/OFF switch to the ON(I) position.
Rotate the pressure regulator knob to the desired line
pressure. Turning the knob clockwise increases air pressure
at the outlet; turning the knob counterclockwise reduces air
pressure at the outlet.
NOTE: Before connecting or disconnecting air tools, turn the
regulator knob counterclockwise to stop the ow of air.
Following all safety precautions in this manual and the
manufacturer’s instructions in the air tool manual. You may
now use your air-powered tool.
WARNING
Fig. 8
Coilhosewithquick
coupler attached
Male connector
fitting
Pneumatic
tool
If not already installed, attach the hose to the compressor.
Connect the air powered tools to the air hose by inserting the
male quick-connect plug to the quick-coupler at the end of the
hose (see g. 8).
On/Off
switch
Fig. 7
Drainvalves
Pressure
regulator knob
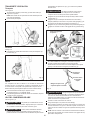
TRANSPORTANDLIFTING
Transport
See gure 5.
Pull the telescopic handle (see g. 5) out until it locks into
place.
NOTE: This handle is only for pulling the unit. DO NOT lift the
unit by this handle.
To lower handle push it down.
Lifting
See gure 6.
For lifting the unit use only the red carry handle (see g. 6).
to do so could result in objects being thrown into your eyes
resulting in possible serious injury.
Do not use in an environment that is dusty or
otherwise contaminated. Using the air compressor in this type
of environment may cause damage to the unit.
Ensure the tank drain valves are closed (see g. 7).
Ensure the ON/OFF switch is in the OFF(O) position and the
air compressor is unplugged (see g. 7).
Ensure the pressure regulator knob is turned fully
counterclockwise (see g. 7).
CAUTION
Fig. 6
Fig. 5

11
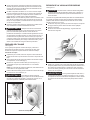
DRAININGTHETANK
See gure 9.
To help prevent tank corrosion and keep liquid and vapor
condensate out of the air supply, drain the compressor tank at
the end of each day’s use.
To drain the tank:
Holding the compressor by its handle, tilt it in the direction of
the drain valve so that the valve is set in a lower position.
Open the drain valve by rotating it ¼ turn counterclockwise
(g. 9).
Keep the unit tilted until all liquid and vapor condensate has
been drained into a suitable container.
NOTE: Condensate is a polluting material; dispose of it in
compliance with local regulations.
Close the drain valve by rotating it ¼ turn clockwise (g. 9).
If drain valve is clogged, unplug air
compressor, release tank pressure by pulling the safety valve
ring, and contact a qualied repair facility for service.
WARNING
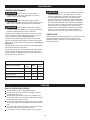
CHECKINGTHESAFETYVALVE
See gure 10.
Do not attempt to tamper with safety valve.
Anything loosened from this device could y up and hit you.
Failure to heed this warning could result in death or serious
personal injury.
The safety valve will automatically release air if the air receiver
pressure exceeds the preset maximum. The valve should be
checked before each day of use by pulling the ring by hand.
Turn the air compressor on and allow the tank to ll. The
compressor will shut off when the pressure reaches the preset
maximum.
Turn the air compressor off.
Pull the ring on the safety valve (g. 10) to release air for
twenty seconds.
DANGER
Release the ring. Air will stop escaping when the ring is
released. Any continued loss of air after releasing the
safety valve ring indicates a problem with the safety valve.
Discontinue use and seek service before continued use of the
air compressor.
If air leaks after the ring has been released,
or if the valve is stuck and cannot be actuated by the ring, do
not use the air compressor until the safety valve has been
replaced. Use of the air compressor in this condition could
result in serious personal injury.
WARNING
Drainvalveopen
Drain
valve
closed
Fig. 9
If using an ination accessory with a quick-connect tting,
control the amount of air ow with the pressure regulator knob.
Turning the knob fully counterclockwise will completely stop
the ow of air.
NOTE: Always use the minimum amount of pressure
necessary for your application. Using a higher pressure than
needed will drain air from the tank more rapidly and cause the
unit to cycle on more frequently.
When nished, always drain the tank and unplug the unit.
Never leave the unit plugged in and/or running unattended.
Check the air tool manual to insure the
correct air pressure regulator setting for optimum operation of
your air tools. If you are using an air tool not originally included
with the air tool kit supplied with this air compressor, your tool
may require more air consumption than this air compressor is
designed to supply.
Always read your air tool owner’s manual to match the correct
air supply to your air tool to avoid damage to the tool or risk of
personal injury.
WARNING
Safety
valve
Fig. 10

12
GENERALMAINTENANCE
When servicing, use only identical
replacement parts. Use of any other parts may create a
hazard or cause product damage.
Always wear safety goggles or safety
glasses with side shields during power tool operation or when
blowing dust. If operation is dusty, also wear a dust mask.
Always release all pressure, disconnect
from power supply, and allow unit to cool to the touch before
cleaning or making repairs on the air compressor.
Humidity in the air causes condensation to form in the air tank.
This condensation should be drained daily and/or every hour,
using the instructions found in DrainingtheTank.
The safety valve automatically releases air if the air receiver
pressure exceeds the preset maximum. Check the safety valve
before each use following the instructions found in Checking the
SafetyValve.
Inspect the tank yearly for rust, pin holes, or other imperfections
that could cause it to become unsafe.
Avoid using solvents when cleaning plastic parts. Most plastics
are susceptible to damage from various types of commercial
solvents and may be damaged by their use. Use clean cloths to
remove dirt, dust, oil, grease, etc.
WARNING
WARNING
WARNING
Do not at any time let brake uids, gasoline,
petroleum-based products, penetrating oils, etc., come in
contact with plastic parts. Chemical can damage, weaken
or destroy plastic which may result in serious personal
injury. Electric tools used on berglass material, wall-board,
spackling compounds, or plaster are subject to accelerated
wear and possible premature failure because the berglass
chips and grindings are highly abrasive to bearings, brushes,
commutators, etc. Consequently, we do not recommend
using this tool for extended work on these type of materials.
However, if you do work with any of these materials, it is
extremely important to clean the tool using compressed air.
LUBRICATION
All the bearings in this tool are lubricated with a sufcient amount
of high grade lubricant for the life of the unit under normal
operating conditions. Therefore, no further lubrication of the
bearings is required.
WARNING
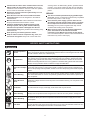
MAINTENANCE
Maintenance schedule
Items to check/change
Before
use
Daily
Every
hour
Checking the safety valve ●
Overall unit visual check ●
Draining the tank ● ●
Check power cord for damage ●
STORAGE
ENDOFOPERATION/STORAGE
Turn the ON/OFF switch to the OFF(O) position.
Unplug power cord from wall outlet and wrap it to prevent
damage when not in use.
Wearing safety glasses drain tank of air by pulling the ring
on the safety valve. Use other hand to deect fast moving air
from being directed toward your face.
Drain tank of condensation by opening drain valve on bottom
of tank. Tank pressure should be below 10 psi when draining
tank.
Air hose should be disconnected from compressor and hung
open ends down to allow any moisture to drain.
Compressor and hose should be stored in a cool, dry place.

13
Problem Possible Cause Solution
The compressor does not run. 1. Loss of power or overheating.
2. There is no electrical power being
supplied to compressor or, the power
switch is in the OFF position.
3. A fuse has blown at the power supply.
4. A breaker has tripped at the power
supply.
5. Thermal overload open.
6. The pressure switch is bad.
7. Tank is full of air.
1. Check for proper use of extension cord.
2. Check to be sure the compressor is plugged
in and the power switch is in the ON position.
3. Replace the fuse at the power supply.
4. Reset the breaker at the power supply and
determine why the problem happened.
5. First unplugged the compressor and wait
until it becomes cool. Motor will restart when
cool.
6. Replace the pressure switch.
7. Compressor will turn on when tank pressure
drops to cut-in pressure.
The motor hums, but does not run or
runs slowly.
1. The voltage from the power supply is low.
2. The gauge wire or the length of extension
cord is wrong.
3. The motor winding is shorted or broken.
4. The unloader or check valve is defective.
1. Check the voltage with a voltmeter.
2. Use the correct wire gauge and length
extension cord.
3. Take the compressor to a service center.
4. Take the compressor to a service center.
The fuses blow or the circuit breaker
trips repeatedly.
1. The fuse size is incorrect or the circuit is
overloaded.
2. The gauge wire or the length of extension
cord is wrong.
3. The unloader or check valve is defective.
1. Check the fuse or breaker at the power
supply is the correct size and type. Be
sure to use only time-delay fuses to avoid
overloading a curcuit, disconnect other
electrical appliances from circuit or operate
compressor on its own branch circuit.
2. Use the correct wire gauge and length
extension cord.
3. Take the compressor to a service center.
The thermal overload protector cuts out
repeatedly.
1. The voltage from the power supply is low.
2. A poorly ventilated room is causing the
motor to overheat.
3. The gauge wire or the length of extension
cord is wrong.
1. Check the voltage with a voltmeter.
2. Move the compressor to well-ventilated area.
3. Check for proper gauge wire and cord
length.
The air receiver pressure drops when
the compressor shuts off.
1. The connections are loose or leaking
(ttings, tubing, etc.).
2. The drain valve is loose.
3. The check valve is leaking.
1. Check all the connections with soapy water
and look for bubbles. Tighten any loose
conections until the leak stops.
2. Tighten the drain valve.
3. Take the compressor to a service center.
Do not disassemble
check valve while air is in tank - empty
the all the air out of the tank before
dissasembly.
There is excessive moisture in the air
discharge.
1. There is excessive water in the air tank.
2. The humidity is high.
1. Drain the tank to remove water.
2. Move the compressor to an area of less
humidity or use an air line lter to reduce
moisture discharge in the tank.
Air is leaking from the compressor. 1. The hose connection is loose or
improperly sealed.
2. The air hose is broken or damaged.
1. Ensure connections are sealed with thread
sealing tape and tightened.
2. Replace the air hose.
The compressor runs continuously 1. The tank drain valve is open.
2. The pressure switch is defective.
3. The usage is excessive.
1. Ensure the tank drain valve is closed.
2. Take the compressor to a service center.
3. Decrease the amount of tool run-time; the
compressor is not large enough to supply the
air requirement of the tool.
The compressor vibrates. 1. The compressor mounting bolts are
loose.
1. Tighten mounting bolts.
The air output is lower than normal. 1. The inlet valves are broken.
2. The connections are leaking.
1. Take the compressor to a service center.
2. Apply thread sealing tape to tting and
tighten.
WARNING
TROUBLESHOOTING

14
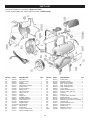
PARTS LIST
KEYNO. CODE DESCRIPTION QTY
023 9054016 AIR FILTER ............................................... 1
049 9038405 PLASTIC COVER ...................................... 1
102 9042030 WHEEL ...................................................... 2
103 9038973 RUBBER FOOT ......................................... 2
104 9417375 TELESCOPIC HANDLE ............................ 1
105 9048101 CHECK VALVE .......................................... 1
106 9047086 QUICK COUPLING ................................... 2
107 9047062 DRAIN VALVE ........................................... 2
108 9051185 AIR REGULATOR ..................................... 1
110 9049115 SAFETY VALVE ........................................ 1
112 9050601 ELBOW...................................................... 1
114 9011049 WHEEL PIN ............................................... 2
117 9038856 RUBBER HANDLE .................................... 1
131 9063217 PRESSURE SWITCH................................ 1
132 9065680 CORD WITH PLUG ................................... 1
133 9414765 POWER SWITCH ...................................... 1
145 9043248 SENDING PIPE ......................................... 1
501 9413494098 AIR RECEIVER ......................................... 1
502 9414746 SCREW 6X20 ............................................ 4
503 9104139 SCREW 6X12 ............................................ 6
504 9038407 PLASTIC CORD HOOK ............................ 2
505 9142241 SCREW PARKER 4,2X16 ......................... 2
KEYNO. CODE DESCRIPTION QTY
507 9104151 SCREW 8X16 ............................................ 2
508 9131540 WASHER 8,5X24X2 .................................. 2
510 9416592 BRACKET FOR WHEEL ........................... 2
511 9065675 WIRE 18AWG (BLACK) ............................ 1
512 9415129 WIRE 18AWG (BLACK) ............................ 1
513 9065676 WIRE 18AWG (WHITE) ............................. 1
514 9064821 LOCK CABLE ............................................ 1
515 9142956 SCREW PARKER 3.9X14,5 ...................... 2
516 9038787 PLASTIC PANEL (SWITCH)...................... 1
519 9052110 GAUGE 2” ................................................. 1
520 9052111 GAUGE 1,5” .............................................. 1
522 9038974 PLASTIC PANEL (GAUGES) .................... 1
526 9038367 BROKEN BRUSH ...................................... 4
527 9416102 BRACKET for TROLLEY HANDLE ........... 2
528 9416105 SNAP BUTTON for TROLLEY HANDLE ... 2
530 9122451 LOCKNUT M6 ........................................... 6
533 9142772 SCREW PARKER 4,2X16 ......................... 2
534 9004049 WASHER 4,3X12X1 .................................. 2
535 9104024 SCREW 5X16 ............................................ 2
536 9131678 WASHER 5,3X12X1,5 ............................... 2
PUMP A700062 PUMP OL197 V120 ................................... 1
Craftsman Portable Air Compressor - Model 107.16874
To order replacement parts, call this toll-free number: 1-888-331-4569
Page is loading ...
Page is loading ...
Page is loading ...
Page is loading ...
Page is loading ...
Page is loading ...
Page is loading ...
Page is loading ...
Page is loading ...
Page is loading ...
Page is loading ...
Page is loading ...
Page is loading ...

® Registered Trademark /
TM
Trademark of KCD IP, LLC in the United States, or Sears Brands, LLC in other countries
® Marca Registrada /
TM
Marca de Fábrica de KCD IP, LLC en Estados Unidos, o Sears Brands, LLC in otros países
Product questions or problems?
1-888-331-4569
Customer Care Hot Line
Get answers to questions, troubleshoot problems,
order parts, or schedule repair service.
Para respuestas a preguntas o problemas, y ordenar
piezas o pedir servicio para la reparación de su equipo.
To help us help you, register your product at www.
craftsman.com/registration
Para poderte ayudar mejor, registra tu producto en www.craftsman.com/registration
Join the Craftsman Club today!
Receive exclusive member benefits including special pricing and offers,
project sharing, expert advice, and SHOP YOUR WAY REWARDS!
Como miembro exclusivo, recibe diversos beneficios como ofertas, precios especiales, proyectos
nuevos, consejos de expertos y nuestro programa de puntos SHOP YOUR WAY REWARDS!
-
 1
1
-
 2
2
-
 3
3
-
 4
4
-
 5
5
-
 6
6
-
 7
7
-
 8
8
-
 9
9
-
 10
10
-
 11
11
-
 12
12
-
 13
13
-
 14
14
-
 15
15
-
 16
16
-
 17
17
-
 18
18
-
 19
19
-
 20
20
-
 21
21
-
 22
22
-
 23
23
-
 24
24
-
 25
25
-
 26
26
-
 27
27
-
 28
28


Craftsman 4 Gallon Twin Tank Compressor Owner's manual
- Category
- Air compressors
- Type
- Owner's manual
Ask a question and I''ll find the answer in the document
Finding information in a document is now easier with AI
in other languages
Related papers
-
Craftsman 009-16957-000 Owner's manual
-
-
-
-
-
-
-
-
-