Page is loading ...

2
REV.
1
1
1
ZZM 616I(B9350EY)
(AMICA)( )
1 PANTONE BLACK C
2
3 A4, A5
4
80
6710002912
06

ZZM 616I

To review the section on troubleshooting Tips
will help you to solve some common problems
by yourself .
The manufacturer, following a policy of constant
development and updating of the product, may
make modifications without giving prior notice.
If you can not solvethe problems by yourself ,
please ask for the help of professional technicians.
Dishwasher Features............................ ........ ...3.
A、Water Softener...........................................4
Attention before or after loading the Dishwasher
Baskets..........................................................9
Filtering System.............................................15
Caring for the Dishwasher...............................16
B、Loading the Salt into the Softener........... ......5.
C、Fill the Rinse Aid Dispenser
................. ........5
.
D、Function of Detergent ........................ .........7.
Loading the upper Basket.................................9
Loading the Lower Basket....................... .......10...
Cutlery Basket........................................... ..11...
Wash Cycle Table...........................................13
Turning on the Appliance................................14
Change the Programme...................... ...........14..
At the End of the Wash Cycle...................... .....14.
Before calling for service.................................24
Error codes...................................................25
Technical information.....................................26
Control Panel...................................................3
Water Connection...................................... .....23.
18
Please carefully read the installation instruction
.....................................................................
....18Aesthetic panel's dimensions and installation
Tension adjustment of the door spring .20..............
Connection of drain hoses................................... ....20.
Dishwasher installation steps...................... ....21.
Dear Cu s to m er,
Please carefully readthismanu albefore using the
dishwasher,itwillhelp y ou t ouseandmaintainthe
dishwasher properly.
Passit on toanysubsequen towner of the appliance.
Thismanualcontains se ctionson safetyInstructions,
OperatingInstructions, Installat ionI nstructionsand
Tr ou bl es hoo ti ng Tip s, et c.
K eep it as ar ef er in t he later day s .
Th is appli ance is in tended t obe used in hous eho ld
andsimilarapplications suchas:
-s taff kitch en ar eas in s hop s, off ices and othe r
w orkin gen viro nme nts;
-farm hous es;
-b ycli ents inhotel s,mo tels and othe rres idential
t ype env i ronme nt s;
-bed and breakfast type environments.

1
This appliance must be grounded. In the event of a
malfunction or breakdown, grounding will reduce
theriskof anelectricshockbyprovidingapathof
least resistance of electric current. This appliance
is equipped with a cord having an equipment-
grounding conductor and a grounding plug.
The plug must be plugged into an appropriate outlet
that is installed and grounded in accordance with
all local codes and ordinances.
Keep children away from detergent and rinse aid, keep
children away from the open door of the dishwasher,
there could still be some detergent left inside.
Do not abuse, sit on, or stand on the door or dish
rack of the dishwasher.
Do not touch the heating element during or
immediately after use.
(This instruction is only applicable to machines
with a visual heating element.)
Do not wash plastic items unless they are marked
dishwasher safe or the equivalent. For plastic items
n
ot so marked, check the manufacturer's
recommendations.
Use only detergent and rinse additives
designed for an automatic dishwasher.
Never use soap, laundry detergent, or hand
washing detergent in your dishwasher. Keep
these products out of the reach of children.
During installation, the power supply must not
be excessively or dangerously bent or flattened.
Do not tamper with controls.
Do not place any heavy objects on or stand on the
door when it is open. The appliance could tip
forward.
When loading items to be washed:
1) Locatesharp items so that they arenot likely
to damage the door seal;
2) Warning: Knives and other utensils with
sharp points must be loaded in the basket
with their points down or placed in a
horizontal position.
When using your dishwasher, you should
prevent plastic items from coming into contact
with the heating element.(This instruction is only
applicable to machines with a visual heating
element.)
If the supply cord is damaged, it must be replaced
by the manufacturer or its service agent or a
similarly qualified person in order to avoid a
hazard.
Please dispose of packing materials properly.
Use the dishwasher only for its intended function.
Remove the door to the washing compartment when
removing an old dishwasher from service or discarding it.
Dishwasher detergents are strongly alkaline, they
can be extremely dangerous if swallowed. Avoid
contact with skin and eyes and keep children away
from the dishwasher when the door is open.
Check that the detergent comparment is empty
after completion of the wash cycle.
The appliance is to be connected to the water
mains using new hose sets and that old hose-sets
should not be reused.
The maximum number of place settings to be
washed is 14.
The maximum permissible inlet water pressure is
1Mpa.
The minimum permissible inlet water pressure is
0.04Mpa.
Children should be supervised to ensure that they do
not play with the appliance.
This appliance is not intended for use by persons
(including children )with reduced physical, sensory or
mental capabilities, or lack of experience and
knowledge ,unless they have beengiven supervision
or instruction concerning use of the appliance by a
person responsible for their safety.
When using your dishwasher, follow the precautions listed below:
WARNING!
The door should not be left open,
since this could increase the risk of tripping.
Do not operate your dishwasher unless all
enclosure panels are properly in place. Open
the door very carefully if the dishwasher is
operating, there is a risk of water squirting out.
Improper connection of the equipment-grounding
conductor can result in the risk of an electric shock.
Check with a qualified electrician or service
representative if you are in doubt whether the
appliance is properly grounded. Do not modify the
plug provided with the appliance; If it does not fit
the outlet. Have a proper outlet installed by a
qualified electrician.

2
Dispose of the dishwasher packaging material correctly.
All packaging materials can be recycled.
Plastic parts are marked with the standard international abbreviations:
PE for polyethylene, e.g. sheet wrapping material
PS for polystyrene, e.g. padding material
POM polyoxymethylene, e.g. plastic clips
PP polypropylene, e.g. Salt filler
ABS Acrylonitrile Butadiene Styrene, e.g. Control Panel .
Packaging material could be dangerous for children!
For disposing of package and the appliance please go to a recycling centre. Therefore cut
off the power supply cable and make the door closing device unusable.
Cardboard packaging is manufactured from recycled paper and should be disposed in the
waste paper collection for recycling.
By ensuring this product is disposed of correctly, you will help prevent potential negative
consequences for the environment and human health, which could otherwise be caused
by inappropriate waste handling of this product.
For more detailed information about recycling of this product, please contact your local
city officeandyour household waste disposalservice.
DISPOSAL: Do not dispose this product as unsorted municipal waste. Collection of such
waste separately for special treatment is necessary.
WARNING!

To get the best performance from your dishwasher, read all
operating instructions before using it for the first time.
3
11 12
Back View
1
2
3
4
5
6
7
8
9
10
on
Of f
Front view
Main Filter
Detergent Dispenser
Cup Shelf
Cutlery Basket
Coarse Filter
Rinse Aid Dispenser
Inlet pipe connector
Drain pipe connector
Lower Basket
Spray Arms
Upper Basket
1
Salt Container
5
6
7
8
9
10
12
11
3
2
4
7 Start / Reset Button: Press this button to start or pause the
dishwasher, the process pilot lamp will be on when
starting.
2 Power Light : To be on when the ON/OFF Button is
Pressed down.
5
3 Salt Warning Light : To be on when the softener
needs to be refilled.
4 Rinse Aid Warning Light : To be on when the
rinse aid dispenser needs to be refilled.
1 ON/OFF Button: To turn on/off the power supply.
Washing Program Selector: Press the button to select wash cycles
6
Program indicator light.
1
2
3
4
5
6 7

4
Be fore u sing you rdishwashe r for th e first time:
Th e wat er soften ermust be s et manu al ly, usin gthe water ha rd ness dial.
Th e wat er soften eris des igned to remove mineral sand sa lts from thewat er, wh ich woul dha ve
a detrim ent alor adverse effe ct on the op eration of the appliance. T heh igher t he
content oft hese mi nerals an dsa lts, the harde ryourwat er is. Thes ofte ner shou ld b e
adj usted acco rding t o the ha rdness ofthe water in you rarea. Your loca l Wa terA uthority
canadvise you onthehardnessofthewaterinyour area.
Adjusting Salt Consumption
The dishw asher isdesig ned to al low for a djus tment i n the amount ofsa lt co nsum ed bas ed o nthe ha rdne ss o f
thewaterused. Thisis intended tooptimise and customise thelevelo f salt consumption.
1. Uns c rew the ca p from the salt co nta in e r.
2. Ther ei s ar i ngo nth e con tai nerwi thana rrow o nit (se e figure
ontheside),ifnecessary, rotate thering intheanticlockwise
direction fromth e"-" Setting towardthe"+"s ign, base don the
hardne sso f the w at er be ing used.
It is recomm end edt hata dju stme nts should b e m ade in
acco rd ance wit hthe foll owin g sc hem e:
WAT ER SOFTENER
Th ehar dne ss o fthe wa ter v ar ie sfrom place t o plac e.I f har dwater is us ed i nthe dis hwa she r, de posits w ill
form on the dish esand ute nsils.
Th eappl ian cei s eq ui pp ed with asp eci alsoften er that uses asal tc onta iner spe cific al ly des ign ed to elimina te
lime an dmi ne ra ls fr om the wate r.
Contact your local w ater bo ardf orinfor matio n on the hardness of your w ater su pply.
dH
mm ol /l
0~1 40~8 0~1.4
/
0
/
14~398~22 1.4~3.9 - 20 50
39~8022~45 3.9~8 Mid 40 25
+
60 16
fH
0~10
10~28
28~56
Clar ke
WATER HARDNESS
SelectorPosition
Salt consumption
(gram/cycle)
Aut o nomy
(cycles/1kgs)
Pl eas e fol lo w thes teps bel ow f or adjus tmen t in salt c on s umpt ion .
""/
"-"
"+ "
"Mid"
Settingtowardthe"+"sign
Settingtowardthe"-"sign
Settingtowardbetween
the "-" sign and "+" sign
No sa ltneed added
45~60 80~1 07 56~75 8~11
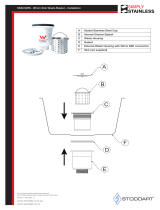
If your m odel doesno thaveanyw ater softene r, you maysk ip this secti on.
A. Set the wate rs of tener
B. Add 1. 5Kgd ishw asher sa lt an dt hen ful l fill t he sal tcon ta iner w it hw ater
C. Filltherinseaiddispenser
D. Fill indete rg en t
°
Clark:Britishdegree
°
fH: Frenchdegree
°
DH : Ger man degr ee
dH =1.25Clarke=1.78 fH=0.17 8mmol/l
°°°
1

5
1.The salt contai ne rmust only be refil le dw hen the salt warning light inthe control panel com es on.
Depend ing on howwel lthe s alt diss olve s, th es alt warning li ght ma ystill be on even though the
salt container is filled .
If the reis n osalt warning light i n the con trol panel (fo rso me Mode ls) ,you c an estim ate when t of ill
the s alti nto theso ftene r by the cyc les that the dishwashe rhas ru n.
2. If th ereare spills ofthe salt, a soak or a rap idpro gram should be ru nto remove t he exce ssiv esa lt.
Always use the salt intende dfor use w ith di shwasher.
The saltc o ntain er i slocat ed ben eath the lowe rbas ket and sh ould b efill eda s e xplained
int he f oll owing:
Attention!
Only us e salt spe cifi ca ll y designe dfort he use i nd ishw ashers! E very other type of
salt n ot speci ficallyde sig ned fo r t heu se in ad ishwas her, espe cial lyt able salt, wi ll
damage the w ater sof tener. I n case of da ma ges caused b yt he use o f un suit able
salt t he ma nuf act urer does not give any wa rranty no r is liabl e for a ny damage s cau sed.
Only fil lwi ths alt just b efore starting one o ftheco mp let e wa shingp ro gra ms.
This wi ll p revent any g rai ns ofs alt or salty water, wh ich ma y have been spilled,
remain ing on the bo tt omof t he machi ne for any p erio dof time, whi ch may cause
c o rr osion.
Th er inse aid is rel ea sed d uri ngthe final rin se to pr event wat er fro m for min g droplet s ony our di sh es, w hich can
leave spots andst re aks. It also improve sdry ingby all ow ing wate r tor oll offt he di shes .Your d ishw asher is
designedtouseliquidrinseaids.The rinseaiddispenser islocated insidethedoornext tothe detergentdispenser.
Tofil l the di spe ns er, ope n the c ap a nd pour the r inse aid i nt oth e dispe nse r unt il the l e veli ndi cat or turn s c omplete l y
black. The v olume oft he ri nse a idc ontainer is about 110ml .
RinseAid Dispenser
Function of RinseAid
Rinse ai d is aut om at ic allya dded d uring t helast ri nse, ensuring thor ough rinsing, and spo tan d s treakfree drying.
Attention!
Only use branded rinseaidfor dishwasher. Neverfilltherinseaiddispenserwithanyothersubstances
(e.g. Di shw asher cleani ng ag ent, liq u id deterg ent). Th is wou ld damag e t he app lian ce .
A Remove the lowerbasket andthen unscrew andremovethe cap fromthesalt container.
B Pl ace the en do fthe fu nnel( suppl ied) in to t heh ole an di ntro duce abo ut1.5kg of d ishw ash ersal t .
C Fullfill thesalt containerwithwater.Itisnormalfor a small amountof watertocomeout ofthesaltcontainer.
D Af ter f illi ng th ec ontain er, sc rew th ec ap t igh tly bac k clo ckwise.
E Usually, the s alt warni ng light will st op bei ng il luminat ed wi th in 2 -6 days af te rth es alt c ont ain erha sbe en fi lled wit h
sal t.
F Immedi at elya fterf illin gt he s alt in to th e sa ltco ntainer, a w ashing program should be start ed
progr am Otherw ise t he fil ter syst em, pump or ot her importan t part s of the machine m ay be d amaged
bysalty water.This is outofwarranty.
(Wesu ggest to use t he
soakorrapid ).

6
To open the dispenser, turn the cap to the "open" (left) arrow and lift it out.
Pour the rinse aid into the dispenser, being careful not to overfill.
Replace the cap by inserting it aligned with "open" arrow and turning it to the closed (right) arrow.
The rinse aid is released during the final rinse to prevent water from forming droplets on your dishes
that can leave spots and streaks. It also improves drying by allowing water to sheet off the dishes.
Your dishwashers are designed to use liquid rinse aids. The rinse aid dispenser is located inside the
door next to the detergent dispenser. To fill the dispenser, open the cap and pour the rinse aid into
the dispenser until the level indicator turns completely black. The volumeoftherinseaidcontainer
is about 140ml.
Be careful not to overfill the dispenser, because this could cause over sudsing. Wipe away any spills
with a damp cloth. Don't forget to replace the cap before you close dishwasher door.
Attention!
Clean up any rinse aid split during filling with an absorbent cloth to avoid excess foaming
during the next wash.
The rinse aid dispenser has six or four settings. Always start with the dispenser set on
“2”. If spots and poor drying are problems, increase the amount of rinse aid dispensed
by removing the dispenser lid and rotating the dial to “3”. If the dishes still are not
drying properly or are spotted, adjust the dial to the next higher number until your dishes
are spot-free. We suggest you to set on “4”(Factory value is “4”)
NOTE:
Increase the dose if there are drops of water or lime spots on the dishes after washing.
Reduce it if there are sticky whitish streaks on the dishes or a bluish film onglasswareor
knife blades.
1
2
3
As the rinse aid diminishes, the size of the black dot
on the rinse aid level indicator changes, as illustrated below.
Full
3/4full
1/2full
1 / 4 full - Should refill to eliminate spotting
Empty
If there is no rinse-aid warning light in the control panel, you can judge the amount of rinse-aid by the color of the optical level
indicator "C" located next to the cap. When the rinse-aid container isfull, the whole indicator will be dark .As the rinse-aid
diminishes, the size of the dark dot decreases. You should never let the rinse aid get below 1 / 4 full.
Adjust lever
(Rinse)
C

7
Based on their chemical composition, dishwasher can be split in two basic types:
conventional, alkaline detergents with caustic components
low alkaline concentrated detergents with natural enzymes
Detergent tablets of different brands dissolve at different speeds. For this reason some
detergent tablets cannot dissolve and develop their full cleaning power during short
programmes. Therefore please use long programmes when using detergent tablets, to
unsure the complete removal of detergent residuals.
The dispenser must be refilled before the start of each wash cycle following the instructions
provided in the Wash Cycle Table? Your dishwashers use less detergent and rinse aid
then conventional dishwashers. Generally, only one tablespoon of detergent is needed for
a normal wash load. Also, more heavily soiled items need more detergent. Always add the
detergent just before starting dishwasher, otherwise it could get damp and will not dissolve
properly.
Amount of Detergent to Use
Always add the detergent just before starting each wash cycle.
Only use branded detergent aid for dishwasher.
If the lid is closed: press release button. The lid springs open.
Dishwasher detergent is corrosive! Take care to keep it out of reach of children.
Proper Use of Detergent
Use only detergent specifically made for use in dishwashers. Keep your detergent fresh
and dry. Don't put powder detergent into the dispenser until you're ready to wash dishes.
Concentrated Detergent
Detergent Tablets
Detergent Dispenser
Detergents with its chemical ingredients are necessary to remove dirt, crush dirt and
transport it out of the dishwasher. Most of commercial quality detergents aresuitable
for this purpose.
1
2

8
Detergents
There are 3 sorts of detergents
1.With phosphate and with chlorine
2.With phosphate and without chlorine
3.Without phosphate and without chlorine
Normally new pulverised detergent is without phosphate. Thus the water softener function of
phosphate is not given. In this case we recommend to fill salt in the salt container even when
the hardness of water is only 6 dH. If detergents without phosphate are used in the case of hard water
often white spots appear on dishes and glasses. In this case please add more detergent to reach
better results. Detergents without chlorine do only bleach a little. Strong and coloured spots will not
be removed completely. In this case please choose a program with a higher temperature.
°
Attention
Keep all detergents in a safe place out of children's reach.
Always add the detergent in the dispenser just before starting the dishwasher.
Use of 2 in 1 3 in 1 4 in 1 and 5 in 1 Combination / Compact Detergents“”、“”、“”“”
These products are detergents with integrated and combined detergent/rinse aid and
salt functions. Before using these products you should first check that the water hardness
in your supply is compatible with the use of these products as per the detergent manu-
facturers (on the product packaging). These products should be strictly used according to
the detergent manufacturer's instructions. In general detergents that include rinse aidor
water softener are only able to serve good results under certain conditions: rinse aid and
water softener can not adapted to specific conditions. For this reasons in some cases
there might be unwanted cleaning or drying results. Please ask the detergent manufac-
turer to inform you about the best consume conditions. If you encounter problems when
using these products for the first time then please contact the detergent manufacturers
care line. The manufacturer of your dishwasher is not liable for damages caused by
compact detergents nor gives warranty if you use compact detergents.
When use 2 in 1 3 in 1 4 in 1 or 5 in 1 Combination / Compact Deter-
gents ,please pay attention to make sure that the size of the Combination Detergents
is fitted to the dispenser so that Combination Detergents can be ease to put in the
dispenser ,and dispenser would not be broken.
“ ”、“ ”、“ ” “ ”
,
Fill the detergent dispenser with detergent.
The marking indicates the dosing levels , as
illustrated on the right:
The place of main wash cycle detergent placed.
The place of pre-wash cycle detergent placed.
Please observe the manufacturers dosing and storage
Recommendations as stated on the detergent packaging.
Close the lid and press until it locks in place.
If the dishesare heavily soiled, place an additional
detergent dose in the pre-wash detergent chamber. This detergent will take effectduring the pre-wash phase.
A
B
Fill in Detergent
You find information about the amount of detergent for the single programme on the last page.
Please aware, that according to the level soiling and the specific hardness of water differences are possible.
Please observe the manufacturer's recommendations on the detergent packaging.
A
B

9
For best performance of the dishwasher, follow these loading guidelines. Features and
appearance of baskets and cutlery baskets may vary from your model.
Attention before or after Loading the Dishwasher Baskets
Scrape off any large amounts of leftover food. Soften remnants of burnt foodinpans.
It is not necessary to rinse the dishes under running water.
Place objects in the dishwasher in following way:
1.Items such as cups, glasses, pots/pans, etc. are faced downwards.
2.Curved items, or ones with recesses, should be loaded aslant so that water can run off.
3.All utensils are stacked securely and can not tip over.
4.All utensils are placed in the way that the spray arms can rotate freely during washing.
Very small items should not be washed in the dishwasher as they could easily fall out of the baskets.
Removing the Dishes
To prevent water dripping from the upper basket into the lower back, we recommend that you
empty the lower basket first and then the upper basket.
Loading the Upper Basket
The upper basket is designed to hold more delicate and lighter dishware such as glasses, coffee
and tea cup and saucers, as well as plates, small bowls and shallow pans (as long as they are
not too dirty).
Position the dishes and cookware so that they do not get moved by the spray of water.
Upper wheels
Lower wheels
Adjusting the Upper Basket
The height of the upper basket can be adjusted in order to create more space for large utensils
both for the upper/lower basket. The height of the upper basket can be adjusted by placing the
wheels on different height of the rails. Long items, serving cutlery, salad servers and knives
should be placed on the shelf so that they do not obstruct the rotation of the spray arms.
The shelf can be folded back or be removed when not required for use.
1
Cups
2
Small serving bowl
3
Large serving bowl
4
Glasses
Saucers
5
6
7
Dish
Dessert dishes
4
5
4
4
4
4
4
4
1
1
7
7
7
4
1
SILVERWARE BASKET
7
SILVERWARE BASKET
6
Gravy ladle Serving spoon

10
Loading the Lower Basket
We recommend that you place large items which are most difficult to clean into the lower basket:
pots, pans, lids, serving dishes and bowls, as shown in the figure to the right.
It is preferable to place serving dishes and lids on the side of the racks in order to avoid blocking
the rotation of the top spray arm.
Pots, serving bowls, etc. must always be placed top down.
Deep pots should be slanted to allow water to flow out.
Thebottom basket feature fold down tine rows so that larger or more potsand pans can be loaded.
Folding spikes
Forbetter stacking of pots and pans, the spikes can be folded down as
show in the picture right.
8
Oval platter
10
Soup plates
Dessert dishes
7
9
Dinner plates
11
Silverware basket
8
5

11
Cutlery Basket
For washing in the dishwasher the following cutlery/dishes
Cutlery with wooden, horn china or
mother-of-pearl handles
Plastic items that are not heat resistant
Older cutlery with glued parts that are not
temperature resistant
Bonded cutlery items or dishes
Pewter or cooper items
Crystal glass
Steel items subject to rusting
Wooden platters
Items made from synthetic fibres
Do not put in items that are dirty of cigarette ash, candle wax, lacquer or paint.
If you buy new dishes please make sure that they are suitable for dishwashers.
Some types of glasses can become
dull after a large number of washes
Silver and aluminum parts have a
tendency to discolour during washing
Glazed patterns may fade if machine
washed frequently
Please do not overload your dishwasher. Do not use dish that is not suitable for
dishwashers. This is important for good results and for reasonable energy consume.
Before loading the dishes, you should:
Remove large left-over
Soften remnants of burnt food in pans
Dishes and cutlery must not impede the rotation of the spray arms
Load hollow items such as cups, glasses, pans etc. with the opening downwards so that
water cannot collect in the container or a deepbase
NOTE:
NOTE:
Are not suitable
Are of limited suitability
Loading cutlery and dishes
When loading the dishes and cutlery, please note:
Cutlery should be placed in the cutlery basket with the handles at the bottom. If the rack has side baskets, the
spoons should be loaded separately into the appropriate slots, especially long utensils should be placed in the
horizontal position at the front of the upper basket as shown in the picture.
Do not let any item extend through the bottom.
Always load sharp utensils with the sharp point down!
Teaspoons
4
Soup spoons
2
Forks
1
Serving fork
8
Serving spoon
6
Knife
5
3
Dessert spoons
7
Gravy ladle
5
1
55
1
55
1
5
2
1
22
1
22
1
2
2
1
22
1
2
5
1
5
2
1
2
5
1
55
1
5
2
1
2
5
1
4
333 3 33
333 3 33
33
444 444
4
44
8
4444
56

12
Di
To
T
shes and items of cutlery must not lie inside one another, or cover each other
avoid damage to glasses, they must not touch
Load large items which are most difficult to clean into the lower rack
he upper rack is designed to hold more delicate and lighter dishware such as glasses, coffee
and tea cups
Attention!
Long bladed knives stored in an upright position are a potential hazard!
Long and/or sharp items of cutlery such as carving knives must be positioned
horizontally in the upper basket.
Damage to glassware and other dishes
Possible causes:
Type of glass or manufacturing process. Chemical composition of detergent.
Water temperature and duration of dishwasher programme.
Suggested remedy:
Use glassware or porcelain dishes that have been marked dishwasher-proof by the
manufacturer
Use a mild detergent that is described as kind of dishes If necessary, seek further
information from detergent manufacturers.
Select a programme with as low a temperature.
To prevent damage, take glass and cutlery out of the dishwasher as soon as possible
after the programme has ended.

13
For normally soiled loads, such
as pots plates glasses and
lightly soiled pans.
、、
Standard daily cycle for normally
soiled loads, such as pots
plates glasses.
、
、
For heaviest soiled crockery,
andnormallysoiledpots pans
dishes etc with dried on soiling;
、、
A shorter wash for lightly soile
d loads and quick wash
For lightly soiled loads that
do not need excellent drying
efficiency.
For normally soiled loads,
use multifunctional detergent
5/30 g.
5/30 g.
30 g.
5/30 g.
20 g.
160
165
125
30
60
1.30
1.04
1.36
0.5
0.95
16.0
12.5
19.5
11.0
12.0
3in1
160
16.0
1.35
Intensive
Normal
(EN 50242)
Eco
Rapid
3In 1
Pre-wash 50
Wash 55
Rinse
Rinse 65
Drying
(℃)
(℃)
(℃)
Pre-w ash(5 0 )
Was h ( 6 5 )
Rin se
Rin se
Rin se (5 5 )
Dryi ng
℃
℃
℃
Pre-wash(50 )
Wash (5 5 )
Rinse
Rinse(65 )
Drying
℃
℃
℃
Wash (5 0 )
Rinse (65 )
Drying
Pre-wash
℃
℃
Wash(6 0 )
Rin se
℃
Rinse (50 )
Drying
℃
Wash (4 0 )
Rinse
Rinse (40 )
℃
℃
*EN 5 02 42 : T his p ro gr amm e is the te s t c yc le . Th e i nfo rm at ion f or com p arab ili t y test
inaccordance withEN 50242, as f ollows:
Capacity: 1 4se tting
Pos i t ion Up pe r b a sk e t:u p per whe el s on ra ils
Rinse a i d s e t t ing: 6
Thepowerconsumptionofoff-modeis0.5W
lef t - o n mo de is 0. W
Rinse
5

14
A forgotten dish can be added at any time before the detergent cup opens.
Press the Start/Reset button to stop the washing.
After the spray arms stop working, you can open the door
completely.
Load the forgotten dishes.
Close the door and press the Start/Reset button, the
dishwasher will start running againafter 10 seconds.
4
3
2
1
If all the lights begin to glimmer, that indicates the machine is out of order, please turn off the
main power and water supply before calling a service.
NOTE:
It is dangerous to open the door when washing,because the hot water may scaldyou.
When the working cycle has finished, the buzzer of the dishwasher will sound for 8 seconds, then stop. Turn off
the appliance using the ON/OFF button, shut off the water supply and open the door of the dishwasher.
Wait for a few minutes before unloading the dishwasher to avoid handling the dishes and utensils while they
are still hot and more susceptible to breakage. They will also dry better.
Starting a wash cycle...
Draw out the lower and upper basket, then load the dishes and
push them back. Please load the lower basket first and push
push it back then the upper one (see the section entitled
“Loading the Dishwasher”).
Pour in the detergent (see the section entitled “Salt,
Detergent and Rinse Aid”).
Insert the plug into the socket. The power supply is 220-240
VAC 50 HZ, the specification of the socket is 10 A 250 VAC.
Make sure that the water supply is turned on to full pressure.
2
3
4
Note: When you press the Start/Reset button to pause during washing,
the program light will stop blinking and the dishwasher will mooing
every minute unless you press the Start/Reset button to start.
Press the program button , the wash program will be changed as follows direction
Intensive->Normal->Eco->Rinse->Rapid->3in1;
If a program is selected, the response light will light. Then press the
Start/Reset button, the dishwasher begins to run.
Premise: You can modify the washing program, When
the dishwasher just runs for a short time. Otherwise,
the detergent may have already been released, and the appliance
may have already drained the wash water. If this is the case, the detergent
dispenser must be refilled (see the section entitled " Loading the
Detergent " ).
Press start/Reset Button more than three seconds the machine will
be in stand by state ,then you can change the program to
the desired cycle setting (see the section entitled " Starting a wash cycle...").
NOTE: If you open the door during washing, the machine
will pause. When you close the door and press the start/reset Button,
the machine will keep on working after 10 seconds.
The program lights show the state of the dishwasher:
1) One of the program lights on----------stand by or pause
2) One of the program lights blinking----- run
1
Turning on the Appliance

15
The filter prevents larger remnants of food or other objects from getting inside the pump.
The residues may block the filter, in this case they must be removed.
The filter system consists of a coarse filter, a flat (Main filter)
And a microfilter (Fine filter).
Main filter
Food and soil particles trapped in this filter are pulverized by a
special jet on the lower spray arm and washed down the
drain.
Coarse filter
Larger items, such as pieces of bones or glass, that could clog
the drain are trapped in the coarse filter. To remove an item
caught in this filter, gently squeeze the taps on the top of this
filter and lift it out.
Fine filter
This filter holds soil and food residues in the sump area and
prevents it from being redeposit on the dishes during a cycle.
2
3
1
2
3
1
- Inspect the filters for blocking after every time the dishwasher has been used.
- By unscrewing the coarse filter. you can remove the filter system. Remove any food remnants and clean the
filters under running water.
step
1:
Turn the filter in anti-clockwise direction,
then lift it up
step2:lift the Main filter up
NOTE:
step 3: lift the Fine filter up
Switch Off the Dishwasher
1.Switch off the dishwasher by pressing the ON/OFF button.
2.Turn off the water tap!
Open the door carefully.
Hot dishes are sensitive to knocks. The dishes should therefore be allowed to cool down around 15 minutes
before removing from the appliance.
Open the dishwasher's door, leave it ajar and wait a few minutes before removing the dishes. In this way they
will be cooler and the drying will be improved.
Unloading the dishwasher
It is normal that the dishwasher is wet inside.
Empty the lower basket first and then the upper one. This will avoid water dripping from the upper Basket onto
the dishes in the lower one.
When following this procedure from step1 to step 3, the filter system will beremoved;
whenfollowingitfromStep3toStep1,thefiltersystemwillbeinstalled.
1
2
3

16
Caring for the Dishwasher
Protect Against Freezing
Filter assembly
To clean the coarse filter and the fine filter, use a cleaning brush. Then, reassemble the filter
parts as shown in the figures left and reinsert the entire assembly in the dishwasher, positioning
in its seat and pressing downward.
The dishwasher must never be used without the filters. Improper replacement of the filter may
reduce the performance level of the appliance and damage dishes and utensils.
For best performance and results, the filter assembly must be cleaned. The filter efficiently removes food
particles from the wash water, allowing it to be recycled during the cycle. For best performance and results,
the filter must be cleaned regularly. For this reason, it is a good idea to remove the larger food particles
trapped in the filter after each wash cycle by rinsing the semicircular filter and cup under running water.
To remove the filter device, pull the cup handle in the upward direction. The entire filter assembly should be
cleaned once a week.
The dishwasher must never be used without the filters.
Improper replacement of the filter may reduce the performance level of the appliance and
damage dishes and utensils.
1.Cut off the electrical power to the dishwasher.
2.Turn off the water supply and disconnect the water inlet pipe from the water valve.
3.Drain the water from the inlet pipe and water valve. (Use a pan to catch the water)
4.Reconnect the water inlet pipe to the water valve.
5.Remove the filter at the bottom of the tub and use a sponge to soak up water inthesump.
please take frost protection measures on the dishwasher in winter. Every time after washing cycles,
please operate as follows
:
The control panel can be cleaned by using a lightly dampened cloth.
After cleaning,makesure to dry it thoroughly.
For the exterior, use a good appliance polish wax.
Never use sharp objects, scouring pads or harsh cleaners on any part of the dishwasher.
Cleaning the Spray Arms
upper
lower
It is necessary to clean the spray arms regularly for hard water chemicals will clog the spray arm jets and bearings.
To remove the upper spray arm, screw off the nut clockwise then remove
the arm.
Remove the upper spray arm
To remove the lower spray arm, pull out .the spray arm upward
Remove the lower spray arm
Wash the arms
Wash the arms in soapy and warm water and use a soft brush to clean
the jets. Replace them after rinsing them thoroughly.

The installation of the pipes
and electrical equipments
should be done by professionals.
Electrical Shock Hazard
Disconnect electrical power before
installing dishwasher.
Failuretodosocanresultindeathor
electrical shock.
The installation position of dishwasher should be near the existing inlet and drain hoses and
power cord.
One side of the cabinet sink should be chosen to facilitate the connection ofdrainhosesof
the dishwasher.
Installation preparation
Note: please check the accompanying installation accessories(hook for aesthetic panel
,screw)
●
17
After every wash, turn off the water supply to the
appliance and leave the door slightly ajar so that
moisture and odours are not trapped inside.
Before cleaning or performing maintenance, always
remove the plug from the socket. Do not run risks.
To clean the exterior and rubber parts of the dishwasher,
do not use solvents or abrasive cleaning products.
Rather, useonly a cloth and warm soapy water.
To remove spots or stains from the surface of the
interior, use a cloth dampened with water and a little
vinegar, or a cleaning product made specifically for
dishwashers.
When you go on holiday, it is recommend that you run a
wash cycle with the dishwasher empty and then remove
the plug from the socket, turn off the water supply and
leave the door of the appliance slightly ajar. This will help
the seals to last longer and prevent odours from forming
within the appliance.
If the appliance must be moved, try to keep it in the vertical
position. If absolutely necessary, it can be positioned on
its back.
One of the factors that cause odours to form in the
dishwasher is food that remains trapped in the seals.
Periodic cleaning with a damp sponge will prevent this
from occurring.
To clean the edge around the door, you should use only a soft warm, damp cloth.
To avoid penetration of water into the door lock and electrical components,donot
use a spray cleaner of any kind.
Never use a spray cleaner to clean the door panel as it may damage the door lock and electrical components.
Abrasive agents or some paper towels should not be used because of the risk of scratching or leaving spots
on the stainless steel surface.
/