Page is loading ...

Part numbers:
# 314 - 14" fan
# 316 - 16" fan
# 318 - 18" fan
Each kit includes
(1) fan, motor & bracket assembly
(4) 3/8 - 16 x 1.25” bolts
(4) 3/8 - 16 x 6” bolts
(8) 3/8 - 16 star nuts
(8) flat washers
(2) “L” brackets
(1) nylon bolt kit
(1) instruction sheet
.
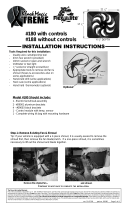
Fan, motor &
bracket assembly
Flat washer
“L” bracket
Diagram A
3/16” Through core
mounting holes
Frame mounting
slots
3/8 - 16 x 6 bolt
Lock nuts
rev. 05-05 99908
1. Insert the 6” bolts through washer and “L” bracket. Attach a lock nut to the bolt. This will be used to locate the height of
the bracket for mounting. Insert bolt and “L” bracket assembly into threaded motor and bracket assembly. (See diagram A)
2. This unit is designed to push or pull air and can be mounted vertically or horizontally.
IMPORTANT: It is not necessary to flip the fan blade or reverse the polarity to change to push or pull configura-
tions. Typically puller fans are more efficient at moving air than pusher fans.
To “push” air from the front of the radiator:
Attach the “L” brackets to the ends of the square threaded struts so that the electric fan motor is facing the radiator. (See
diagram B) Use the bolts and washer supplied to attach the “L” brackets. (See diagram A)
To “pull” air from the back of the radiator:
Attach the “L” brackets to the ends of the square threaded struts so that the electric fan blade is facing the radiator. (See
diagram C) Use the bolts and washers supplied to attach the “L” brackets. (See diagram A)
Adjustable Fan Assembly
High Volume Adjustable Electric Fan
Instructions

Installation (Frame mount)
1. Determine the best place to mount the fan on the radiator, vertically or horizontally in either push or pull
configuration.
2. While holding the fan in place, extend the 6” long bolts and “L” brackets out to the radiator flange or
bracket(s). Mark the position of the “L” brackets slots on the radiator flange or bracket(s). Drill a 5/16” hole at
the marked positions. IMPORTANT: Prior to drilling, be sure that holes can be safely drilled in the desired
locations.
3. Using the provided bolts, nuts and washers, if applicable, attach the fan unit to the radiator. Tighten the bolts
accordingly. (See diagram B or C)
Wiring
DIRECT CONNECTION
1. Attach the Black motor wire to a 12V positive ignition controlled source i.e., fuse box.
2. Attach the Red motor wire to ground i.e., chassis, negative post of the battery.
MANUAL SWITCH (not included)
Splice a manual switch into the ground side of the electric fan motor (Red motor wire).
Diagram B (Push)
Diagram C (Pull)
“L” bracket
“L” bracket
3/8 - 16 x 1.25
bolt
3/8 - 16 x 1.25
bolt
3/8 - 16
star nut
3/8 - 16
star nut
Flat washer
Flat washer
Radiator
flange
Backside
of
radiator
Backside
of
radiator
Installation (Through core)
1. Determine the best place to mount the fan on the radiator, vertically or horizontally in either push or pull
configuration.
2. Using the 3/16” holes of the “L” brackets, mark the position for mounting the fan on the radiator then
pass a small Phillips head screwdriver through the marked holes to spread the fins to allow easy
passage for the nylon bolts.
3. Pass the nylon bolt through the: Nylon washer, 3/16” hole of the “L” bracket, rubber washer,
then finally the marked holes on the radiator. Be sure that the rubber washer is used between the brackets
and the radiator surface.
4. On the opposite side of the radiator, push on the nylon fastener nut until snug.
rev. 05-05 99908
The Flex-a-lite Limited Warranty
Flex-a-lite Consolidated, 7213-45th St. Ct. E. Fife, WA 98424, Telephone No. 253-922-2700, warrants to the original purchasing user, that all Flex-a-lite products to be free of
defects in material and workmanship for a period of 365 days (1 year) from date of purchase. Flex-a-lite products failing within 365 days (1 year) from date of purchase may
be returned to the factory through the point of purchase, transportation charges prepaid. If, on inspection, cause of failure is determined to be defective material or workmanship
and not by misuse, accidental or improper installation, Flex-a-lite will replace the fan free of charge, transportation prepaid. Flex-a-lite will not be liable for incidental,
progressive or consequential damages. Some states do not allow the exclusion or limitation of incidental or consequential damages, so the above limitation or exclusion may
not apply to you. This warranty gives you specific legal rights and you may have other rights, which vary from state to state.
The Flex-a-lite warranty is in compliance with the Magnuson-Moss Warranty Act of 1975.
/