Saey 478.0394 SERIES Operating Instructions Manual
- Category
- Stoves
- Type
- Operating Instructions Manual
This manual is also suitable for

1.
SAEY nv., Industrielaan 4,
8501 Kortrijk-Heule (Belgium)
tel. (56)36.14.64 - fax (56) 36.15.10
OPERATING INSTRUCTIONS
SAEY 94 (TOP) COAL / MULTIFUEL
478.0294.XX Saey 94 coal
478.0394.XX Saey 94 TOP coal
SAEY 94 MULTI-FUEL
Documentation addressed
to the user and installer
06/2000

2.
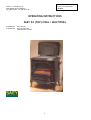
Dimensions
Height of standard model................................ ................................... ... 74 cm
Height of TOP model.................................................. ....................... ... 77 cm
Height with open lid................................................................... . 110 cm
Width ........................................................................ ......... .... .... 64,5 cm
Depth ........................................................................................... . ... 53 cm
Diameter of the outlet duct .............................................................. 150 mm
Distance from ground to bottom part of the outlet duct ......................... .. 52 cm
1. IMPORTANT WARNINGS
WARNING !
- The user of a stove must read the manual attentively before using the appliance for the first time.
- If your stove has been installed in the living room, you must ensure a sufficient supply of fresh air in any case.
- The appliance should only be used with closed doors.
- When the doors remain open once the stove is functioning, the thermostat function is disabled and the inflow of air
into the stove is no longer being controlled.
The danger then arises that the stove will become too hot and overheated, so that slag formation takes place and the
parts exposed to the flames are damaged.
The glass panel will become warped and glowing embers will burn into the glass surface. This kind of damage is not
covered by the guarantee.
- Shut the stove doors and turn off the thermostat, even when the stove is not in operation.
2. THE CONNECTION OF A STOVE
It is only when the appliance was connected by an authorised installer that you can be certain that the installation and
fire protection instructions were observed.
The most important connection component is the chimney.
Make an appointment with a recognised chimney sweeper so that the specific regulations applicable in the country of
use in this regard, are also complied with.
Also pay attention to the following:
The stove is suitable for a chimney with several shafts. For this purpose, the stove must be used with closed doors.
The inflow of air must be sufficient in whatever space the appliance has been installed. Tightly closed doors and
windows may cause problems in this regard.
Preferably place your stove near the chimney. A heat-resistant, fireproof base (bottom plate) must be placed
underneath the stove.
These bases (made of cast iron, steel sheeting…) are available commercially.
In any case, ensure that the base is fireproof.
Flammable objects such as doors, furniture, woodwork etc. must be at a distance of at least 60 cm.
Place your appliance at least 30 cm away from the wall. The wall must consist of non-flammable material.
3. CONNECTING THE STOVE TO THE CHIMNEY

3.
The chimney draught must be above 0,08 mbar (0,8 mm WK). The diameter of the smoke
duct must correspond with that of the connector (150 mm).
The smoke duct must be sealed at all
connection points! Attention is specifically drawn to the danger of escaping fumes.
False air results in a weaker chimney draught.
If the chimney draught is too strong, the installation
of a draught regulator is recommended.
The discharge of fumes takes place at the back of the stove.
Take note of the following precautionary measures before the smoke duct is installed:
- The diameter of the smoke duct may not be reduced and it may not be positioned horizontally, but should still rise
towards the chimney at a slight angle.
- The stovepipe must fit into the chimney opening to make the discharge of fumes possible. Make provision for a
double lining in this regard.
- Chimney connections of different stoves may not be so positioned opposite one other, i.e. at the same height. This
may obstruct the discharge of exhaust fumes. The distance between two outlets for fumes should be at least 30 cm.
- Do not connect too many stoves to one chimney – too many connections hamper the upward draught. Ask your
chimney sweeper for advice.
- The chimney may not conduct any false air. Ensure that the chimney control valves as well as the cleaning openings
in the cellar are closed.
- The smoke duct must be securely attached to the connector.
4. SUITABLE FUELS
The SAEY 94 stove makes use of the following fuels:
* COAL : Anthracite granules 6/12, 12/22, 20/30
* WOOD : Logs with sticky bark, e.g. cleaved logs, with a length of 45 cm.
The wood should be stored for about two years, and should
have a maximum residual humidity level of 20%.
Wet wood does not burn well and produces smoke, resulting in
condensation and a tar discharge, which makes the stove dirty.
When wood is burnt, the filling funnel must be removed (model Coal TOP ONLY).
Topping up takes place via the right side door.
TAKE CARE: NO synthetic fuels (e.g. FUTUREX)
DO NOT burn waste matter

4.
5. FOR THE FIRST KINDLING
When used for the first time, the stove must be dried out first. For this purpose, use a little fuel to keep the fire burning
for one hour.
When burning wood: Air slider R + L (at the front, above the glass panel) slide to the outside (open position)
When burning coal: Air slider R + L (at the front, above the glass panel) slide to the inside (closed position)
When the air sliders are open, the glass is 'washed' by an air current that glides over the window. Thus, your window
remains clean for a long time
(=air-wash system). Fresh air is also added to the hot fumes via these openings. This causes the fumes to ignite so
that a second combustion takes place, resulting in a higher output and cleaner fume emissions (= post-combustion).
This causes the protective lacquer to dry up, and a smell may be given off.
Monitor the protection process carefully, and carefully wipe off any condensation drops before the residue gets a
chance to burn into the enamel (e.g. the lacquer).
6. PRECAUTIONS
A stove gets hot, especially the covering plate, the casing and the glass panel!
Install your stove in a safe place in order to prevent playing children from touching it.
Even if all the safety regulations are observed, there is still a risk of accidents occurring.
KEEP SMALL CHILDREN AT A SAFE DISTANCE.
7. LIGHTING THE STOVE – THE STANDARD PROCEDURE
When lighting the fire - thermostat: position “8”
Open the door with the glass panel and put crumpled newspaper on the fire grating, with a handful of splintered wood
(thin wood) on top of it.
Now pour a small amount of fuel onto it. After the stove has been lit, the door with the glass panel must be firmly
closed.
The door of the ash pan must be opened slightly so that the condensation vapours that are released will not be
deposited on the cold door with the glass panel.
Monitor the combustion process, and close the door of the ash pan after about 10 minutes.
IMPORTANT : The door of the ash pan and the door with the glass panel should now not be opened again, except for
the purpose of topping up.
8. FILLING UP WITH COAL
You may begin filling the stove once the kindling fuel has burnt out well and the coal bed is glowing adequately. The
filling funnel is filled at your own discretion, but should be at least half full.
The stove may only be filled up to the marked maximum level. The upper gas vents of the filling funnel must remain
open, so that the expansion gases can escape.
When filled to maximum capacity, the stove can burn for about 14 to 16 hours!
At a low thermostat setting, this is extended to 24 hours.
To stoke the fire: - air slider : “closed”
- thermostat : choose a setting between 2 and 8
IMPORTANT:

5.
It is advisable to set the thermostat to a lower position after about half an hour. This will ensure that combustion takes
place correctly.
The setting of the thermostat depends on the heat level required, and must be determined individually.
The heat capacity is also determined by other factors : the local conditions, the condition of the building and the
chimney. After some experimentation, you will be able to regulate your stove easily and confidently.
9. TIPS
a) When using brown coal
The quantities of fuel used in this regard (long briquettes 6” - 7” and small briquettes) are determined by the heat level
required. The stove should only be filled to the maximum level when a lot of heat is required.
The lowest setting (1-2) is the “glow setting”.
For heating during the night, when only a little heat is required, it is adequate to place 3 to 4 long briquettes or 2 shovels
of small briquettes on the burning grate without poking the ash.
Now set the thermostat to minimal air supply (1-2).
b) When using crushed foundry coke
In the case of poor combustion, processed crushed foundry coke requires a larger quantity of combustion air.
This means that it will not be possible to operate the stove at the lowest thermostat setting, as in the case of other
fuels. In addition, the setting of the thermostat can only be reduced gradually in this case.
10. REFILLING WITH FUELS
Coal : The shaking grate should be used every time the stove is refilled. Before opening the filling funnel lid, the
thermostat should be set to the position “8 open”.
This will ensure that the fumes present in the filling funnel or the combustion chamber do not escape into the area
where the stove is installed.
Wood : Do not poke
11. WOOD COMBUSTION
a) Conversion
If you want to burn wood in the stove, a small conversion is required. After removing the filling funnel lid (standard
model) or the drop-in frame (TOP model), you can remove the filling funnel from the stove.
b) Topping up
To stoke the fire - thermostat: setting 1-2 (basic wood position)
- open the air slider (max.)
Open the thermostat to prevent smoke from escaping via the side door.
On a coal bed that is still glowing adequately, lay down 3 logs next to the right “filler door” or the “door with glass panel”,
in a maximum of 2 layers. Do not overfill.
c) Operation
The burning of wood is accompanied by high flames and heavy smoke production. Wood must be burnt up rapidly and
with a constant oxygen supply. The combustion process may not be slowed down under any circumstances.
Negative consequences could be:
* smouldering fire, condensation and tar discharge
* excessive production of soot
* inconvenience caused by smoke (emission of harmful substances)

6.
* danger of asphyxiation
Wood provides intense combustion of short duration.
Sustained combustion is only achieved through regular top-ups, which means: only when the wood has almost been
burnt up and the degassing process completed - high flames are reduced to small, low flames and wood is converted
into glowing embers - can the emission of heat be slowed down by closing the air slider above the door with the glass
panel and the one of the ash pan.
Avoid an excessive amount of fuel in any case, otherwise the energy surge becomes too great and too much heat will
be lost.
d) Removal of ash
Take note: do not poke the fire when the appliance is in operation.
Wood combustion produces little ash. Because of this, the remains of the embers continue to smoulder in the glowing
ash.
12. ASH REMOVAL
The ash must be removed from the stove once to twice a day. For poking, use the poker rod located on the rear wall,
next to the closed ash door.
The ash pan may be maximally filled with ash to the upper edge. No ash cone may be formed; otherwise cooling of the
combustion chamber becomes impossible and the cast iron parts would begin to melt.
The ash door should always be closed when the stove is in operation. If this is not done, the stove overheats and is
damaged.
13. MAINTENANCE - IMPORTANT
The smoke discharge duct (between the checking-plate and the rear wall) must be cleaned after every heating season
– at least 1 x a year.
By removing the control damper, you will be able to reach the smoke discharge duct.
This makes it easy to remove the fly ash from the discharge duct as well as the connector. The control damper must
be put back correctly afterwards.
It is recommended that, after the heating season (i.e. during the summer months) the flue pipe between the stove and
chimney should be removed or sealed in order to prevent condensation and/or corrosion in the stove. This improves
the durability of your stove.
14. INSTRUCTIONS
In the case of the TOP model, kettles, pans, etc. may only be placed on the polished filler funnel lid and the drop-in
frame after 1 month of use.
In addition, no water may be spilt on the hot plates (to prevent cracks from being formed).
When in use, the polished upper plate will glow and become blue. This is a normal phenomenon.
The polished plate can be cleaned with steel wool or a maintenance product intended for this purpose.
15. GUARANTEE
THE MANUFACTURER GUARANTEES
a. Impeccable quality and processing of the raw materials
according to the stated requirements
b. Assembly by an expert
The guarantees a. and b. provide for free replacement of appliance parts declared unfit for use.
Such parts are only replaced free of charge when it can be proven that there are flaws in the raw materials or in the
workmanship.
No further claims may be made.

7.
THE MANUFACTURER DOES NOT GUARANTEE
Parts that are subject to wear and tear, and damage to and defects in the appliances or their parts, caused by:
Chemical or physical influences from outside with regard to transport, storage, incorrect installation and use of
appliance (e.g. cooling down with water, overheating). Use of inferior fuels – incorrect operation.
The manufacturer is not responsible for direct or indirect damage caused by the appliance. No claim can be laid to a
full or partial exchange, unless the manufacturer is unable to fix the flaw or damage within a certain time span.
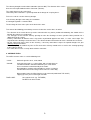
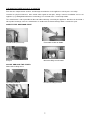
94 MULTI-FUEL AND WOOD STOVE
Control handle (thermostat) Extendable Handle for Riddler
Ash pan Maximum filling level for wood
94 COAL AND COAL TOP STOVES
Marked line in filling funnel
Open filling funnel lid Remove the filling funnel lid
Lifting out continuous feed hopper

8.
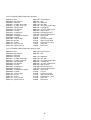
LIST OF SPARE PARTS FOR SAEY 94 COAL
0094-012 floor 0094-180 left fire basket
0094-020 top coal plate 0092-015 foot
0094-030 front wall 0092-110 doorknob
0094-035 air slider on the right 0092-140 filler door
0094-037 air slider on the left 0092-145 inner plate of filler door
0094-040 right side wall 0092-165 cleaning disc
0094-050 left side wall 0092-270 cast-iron shaking lever
0094-060 rear wall 0092-272 door fastener
0094-070 shaking grate 2348-250 operating spanner
0094-080 front grate 3385-210 complete filling funnel
0094-086 shaking grate support A28a/94 glass panel
0094-090 fire door A 19/98 ash pan
0094-100 ash pan door A 20/98 left ash pan guide
0094-120 filler lid A 21/98 right ash pan guide
0094-130 air duct A 15/98 shaking lever (steel)
0094-161 inner rear wall A 14/85 poker rod
0094-170 right fire basket A 02/86 thermostat
LIST OF SPARE PARTS FOR SAEY 94 TOP COAL
0094-012 floor 0094-180 left fire basket
0094-020 top coal plate 0092-015 foot
0094-027 front wall
0094-030 front wall 0092-110 doorknob
0094-035 air slider on the right 0092-140 filler door
0094-037 air slider on the left 0092-145 inner plate of filler door
0094-040 right side wall 0092-165 cleaning disc
0094-050 left side wall 0092-270 cast-iron shaking lever
0094-060 rear wall 0092-272 door fastener
0094-070 shaking grate 2348-250 operating spanner
0094-080 front grate 3385-210 complete filling funnel
0094-086 shaking grate support A28a/94 glass panel
0094-090 fire door A 19/98 ash pan
0094-100 ash pan door A 20/98 left ash pan guide
0094-120 filler lid A 21/98 right ash pan guide
0094-130 air duct A 15/98 shaking lever (steel)
0094-161 inner rear wall A 14/85 poker rod
0094-170 right fire basket A 02/86 thermostat
-
 1
1
-
 2
2
-
 3
3
-
 4
4
-
 5
5
-
 6
6
-
 7
7
-
 8
8


Saey 478.0394 SERIES Operating Instructions Manual
- Category
- Stoves
- Type
- Operating Instructions Manual
- This manual is also suitable for
Ask a question and I''ll find the answer in the document
Finding information in a document is now easier with AI
Other documents
-
 Olymberyl HF-556M Septima User manual
-
 Mendip Stoves Churchill 8 Operation and Installation Manual
-
Breckwell SF747 User manual
-
 Henley Achill 17.1kW User manual
-
United States Stove NITED STATES STOV 1602M User manual
-
Ashley 1602R Installation/operator’s User manual
-
 Broseley Hotspur 5 Woodburning Stove Installation guide
-
 Broseley Desire 5 Widescreen Multifuel Stove Installation guide
-
 Broseley Ignite 5 Multifuel Stove log store Installation guide
-
 Valor Fires BALTIMORE Installation And Operating Insctruction Manual


