Page is loading ...

512-811 Atomic Clock
with Weather Forecast
Quick setup manual
SET UP:
INSTALL BATTERIES IN THE TRANSMITTER:
Remove the screws and the battery cover from the back of the
W186-E transmitter with a small screwdriver.
Select the channel to transmit the outdoor temperature to the display.
NOTE: if using more than one transmitter, set each to a different
channel to be displayed on the clock.
Insert two fresh AAA alkaline batteries into the transmitter,
observing the correct polarity (see markings in battery compartment).
Select Fahrenheit or Celsius for the sensor display.
Press TX button to send a signal to the clock.
Keep transmitter 5-10 feet from the clock
The transmitter display should be showing a temperature reading.
If not please check battery polarity or try a new set of batteries.
INSTALL BATTERIES IN THE CLOCK:
Remove the battery cover from the clock:
Insert a finger in the rounded depression at the bottom of
the battery cover.
Lift up and pull out to remove battery cover.
Install three fresh AA alkaline batteries according to the polarity
markings.
Replace battery cover.
Once the batteries are in place, all segments of the LCD will light up
briefly. Then the indoor temperature will be displayed. If the indoor
temperature is not shown in the LCD after 60 seconds, remove the
batteries and wait for at least 60 seconds before reinserting them.
Within three minutes the outdoor temperature should be displayed on
the clock. If the outdoor temperature is not displayed within three
minutes, remove the batteries from both units and start again.
In order to ensure sufficient 434 MHz transmission, the outdoor
transmitter should be placed a distance of no more than 100 feet (30
meters, open air) from the Atomic clock.
WWVB RADIO CONTROLLED TIME
The NIST radio station, WWVB, is located in Ft. Collins, Colorado and
transmits the exact time signal continuously throughout the United States at
60 kHz. The signal can be received up to 2,000 miles away through the
internal antenna in the atomic clock. However, due to the nature of the
Earth’s Ionosphere, reception is very limited during daylight hours. The
atomic clock will search for a signal every night when reception is best.
If the tower icon flashes, but does not set the time or the WWVB tower does
not appear at all, then check the following:
Recommended distance from any interfering sources like computer
monitors or TV sets is a minimum of 6 feet (2 meters).
Within ferro-concrete rooms (basements, superstructures), the
received signal is weakened. In extreme cases, please place
the unit close to a window and/ or point its front or back towards the
Fort Collins, Colorado, transmitter.
During nighttime, the atmospheric disturbances are usually less severe
and reception is possible in most cases. A single daily reception is
adequate to keep the accuracy deviation below 1 second.
WWVB RECEPTION icon with full signal strength will appear on
screen if the reception of atomic time is successful. The atomic clock will
have a daily synchronization at 02:03 and 03:03 everyday. Each reception
cycle is minimum 2.5 minutes and maximum 10 minutes.
BUTTONS: Zz/CH, SET, AL, +/ , -/CF, ZONE.
NOTE: The time cannot be manually set while the clock is actively
searching for a WWVB signal. Please wait 3 minutes if signal search is in
progress.
SET TIME:
LANGUAGE: Hold the SET button until the Language will flash. Press
and release the PLUS button to set the Language (EN English, GE
German, FR French, SP Spanish, DU Dutch,). Press the SET button
once to continue.
YEAR: The Year will flash. Press and release the PLUS button to set
the Year. Press the SET button once to continue.
MONTH: The Month will flash. Press and release the PLUS button to
set the Month. Press the SET button once to continue.
DATE: The Date will flash. Press and release the PLUS button to set
the Date. Press the SET button once to continue.
NOTE: Day of week will set automatically.
HOUR: The Hour will flash. Press and release the PLUS button to set
the Hour. Press the SET button once to continue.
MINUTES: The Minutes will flash. Press and release the PLUS button
to set the Minutes. Press the SET button once to continue.
12/24-HOUR TIME: 12hr or 24hr will flash. Press and release the
PLUS button to select 12-hour or 24-hour time mode. Press the SET
button once to continue.
WEATHER FORECAST ICON: The forecast icon will flash. Press and
release the PLUS button to select the forecast Icon that represents
your current local weather. Press and release the SET button to exit.
NOTE: If possible, it is best to select the RAINY ICON when it is
raining outside. This allows for the most accurate future forecasts
based on barometric pressure changes.
DST: dSt on or dSt of will flash. Press and release the PLUS button to
turn the DST feature ON or OFF. Pres and release the SET button to
continue.
SET TIME ZONE:
TIME ZONE: Press the ZONE button to select four U.S. Time Zones:
ES Eastern
CS Central
MS Mountain
PS Pacific
NOTE: This station will only support these 4 Time Zones.
WEATHER FORECAST ICONS:
The unit predicts weather condition of the next 12 – 24 hours based on the
change of atmospheric pressure. The weather forecast is about 70-75%
correct. As weather conditions cannot be 100% correctly forecasted, we
cannot be responsible for any loss caused by an incorrect forecast.
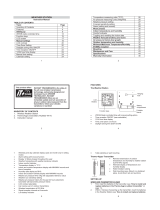
Time
Alarm icon
Outdoor
Temperature
Barometric Date Indoor
Pressure Temperature
History
Forecast icon
WWVB
Reception
Battery
compartment
Foldout stands
Wall mount
Function
bu
tt
o
n
s
Time Zone Map
(
four time zones
)
Snooze icon
Channel
Selection
C/F Selection
Battery Cover
TX Button
Battery Compartment

SET ALARM:
ALARM HOUR: Press and hold AL button to enter alarm time set
mode. The Alarm Hour will flash. Use the PLUS button to set the
Hour. Please note AM or PM. Press and release the AL button.
ALARM MINUTE: The Alarm Minutes will flash. Use the PLUS
button to set the Minutes. Press and release the AL button.
ALARM ACTIVATION:
Press and release the AL button to show Alarm Time.
Press and release the PLUS or MINUS button to activate or
deactivate the Alarm.
The alarm icon appears when alarm is activated.
To stop alarm for one day, press AL button, when the alarm sounds.
The alarm icon will show solid.
SNOOZE:
When the alarm sounds, press the Zz/CH button to trigger snooze
alarm for 5 minutes. The snooze icon Zz will flash.
To stop alarm for one day, press AL button, while in snooze mode.
The alarm icon will show and the snooze icon Zz will disappear.
FAHRENHEIT/CELSIUS:
Transmitter: Remove the battery cover then press and release the C/F
button on the transmitter to select Fahrenheit or Celsius.
Clock: Press and release the -/CF button once to switch from Fahrenheit to
Celsius.
Channels: If more than one transmitter is used, set each transmitter to a
different channel. To view: press the CH button to select Ch1, Ch2, Ch3 and
auto-channel scrolling display modes.
Auto-channel will show a circling arrow above the channel number and
will rotate through each channel approximately every 5-8 seconds
18-HOUR BAROMETRIC PRESSURE HISTORY GRAPH:
The bar chart indicates the air pressure history trend over the last 18 hours
in 5 steps, 0h, -3h, -6h, -9h, & -18h. The columns represent the “hPa” at
specific times. The “0” in the middle of this scale is equal to the current
pressure and each change (0, -3, -6, -9, -18) represents how high or low in
“hPa“ the past pressure was compared to the current pressure.
If the bars are rising, it means that the weather is getting better due to the
increase of air pressure. If the bars go down, it means the air pressure has
dropped and the weather is expected to get worse from the present time
“0h“.
LOW BATTERY:
It is recommended to replace the batteries in all units every 12 months to
ensure optimum accuracy of these units. A low battery icon will display next
to the outdoor temperature when the transmitter batteries are low and next
to the indoor temperature then the batteries in the clock are low.
POSITIONING THE CLOCK:
There are two possible ways to mount the atomic clock:
Foldout leg stands or wall mount.
FOLDOUT LEG STANDS
The two foldout leg stands are located on the back of the
clock. Pull the leg stands out from the back of the clock to
place the clock on a desk or table.
WALL MOUNT
Install one screw (not included) into a wall, leaving
approximately 3/16 of an inch (5mm) extended from the wall.
Place the atomic clock onto the screw, using the hanging hole
on the backside.
Gently pull the clock down to lock the screw into place.
POSITIONING THE OUTDOOR TEMPERATURE SENSOR
The remote temperature sensor should be mounted vertically.
WALL MOUNT
Install one screw (not included) into a wall within leaving
approximately 3/16 of an inch (5mm) extended from the wall.
Place the transmitter onto the screw, using the hanging hole
on the backside.
Gently pull the transmitter down to lock the screw into place.
Mount where direct sunlight cannot reach the outdoor temperature sensor.
Mount the outdoor temperature sensor on a North-facing wall or in any well-
shaded area. The maximum transmitting range in open air is 100-feet (30
meters). Obstacles such as walls, concrete, and large metal objects can
reduce the range.
SPECIFICATIONS:
Indoor Temperature:
Range: 32° F to 122° F (0° C to + 50° C)
Resolution: 0.1° F
Outdoor Temperature:
Range: -4° F to 140° F (-20° C to + 60° C)
Resolution: 0.1° F
Distance: 100 ft (30 meters) RF 434MHz (open air)
Power:
Receiver: 3-AA, IEC, LR6 alkaline batteries (not included).
Transmitter: 2-AAA, IEC, LR3 alkaline batteries (not included).
Dimensions:
Receiver: 11.45” W x 1.24” D x 11.45” H
Transmitter: 4.49” W x .86” D x 3.54” H
WARRANTY INFORMATION
La Crosse Technology, Ltd provides a 1-year limited warranty on this product against
manufacturing defects in materials and workmanship.
This limited warranty begins on the original date of purchase, is valid only on products
purchased and used in North America and only to the original purchaser of this product.
To receive warranty service, the purchaser must contact La Crosse Technology, Ltd for
problem determination and service procedures. Warranty service can only be performed
by a La Crosse Technology, Ltd authorized service center. The original dated bill of sale
must be presented upon request as proof of purchase to La Crosse Technology, Ltd or
La Crosse Technology, Ltd’s authorized service center.
La Crosse Technology, Ltd will repair or replace this product, at our option and at no
charge as stipulated herein, with new or reconditioned parts or products if found to be
defective during the limited warranty period specified above. All replaced parts and
products become the property of La Crosse Technology, Ltd and must be returned to La
Crosse Technology, Ltd. Replacement parts and products assume the remaining
original warranty, or ninety (90) days, whichever is longer. La Crosse Technology, Ltd
will pay all expenses for labor and materials for all repairs covered by this warranty. If
necessary repairs are not covered by this warranty, or if a product is examined which is
not in need or repair, you will be charged for the repairs or examination. The owner must
pay any shipping charges incurred in getting the La Crosse Technology, Ltd product to a
La Crosse Technology, Ltd authorized service center. La Crosse Technology, Ltd will
pay ground return shipping charges to the owner of the product to a USA address only.
The La Crosse Technology, Ltd warranty covers all defects in material and workmanship
with the following specified exceptions: (1) damage caused by accident, unreasonable
use or neglect (including the lack of reasonable and necessary maintenance); (2)
damage occurring during shipment (claims must be presented to the carrier); (3) damage
to, or deterioration of, any accessory or decorative surface; (4) damage resulting from
failure to follow instructions contained in the owner’s manual; (5) damage resulting from
the performance of repairs or alterations by someone other than an authorized La
Crosse Technology, Ltd authorized service center; (6) units used for other than home
use (7) applications and uses that this product was not intended or (8) the products
inability to receive a signal due to any source of interference.. This warranty covers only
actual defects within the product itself, and does not cover the cost of installation or
removal from a fixed installation, normal set-up or adjustments, claims based on
misrepresentation by the seller or performance variations resulting from installation-
related circumstances.
LA CROSSE TECHNOLOGY, LTD WILL NOT ASSUME LIABILITY FOR INCIDENTAL,
CONSEQUENTIAL, PUNITIVE, OR OTHER SIMILAR DAMAGES ASSOCIATED WITH
THE OPERATION OR MALFUNCTION OF THIS PRODUCT. THIS PRODUCT IS NOT
TO BE USED FOR MEDICAL PURPOSES OR FOR PUBLIC INFORMATION. THIS
PRODUCT IS NOT A TOY. KEEP OUT OF CHILDREN’S REACH.
This warranty gives you specific legal rights. You may also have other rights specific to
the State. Some States do not allow the exclusion of consequential or incidental
damages therefore the above exclusion of limitation may not apply to you.
For warranty work, technical support, or information contact:
La Crosse Technology, Ltd
2817 Losey Blvd. S.
La Crosse, WI 54601
The complete instruction manual is available at:
www.lacrossetechnology.com/512-811
Le manuel d'instruction complet est disponible sur:
www.lacrossetechnology.com/512-811
El manual de instrucciones completo está disponible en:
www.lacrossetechnology.com/512-811
Contact Support: 1-608-782-1610
Product Registration:
www.lacrossetechnology.com/support/register.php
All rights reserved. This handbook must not be reproduced in any form, even in
excerpts, or duplicated or processed using electronic, mechanical or chemical
procedures without written permission of the publisher.
This handbook may contain mistakes and printing errors. The information in this
handbook is regularly checked and corrections made in the next issue. We accept no
liability for technical mistakes or printing errors, or their consequences.
All trademarks and patents are acknowledged.
/