Page is loading ...

e-mail: [email protected]
INSTRUCTION MANUAL
CAST ALUMINUM PATIO HEATER
Item #:PH-S-127
PH-S-126
Model number: H0H1010-T-2
R
US
WARNING: For outdoor use only.
FOR YOUR SAFETY
If you smell gas:
1. Shut off gas to the appliance.
2. Extinguish any open flame.
3. If odour continues, immediately
call gas supplier.
FOR YOUR SAFETY
Do not store or use gasoline or
other flammable vapours or liquids
in the vicinity of this or any other
appliance.
For cus tomer service, parts
or warranty issues:
Call 1-800-561-5550
or e-mail [email protected]
Establishing a burner ignition for
the FIRST time or after changing
the cylinder tank may take up to
2-3 minutes in order for the gas
to purge through the feeder lines.
FOR OUTDOOR USE ONLY
PLEASE READ INSTRUCTIONS CAREFULLY BEFORE ASSEMBLY
RETAIN THIS MANUAL FOR REFERENCE
1

GENERAL AND SPECIFICATIONS
SECURITY AND CAUTION
TOOLS AND ACCESSORIES REQUIRED
3
4
5
OPERATION 9,10
TROUBLE SHOOTING 11
STORAGE AND MAINTENANCE 12
ASSEMBLY AND INSTRUCTIONS 6,7,8
** WARNING **
Improper operation, installation, adjustment,
alteration, servicing or maintenance cause severe
property damage and /or serious damage and /or
serious injury or death. Please read the installation,
operating and maintenance instructions thoroughly
before installing, operating or servicing this
appliance.
** For Your Safety **
If you smell gas :
1.Shut off gas to appliance
2.Extinguish any open flame
3. If odor continues, immediately call your gas
supplier
** For Your Safety **
Do NOT store or use gasoline or other flammable
vapors in the vicinity of this or any other appliance.
** IMPORTANT NOTICE***
Do NOT return to place of purchase!!!
Please contact our Toll Free Hotline: 1-800-561-5550
for customer service and warranty issues
e-mail: [email protected]
Hotline hours: Mon. to Fri. 7:00am - 4:00pm ( P.S.T.)
Establishing a burner ignition for the FIRST time or after
changing the cylinder tank may take up to 2-3 minutes
in order for the gas to purge through the feeder lines.
If stored indoors, detach and leave cylinder outdoors.
Keep this manual in your files for future refernce.
NOTE : 20 lb., 5 Gallon LPG tank is not included
TABLE OF CONTENTS
2

This appliance is a propane transportable heater.
The burner is controlled and adjusted by the gas control knob.
Gas supply is controlled by the valve on the gas cylinder.
The burner is made of stainless steel Heat diffusion is assisted by the
reflector above
Technical specification:
** WARNING **
Improper operation, installation, adjustment,
alteration, servicing or maintenance can cause
severe property damage and/or serious damage
and/or serious injury or death. Please read the in-
stallation, operating and maintenance instructions
thoroughly before installing, operating or servic-
ing this appliance.
WARNING !
Operating pressure with gas : 11’’WC (water column) (2.75 Kpa)
Inlet gas supply pressure : Min. 5 psi, Max. – 150 psi
Max. Heat rating : BTU 41,000
Low setting rating : BTU 25,000
Radiant Heat Range : 14 ft. To 16 ft. Diameter
Fuel Type : Liquid Propane Gas
Cylinder Size : Standard Industry 20 lb. Cylinder (5 gal. Cylinder capacity)
Consumption Rate : Approx. 10 hrs. at highest setting
Gross Weight : 60 lbs.
Water Column Diameter in mm
11’’ (2.75 Kpa) 1.8
MADE IN CHINA
GENERAL DESCRIPTION
3

FOR YOUR SAFETY
1. If you smell gas :
a Close gas supply at cylinder valve
b. Extinguish all open flames
c. Proceed to a leak test with a soapy water solution (50% soap/ 50% water)
d If bubbles are detected, retighten connections. If no leaks are detected,
open gas valve at cylinder and verify if you smell gas.
e. If you still smell gas, shut-off heater completely and gas valve at cylinder
or contact a gas appliance service center
2. Never store or handle gas, or any other flammable vapors or liquids in the
vicinity of your Patio Heater or any gas appliance.
Faulty installation, modifications, repairs or maintenance to the appliance may
cause injury or damage to property, and will void the warranty.
Carefully read this User Guide before assembling and setting up the heater.
CAUTION
Keep this guide for future reference.
SECURITY AND CAUTION
4

CAUTION
• DO NOT operate the heater in an explosive environment Keep this
appliance away from areas where you have stored gas. or other vapors and
flammable liquids.
• Before use, verify that no parts are damaged, inspect gas hose.
• Never modify, this appliance in any way or it will void the warranty.
• Never use the heater without the reflector shield .
• Respect minimum clearance from combustibles top 36", sides 24".
.
• Always place heater on a leveled, stable and hard surface.
• Only use this heater outdoors.
• Never clean with abrasive, corrosive or flammable cleaners.
• Do not paint the heater or any of its parts.
• When fully assembled please perform a leak test, and every time you
disconnect the hose, before lighting up the heater.
• A leak test must be performed before operating the appliance.
To leak test, use a 50/50 mix of each water and soap in a spray bottle.
• NEVER LEAK TEST with an open flame or while smoking.
• The gas cylinder must be closed at all times when not using the heater.
• Children and adults should be made aware of hot surfaces on the heater.
• Do not obstruct the ventilation opening (hand hole) on cylinder cover.
• Installation, maintenance and repair of this heater should always be performed
by a qualified qas technician.
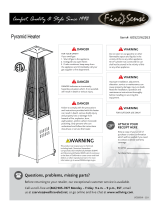
Base
Connector
Table
Pole
Gas control
Burner assembly unit
Reflector
igniter
Regulator(inside base)
PARTS LIST
1
2
3
4
5
6
7
8
9
guard bar
10
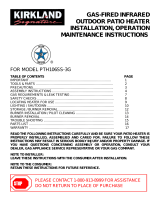
Screw(M6X30) X3
X3
X4
X6
X2
X9
X7
X3
X3
X4
X9
Spring Washer(M6)
Bolt(M6X13)
Washer(M8)
Claw Screw(M6X12)
Bolt(M6X8)
wrench , screwdriver.
TOOLS AND EQUIPMENT REQUIRED
Washer(M6)
Nut(M6)
Claw Nut(M8)
Screw(M6X10)
Nut(M6)
Leak test solution: MIX 50/50 water and soap
1 Propane cylinder (not supplied), with QCC 1 valve
6
7
5
8
4
3
2
1
TOOLS AND ACCESSORIES
5
• Clothing and other accessories or objects are not to be hung or laid on the heater
or near it to dry.

ASSEMBLY INSTRUCTIONS
A.
Attach the 3 Screws(M6X30mm) to the
screw holes of the Connector.
(NOTE:Tighten all the Scews.)
B.
Fit the Connector to the base by inserting
the prefixed Screws into the three holes
using 3 W ashers (M6), 3 Spring washers
(M6) and 3 Nuts (M6).Tighten the nuts .
C.
Attach the Pole to the Connector.
ASSEMBLY AND INSTRUCTIONS
6

D.
E.
F.
Set the table onto the pole . Use
the 4 Philips bolts (M6 x 13mm) and 4 Washers (M6).
To secure the table
Put the Reflector together using the 9
Bolts(M6X8) and the 9 Nuts.
Starting with the outer ring
Place a steel washer over each bolt on
the Top of the burner assembly unit
Lay reflector over the burner top bolts
add another steel washer to each bolt
Use Claw nuts to fasten reflector to the
burner unit
G.
Connect the regulator to the hose first;
Slide hose through bottom of the base and attach to the burner assembly unit.
Attach burner assembly head unit to the with the 4 screws (M6x10mm)
ASSEMBLY AND INSTRUCTIONS
7

H.
Attach the guard bar to the heating
furnace using the clawscrew(M6X12mm).
Install a full gas cylinder on the base. Connect
the gas regulator hose to the cylinder valve by
turning the knob clockwise manually . do not
use a tool. Tighten firmly by hand. Close door.
LEAK TEST
Now that the heater is assembled, for your safety you must perform a leak test of all
connections and hoses.
Mix in a spray bottle equal parts of water and soap.
1. Ensure that the heater gas control knob is fully closed by turning
completely clockwise
2. Open cylinder valve.
3. Apply the solution generously to all connections and hoses.
If you detect bubbles, there is a leak. Close cylinder valve completely. Retighten the
leaking connection and repeat leak test process.
If the leak cannot be repaired permanently, close cylinder valve completely and contact
a qualified gas technician.
I.
ASSEMBLY AND INSTRUCTIONS
8

OPERATIONS
9
TO TURN ON THE HEATER
A.Turn on the valve on the gas supply cylinder completely.
B.Press lightly and turn the variable control knob to PILOT position.
C.Press down the variable control knob and hold for 30 seconds. While holding down the
variable control knob, press the igniter button several times until the pilot flame lights. Release
the variable control knob after the pilot flame lights.
D.Press lightly and turn the variable control knob to LO (minimum) position and leave it there
for about 5 minutes, then turn the variable knob to switch to desired temperature position.
Note:A 5-minute complete shut off period is necessary before relighting.
If you experience any ignition problem please consult "Troubleshooting" on page 11.
Caution: Avoid inhaling fumes emitted from the heater's first use. Smoke and odor from the
burning of oils used in manufacturing will appear. Both smoke and odor will dissipate after
approximately 30 minutes. The heater should NOT produce thick black smoke.
Note: The burner may be noisy when initially turned on. Turn the knob to the level of heat
desired.

OPERATIONS
10
FOR YOUR SAFETY
Be careful when attempting to manually
ignite this heater. Holding in the control
know for more than 10 seconds before
igniting the gas will cause a ball of flame
upon ignition.
FOR YOUR SAFETY
Heater will be hot after use. Handle with
extreme care.
When heater is ON:
Emitter screen will become bright red due to intense heat. The color is more visible at
night. Burner will display tongues of blue and yellow flame. These flames should not be
yellow or produce thick black smoke, indicating an obstruction of airflow through the
burners. The flame should be blue with straight yellow tops. If excessive yellow flame is
detected, turn off heater and consult "Troubleshooting" on page 11.
TO TURN off THE HEATER
A. Turn the variable control knob to LO position.
B. Turn the variable control knob to PILOT position.
C. Then press lightly and turn the variable control knob to OFF position.
D. Turn off the valve on the gas supply cylinder to shut down the heater completely.

TROUBLE SHOOTING GUIDE
If you are having this
problem If this condition exists: You will need to do the following:
Burner flame will
not stay on
1. Cylinder valve may be
OFF.
2. LPG tank empty
3. Orifice blocked
4. Loose connection
5. Thermocouple failed
6. Gas leak in line
7. Lack of fuel pressure
Open valve at cylinder. Turn cylinder
valve in counter-clockwise direction.
Burner flame
will not light
1. Pressure is low
2. Control not ON
3. Orifice blocked
Igniter does not work Electrode might have
accumulated black soot
Refill LPG tank
Clean Spider web or other blockage,
or replace orifice.
Check all fittings
Replace thermocouple
Refill fuel tank
Turn tank off. Wait 5 minutes.
Check fuel line connections.
Reinsert regulator tighten firmly
and re-try.
Tank is near empty
Turn valve to ON and push in.
Remove and clean out.
Light the burner manually or clean
the electrode, check wire
connections and re-try.
TROUBLE SHOOTING
** IMPORTANT NOTICE***
Do NOT return to place of purchase!!!
Please contact our Toll Free Hotline: 1-800-561-5550
for customer service and warranty issues
e-mail: [email protected]
Hotline hours: Mon. to Fri. 7:00am - 4:00pm ( P.S.T.)
11

STORAGE AND MAINTENANCE
CUSTOMER SERVICE
ATTENTION : Consumer ... Please use the customer information listed below for any questions concerning
assembly, care information, warranty issues and/or replacement parts.
To ensure your satisfaction and maintain high standards for quality and workmanship, we want to hear from
you should you have any questions or comments. You can contact : J&R Home Products at 1-800-561-5550
Again, thank you for selecting our product line!
STORAGE & MAINTENANCE
STORAGE :
During the season :
Control knob must be in OFF position
Propane cylinder valve must be closed completely
Patio heater must be upright and sheltered from any harsh weather conditions (i.e. strong winds, rain, heavy
mist, snow, dust & debris)
Control knob must be in OFF position
Disconnect LPG cylinder and store in a well ventilated OUTDOOR area where the temperature will not ex-
ceed 125 degrees F.
Appliance should be upright and sheltered from outside weather conditions (i.e. rain, snow, hail, winds, dust,
debris).
It is recommended that the ‘’head components’’ be wrapped or covered to protect against debris, dust and
insects clogging air and gas passageways. Suggestion : use a poly trash can liner or polytarp material.
MAINTENANCE :
Outside metal surface – Clean with warm soapy water and soft rags or paper towels. Do NOT use abrasive or
corrosive cleaning agents. Be careful NOT to wet the burner or pilot ignition assemblies. Do NOT spray water
or cleaning agents directly onto head components as severe damage may result.
Possible signs of obstructed air and gas passageways :
Heat glow on head component is very UNEVEN1.
2.
Heating output (BTU) is noticeably reduced3.
Crackling or popping noises coming from heating components4.
NOTE : Locations near the ocean or saltwater will require more maintenance and frequent checking of components.
er.
12

.
IMPORTANT
For questions, concerns or problems with our product please
email our customer service department:
DATED PROOF OF PURCHASE REQUIRED FOR WARRANTY SERVICE
WARRANTY
This product is inspected, tested and carefully packaged to minimize the chance of
damage during shipment. If a part (excluding light bulbs and fuses*) within one year from
the date of purchase proves to be defective in material or fabrication under normal
use, the part will be repaired or replaced. The Company’s obligation under the warranty
is to replace or repair defective parts at our discretion. Any expenses or damage resulting
from the installation, removal or transportation of the product will be the responsibility
of the owner and are not covered by this warranty. The owner assumes all other risks
arising from the use or misuse of the product. The warranty will be void if the product
damage or failure is deemed by the Company to be caused by accident,
alteration, misuse, abuse, incorrect installation or removal, or connection to an incorrect
power source by the owner. The Company neither assumes, nor authorizes any person or
entity to assume for it any obligation or liability associated with its products.
Light bulbs and fuses are not covered under this warranty. If you have any questions
regarding the warranty or service, please contact us at [email protected].
Customer Service:
JR Home Products
Unit 306 - 19100 Airport Way, Pitt Meadows, BC V3Y 0E2
Toll Free: 1-800-561-5550
E-mail: [email protected]
Warranty Registration Information Form / Formulaire d’enregistrement de la garantie
Registration can be completed online at www.jrhome.com or by mailing this form.
Name / Nom:
Street / Adress:
City / Ville:
Province / Province:
Postal Code / Code postal:
Daytime Phone # / No téléphone jour:
Evening Phone # / No téléphone soir:
E-Mail Address / Courriel:
Product/Produit:
Place of Purchase / Lieu de l’achat:
Date of Purchase / Date de l’achat:
Model # / No de modèle:
Serial # / Numéro de série:
You MUST register your product to receive
warranty service.
For warranty service, contact J&R Home
Products at the address, phone numbers listed
below within 30 days of purchase. Be sure to
have your sales receipt and original date of
purchase. All warranty service will be
coordinated by
J&R Home Products service center.
Vous DEVEZ enregistrer votre produit pour vous
prévaloir de la garantie.
Afin de faire valoir la garantie, communiquez
avec J&R Home Products à l’adresse et aux
numéros indiqués ci-dessous dans les 30 jours
suivant la date d’achat. Ayez en main votre reçu
et la date d’achat. Toutes les demandes liées
aux garanties seront traitées par le centre de
service de J&R Home Products.
Please mail to / Veuillez poster le tout à : Parts & Service Department, J&R Home Products Ltd. Unit 306 - 19100 Airport Way, Pitt Meadows, BC V3Y 0E2
You MUST register your product to receive warranty service.
13
/