Page is loading ...

1
©2014 Welch Allyn, Inc.
MM 721462 Ver.
C
Fiber optic laryngoscope handles
Directions for use
Intended
use
The
fiber optic laryngoscope handle is an accessory used with compatible rigid fiber optic
laryngoscope blades which are used to examine
and visualize
a patient’s airway
and
aid
placement of a tracheal
tube.
About this
document
This directions for use apply to Welch Allyn reusable fiber optic laryngoscope handles:
60813, 60814, 60815. Welch Allyn
reusable
fiber optic laryngoscope handles may be used
with
Welch Allyn fiber optic laryngoscope blades MacIntosh
REF:
6906X, English
MacIntosh
REF:
6921X, and Miller REF: 6806X.
Warnings and
cautions
WARNING: R
eusable
fiber optic
laryngoscope handles
must
be reprocessed
after
each
use.
WARNING: The reprocessing procedure and the equipment and materials described
must be followed and conducted by persons trained and familiar
with
medical device
reprocessing.
WARNING: Consult cleaning and disinfecting agent manufacturer
instructions
for their
proper preparation and use.
WARNING: Repeated
reprocessing may
degrade
elements of the handle.
Follow
inspection procedures to assure damage has not occurred to the handle.
WARNING: High level disinfection and/or sterilization are not achieved by these
methods.
WARNING:
Lamps, if left illuminated, could generate sufficient heat to cause burns
WARNING: Discard any component that shows evidence of damage or
deterioration.
WARNING: Do not modify this equipment. Any modification of this
equipment may
lead to patient injury. Any modification of this equipment voids the
product warranty.
WARNING: Personnel shall
follow their facility policies
and
procedures
and
wear
appropriate personal protective equipment when handling
potentially
contaminated
equipment.
WARNING:
Laryngoscope equipment is not suitable for use in intense
magnetic
fields
CAUTION:
Only use lamp specified. Failure
to follow these instructions may cause
damage or poor performance of the handle.
CAUTION: If the device will be unused for several months or longer, remove
the
batteries prior to storing the device.

2
Directions fo
r
use
Welch Allyn fiber optic laryngoscope handle
s
Reprocessing
instructions
These reprocessing instructions refer to procedures for cleaning and intermediate level
disinfection. Fiber optic laryngoscope handles must be reprocessed prior to first use and
between each use using
the
following method as outlined in this
document:
•
Cleaning
and intermediate level
disinfection
Welch Allyn has validated the above instruction as being capable of preparing these
laryngoscope handles for re-use. The user must ensure that the reprocessing as actually
performed by the user's personnel, with the user's equipment and materials, achieves the
desired result. This may require validation and routine monitoring of the user's actual process
NOTE: The main handle and bottom cap components are compatible with the disinfection
solution and autoclave methods identified which are provided for facilities who wish to perform
either method after cleaning and intermediate level disinfection.
Cleaning and intermediate level disinfection instructions
Point of use: 1.
Separate
blade assembly from handle and place handle
into suitable containment for subsequent reprocessing
(per figure 1). Do not place handle with sharp devices.
2. Prevent the handle from drying (i.e. wrap/cover in moist
germicidal
wipe).
Preparation
for
decontamination:
1. Select an appropriate quaternary ammonium
isopropanol based germicidal cleaner labeled suitable
for use on healthcare equipment and capable
intermediate level disinfection. Reference EPA-
registered disinfectants:
http://www.epa.gov/oppad001/chemregindex.htm
Outside of the U.S., please consult applicable
regulatory body for equivalent quaternary ammonium
isopropanol germicidal cleaner.
2. Remove batteries and lamp cartridge (per figure 2).

Directions fo
r
use
Welch Allyn fiber optic laryngoscope handles
3
Cleaning
and
intermediate level
disinfection:
Drying:
Maintenance,
Inspection and Testing
1. Follow the germicidal wipe manufacturer’s instructions
to clean all exposed surfaces of the main handle, end
cap, and lamp cartridge.
2. If necessary, brush with a dry, soft-bristled brush and
re-wipe to loosen/remove excessive visible soil.
3. After all visible soil is removed, re-wipe to wet all
surfaces and allow adequate contact time for
disinfection as directed by the germicidal wipe
manufacturer.
CAUTION: Only use quaternary ammonium
isopropanol based germicidal wipes.
Allow components to air dry.
1. Inspect
each
component
area (per f
igure 3
)
for
damage
or
deterioration.
WARNING: Discard any component that
shows
evidence of damage or deterioration.
Contact Welch Allyn for component replacement.
2. Reassemble handle (per figure 4) with new or
batteries in known good condition.
3. Attach handle to a clean and disinfected test blade
assembly in known working condition. Verify
that:
•
Blade assembly engages and locks onto handle.
•
Blade assembly deploys into its locked position on
handle
AND lamp illuminates.
•
Light output is satisfactory.
If the lamp fails to
light or output is low
, check or
replace the lamp and/or
batteries.
Storage Store handle per facility practice to allow device to remain
clean, dry, and ready for service.
End of
reprocessing
instructions for intermediate level disinfection.

4
Directions fo
r
use
Welch Allyn fiber optic laryngoscope handles
Cold solution disinfection instructions
NOTE: The main handle and bottom cap are compatible with this cold solution disinfection
method which is provided for facilities who wish to solution disinfect after cleaning and
intermediate level disinfection.
Disassembly: 1. Disassemble the handle and remove batteries and
lamp cartridge per figures 3.
2. Set batteries and lamp cartridge aside.
Preparation
for
decontamination:
Cold solution
disinfection:
1. Select a 14 day (2.4 – 2.6%) glutaraldehyde
disinfectant.
2.
Prepare
disinfection solution per manufacturer
instructions.
1. Immerse main
handle and
bottom
cap (only)
in disinfection
solution, for a time duration identified by the disinfection
solution manufacturer.
2. Thoroughly rinse all components in potable water,
softened water or per disinfection solution manufacturer
instructions to remove disinfecting
solution.
Drying: Dry all components with a clean cloth or allow to air dry.
Maintenance,
Inspection and Testing
Storage
1. Inspect
each
component
area (per f
igure
2)
for
damage
or
deterioration.
WARNING: Discard any component that
shows
evidence of damage or deterioration.
Contact Welch Allyn for component replacement.
2. Reassemble handle (per figure 4) with new or batteries in
known good condition.
3. Attach handle to a clean and disinfected test blade
assembly in known working condition. Verify
that:
•
Blade assembly engages and locks onto handle.
•
Blade assembly deploys into its locked position on
handle AND lamp
illuminates.
•
Light output is satisfactory
If the lamp fails to
light or output is low
, check or
replace the lamp or
batteries.
Store handle per facility practice to allow device to remain
clean, dry, and ready for service.

Directions fo
r
use
Welch Allyn fiber optic laryngoscope handles
5
Autoclave
instructions
NOTE: The main handle and bottom cap are compatible with these autoclave methods which
are provided for facilities who wish to autoclave after cleaning and intermediate level
disinfection.
Disassembly: 1. Disassemble the handle and remove batteries and
lamp cartridge per figures 3.
2. Set batteries and lamp cartridge aside.
After battery and lamp cartridge removal, select ONE of the following autoclave
methods below
for
the main handle and bottom cap:
Gravity autoclave: Follow equipment manufacturer and
facility
procedures in the
set-up and operation of autoclave equipment. Gravity autoclave settings are as
follows:
•
Temperature: 132 C (270 F)
•
Exposure time: 3 minutes (unwrapped)
•
Minimum dry time: 1
minute
Pre-vacuum autoclave: Follow equipment manufacturer and
facility
procedures in the
set-up and operation of autoclave equipment.
Pre-vacuum
autoclave settings are as
follows:
•
Temperature: 132 C (270 F)
•
Exposure time: 3 minutes (unwrapped)
•
Minimum dry time: 1
minute
Maintenance,
Inspection and Testing 1. Inspect
each
component
area (per f
igure
2)
for
damage
or
deterioration.
WARNING: Discard any component that
shows
evidence of damage or deterioration.
Contact Welch Allyn for component replacement.
2. Reassemble (per figure 4) with new or batteries in known
good condition.
3. Attach handle to a clean and disinfected test blade
assembly in known working condition. Verify
that:
•
Blade assembly engages and locks onto handle.
•
Blade assembly deploys into its locked position on
handle AND lamp
illuminates.
•
Light output is satisfactory.
If the lamp fails to
light or output is low
, check or
replace the lamp and/or
batteries
Storage: Store handle per facility practice to allow device to remain
clean, dry, and ready for service.

6
Directions fo
r
use
Welch Allyn standard laryngoscope handles
Maintenance
instructions
Replace
the
lamp
WARNING: Lamps, if left illuminated, could generate sufficient heat
to
cause burns.
CAUTION: Use only Welch Allyn replacement lamps REF: 06000 to ensure
proper
illumination alignment.
1. Unscrew bottom cap of handle counterclockwise and remove batteries per figure 3.
2. Remove lamp cartridge assembly from main handle by applying finger pressure in
the
direction shown by the arrow per figure 4.
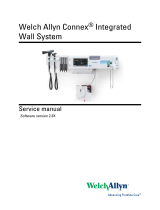
3. Remove shroud cap from shroud by rotating shroud cap counterclockwise per f
igures
5
and 6.
4. Rotate lamp counterclockwise to remove per figure 6.
5.
Replace
lamp and rotate shroud cap clockwise to tighten per figure 7.
6. To replace lamp cartridge assembly in the main handle, invert handle, then gently slide
the cartridge down the inside of handle, tipping it side to side until the shroud cap
exits
opening on
top.
7. Re-insert batteries and apply slight pressure to set the cartridge in place.
8.
Replace
and tighten bottom cap.
9. Reprocess repaired assembly as appropriate per these instructions.
Figure 3 Figure 4
Figure 5 Figure 6
1. Shroud cap
2. Lamp
3. Shroud
Figure 7

Directions fo
r
use
Welch Allyn standard laryngoscope handles
7
Replace
the
batteries
1. Unscrew bottom cap of handle per figure 3 and remove batteries.
2. Alkaline batteries are supplied with your handle for maximum performance and
are recommended as replacements; however
carbon-zinc
batteries may also be
used.
•
Medium handle, REF 60813 uses two “C” size
•
Penlight handle, REF 60814 uses two “AA” size
•
Stubby handle, REF 60815 uses two “AA” size
3. Insert batteries and reinstall bottom cap per figure 3.
4. Verify lamp and blade engagement/operation using a known working test blade.
5. Reprocess repaired assembly as appropriate per these instructions.
Specifications
Electrical:
For information about electromagnetic compatibility (EMC) see Welch Allyn website:
http://www.welchallyn.com
Operating:
Storage/Transport:
32
F
(0 C)
104 F
(40 C)
-4 F
(-20 C)
120 F
(49 C)
Approvals:
Conforms to ASTM F 965 and
ISO-7376-1, IEC/EN
60601-1,
IEC/EN
60601-1-2
The
CE
mark on this product indicates that it has been tested to and
conforms
with the provisions noted within the
93/42/EEC
Medical Device
Directive.
Complies with EMC Framework of Australia
Warranty:
One year
Service Information:
For
Technical
Support or to obtain information about any Welch Allyn product,
contact
Welch Allyn
Technical
Support: w
ww.welchallyn.com/support
.
Welch Allyn, Inc.
4341 State Street Road
Skaneateles Falls, NY 13153-0220 USA
www.welchallyn.com
Authorized European Representative Address:
Regulatory Affairs Representative
Welch Allyn, Limited
Navan Business Park
Dublin Road
Navan, County Meath, Republic
of Ireland
/