Gamber Johnson 7160-0526-00 User manual
- Category
- Notebook docks & port replicators
- Type
- User manual
This manual is also suitable for

INST-626
required. Gamber-Johnson specifically disclaims any responsibility for the improper use or installation of its products not consistent with the original vehicle manufactures specifications
Product Mounting Disclaimer
Gamber-Johnson is not liable under any theory of contract or tort law for any loss, damage, personal injury, special, incidental or consequential damages for personal injury or other damage
of any nature arising directly or indirectly as a result of the improper installation or use of its products in vehicle or any other application. In order to safely install and use Gamber-Johnson
products full consideration of vehicle occupants, vehicle systems (i.e., the location of fuel lines, brakes lines, electrical, drive train or other systems), air-bags and other safety equipment is
and recommendations, Gamber-Johnson product instruction sheets, or workmanship standards as endorsed through the Gamber-Johnson Certified Installer Program.
Rev.A
the computer.
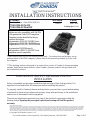
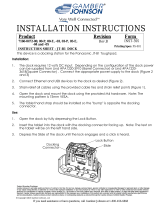
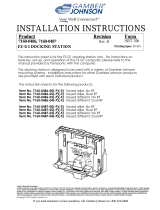
INSTALLATION INSTRUCTIONS
Product
If you need assistance or have questions, call Gamber-Johnson at 1-800-456-6868
*These instructions are for the docking station only. For instructions on features, set-up
Revision
Printing Spec:
PS-001
Docking Staton - Getac B300 USB 3.0
Form
7160-0526-02 Dual RF
warranty.
Opening the power/port replication housing will void the product
docking station.
There are no adjustments required at any time of the electrical components within the
and service of aftermarket vehicle equipment.
of automotive electrical procedures and systems, along with proficiency in the installation
To properly install a Gamber-Johnson docking station you must have a good understanding
important to read and follow all instructions before installing this product.
Safety is dependent on the proper installation and servicing of this docking station. It is
7160-0526-00 No RF
IMPORTANT SAFETY INFORMATION for
each individual product.
systems. Installation instructions for other Gamber-Johnson products are provided with
This docking station is designed to be used with a variety of Gamber-Johnson mounting
**
and operation of the B300 computer, please refer to the manuals provided by Getac with
© Copyright 2014 Gamber-Johnson, LLC
INSTALLERS
Page 1 of 8
7160-0526-00 & 7160-0526-02 Docking
Stations are only compatibile with 3rd, 4th
& 5th generation Getac B300 computers.
Computers can be identified by the p/n
found on the bottom.
3rd generation (B300-H) 52628417xxxx,
4th generation (B300-G4) 52628540xxxx,
5th generation (B300-G5) 52628591xxxx.
1st generation 52628144xxxx &
2nd generation (B300-X) 52628317xxxx
computers are not compatible.

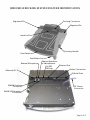
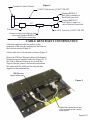
B300 USB 3.0 DOCKING STATION FEATURE IDENTIFICATION
Page 2 of 8
WLAN/GPS Antenna
Docking Connector
Alignment Pin
Video Connection
Push Button Lock
Front Retainer
Interlock Pin
Alignment Pin
Connector
Connector
(2)Serial Ports
Ethernet Port
Docking Handle
DC Power
or Headphones
External Speakers
3.0 Ports
External Microphone
Alternate DC In
(4) USB
WWAN Antenna
Connector

3. VERIFICATION that no shorts exist in the entire system
hazardous sparks resulting in electrical fires or flying molten metal.
CAUTION: If wiring is shorted to the frame, high current conductors can cause
prior to the actual install to verify that mounting locations are safe and practical.
amber-Johnson also recommends positioning of all mounts and equipment in the vehicle
*G
equipment (printers, modems, scanners, etc.).
3. Interconnect entire assembly and verify start-up of all components, including other
dock.
2. Insert computer into docking station and verify that the computer is operating in the
1. Make sure computer is operational by itself.
and software issues are resolved prior to installation:
Gamber-Johnson strongly advises a "bench test" be conducted to verify that all electronic
Page 3 of 8
PRE-INSTALLATION RECOMMENDATIONS
in property damage, serious injury or death.
WARNING: Failure to follow all safety precautions and instructions may result
maintenance or re-installing.
File these instructions in a safe place and refer to them when performing
Conduct a "Bench Test"
• Test the docking station to ensure that it is working properly.
clear of anything that could be damaged.
After Installation
•
air bag.
When drilling into the vehicle, DO make sure that both sides of the surface are
•
1. ALL other electrical connections are made
DO NOT install equipment or route wiring or cords in the deployment path of any
• DO NOT connect this docking station to the vehicle battery until:
During Installation
2. Mounting of ALL components are complete

information regarding these features.
*Refer to the Power Supply and Wiring Instructions sections of this manual for further
switch position.
(bypassing the power switch) and the green LED light is lit regardless of
•
off to regulate power through the unit.
By-Pass Installation - In this set-up, the unit is continuously powered
•
This docking station has a power switch with an LED light (see Figure 1):
Figure 1
docking station and bypass the power switch.
Standard Installation - In this set-up, the power switch can be turned on and
•
switch on the docking station, regulating power through the unit.
By-Pass Installation - Use the BLUE and BLACK wires to continuously power the
•
Power is provided using the wires located on the underside of the docking station:
volt DC system. The voltage output is factory set at 19 volts.
This docking station has a built-in power supply and is designed to be used with an 11 - 28
POWER SUPPLY INFORMATION
Page 4 of 8
POWER SWITCH
Standard Installation - Use the RED and BLACK wires to utilize the power
Power Switch w/
Green "POWER" LED
Red, Black &
Blue Wires w/
Disconnect
"INPUT POWER" - The green LED light, built into the power switch, indicates that there is •
power to the unit.

WIRING INSTRUCTIONS
1-800-456-6868
IMPORTANT: Make sure that you have read this entire section before you begin wiring!
•
be wired in-line with the supply voltage (V+) to the docking station.
If you have any installation questions, please call Gamber-Johnson customer support at
•
rated at 10 amp, 32 volt AC/DC fast acting.
of fire replace only with the same type and rating of supplied fuse. The provided fuse is
Caution: For continued protection against risk
If a timing device is used follow the instructions of the manufacturer of that device. It must
•
device conforms to ASTM standard D471 and SAE standard J1128.
personnel using Littlefuse part number FHM1 (Gamber-Johnson part number 11689). This
Caution: If the fuse holder requires replacement it should be replaced by qualified service
battery positive, away from moving parts, and temperatures that exceed 180 degrees F.
The fuse holder location must be kept within 10 inches of the connection to the
crimp tools CT-100, CT-600, CT-1525 or CT-1551.
When assembling the butt splice connectors use only Panduit
provided with fuse holder.
with the dock. Connect the fuse holder to the lead wire using the butt splice connectors
Fuse must be inserted in supplied fuse holder.
• The power connection must be made with the 10 amp in-line fuse and fuse holder provided
•
away from moving parts or areas where high temperatures may occur.
Connection of the supply voltage (V+) must be kept as close to the battery as possible.
•
must conform to SAE standard J1128.
30 feet and
Protect the lead wires from abrasion and chafing by using wire loom or conduit, and route
must not exceed
•
Use only Panduit crimp tool CT-1550 or CT-1551.
the disconnect pigtail.
cap the un-used RED or BLUE wire on
Route the lead wires to the battery. Total wire in the circuit
Using the
CT-1550 OR CT-1551.
,
use only Panduit crimp tools CT-100, CT-600, CT-1525
station. The disconnect must be easily accesible. When assembling the butt splice connectors
to the docking station as possible using the disconnect pigtail provided with the docking
Caution: The butt splice connections must be made as close
wire joint provided with the docking station,
docking station.
nnect lead wires to the disconnect pigtail using the butt splice connectors provided with the •
docking station to the vehicle's electrical system.
Co
•
IMPORTANT REMINDERS:
supply voltage (V+) from the vehicle. (The RED wire remains unconnected)
b. By-Pass Installation (Power switch is by-passed) - Connect the BLUE wire to the
supply voltage (V+) from the vehicle. (The BLUE wire remains unconnected)
a. Standard Installation (Power switch is operational) - Connect the RED wire to the
vehicle chassis.
2. Attach BLACK ground wire to the location where the vehicle battery grounds to
1. Install docking station into vehicle, making sure that all bolts are tight.
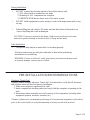
Refer to Figure 2
Use only SAE J1128 Type GPT number 14 AWG stranded wire (minimum) to attach the
Page 5 of 8

14 AWG (black wire) J1128 TYPE GPT
Panduit #BSN14-C
Butt Splice connects to
black lead from dock
Panduit #BSN14-C
Butt Splice connects to
red or blue lead from dock
Vehicle Battery
Ground to Vehicle Chassis
Connect in-line fuse holder to lead
wire using Panduit #BSN14-C
Butt Splice connectors
14 AWG (red wire) J1128 TYPE GPT
Support Bracket
Figure 3
Page 6of 8
CABLE RESTRAINT INFORMATION
supplied in the hardware bag.
the cables with the additional tie wrap anchors
Support Bracket, remove the bracket and restrain
the USB or Ethernet cables do not fit with the
Bracket using the supplied cable ties (Figure 3). If
Retain the USB and Ethernet cables at the Support
Attach cable ties to the anchors as shown (Figure 3).
the locations shown (Figure 3).
underside of the dock by pushing into the holes in
Attach the supplied cable tie anchors to the
Figure 2
-
+
10"
Fuse
USB/Ethernet
Assemble cable ties to the
anchors and route cables
as required

Docking Handle
Figure 5
Figure 6
Figure 4
opened or closed.
*Docking station will operate with computer screen
computer is powered and ready for use.
4. Boot the computer. If the dock is powered, the
added security)
(The Push Button latch can be locked for
dock until the latch catches (Figure 6).
3. Pull the docking handle towards the front of the
to ensure it is fully seated.
c. Lightly press down on the back of the computer
onto the Alignment Pins (Figure 5).
b. Lower the back of the computer
retainer (Figure 5).
a. Hook the front of the computer on the front
2. Set computer in the dock:
docking connector. (Figure 4)
been fully opened, exposing the computer's
on the back of the computer) has
1. Make sure the sliding door (located on the
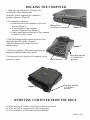
DOCKING THE COMPUTER
3. Lift the computer out from under the Front Retainer.
2. Lift the back of the computer off of the locating pins.
1. Unlock with key if locked. Push button in until lever releases.
REMOVING COMPUTER FROM THE DOCK
Page 7 of 8
in "Undocked"
Docking Connector
Front Retainer
Sliding Door
position
Docking Handle
in "Docked"
position

TROUBLESHOOTING
2. To serve as a reminder to turn off the computer's power switch.
1. To be used for a limited time, depending on the computer's battery life.
powered by only the computer's battery. This feature allows for the docking station:
When the Green Switch LED is off , this indicates that the docking station is being
go out.
switch is turned off, removing power from the vehicle battery, the Green Switch LED will
Standard Installation (Power switch is operational) - If the DOCKING STATION power
OPERATING on COMPUTER BATTERY POWER
damage the connector or the computer.
Do not force the connectors to engage. You may
connector should be free and smooth.
slight misalignment with the computer connector. The action of engaging the docking
CAUTION: The docking connector has been designed to include "float" which allows for
support at 1-800-456-6868.
adjusted by the installer. Please call Gamber-Johnson customer
b. If YES - The problem is inside the docking station and should not be
a. If NO - Determine the cause and solve.
providing power to the docking station.
1. Check to see if the BLACK and RED (or BLUE in by-pass installation) wires are
LED light does not light up:
If after applying power to the docking station and turning the power switch on, the GREEN
"Power" GREEN LED light does not light up:
Page 8 of 8
-
 1
1
-
 2
2
-
 3
3
-
 4
4
-
 5
5
-
 6
6
-
 7
7
-
 8
8


Gamber Johnson 7160-0526-00 User manual
- Category
- Notebook docks & port replicators
- Type
- User manual
- This manual is also suitable for
Ask a question and I''ll find the answer in the document
Finding information in a document is now easier with AI
Related papers
-
 Gamber Johnson GD8000 User manual
-
Gamber Johnson 7160-0595-00 Installation guide
-
Gamber Johnson 7160-0393-00 User manual
-
Gamber-Johnson 7160-0318-07 User manual
-
 Gamber Johnson 7160-0472-03 User manual
-
 Gamber Johnson 7160-0487 User manual
-
 Gamber Johnson Zebra ET50/55 Tamper Proof Bracket with Accelerometer Hardware Installation guide
-
 Gamber Johnson 7160-0248-01 User manual


Other documents
-
-
Getac B300(52628144XXXX) User guide
-
-
-
Gamber-Johnson Getac B300 Docking Station Screen Support Installation guide
-
-
-
-
-
Samsung B300 Hard reset manual