Overview of Your Safe
WELCOME!
Your new First Alert
®
Fire Theft Safe™ will provide years of safe and secure
protection for your valuables, important documents and other personal items.
All First Alert
®
safes are designed and built using the highest manufacturing
standards to ensure maximum user satisfaction under a variety of conditions.
With proper care, your First Alert
®
safe will provide “Peace of Mind” for many
years to come.
Thank you and Enjoy!
The following list outlines the items and quantities of each included with
your new safe. Please carefully check the list to confirm all items have been
received. If any item is missing, then please contact Customer Service
@1-800-223-8566.
1
Home and Office Security Safes
8
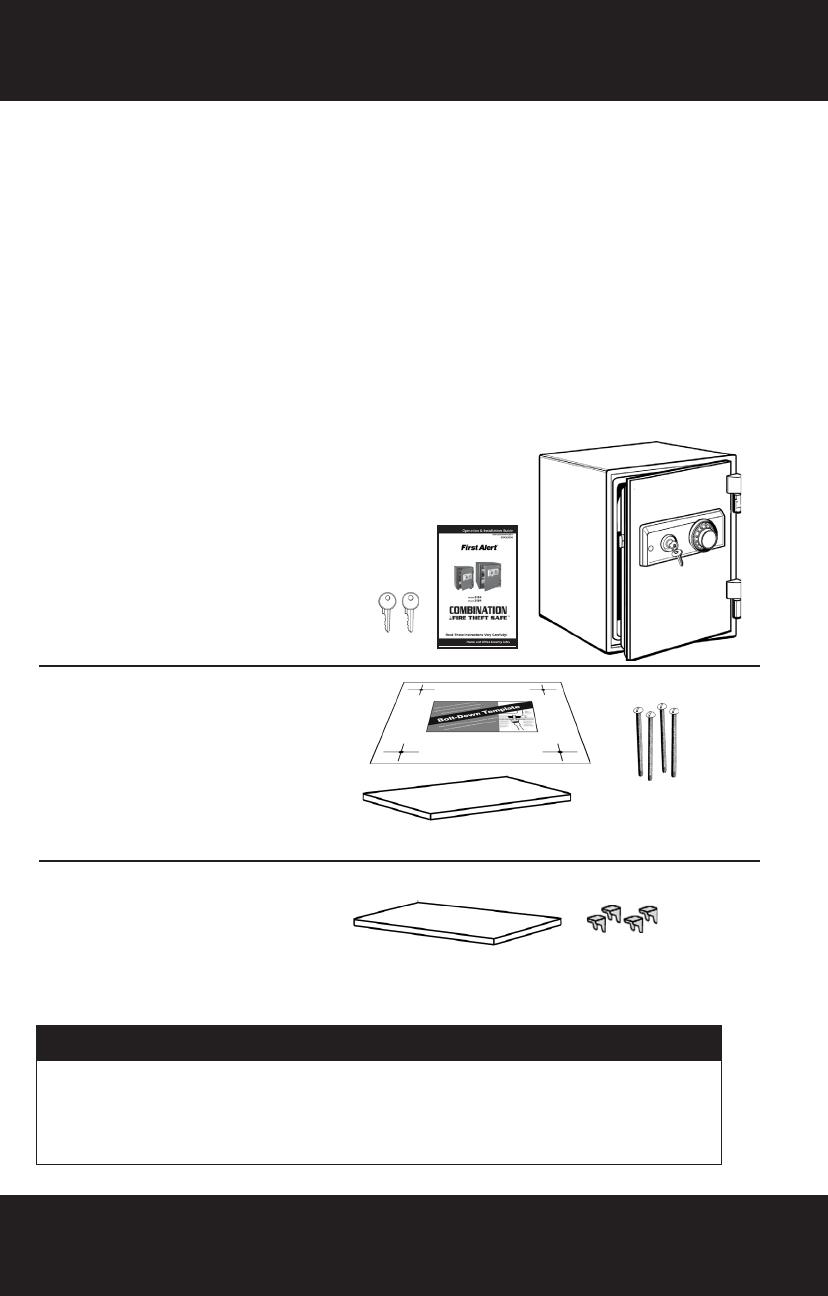
Package Contents
All Models
1 First Alert
®
Firesafe
1 Operation & Installation Guide
2CompanionEntryKeys
Models2054F(only)
1Bolt-DownKitIncluding:
1 Mounting Template
4Break-offBolts
4Washers
1 Removable Shelf
Models2084F(only)
1 Adjustable Shelf
4ShelfSupportClips
Important: DO NOT RETURN SAFE TO STORE
If you are missing parts, have difculty programming your safe or
have any other questions pertaining to its proper use and care, DO
NOT RETURN your safe to the store. Please contact Consumer Affairs
at 1-800-223-8566 (USA & Canada) for assistance.
Use, Care and Maintenance
Safe Care and Maintenance
When properly maintained, your safe will continue to provide protection for
many years. In order to ensure optimum performance of your safe, please
follow these simple precautions:
Clean Hands-Donotattempttooperatecombinationdialifyourhandshave
excessive dirt, debris, or liquids on them. Under normal circumstances, it is not
necessary to wash your hands before using the safe.
Clean Safe – To clean the outside surface of your safe, it is recommended that
you use a mild cleaner (e.g., window cleaner) to avoid scratching or discoloring
the surface. Do not use abrasive cleansers.
Moisture – If the safe is stored in an area of high moisture content (such as near
the ocean or in a tropical climate), moisture from the environment may become
trapped inside the safe. If this applies to you, open the safe on a regular basis to
promote air circulation.
For future reference, store this Operation and Installation Guide in a secure area
away from the safe. DO NOT DISCARD!
Appropriate Use of Your Safe
First Alert
®
fire safes protect paper records and many other valuables.
Verified fire protection for:
Memory sticks, CD’s & DVD’s, USB Drives.
This product is NOT INTENDED to protect audio or video cassettes, floppy discs,
data cartridges, film and photos or photo negatives
Testingshowsthattheinteriortemperatureofthesaferemainsbelow350°F
(177°C)for1hourduringareupto1700°F(927°C)whenusedproperly.Your
safe must be closed and latched in order to properly protect the contents from fire.
Moisture Warning
Due to the high moisture content of the fire retardant insulation used in
UL Classified fire safes, we recommend that you place delicate items such as
picturesorintricatejewelryintoanair-tightcontainerbefore storing them in
your safe. Avoid placing your safe in areas of high humidity. For optimum
performance,thesafeshouldbeopenedandairedoutforatleast20minutes
every two weeks.
Firearms Warning
This safe is not designed to store medication, items with combustible content,
gunsorotherweapons.PleasecontactBRK/SISCOat800-223-8566orshop
www.FirstAlert.com for information about safes that can securely store your
firearms or medication.
Pearls
Becausepearlssustainheatdamageattemperaturesbelow350°F,weadvise
that you DO NOT store pearls in this fire safe.