
Owner’s
Manual
Compactor
ZCG3100
ZCG3300
ZCG3500

2
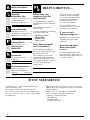
HELP US HELP YOU…
Before using your
compactor, read this
book carefully.
It is intended to help you operate
and maintain your new compactor
properly.
Keep it handy for answers to
your questions.
If you don’t understand something
or need more help, call:
GE Answer Center
®
800.626.2000
24 hours a day,
7 days a week
Write down the model
and serial numbers.
You’ll find them by pulling the
drawer out and locating the rating
label on the inside wall.
These numbers are also on the
Consumer Product Ownership
Registration Card that came with
your compactor. Before sending in
this card, please write these
numbers here:
Model Number
Serial Number
For quick reference, the model
number is also located behind
the key lock switch knob. Turn
the knob to the OFF/LOCK
position and remove it to
reveal the model number.
Use these numbers in any
correspondence or service calls
concerning your compactor.
If you received a
damaged compactor…
Immediately contact the dealer
(or builder) that sold you the
compactor.
Save time and money.
Before you call for
service…
Check the Problem Solver in the
back of this book. It lists causes of
minor operating problems that you
can correct yourself.
IF YOU NEED SERVICE
To obtain service, see the Consumer Services page
in the back of this guide.
We’re proud of our service and want you to be
pleased. If for some reason you are not happy with
the service you receive, here are some steps to follow
for further help.
FIRST, contact the people who serviced your appliance.
Explain why you are not pleased. In most cases, this will
solve the problem.
NEXT, if you are still not pleased, write all the
details—including your phone number—to:
Manager, Customer Relations
GE Appliances
Appliance Park
Louisville, KY 40225
Safety Instructions .......... 3
Operating
Instructions, Tips
Features of Your Compactor 4, 5
Trash Bag Installation ................. 6
Operating Your Compactor....... 7
Care and Cleaning
Changing Front Panel ................. 9
Cleaning—Inside and Outside... 8
When Going on Vacation........... 8
Problem Solver................10
More questions ?…call
GE Answer Center®
800.626.2000
Installation
Electrical Requirements ............. 9
Grounding...................................... 9
Consumer Services 11
Appliance Registration............... 2
Model and Serial Numbers........ 2
Warranty ..................... Back Cover

Important Safety Instructions
IMPORTANT SAFETY INSTRUCTIONS
Read all instructions before using this appliance.
WARNING—When using this appliance,
always exercise basic safety precautions,
including the following:
• This compactor is for household use only.
Use this appliance only for its intended
purpose as described in this manual.
• To prevent hazard of electrical shock, this
compactor must be properly installed and
grounded in accordance with the Installation
Instructions before it is used. SAVE YOUR
INSTALLATION INSTRUCTIONS FOR
FUTURE USE SHOULD YOU MOVE OR
RELOCATE YOUR COMPACTOR. If you did
not receive an Installation Instruction sheet with
your compactor, you can obtain one by contacting
the service location nearest you.
• Close supervision is necessary when any
appliance is operated near children. Do not
allow the compactor to be used as a toy, or to run
unattended at any time.
• Turn the key to OFF and remove it when not
compacting trash. This will help prevent anyone
from tampering with the compactor or children
from operating it.
• Do not push trash into the drawer with hands
or feet. Trash might contain broken glass, sharp
pieces of metal or other sharp objects that might
cause injury.
• When removing or carrying the trash bag,
keep the bag away from your body. Sharp objects
may have pierced it.
• When cleaning the inside of the cabinet,
be careful. Glass fragments may be stuck to
the ram or be lying in the bottom of the cabinet.
• When cleaning the trash drawer, be careful.
Glass fragments may be imbedded in the surface
of the drawer.
• Do not touch moving parts.
• Do not operate with a damaged cord set, plug,
motor or after damage in any manner. Have the
appliance examined, repaired or adjusted by an
authorized serviceman.
• Do not take apart this appliance. Incorrect
reassembly can cause electric shock when
subsequently used.
• Do not compact food waste such as raw meat
and fish, grapefruit rinds, personal hygiene
items and disposable diapers. These items
create very strong odors and should not go
into the compactor.
Precautions against unreasonable use of your
compactor:
• Never compact shotgun shells, cartridges
for firearms, fireworks, etc., which are highly
explosive.
• Never compact flammable materials such as
paint, oil- or gasoline-saturated rags, engine
starting fluid cans, paint thinner cans, etc.—
spontaneous combustion or explosive vapor
concentrations could occur.
• Never compact containers of toxic chemicals
such as strong insecticides or other poisonous
materials—compaction could release hazardous
fumes.
• Never compact aerosol cans containing explosive
or highly toxic chemicals. (If you are sure the
aerosol cans contain non-hazardous materials
such as shaving cream, cheese spread and
whipped cream, they may be compacted.)
• Do not compact lighted cigarettes, cigars or other
hot or burning items.
• Unplug the compactor before making any
repairs. NOTE: We strongly recommend that any
servicing be performed by a qualified person.
• DO NOT USE AN ADAPTER PLUG
OR AN EXTENSION CORD WITH
THIS APPLIANCE.
• Do not store or use gasoline or other flammable
vapors and liquids in the vicinity of this or any
other appliance.
SAVE THESE
INSTRUCTIONS
3

4
FEATURES OF YOUR COMPACTOR
Odor Control
Panel
Drawer Handle–
lift to pull out
drawer
Model and
Serial number
location
Changeable
Door Panels
Drawer
Buttons
Container Latch
Quick Reference Model
Number is located behind
the Key Lock switch knob
Mount optional
air freshener here
(not included)
Key Lock Switch
Ram
Bag Caddy
Removable
Trash Drawer
Leveling Legs
Models ZCG3100 and ZCG3300 come
with reversible black and white panels.
These units will also accept 1/4″ and
3/4″ custom panels.
Models ZCG3500 has a stainless steel
wrapped drawer panel.

5
Features of Your Compactor
What It Does
Your compactor reduces household trash to as little as
25% of its original volume.
It compacts most refuse, including paper, cans,
bottles, jars, plastic containers, wrappings, sweepings
and some food wastes.
How it Works
Drop trash into a disposable bag that lines the trash
drawer and close the drawer. When you start the
compactor, an electrically-operated ram moves down
into the drawer, compacts trash, moves back up
again—and the compactor shuts off automatically.
NOTE: The trash drawer must be 1/2 full before you
will notice compaction because the ram travels only
about 2/3 of the way down into the drawer.
Key Lock Switch
A key lock switch is provided for your protection as a safety measure.
When the key lock switch is in the OFF position, the compactor will not
operate. Lock the compactor when it is not in use, and remove the key for
safekeeping to keep children from operating the compactor or to prevent
anyone from tampering with it.
Odor Control Panel
A panel behind the drawer front is designed to hold an adhesive backed
freshener, such as a Stick-Up brand Air Freshener package. Simply open the
drawer and fasten the opened air freshener package on the panel. Replace
the air freshener as needed.
Adjustable Base
The base of this compactor can be adjusted forward or backward to achieve
a toekick to match the cabinet (see Installation Instructions).

TRASH BAG INSTALLATION
Reinforced polyethylene bags come with your
compactor. These bags are ready to be installed.
You must use the specially designed heavy-duty
trash bags included with your compactor. Replacement
bags can be obtained by calling 800.626.2002. The part
number for replacement bags for your model is
WC60X5015.
• With trash drawer pulled
out to first stop, move the
drawer to the second stop
by lifting the front of the
drawer slightly and pulling
forward. Now lower the
front edge of the drawer
to the floor allowing the
rear wheels to remain on
the track. This will clear
the back of the container
from the cabinet for easy
installation of the bag.
• Set bag caddy into
drawer.
• Set trash bag into bag
caddy and fold over rear
of drawer only.
• Lift drawer in front
and reengage wheels on
track so that the drawer
is self-supporting at its
outermost position.
• Open container latch on
right side of drawer and
swing door open.
• Pull bag over front of
drawer and smooth and
shape the bag to conform
to the drawer. Hook the
prepunched holes in the
bag over the drawer
buttons.
• Gently swing door shut,
assuring that the door
guide ‘‘V’’ is aligned
properly with the ‘‘V’’
groove in the drawer
and that the bag is
captured just above
the “V” groove.
• Finally, use the container
latch to completely close
the door. This will pull
the door guide ‘‘V’’ snug
in the ‘‘V’’ groove in the
drawer flange and tightly
grasp the bag.
Failure to align the ‘‘V’’s properly or to latch the
drawer to the door may cause the compactor to
not function properly.
To remove a full trash bag:
• Pull the drawer out to the first stop.
• Unhook the container latch from the door catch
and swing the door open.
• Unbutton the bag and close it by twisting the bag top,
much as you would close a garbage bag. Fasten with
a twist tie.
• Slip your hand through
both handles in the bag
caddy and pull upward
and forward, tipping the
bag toward you. A full
bag of compacted trash
is easy to carry in
this manner.
Bag Caddy
Trash Bag
Drawer
Buttons
“V” Groove
Container
Latch
6

OPERATING YOUR COMPACTOR
After installing a trash bag, the compactor is ready to use.
Loading
Pull the trash drawer out as far as necessary to
load the items.
• Bottles and large cans compact best when laid flat
near the center of the drawer.
• To help keep the ram clean when compacting
messy food waste, place a couple of folded sheets
of newspaper or a large grocery bag on top of the
load to be compacted.
• Folded newspaper will also help prevent glass
fragments from flying out of the drawer into the
mechanism when compacting a large glass bottle,
or several bottles or jars, or any other items that
might shatter.
• Refuse too bulky to go into the drawer can be folded
to fit. If it cannot be folded to fit into the drawer, do
not attempt to force it in.
• Although it is not necessary to compact until the
drawer is full or nearly full, we suggest that, for
maximum compaction, you start the compactor
each time a significant amount of trash is added.
Compacting
To start the compactor:
1. Close the drawer.
2. Rotate the key past ON to the START position,
hold it momentarily at START, and then release it
back to ON. The motor will start and compacting
will proceed.
The ram travels downward into the drawer,
compacting the trash. At the bottom of the stroke, the
ram automatically reverses direction, retracts out of
the drawer, returns to its starting position and the
compactor shuts off automatically.
The cycle takes about one minute. As the trash drawer
fills, cycle time gets progressively shorter.
Glass bottles can make a loud noise when they break
during compaction. This is normal. Also, bottles in
the trash drawer will not always break during the first
cycle. Breaking glass and associated noise may occur
several cycles later, depending on the type and
volume of the trash.
When bottles and cans are compacted, small tears
in the bag may occur. This is normal and in no way
affects the performance of the compactor. Always use
the bag caddy to carry the compacted trash to storage
or pick-up areas, and keep the bag away from your
body to prevent injury from sharp objects that may
have pierced the bag.
CAUTION: When emptying waste baskets into the
trash drawer, some items may spill into the compactor
behind the drawer. Items behind the drawer could
prevent it from closing completely and prevent the
compactor from operating. To remove such items
from behind the drawer, open the drawer and, if
necessary, remove it to clean them out. See Care
and Cleaning instructions.
CAUTION: DO NOT FORCE KEY WHEN
TURNING. The key should always rotate
easily. Forcing may break the key and
damage the switch.
To Stop Compacting Anti-Jamming Feature
The compactor may be stopped at any time by turning
the key to OFF. Restarting the compactor will allow the
ram to move upward into its starting position.
Should unusual loads cause misalignment, compactor
will automatically stop to prevent damage to the unit.
To reset the unit and return the ram to the UP position,
turn the key switch to START and hold momentarily
at START, then release it back to ON. The motor will
start and the ram will return to the UP position and stop.
Redistribute the load evenly in the drawer, placing
bottles and large cans flat and centered in the drawer,
before recycling the compactor.
Trash Bag Installation Operating Your Compactor
7

8
CARE AND CLEANING
The inside and outside of your compactor are finished with durable baked-on enamel.
Cleaning—Outside
Keep the outside clean. Do not wipe with a soiled
dishwashing cloth—it may leave a residue that can
damage the paint. Do not use harsh or gritty cleansers
or scouring pads that may mar the finish. Apply a coat
of kitchen/appliance wax when the compactor is new,
and then several times a year. Appliance Polish and
Wax Cleaner (Cat. No. WR97X216) is available
from GE Appliance Parts Marts.
Stainless Steel Panels. The stainless steel panels can
be cleaned with Stainless Steel Magic or a similar
product using a clean, soft cloth. You can order
Stainless Steel Magic (Cat. No. WX10X15) through
GE Parts by calling 800.626.2002.
Cleaning—Inside
To clean the cabinet interior:
1. Pull out trash drawer until it stops.
2. Lift up on drawer slightly, then pull out drawer
to second stop.
3. Lift drawer up and out of compactor.
4. Vacuum clean cabinet base, track channels and
drawer, particularly in corners.
5. Wash the cabinet interior and trash drawer with
normal mild household cleaners, rinse and dry with
a clean cloth. Be sure trash drawer is thoroughly
dry before inserting a new bag.
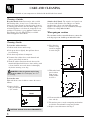
To clean the ram:
With trash drawer out of cabinet, remove the ram as
follows:
1. Remove bolt in
center of ram with
a 1/2″ wrench.
2. Place hand on
ram face, being
careful to support
its entire length.
3. With other hand,
press back on
front of ram,
sliding it until
it releases.
4. Clean ram with normal mild household cleaners,
rinse and dry.
5. Fit ram into grooves on the compacting mechanism
and slide it forward until it snaps into position.
6. Replace center bolt removed in Step 1.
FRONT
For vacations or other extended absences, remove the
trash bag to prevent a build-up of undesirable odor.
When going on vacation
CAUTION: WATCH FOR GLASS FRAGMENTS.
WARNING: Glass fragments may be lying
in bottom of cabinet. To avoid injury, use care
in cleaning.

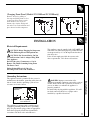
Changing Front Panel (Models ZCG3100 and ZCG3300 only)
Remove drawer by pulling to
first stop and lifting front to clear
second stop. Place drawer on its
back. Remove two screws in
bottom edge of trim. Slide panel
out and reverse. Reinstall trim and
place drawer back in compactor.
Grounding Instructions
This appliance must be grounded. In the event of a
malfunction or breakdown, grounding will reduce the
risk of electric shock by providing a path of least
resistance for electric current.
This appliance is equipped with a cord having an
equipment grounding conductor and a grounding
plug. The plug must be plugged into an appropriate
outlet that is properly installed and grounded in
accordance with local codes and ordinances.
DANGER: Improper connection of the
equipment grounding conductor can result in a risk of
electric shock. Check with a qualified electrician if
you are in doubt as to whether the appliance is
properly grounded.
Do not modify the plug with this appliance. If it will
not fit the outlet installed, have a proper outlet
installed by a qualified electrician.
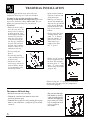
PREFERRED
METHOD
Ensure proper ground
exists before use
INSTALLATION
Electrical Requirements
CAUTION: Before Plugging In Compactor,
Read The Following Electrical Requirements.
CAUTION: For Personal Safety, Do Not
Use An Extension Cord Or Adapter Plug With
This Appliance.
Do Not Under Any Circumstances, Cut Or
Remove The Third Grounding Prong From
The Power Cord.
Follow National Electrical Codes Or
Prevailing Local Codes And Ordinances.
This appliance must be supplied with 120V, 60HZ and
connected to an individual, properly grounded branch
circuit protected by a 15 or 20 amp circuit breaker or
time delay fuse.
If the electric supply provided does not meet the
above requirements, call a licensed electrician.
Care and Cleaning Installation
9

PROBLEM POSSIBLE CAUSE
COMPACTOR DOES • May not be plugged into a live electrical outlet.
NOT OPERATE
• If plug is secure and compactor still fails to operate, plug a lamp or small
appliance into the same outlet to determine if there is a tripped circuit breaker
or burned-out fuse.
• Key lock switch may not be in ON position.
• Key lock switch may not have been held at START long enough to start the
compaction cycle.
• Drawer may not be firmly closed.
• Compactor has an automatic thermal cutout. If you have just compacted
repeatedly, this protector may have opened the motor circuit. Wait a few
minutes and the cutout will reclose automatically.
• In the unlikely event that the actuator (on the inside of the door) breaks off,
the compactor will not operate. DO NOT ATTEMPT TO OPERATE
COMPACTOR IN ANY OTHER MANNER. A replacement actuator can
be ordered from Monogram Preferred Service, 800.444.1845.
DRAWER IS • Trash may have fallen behind the drawer and is preventing the safety switch
HARD TO CLOSE from being closed.
DRAWER WILL • On rare occasions, a large can placed near the side of the drawer may become
NOT OPEN wrapped around the edge of the ram, interfering with the opening of the drawer.
Grasp the drawer handle and move the drawer back and forth until the stuck
can becomes dislodged.
• The Key/Lock switch may have been turned to OFF/LOCK before the ram
returned to the full UP position. Close the drawer and turn the Key/Lock
switch to ON. The ram will return to the UP position automatically.
• Unusual or unbalanced loads may result in compactor stopping before ram has
fully returned to UP position. Turn key switch to START and hold momentarily
at START, then release it back to ON. The motor will start and the ram will
return to the UP position and stop. To avoid an unbalanced load, distribute the
trash evenly in the drawer, keeping bottles and large cans flat and in the center
of the drawer.
LITTLE OR • Drawer must be at least 1/2 full of trash before you will see any appreciable
NO APPARENT amount of compacting because the ram does not travel all the way to the
COMPACTION bottom. Trash in bottom of drawer will be crushed during subsequent
compaction cycles.
GREASE LEAKING • Early in the life of your compactor, grease from the mechanism may drop
FROM MECHANISM into the drawer or be found on the front of the bag. This is normal, and
will soon stop.
If you need more help…call, toll free:
GE Answer Center
®
800.626.2000
consumer information service
10
QUESTIONS?
USE THIS PROBLEM SOLVER

Parts and Accessories
800.626.2002
Individuals qualified to service their own appliances
can have needed parts or accessories sent directly to
their home. The GE parts system provides access to over
47,000 parts…and all GE Genuine Renewal Parts are
fully warranted. VISA, MasterCard and Discover cards
are accepted.
User maintenance instructions contained in this
booklet cover procedures intended to be performed
by any user. Other servicing generally should be
referred to qualified service personnel. Caution
must be exercised, since improper servicing may
cause unsafe operation.
Upon request, GE will provide
Braille controls for a variety of
Monogram appliances, and a
brochure to assist in planning a
barrier-free kitchen for persons
with limited mobility. To obtain
these items, free of charge, call
800.626.2000.
Consumers with impaired hearing or speech who have
access to a TDD or a conventional teletypewriter may
call 800.TDD.GEAC (800.833.4322) to request
information or service.
With the purchase of your new Monogram appliance, receive the assurance that if you ever
need information or assistance from GE, we’ll be there. All you have to do is call—toll-free!
Monogram Preferred Service
800.444.1845
A GE consumer service professional will provide expert repair service,
scheduled at a time that’s convenient for you. Many GE Consumer Service
company-operated locations offer you service today or tomorrow, or at your
convenience (7:00 a.m. to 7:00 p.m. weekdays, 9:00 a.m. to 2:00 p.m. Saturdays).
Our factory-trained technicians know your appliance inside and out—so most
repairs can be handled in just one visit.
GE Answer Center
®
800.626.2000
Whatever your question about any Monogram major appliance, GE Answer
Center
®
information service is available to help. Your call—and your
question— will be answered promptly and courteously. And you can call any
time. GE Answer Center
®
service is open 24 hours a day, 7 days a week, or visit
our website at: ge.com..
Service Contracts
800.626.2224
You can have the secure feeling that GE Consumer Service will still be there
after your warranty expires. Purchase a GE contract while your warranty is still
in effect and you’ll receive a substantial discount. With a multiple-year contract,
you’re assured of future service at today’s prices.
For Customers With Special Needs…
800.626.2000
The Problem Solver Consumer Services
1111

YOUR MONOGRAM COMPACTOR WARRANTY
Staple sales slip or cancelled check here. Proof of original purchase
date is needed to obtain service under warranty.
WHAT IS
COVERED
From the Date
of the Original
Purchase
WHAT IS NOT
COVERED
• Service trips to your home to teach you
how to use the product.
• Improper installation, delivery or
maintenance.
• Replacement of house fuses or resetting
of circuit breakers.
• Failure of the product if it is abused, misused,
or used for other than the intended purpose
or used commercially.
• Damage to the product caused by accident,
fire, floods or acts of God.
• Incidental or consequential damage caused by
possible defects with this appliance.
• Damage caused after delivery.
• Product not accessible to provide required
service.
Warranty
Compactor
ONE-YEAR
Any part of the compactor which fails due to a defect in materials or workmanship. During this
limited one-year warranty, GE will also provide, free of charge, all labor and in-home service to
replace the defective part.
This warranty is extended to the original purchaser and any succeeding owner for the products
purchased for ordinary home use in the 48 mainland states, Hawaii, Washington, D.C. or Canada. If
the product is located in an area where service by a GE Authorized Servicer is not available, you may
be responsible for a trip charge or you may be required to bring the product to an Authorized GE
Service location for service. In Alaska the warranty is the same except that it is LIMITED because
you must pay to ship the product to the service shop or for the service technician’s travel cost to
your home.
All warranty service will be provided by our Factory Service Centers or by our authorized
Customer Care
®
servicers during normal working hours.
Should your appliance need service, during warranty period or beyond, in the U.S.A. call
800.444.1845. Please have serial number and model number available when calling for service.
Some states/provinces do not allow the exclusion or limitation of incidental or consequential damages, so the
above limitation or exclusion may not apply to you. This warranty gives you specific legal rights, and you may
also have other rights which vary from state to state/province to province. To know what your legal rights are
in your state/province, consult your local or state/provincial consumer affairs office or your state’s Attorney
General.
Warrantor in USA: General Electric Company,
Louisville, KY 40225
165D4700P333
49-55013
Printed in the United States
11-05 JR
EXCLUSION OF IMPLIED WARRANTIES—Your sole and exclusive remedy is product repair as provided in this
Limited Warranty. Any implied warranties, including the implied warranties of merchantability or fitness for a
particular purpose, are limited to one year or the shortest period allowed by law.
GE Consumer & Industrial
Appliances
General Electric Company
Louisville, KY 40225
ge.com
-
 1
1
-
 2
2
-
 3
3
-
 4
4
-
 5
5
-
 6
6
-
 7
7
-
 8
8
-
 9
9
-
 10
10
-
 11
11
-
 12
12


Ask a question and I''ll find the answer in the document
Finding information in a document is now easier with AI
Related papers
Other documents
-
Ergotron 97-873 User guide
-
Jenn Air TC407 Owner's manual
-
KitchenAid KTTS505ESS User guide
-
KitchenAid W10242569A User manual
-
Viking Range DUC181 User guide
-
-
-
-
-