
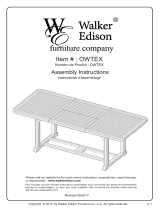
Item #: OWTEX
Assembly Instructions
For our most current instructions, to request missing, lost or broken parts, or for any other Customer
Service issues, please visit our website at www.walkeredison.com or call us at 877-207-5906.
Revised 02/2012

Parts List

Hardware List
Phillips head screwdriver required for assembly
(not included)
Small wood screw
Large wood screw
Small bolt
Large bolt
Small screw
Large screw
Latch screw

Assembly Options
Follow Steps 1-17 to assemble the
table. Final assembly will be the table in
its extended form.
The table also has a compact form.
Follow Steps 18-22 for instruction on
how to put the self-contained leaf away.

Secure slat (15) to legs (13,14) using large screws (G). Tighten large screws (G) with wrench (J). Repeat this
step for second set of legs (13,14).
Secure slat (16) to legs (13,14) using large screws (G). Secure supports (17) to legs (13,14) using small
screws (F). Tighten all screws with wrench (J). Repeat this step for second set of legs (13,14).

Secure umbrella supports (19) to slats (18) using large screws (G). Tighten large screws (G) with wrench (J).
Attach slats (18) to slats (16) using large screws (G). Tighten large screws (G) with wrench (J).

Insert slat (6) into slat (5). Repeat this step for second set of slats (5,6).
Secure slat (7) to slats (5,6) using small bolts (E). Tighten small bolts (E) with wrench (J). Repeat this step for
second set of slats (5,6,7).

Secure slat (12) to slats (8,9) using small screws (F). Tighten small screws (F) with wrench (J).
Secure slat (11) to slats (8,9) using small wood screws (A). Tighten small wood screws (A) with a screwdriver.

Construct the inner frame of the table by securing the slat (6) assemblies from Step 6 to slats (8,9,10) using
large screws (G). Tighten large screws (G) with wrench (J).
Carefully slide the leg assembly from Step 4 into place along the inner frame assembly from the previous
step.

Secure supports (17) to the inner frame assembly using small screws (F). Tighten small screws (F) with
wrench (J). Secure each leg to the inner frame assembly using large bolts (C) and sleeve nuts (D). Tighten
large bolts (C) and sleeve nuts (D) onto each other using wrenches (J).
Carefully slide table top sections (1,3) into place.

Carefully flip table over onto a soft surface. Attach draw pull latches (I) to table top sections using latch
screws (H) as shown above. Tighten screws (H) with a screwdriver. Insure that draw pull latches (I) can
appropriately lock and unlock. Lock draw pull latches (I).
Carefully lay table top section (2) into place.

Attach blocks (4) to all table top sections using small wood screws (A) as shown above. Tighten small wood
screws (A) with a screwdriver.
Secure slat (12) to table top section (2) using large wood screws (B). Tighten large wood screws (B) with a
screwdriver.

To put the extendable leaf of the table away, unlock the draw pull latches. You do not need to flip the table
over to unlock the draw pull latches. The diagram is shown as such for illustration purposes only.
Option A
Final Assembly

Carefully fold table top section (2) over itself.
Carefully rotate table top section (2) so it rests on the inner frame of the table.

Carefully slide table top sections (1,3) together. Lock draw pull latches of table top sections (1,3) together.
Option B
Final Assembly
-
 1
1
-
 2
2
-
 3
3
-
 4
4
-
 5
5
-
 6
6
-
 7
7
-
 8
8
-
 9
9
-
 10
10
-
 11
11
-
 12
12
-
 13
13
-
 14
14
-
 15
15


Walker Edison Furniture Company HDWTEXDB Operating instructions
- Type
- Operating instructions
Ask a question and I''ll find the answer in the document
Finding information in a document is now easier with AI
Related papers
-
 Walker Edison Furniture Company HDW6XBDBR Operating instructions
-
Walker Edison Furniture Company HD8089 Installation guide
-
Walker Edison Furniture Company HD8065 Installation guide
-
 Walker Edison Furniture Company C44AIETBW Operating instructions
-
 Walker Edison Furniture Company HDQ44CSTB Operating instructions
-
 Walker Edison Furniture Company HD44CCRAG User manual
-
 Walker Edison Furniture Company HD52C32BL User manual
-
 Walker Edison Furniture Company HDQ42BC3TB User manual
-
Walker Edison Furniture Company HDQ44CFDES Operating instructions
-
 Walker Edison Furniture Company HDWSTOLLWH Operating instructions


Other documents
-
POLYWOOD PWS118-1-11TE Operating instructions
-
POLYWOOD PWS117-1-11NT Operating instructions
-
Walker WQ44CSTB User manual
-
Gorilla Playsets Riverview Installation guide
-
-
-
-
-
-
Gorilla Playsets 01-0066-TS Operating instructions