Page is loading ...

866.729.2378 | WWW.MOISTURESHIELD.COM
Tools
All you’ll need is a hammer and screw gun, circular saw (carbide-
tipped blade with fewer than 20 teeth is recommended), level, tape
measure, rasp and blue chalk line. Manufacturer recommends blue
chalk since other colored chalk may stain the deck.
Building Code Requirements
For your convenience, some common building code requirements
are reprinted here. Please check your local building code
requirements to be sure you are compliance in your area.
• Residential minimum handrail height is generally 36-inches.
• Multi-family minimum handrail height is sometimes 42 inches.
• Baluster maximum spacing is generally 4 inches (clear distance
between balusters**).
• Maximum gap between bottom rail and deck surface is generally
4-inches.
**Some codes require a 2-inch maximum gap for multi-family applications.
**Spacing note: The precise language is generally “do not allow passage of a sphere 4-inch
in diameter”.
Carbide-tipped
blade with fewer
than 20 teeth.
Carbide-tipped
blade with fewer
than 20 teeth.
Carbide-tipped
blade with fewer
than 20 teeth.
Carbide-tipped
blade with fewer
than 20 teeth.
COMPOSITE RAILING
INSTAL LATION
Baluster
ACTUAL DIMENSIONS:
1.5" × 1.265"
LENGTH: 38 inches and 12 feet
Magnum Railing
ACTUAL DIMENSIONS:
2.92" × 3.95"
LENGTH: 6 feet
FITS 4” x 4” Post
Post Cap
ACTUAL DIMENSIONS:
5.5" × 5.5"
FITS 4” x 4” Post
Post Collar
ACTUAL DIMENSIONS:
5.5" × 5.5"
FITS 4” x 4” Post
4" × 4" Post
ACTUAL DIMENSIONS:
4.265" × 4.265"
LENGTH: 51 inches

866.729.2378 | WWW.MOISTURESHIELD.COM
COMPOSITE RAILING
INSTAL LATION
Attach posts to decking frame. DO NOT NOTCH POSTS. The
maximum distance from center of post to center of post is
72-inches. Square and level posts.
A. Block posts and attach to rim joists with two bolts (1/2-inch
carriage bolts 8-inch - minimum length with 1-1/4-inch flat
washer and nut on back).
1.
Bolt positions: The top bolt
to be no more than 3-inches
below the finished deck surface
and the bolt spacing to be no
less than 4-inches on-center.
Corner
Post
Blocking
Line Post
Blocking
Interior
View
Interior
View
Exterior
View
Exterior
View
Line Post
Blocking
Corner
Post
Blocking
Corner
Post
Blocking
Line Post
Blocking
Interior
View
Interior
View
Exterior
View
Exterior
View
Line Post
Blocking
Corner
Post
Blocking
Railing Orientation - Magnum Railing: To use the magnum railing, the top magnum rail must be installed with the long leg (4-inch) in the
horizontal orientation. The balusters sit on the ledge of the bottom leg of the bottom magnum rail and are covered by the top magnum
rail leg. The top and bottom magnum rails allow the balusters to face either toward or away from the deck depending on which way the
consumer prefers the rail system to be installed.
For ease of installation, we offer our railing products in full section packages.
These include:
· Railing Package: 2 magnum railings – 6 feet (one top and one bottom rail)
· Balusters Package: 14 balusters – 38 inches
· Post Package: 1 post – 51 inches

866.729.2378 | WWW.MOISTURESHIELD.COM
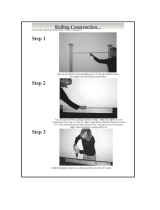
*INSTALL ATION TIP:
· Use clamps to secure for easier installation.
Temporary Blocks
Cut two temporary blocks from scrap material to the height you want
the toe sweep (no less than 2-inches nor greater than 4-inches). Place
on inside of posts sitting on decking.
A. Set bottom magnum rail on blocks (with the 4-inch leg resting on the
blocks) and center on post.
B. Place baluster against post and sit it on the bottom magnum rail
(1-1/4-inch side against the post).
C. Using 2-1/4-inch, #7 stainless steel trim head screws, secure baluster
to post, two screws at each end, and four additional screws evenly
spaced between the end connections.
D. Place second baluster against opposite post and repeat step C.
2.
Baluster
1-1/4"
4"
3"

866.729.2378 | WWW.MOISTURESHIELD.COM
Secure bottom magnum rail to each post baluster using two,
2-1/4-inch, #7 stainless steel trim head screws, repeat on
other end of bottom magnum rail.
Place a support block every two feet between bottom rail and
decking for support. Secure support block with one, 2-1/4-
inch, #7 stainless steel trim head screw through the bottom
rail into the support block.
Place top magnum rail on balusters (see railing orientation for
details) and repeat fastening as in step 3. In addition, angle
(toe nail) two 2-1/4-inch , #7 stainless steel trim head screws
from top magnum rail directly into each post. Countersink the
screws no more than ¼ inch. To avoid potential splitting, drill
a lead hold with a 7/64 drill bit at a 45-degree angle, one-inch
away from the end of the magnum rail.
3. 4.
5.
Baluster
1-1/4"
4"
3"

866.729.2378 | WWW.MOISTURESHIELD.COM
Use the formula below to determine the amount of balusters
you need and the spacing between them. Measure the
distance in inches between the inside of one post baluster to
the inside of the other post baluster. This is your total space.
A. Divide the total space by 5, and round it off to a whole
number. This is the number of additional balusters you need.
B. Multiply the value in (A) by 1.5 and subtract it from your
total space.
C. Divide the value in (B) by the value of (A+1). This is the
spacing between the balusters. You may want to cut two
spacer blocks from scrap material or a baluster, the same
width as answer C, and use these two spacers at top and
bottom to place each baluster.
Attach post caps to
top of post.
Additionally, for a finished look, install trim boards over the rim
joists. Position flush with the top of the decking.
A. Attach using 2-1/4-inch, #7 stainless steel trim head screws.
One screw through the end or side of the decking, and three
screws into the rim joist vertically. Repeat this step every 10-12
inches horizontally through the length of the trim board.
B. We recommend putting the screw through the thickest part
of the deck board (center between the top and bottom of the
board) when attaching the trim board, then the other three into
the rim joist.
Attach baluster to top and bottom magnum rails using one,
2-1/4-inch, #7 stainless steel trim head screws. (4-inch
maximum distance between balusters, visible opening –
check local building code).
6.
8.
10.
7.
*INSTALL ATION TIP:
· 3-1/2-inches between balusters is always a good
starting point.
*INSTALL ATION TIP:
· Quality outdoor adhesive can be
used for caps.
*Trim can also be installed underneath boards when the
boards overlap the joist.
Slip post collar over post onto deck if installing.
9.

866.729.2378 | WWW.MOISTURESHIELD.COM
Attach posts to decking frame. Square to straight side
of rim joist and level. Slip post collar over post onto deck
if installing.Follow procedures 2-4 to install posts and
decking.
Determine the angle of the top magnum rail.
A. Lay a top magnum rail centered on top of the two posts
and mark angle (see railing orientation) and cut.
B. Mark and cut the bottom magnum rail the same way,
making sure to lay the 4-inch leg on the posts.
A. Place bottom magnum rail on blocks that are cut to the
toe sweep height desired (no less than 2-inches nor greater
than 4-inches) – 4-inch leg lying on blocks.
B. Place baluster with 45-degree cut side against the post
positioned at the 45-degree corner and sit on the bottom
magnum rail. Attach it to the post using procedure #1C.
C. Place a regular baluster against the diagonal baluster,
sitting on bottom magnum rail and attach with three, 2-1/4-
inch, #7 stainless steel trim head screws, evenly spaced top
to bottom.
Finish with steps #1D through #7 from the composite railing
installation instruction – with the exception of the post
baluster that has been installed already in this 45-degree
section (step #2).
1.
2.
3.
4.
45-DEGREE RAILING
INSTAL LATION

866.729.2378 | WWW.MOISTURESHIELD.COM
Attach posts to stair stringers (stringers should be placed 9-inch OC or less). Square posts to stringers and level. Be sure
posts measure no more than 72-inches from outside to outside at the angle of the stairway when using as a stair rail. Guard rail
sections are sold in 72-inch lengths and must be trimmed to fit between the posts. Allow for decrease in length from angle cuts.
72" Maximum
A. Follow step #2 in the decking installation instructions
to install posts to stair stringers (use corner post blocking
method).
Install deck boards. Boards may be flush with riser or extend
past the riser by 1-inch. Use two, 2-1/4-inch, #7 stainless
steel trim head screws per board per stringer.
A. Optional: Cut and install ‘kick boards’ (deck boards) along
each stair rise.
B. Install post collars if desired.
C. Cut and install trim board on stringers if desired. Use procedures in step #8 from the
composite railing installation section.
1.
2.
STAIR RAILING
INSTAL LATION

866.729.2378 | WWW.MOISTURESHIELD.COM
Lay a top and bottom magnum rail along the edges of the steps and up next
to the post.
A. Position both rails for marking with the 2-5/8-inch leg lying on the steps.
B. Mark the rails on the inside faces of the two upright posts.
C. Cut each rail along this mark (line).
Position bottom magnum rail 1/2-
inch above edges of steps (check
local code) support on blocks cut
from scrap material.
Cut ends of two balusters at
the same angle as the top and
bottom magnum rails and use
them as the post balusters.
To complete stair railing follow steps #1B
through #7 from the composite railing
installation section.
3.
4.
5.
6.
72"
© 2015 Advanced Environmental Recycling Technologies, Inc. All trademarks are property of Advanced Environmental Recycling Technologies, Inc., unless otherwise noted. All rights reserved. July 2015.
/