Page is loading ...

DIMENSIONS
TOLL FREE: (866) 591 - 7792
E-Mail: [email protected]
www.vigoindustries.com
VANITY SPECIFICATIONS
VANITY COMPONENTS
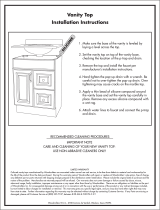
Model VG09041KM
MODEL # VANITY VANITY VANITY
WIDTH HEIGHT DEPTH
VG09041KM 35 7/8" 33 1/2" 18 1/4"
MODEL VG09041KM
FEATURES
PACKING LIST
Vanity Assembly
Mirror
Sink
33 1/2"
35 7/8"
18 1/4"
For warranty purposes contact our toll free number:
30 5/8"
27 1/2"
3/4"

THE MEASUREMENTS IN INCHES ARE ROUNDED TO THE NEAREST 1/8"
MODEL VG09041KM
SIDE VIEW
FRONT VIEW
BACK VIEW
wood support
drawer
open area
shelf
dimensions with out sink top (where applicable)
9 7/8"
3/4"
6 3/8"
3/4"
11 1/8"
3 1/2"
31 1/2"
1 5/8"
1 5/8"
22 5/8"
1 3/4"
32 1/4"
34 5/8"
33 1/2"
18 1/4"
35 7/8"
30 5/8"
2 3/8"
25 7/8"
2 3/8"
27 1/2"
2 3/8"
22 3/4"
2 3/8"
3/4"
27 1/2"
7 1/2"
2
DIMENSIONS

THE MEASUREMENTS IN INCHES ARE ROUNDED TO THE NEAREST 1/8"
MODEL VG09041KM
BACK VIEW
wood support
drawer
shelf
9 3/4"
3/4"
6 3/8"
3/4"
11 1/8"
3 1/2"
31 1/2"
1 5/8"
1 5/8"
22 5/8"
34 5/8"
1 3/4"
30 1/2"
3
ROUGHING-IN
Open space for
Rough-In Plumbing
Should be at the same height
as the center of the 2"x6"
Backing Material

4
NOTE: This is the recommended installation for wall mount and freestanding vanities.
NOTE: To properly secure the vanity, the center of the required 2x6 backing material
must be the correct height from the floor. This will be your desired height.
Measure and mark your desired height up from the floor. Make sure to remove the
distance of the top of the vanity without the sink to the center on the 2 mounting
vanity brackets, 1 3/4". This will be the height from the floor to the center of the 2x6
backing material. Refer to the vanity and lavatory "Roughing-In" section for proper
placement.
Option A - Front-notch the studs 1 1/2" to ensure the 2x6 backing material is flush
against the studs.
Option B - Toe nail the 2x6 pieces between the open framing. Make sure to cut the
sections wide enough to securely fit on center and make sure the 2x6 are flush with
the face of the framing to prevent the vanity from sticking too far out or not far
enough out.
Secure the 2x6 backing material to the studs with framing nails.
Rough in the water supply and drain lines into the rough-in plumbing area of the
vanity. Refer to the vanity and lavatory "Roughing-In" section for proper placement.
Note: All Rough in material is not included with the vanity.
Write down the location of the 2x6. This will benefit you when the wall is closed by
wall board, tile, etc.
NOTICE: To ensure proper alignment of the lavatory, drawer and door: The finished
wall must be straight and plumb. The floor must be flat and perpendicular to the finished
wall.
NOTICE: Do not install any moldings that may inhibit the vanity from being flush against
the finish wall.
ADJUSTABLE
BASED OFF
DESIRED HEIGHT
REQUIRED TOOLS
Plus
Framing Nails
Siliconized Acrylic Caulk
Adjustable Wrench
Plumber's putty or Caulking
Pipe Tape
Tubing Cutter or Hacksaw
Caulking Gun
2x6 Backing Material
Rubber Mallet
PREPARE SITE
WARNING: Risk of property damage. Do not modify the vanity in any way. Doing so will compromise the structural stability of the vanity and may cause
property damage.
NOTICE: Siliconized acrylic caulk must be used to secure the lavatory to the vanity. Do not use 100% silicone sealant, which will damage the finish of the vanity.
Observe all local plumbing and building codes.
Two people should install this product.
Vigo Industries reserves the right to make revisions in the design of products without notice, as specified in the Price List.
BEFORE YOU BEGIN
ADJUSTABLE
BASED OFF
DESIRED HEIGHT
OPTION A
FRONT-NOTCH
OPTION B
TOE NAIL
(Not included)
!

5
ASSEMBLY
PACKAGE CONTENTS
BACK SIDE OF THE VANITY
WALL SCREW
LOCATION
6. Select the mirror location and mark
holes on the wall for mounting. Measure
from the center holes on the back of the
mirror. Measurement should be the
distance between the mounting holes.
Drill holes, sink anchors and secure
screws. Hang up the mirror.
Wall
Cabinet
Plastic anchor
Screw
5. For specific Faucet installation instructions refer to the Faucet manufacturer's
instruction guide. Connect supply line to faucet.
3. Silicone the lavatory to the vanity, align it and press down firmly.
1. Select the vanity location and mark holes on the wall for mounting screws.
Remove the vanity, drill holes, stick anchors. Securely screw unit to the wall. This
should be drilled into your 2"x6" backing material.
VANITY INSTALLATION
1
6
MIRROR
PLASTIC ANCHOR - 2PC.
SCREW - 2PC.
VANITY
PLASTIC ANCHOR - 2PC.
SCREW - 2PC.
4
4. Connect Trap to drain assembly. Vigo recommends installing the Vigo brand
corresponding sink and pop up. Figure #4 depicts the complete assembly of the
Vigo brand sink, vanity and pop up.
CARE AND MAINTENANCE
REQUIRED TOOLS
SAFETY TIPS
INSTALLATION
Installation must be done by a qualified licensed plumber.
Prior to installation please read the instructions thoroughly, confirm that all parts
are included and visually inspect the unit for any defects.
If you have any questions please contact the Vigo Technical Support
Department before proceeding with installation.
REMOVING YOUR OLD LAVATORY
Adjustable wrench
Plumber's putty or Caulking
Pipe tape
Flat screwdriver
Philips Screw Driver
To ensure that your installation project goes smoothly, please review these
instructions before proceeding.
Your new lavatory is designed for years of trouble-free performance.
Keep it looking new by cleaning it periodically with a soft cloth. Avoid abrasive
cleaners, steel wool and harsh chemicals.
To protect against scratches, use felt, leather, or cork under all items placed on
the wood surface. Do not expose wood furniture to direct sunlight, drying heat
sources, or dampness. Dust frequently with a soft cloth in the direction of the
grain. Use only products specifically made for cleaning wood. Avoid using oily
polishes or waxes, or products containing silicone. Blot spills immediately with
a soft, damp cloth.
Turn off the water supply. This is done by closing the two shut-off valves
located under the lavatory.
If there are no shut-off valves leading to the lavatory, you must turn off the
water at the main valve. This is usually located in the basement, garage or near
the foundation on the outside of the house. It may also be near the water meter.
Check to be sure the water is off by turning on the faucet where you are
working until the water stops flowing.
If you have shut off the main valve in a two-story house or greater, you should
open the kitchen faucet and another faucet on the same level. Water will then
drain from the entire line. This will help avoid spills. Be sure and close the
faucets before you turn on the main valve again. Disconnect the drain pipes.
Take off as many sections as possible between the lavatory and the wall or
floor to facilitate removal. Place a basin under the work area to catch any water
that may still be in the drain.
Drill
Tape Measure
Tubing Cutter or Hacksaw
Caulking gun
Observe all local plumbing and building codes.
Risk of personal injury or product damage will occur if not handled in the proper
manner. Always consult your licensed contact with any questions or concerns.
Handle with care. Vitreous china/Glass/Acrylic can break or chip if the product is
handled carelessly.
Prior to installation, unpack the new vanity components and inspect it for
damage. Return the material to its protective carton until you are ready to install
it. Inspect the drain and supply plumbing. Replace if necessary.
2. For ease of installation it is recommended for you to install the faucet on the
sink/top at this point. If you are unable to do so at this point and have to install
the faucet at the completion of the vanity see page 6 as this is the needed drawer
removal steps for access for completion of installation.
Wall
Plastic anchor
Screw
NOT PROVIDED
TAIL PIECE
DRAIN NUT
TO DRAIN
WASHER
DRAIN ASSEMBLY
SOFT WHITE WASHER
POP UP TOP
INTERNAL BRASS PIECE (POP UP MECHANISM)
DO NOT OVER TIGHTEN THE DRAIN
!
POP UP DRAIN
RUBBER WASHER
SINK
OVERFLOW
(with overflow)
TAIL PIECE
DRAIN NUT
SOFT WHITE WASHER
TAIL PIECE NUT
WHITE PLASTIC WASHER
POP UP DRAIN TOP
RUBBER WASHER
SINK
INTERNAL BRASS PIECE
(POP UP MECHANISM)
OVERFLOW
WHITE PLASTIC WASHER

6
When installing your faucet it is highly recommended to remove the top drawer. This will allow you to have access to the hollow pin and supply lines of the
faucet in order for you to complete your installation. Vigo brand vanities have two typical styles for the drawer assembly. Vigo offers multiple methods for
removal of the drawers. Below are the typical methods to remove the top drawer.
UNSCREW
Pull the drawer out. Unscrew the screw shown in figure 1. Then lift up the drawer from the
front end and slide it out to release it from the back hook.
1
Pull the drawer out. When the drawer is locked in place it will look like figure 2. To
unlock it you will have to pull out the piece as shown and turn the lever clockwise as
shown in figure 3. Then lift up the drawer from the front and slide it out to release it
from the back hook.
LOCKED UNLOCKED
2 3
PULL OUT
TURN
CLOCKWISE
BACK HOOK
BACK HOOK
NOTE: To reinstall the drawers follow the above steps in reverse order.
OPTIONAL: STEP 2 OF INSTALLATION INSTRUCTIONS
OPTION A
OPTION B
NOTE: To reinstall the drawers follow the above steps in reverse order.

7
VANITY COMPONENTS LIMITED WARRANTY
EFFECTIVE JANUARY 1, 2010
original owner or end-user for personal household use. For commercial uses, additional limitations apply.
VIGO warrants the Product to be free from defects in workmanship and materials under normal use and service for a period of five (5) years from the initial date of
purchase by the owner or end-user, contractor, or builder, from VIGO or an authorized VIGO dealer.
Subject to the Warranty Service provision below, any product reported to the authorized dealer or to VIGO as being defective within the warranty period will be repaired
or replaced (with a product of equal value) at the option of VIGO. This warranty extends to the original owner or end-user and is not transferable to a subsequent owner.
Neither the distributor, authorized VIGO dealer, nor any other person has been authorized to make any affirmation, representation, or warranty other than those
contained in this warranty. Any affirmation, representation, or warranty other than those contained in this warranty shall not be enforceable against VIGO or any other
person.
VIGO reserves the right to modify this warranty at any time, it being understood that such modifications will not alter the warranty conditions applicable at the time of
sale of the products in question.
Limitations
This warranty shall not apply to instances of incorrect operating procedures, breakages, or damages caused by fault through improper installation, carelessness, abuse,
misuse, misapplication, improper maintenance, or alteration of the Product, as well as chemical or natural corrosion, accident, fire, flood, an act of God, or any other
casualty. Avoid abrasive cleaners, steel wools, and harsh chemicals as these will scratch, damage, and / or dull the product and / or finish and void this warranty. The
owner/end-user of the Product covered by the present warranty is entirely responsible for its proper installation and any applicable plumbing or electrical wiring. VIGO
neither installs nor supervises the installation nor hires a contractor for this purpose; consequently, VIGO cannot be held responsible for any default, breakage, or
damages caused thereby or resulting thereof, either directly or indirectly.
The owner/end-user must provide access to the components of the Product as described in the installation guide so that VIGO can execute the warranty specified
herein. If such access is not available, all expenses to provide said access will be the responsibility of the owner/end-user.
This warranty does not apply to Products that have not been installed or operated in accordance with instructions supplied by VIGO and all applicable rules, regulations,
and legislation pertaining to such installations.
This warranty does not apply unless the VIGO Product is installed by fully insured licensed professionals. Vigo strongly recommends that such licensed professionals
have experience in the installation of bathroom and kitchen products. Installation of certain products, including, without limitation, glass products (i.e., shower doors and
glass sinks) by an inexperienced person may result in glass breakage and, consequently, cause personal injury or death.
VIGO is not liable for personal injuries or deaths to any persons or for any direct, special, incidental, or consequential damage, loss of time, loss of profits,
inconvenience, incidental expenses, labor or material charges, or any other costs resulting from the use of the product or equipment or pertaining to the application of
the present warranty, or resulting from the removal or replacement of any product or element or part covered by this warranty.
EXCEPT AS OTHERWISE PROVIDED ABOVE, VIGO MAKES NO WARRANTIES, EXPRESSED OR IMPLIED, INCLUDING WARRANTIES OF MERCHANTABILITY
AND FITNESS FOR A PARTICULAR PURPOSE OR COMPLIANCE WITH ANY CODE.
In any case, VIGO cannot be held liable for any amount over and above the purchase price paid for the Product by the owner/end-user, contractor, or builder.
Commercial Limitations
In addition to the above conditions and limitations, the warranty period for products installed for commercial applications or used in commercial ventures is one (1) year
from the initial date of purchase by the owner/end-user, contractor, or builder from an authorized dealer. VIGO is not responsible for loss of use or profit under any
circumstances. If the product is used as a display, the warranty period begins when the product is placed on display. This warranty gives the owner/end-user specific
legal rights. The owner/end-user may also have other rights which can vary from one state or province to another.
Warranty Service
In order to obtain service provided under this warranty during regular business hours, contact the dealer or distributor who sold the unit, or contact VIGO directly. VIGO
will provide the warranty service described above when the following conditions have been met: the failure is of the nature or type covered by the warranty; the user has
(e.g., proof of purchase or installation) is provided to the foregoing by the user proving that the failure occurred or was discovered within the warranty period; an
authorized independent service person or company representative has been permitted to inspect the product during regular business hours within a reasonable time
*Certain models are pending approval.
Certification may be ended by VIGO or certification agencies without notice.
/