
Not for
Reproduction
WARNING! Read this manual before operating your VICTA Pro Combitool
Brushcutter
Assembly and
Owner’s Manual

Not for
Reproduction
IMPORTANT NOTES
Please read the following
Thank you for purchasing your Cheetah trimmer. Cheetah prides itself in the quality and
performance of all its products.
This instruction manual will aid in the assembly, safe operation and maintenance of your
trimmer.
Please read the following warnings to ensure safety and the long life of your product.
Safety Markings and Symbols
Warning!
Always switch off the
machine and pull off the
spark plug boot
Read the directions
for use before
operating the machine.
Read the directions
before carrying out any
maintenance work.
Wear safety goggles,
a helmet and ear
protection.
Do not use rigid cutting
disk.
Wear sturdy, non-slip
footwear.
Do not use solid saw
edged blades.
Wear safety gloves.
All bystanders must be
kept at least 15 m from the
machine.
Protect the machine
from rain and damp.
Tool continues to run some
seconds after switching off
motor.
Be careful of objects
being thrown out!
CAUTION: Hot machine
parts. Keep your distance.
• Read the instructions carefully. Ensure you are familiar with all controls & safety
precautions outlined in this document before operating the machine.
• Stay alert and watch what you are doing when operating the machine. Do not operate
the trimmer under the influence of alcohol, drugs or medication or when you are tired
or sick.
• Operate the trimmer at reasonable hours only - not early in the morning or late at night
or when people might be disturbed. Check with your local council for operation times.
• Do not operate the trimmer indoors or in confined spaces.
• While the trimmer is running, always keep hands and feet away from the trimmer head.
(Keep away from any bystanders or animals when in use.)
• Use only manufacturer's genuine recommended replacement parts and accessories.

Not for
Reproduction
Table of Contents
NOTE – WARRANTY DETAILS ARE NOT WRITTEN WITHIN THIS OPERATOR’S
MANUAL. REFER TO OTHER DOCUMENTS SUPPLIED WITH THIS MACHINE FOR
WARRANTY DETAILS.
THE WARRANTY DOCUMENTS MAY INCLUDE TECHNICAL SPECIFICATIONS
THAT ARE SPECIFIC TO EACH MODEL THAT ARE NOT WRITTEN WITHIN THIS
OPERATOR’S MANUAL.
Quick Start
Quick Start 1
Features & Definitions
Features Definitions 2
Safety & Handling
Safety Instructions 5
Hazards 7
Personal Safety Equipment 7
Assembly Procedures
Handle Assembly 8
Carry Strap Assembly 8
Guard Assembly 8
Shaft Assembly 9
Trimmer Line Assembly 10
Cutting Head Assembly 13
Operating Instructions
Fuelling Procedures 14
Starting Instructions 15
Stopping Instructions 16
Trimming Tips 16
Maintenance & Care
Air Filter 17
Spark Plug 19
Cleaning & Storage 19
Maintenance Chart 20
Troubleshooting
Troubleshooting 21
Not for
Reproduction
QUICK START
Quick Start Guide
• That there are no leaks in the fuel system
• That all screws are securely fastened
• Trimmer Bump Head, Guard and Coupling are secured safely and as
instructed.
Check the position & operation of controls to ensure you are
comfortable before you start using the machine.
Check all components are assembled as per assembly instructions on
page 8.
Check
1
Quick Start Guide
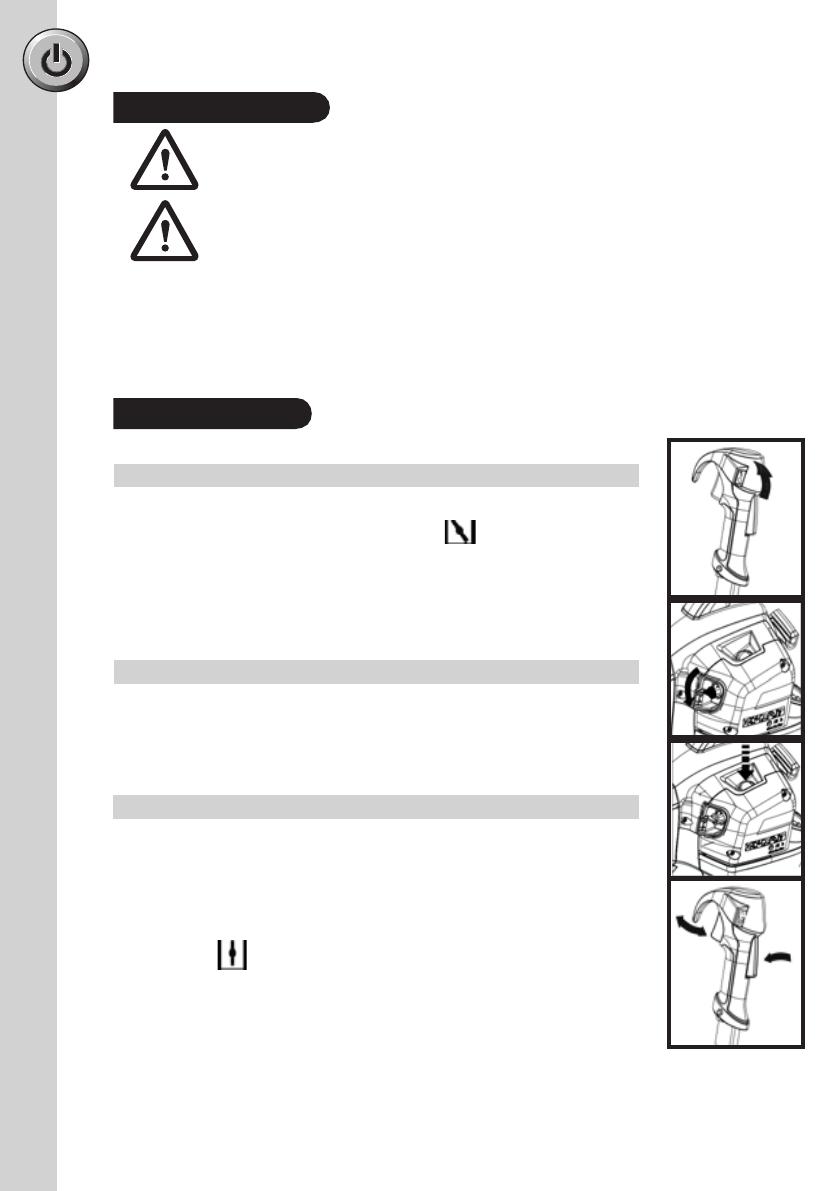
• Place the Brushcutter on a hard, level surface.
• Choke: Set the choke knob in the choke position
1 – Get ready…
• Primer bulb: Press the primer bulb repeatedly until fuel begins to fill
the bulb. The bulb need not be completely filled.
2 – Set
• Pull the starter cord until you feel it resist.
Then tug sharply on the starter cord 2 or 3 times.
* The engine may start or run for a short period set
on cold. Choke can be set to hot while the engine
is running.
• Operate the throttle trigger slightly, let the choke knob return to the
run position
• If required, tug sharply on the starter cord 2 or 3 times or until the
engine starts
* * In cold conditions, the engine may require 5-10
seconds running at idle. Pulling the trigger during
warm-up may help starting.
3 – Go!

Not for
Reproduction
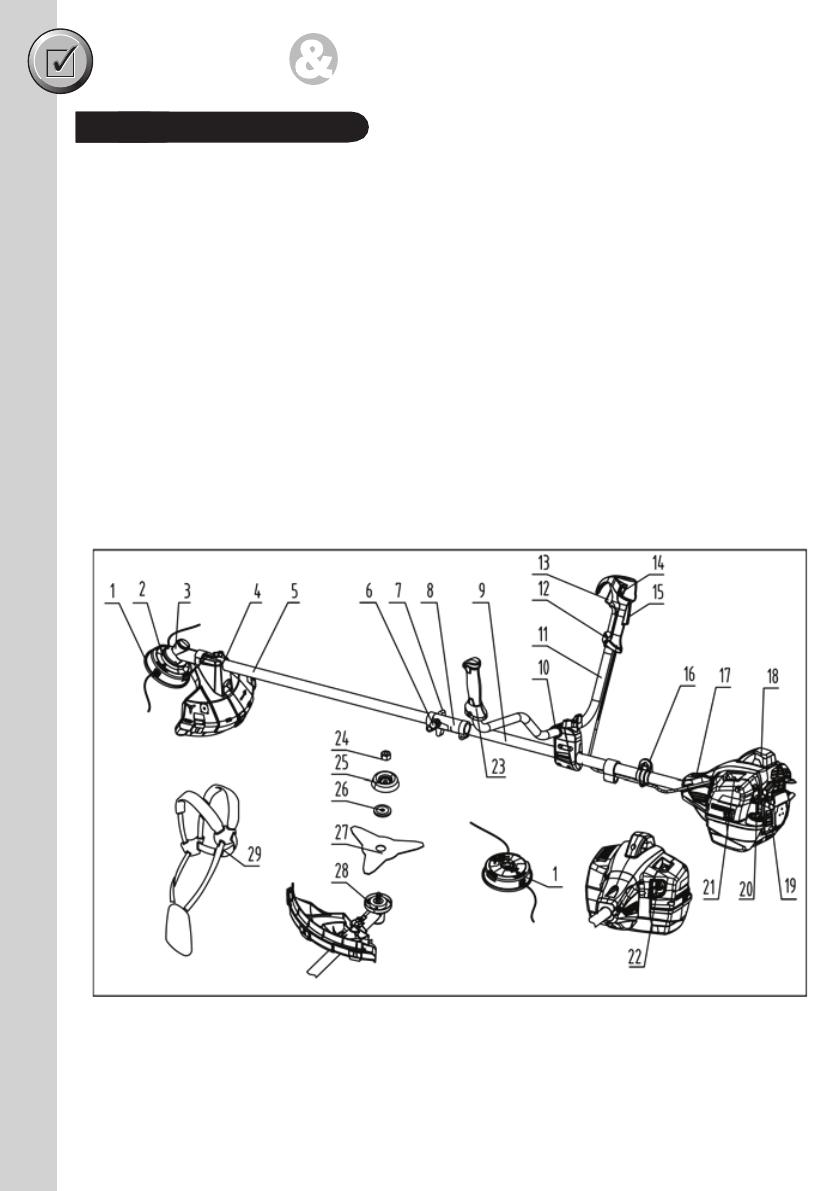
2
FFBent Shaft Trimmer
1Universal Handle
2Trimmer Guard
3Spark Plug Wrench
4Allen Key
5Engine Stop Switch
6Throttle Lever
7Presence Release
8Spark Plug Boot
9Engine Shroud Cowling
10 Fuel Primer Pump
Do not operate the Trimmer
before reading all Safety &
Handling sections.
FEATURES DEFINITIONS
11 Starter Chord Lever
12 Choke Lever
13 Air Filter Housing Cover
14 Petrol Tank
15 Trimmer Line - Bump
Head
16 Bent Shaft
Not for
Reproduction
3
FEATURES DEFINITIONS
FFSplit Bent Shaft Trimmer
1Shoulder Strap
2Universal Handle
3Trimmer Guard
4Spark Plug Wrench
5Allen Key
6Allen Key
7Hook, Shoulder Strap
8Engine Stop Switch
9Throttle Lever
10 Presence Release
11 Spark Plug Boot
12 Engine Shroud Cowling
13 Fuel Primer Pump
14 Starter Chord Lever
15 Choke Lever
16 Air Filter Housing Cover
17 Petrol Tank
18 Shaft Coupling
19 Trimmer Line - Bump
Head
20 Bent Lower Shaft
21 Upper Shaft
22 Bracket Trimmer Guard
23 Spanner

Not for
Reproduction
4
Safety Instructions
Operator Safety
• Wear the necessary safety equipment, as listed on page (7), in the Personal Safety
Equipment Section.
• Always wear heavy, long pants. Do not wear loose clothing, jewellery, short pants,
sandals or go barefoot. Secure hair so it is above shoulder length.
• Do not operate the unit if you are tired, ill or under the influence of alcohol, drugs or
medication.
Unit Safety
• The product is intended for garden maintenance trimming of organic ground covering
such as grass and lawn. The product must not be used for or modified for uses other
than is intended, unless approved by the manufacturer.
• Inspect the entire unit and cutting head before each use.
• Ensure that the guard is properly attached.
• Do not use the unit if it is running erratically. Have it serviced promptly.
• Keep handles free of oil and fuel.
• Learn how to stop the engine quickly in an emergency.
• Stop the engine when the unit is unattended. Never leave engine running while
unattended.
• Never allow children or unauthorised persons to operate the unit.
• Do not leave the unit on dry cuttings when it is Hot, as a risk of fire is present. Do not
cover muffler or restrict airflow to muffler..
Fuel Safety
• Use a container approved for fuel and a funnel to avoid spillage.
• Mix and pour fuel outdoors where there are no sparks or flames.
• Frequently check for fuel leaks.
• Do not smoke or allow smoking near fuel, or near the unit, or while using the unit.
• Add fuel before starting the unit.
• Never remove the fuel tank cap while the engine is running or hot, allow to cool before
refuelling.
• Never allow the unit to run out of fuel before refuelling.
• Move at least 3 metres away from the fuelling site before starting the engine.
• Wipe all traces of fuel on the unit before starting the engine.
• Change your clothes before starting the unit if fuel has been spilt on them.
Do not operate the Cheetah Trimmer before reading all Instructions &
reading all Safety & Handling sections.

Not for
Reproduction
5
Safety Instructions
Unit Safety
• The product is intended for garden maintenance trimming of organic ground covering
such as grass and lawn. The product must not be used for or modified for uses other
than is intended, unless approved by the manufacturer.
• Inspect the entire unit and cutting head before each use.
• Ensure that the guard is properly attached.
• Do not use the unit if it is running erratically. Have it serviced promptly.
• Keep handles free of oil and fuel.
• Learn how to stop the engine quickly in an emergency.
• Stop the engine when the unit is unattended. Never leave engine running while
unattended.
• Never allow children or unauthorised persons to operate the unit.
• Do not leave the unit on dry cuttings when it is Hot, as a risk of fire is present. Do not
cover muffler or restrict airflow to muffler..
Fuel Safety
• Use a container approved for fuel and a funnel to avoid spillage.
• Mix and pour fuel outdoors where there are no sparks or flames.
• Frequently check for fuel leaks.
• Do not smoke or allow smoking near fuel, or near the unit, or while using the unit.
• Add fuel before starting the unit.
• Never remove the fuel tank cap while the engine is running or hot, allow to cool before
refuelling.
• Never allow the unit to run out of fuel before refuelling.
• Move at least 3 metres away from the fuelling site before starting the engine.
• Wipe all traces of fuel on the unit before starting the engine.
• Change your clothes before starting the unit if fuel has been spilt on them.
WARNING! Never use a machine with faulty safety equipment. The
machine’s safety equipment must be checked and maintained as
described in this section. If your machine fails any of these checks
contact your service agent to get it repaired.

Not for
Reproduction
6
Safety Instructions
Starting Safety
• Start the engine with feet well away from the cutting head.
• Ensure that the area of starting and operation is clear of sticks, stones, glass, nails, wire,
string and debris, which could be thrown by the cutting head.
Cutting Safety
• Use only in good visibility and favourable weather conditions.
• Keep children, animals and bystanders outside the 15 metre hazard zone. Stop the
engine immediately if approached.
• Keep the engine to the right of your body, holding the unit with both hands.
• Keep a firm footing and balance. Do not over reach.
• Keep the cutting head below waist level and do not raise the engine above your shoulder.
The cutting head can come dangerously close to your body.
• Keep your body away from the cutting head and muffler when the unit is running.
• Do not strike objects that may cause harm or damage to the unit.
Maintenance Safety
• Stop the engine and disconnect the spark plug before clearing blockages, checking or
working on the unit. Clean carbon from the muffler at exhaust outlet frequently.
• Stop the engine, disconnect the spark plug and inspect the unit if it begins to vibrate
abnormally or if it strikes a foreign object.
• Use only genuine Cheetah trimmer line. Never use wire, rope, string, etc.
• Use only genuine Cheetah replacement parts.
Transporting and Storage
• Hand carry the unit with the engine stopped and the muffler away from your body.
• Allow the engine to cool, empty the fuel tank and secure the unit before storing or
transporting in a vehicle.
• Empty the fuel tank after each use and before storing the unit.
• Store the unit and fuel well away from sparks or open flames from water heaters, electric
motors, switches or furnaces, etc.
• Store the unit out of reach of children and unauthorised persons.

Not for
Reproduction
7
Personal Safety Equipment
Always use the following safety equipment when working with your trimmer:
• A safety helmet fitted with a visor or suitable eye protection.
• A set of ear muffs.
• A pair of protective gloves.
• A pair of safety boots.
Safety Instructions
Hazards
The following safety precautions must be strictly observed to avoid the risk of damage or
personal injury.
Prior to using the unit, clear the operating area of objects which may
be thrown up by the cutting head, such as rocks, glass and other
debris.
Do not start or operate the unit inside a closed room or building.
Breathing exhaust fumes can kill.
Be careful when operating the unit on slippery ground or overgrown
terrain. Be attentive for concealed hazards, such as ditches, tree
stumps and roots.
Maintain solid footing and balance while operating the unit. Cut only
on ground level.
Never use the unit without the guard securely in place.
Do not touch the cutting head in motion. When handling blade for
assembly or maintenance tasks, always wear protective gloves.
Bystanders must be at least 15 metres away during operation of the
unit, as rocks and other materials may be thrown at high velocities.
Switch the unit off immediately if approached.
Keep body away from hot muffler parts.
Not for
Reproduction
8
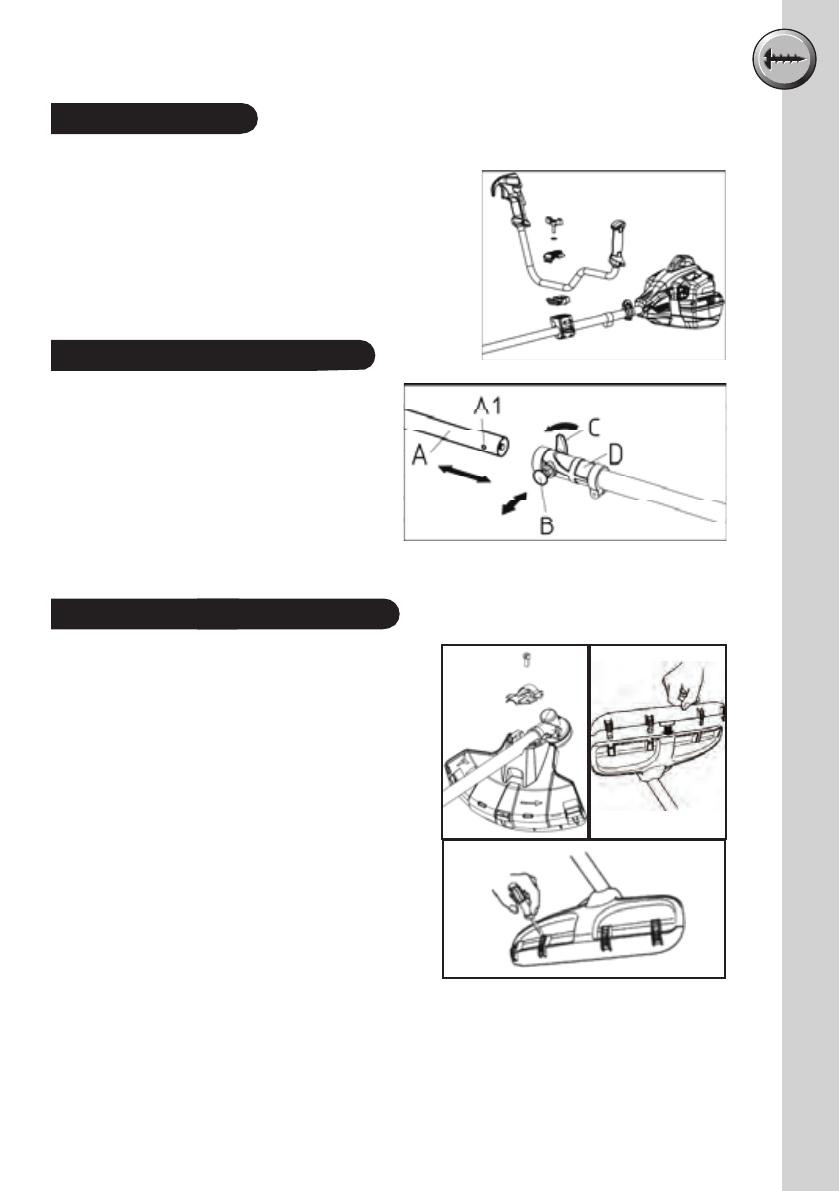
Fitting The Guard Extension
Fitting the handle
Fit the handlebar in the handlebar base on the shaft,
and then using the handle bar cover and handle screw
to tighten it.
Handle Assembly
CAUTION! Not too loose or too tight. Over
tightening may damage the unit.
The guard extension shall always be fitted when
using the trimmer head and combination guard.
The guard extension shall always be removed
when using the grass blade and combination
guard.
Hook the blade guard/combination guard onto
the fitting on the shaft and secure with three
bolts.
Enter the guard extension guide in the slot of
the combination guard. Then click the guard
extension into position on the guard with some
claws.
The guard extension is removed easily using a
screwdriver, see illustration.
Connecting The Tube
Align the hole (A1) on the front tube (A)
and the lock pin (B). Then, Pull out the
Lock pin, and while inserting the front
tube in the connector (D) to the end. After
loosened the lock pin, it will return to its
original position automatically, and insert
into the hole on the front tube.
Make sure the front tube can’t be rotated
after the lock pin came back to its original
position. Turn the lock knob (C) clockwise to tighten
the front tube securely.
ASSEMBLY PROCEDURES
Not for
Reproduction
ASSEMBLY PROCEDURES
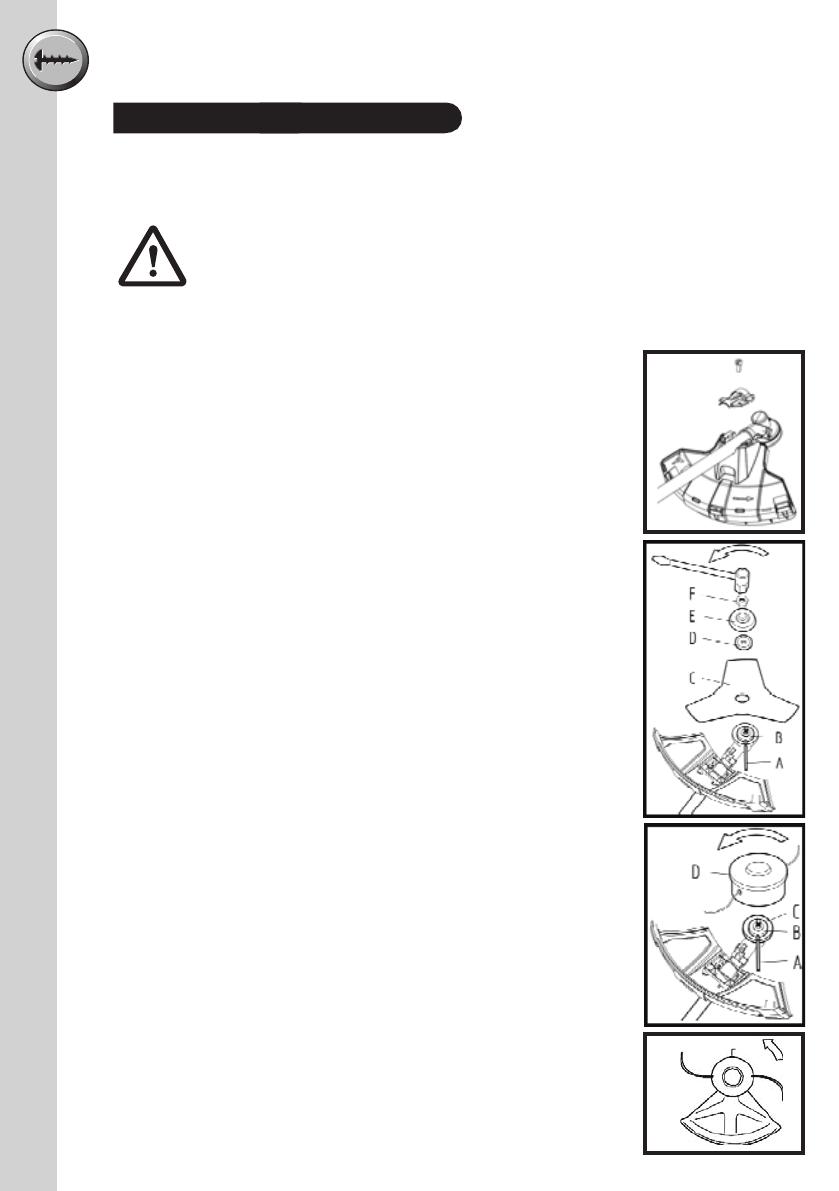
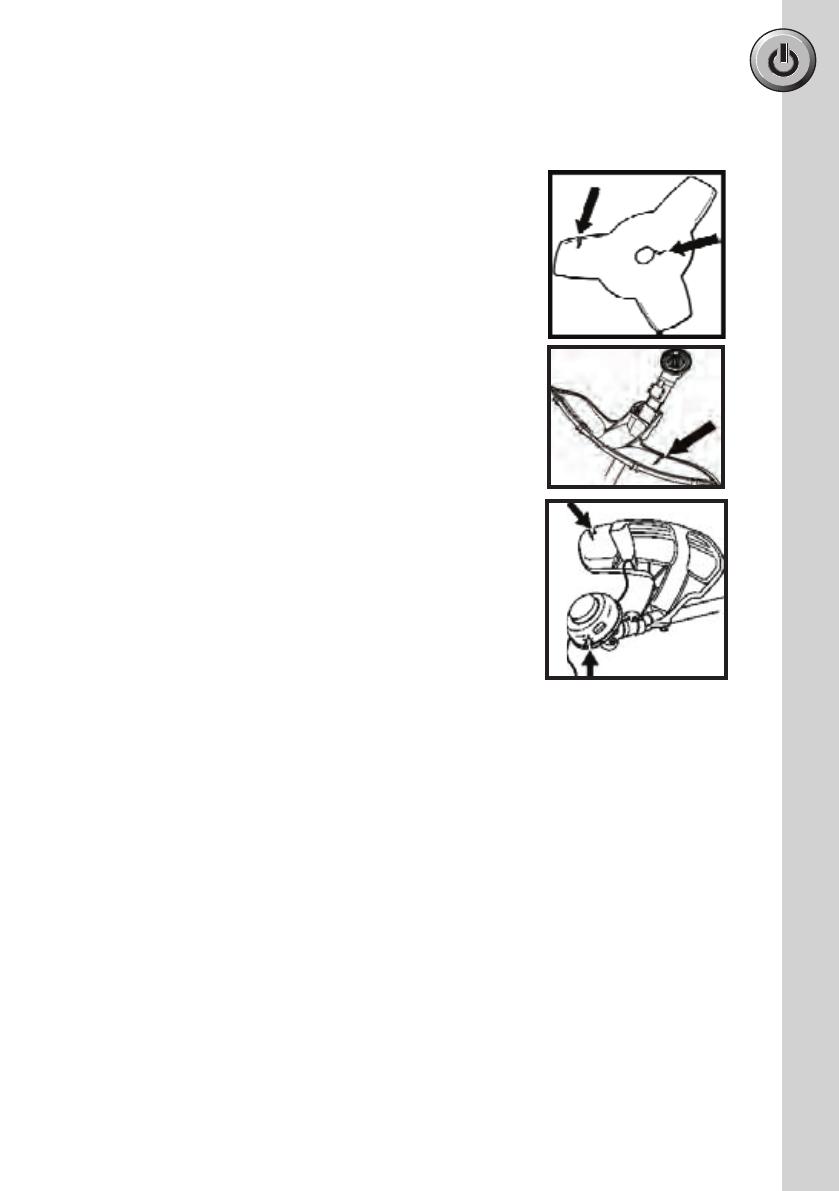
Fitting A Blade Guard, Grass Blade And Grass Cutter
Hook the blade guard/combination guard onto the fitting on the shaft
and secure with three bolts. Use the recommended blade guard. See
the Technical data section.
CAUTION! Ensure that the guard extension is removed.
1. Fit the top clamping plate (B) on the output shaft. Turn the blade
shaft until one of the holes in the top clamping plate aligns with
the corresponding hole in the top protecting cap.
2. Insert the locking pin (A) in the hole to lock the shaft.
3. Place the blade (C), bottom clamping plate (D) and bottom
protecting cap (E) on the output shaft.
4. Fit the nut (F). The nut must be tightened to a torque of
35-50 Nm (3.5-5 kpm). Use the socket spanner in the tool kit.
Hold the shaft of the spanner as close to the blade guard as
possible. To tighten the nut, turn the spanner in the opposite
direction to the direction of rotation (Caution! left-hand thread).
5. Pull out the locking pin after all installation process has been
finished.
Fitting The Trimmer Guard And Trimmer Head
Fit the correct trimmer guard for use with the trimmer head.
CAUTION! Ensure that the guard extension is fitted.
1. Hook the trimmer guard/combination guard onto the fitting on
the shaft and secure with three bolts.
2. Fit the top clamping plate (B) on the output shaft.
3. Turn the blade shaft until one of the holes in the top clamping
plate aligns with the corresponding hole in the top protecting
cap (C).
4. Insert the locking pin (A) in the hole to lock the shaft.
5. Screw on the trimmer head (D) in the opposite direction to the
direction of rotation.
6. To dismantle, follow the instructions in the reverse order.
9
Fitting Blades And Trimmer Heads
When fitting the cutting attachment it is extremely important that the
raised section on the top clamping plate/support flange engages correctly
in the centre hole of the cutting attachment. If the cutting attachment is
fitted incorrectly it can result in serious and/or fatal personal injury. Never
use a cutting attachment without an approved guard. If an incorrect or
faulty guard is fitted this can cause serious personal injury. Wear gloves
to avoid shape edges of blade or other components to injury the operator
while complete assembly. If a grass blade is to be used the machine must
be equipped with the correct handlebar, blade guard and harness.

Not for
Reproduction
ASSEMBLY PROCEDURES
10
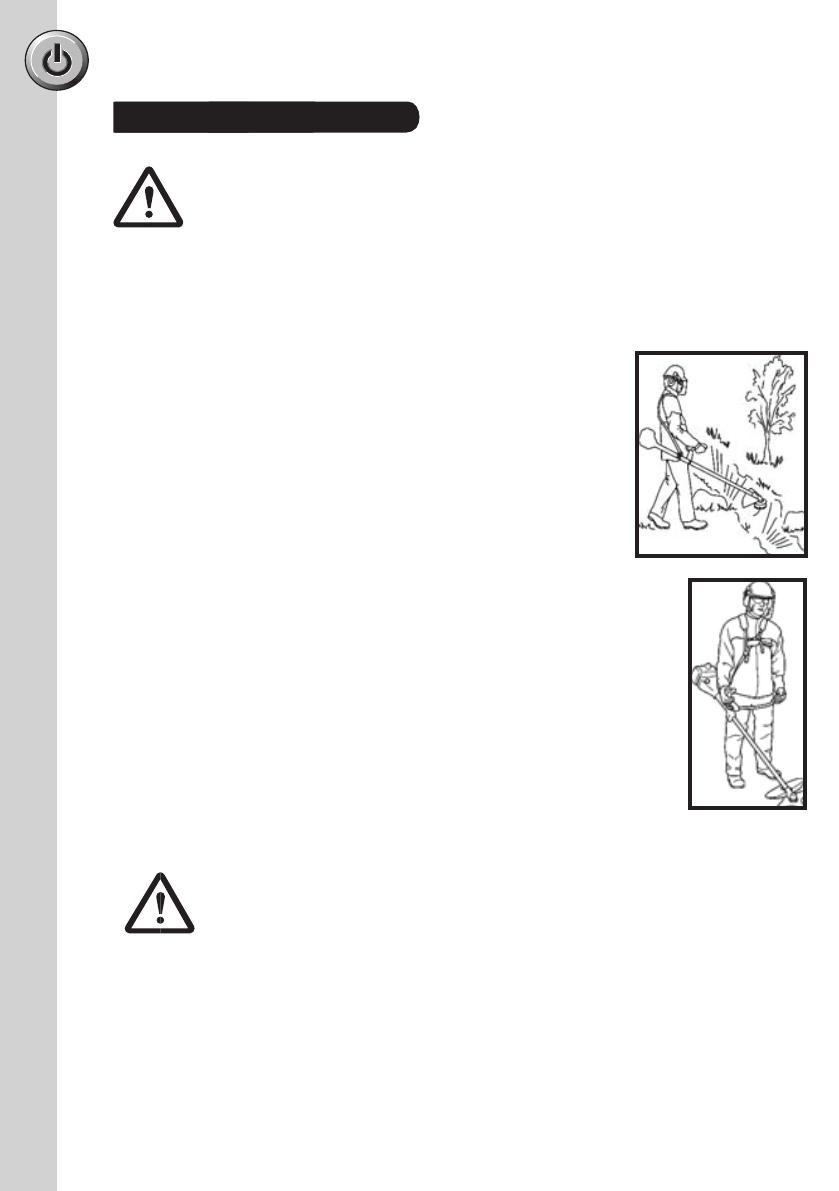
Adjusting The Harness And Brush Cutter
1. At the front is an easily accessible, quick release.
Use this if the engine catches fire or in any other
emergency situation that requires you to free
yourself from the machine and harness.
2. A well adjusted harness and machine makes work
much easier.
3. Adjust the harness for the best working position.
Tension the side straps so that the weight is evenly
distributed across both shoulders.
4. Adjust the shoulder strap so that the cutting
attachment is parallel to the ground.
5. Let the cutting attachment rest lightly on the
ground. Adjust the position of the suspension ring
to balance the brush cutter correctly.
When using a brush cutter it must always be hooked securely to the
harness. Otherwise you will be unable to control the brush cutter safely
and this can result in injury to yourself or others.
Never use a harness with a defective quick release.

Not for
Reproduction
ASSEMBLY PROCEDURES
11
Text
Before Starting
Recommended fuels
• Use only a mixture of normal unleaded petrol and 2-stroke engine oil. Mix the fuel mixture
as indicated on the fuel mixing table.
• Start the machine at least 3 metre away from the refuelling site to avoid the possible risk
of fire.
• Do not smoke whilst refuelling or working with the machine.
• Do not use the trimmer near inflammable liquids or gases. This could result in an
explosion and/or fire.
• Pour the correct quantities of petrol and 2-stroke oil into a container. Then shake the
container well.
Check the position & operation of controls to ensure you are
comfortable before you start using the machine. Triggers, starter
cord and grip position should provide smooth operation, balance and
comfort before starting the machine. Check that all screws are securely
fastened and also check all the safety devices.
Always use the shoulder strap when using the machine. Switch off the
engine before you take off the shoulder strap.
Check the machine for the following each time before use:
• That there are no leaks in the fuel system
• That the cutting unit and all safety devices are in perfect condition
• That all screws are securely fastened
Fuel and Oil
NOTE: Product may need to be re-primed if it has run out of fuel.
Fuel Mixture Table
Petrol (unleaded) 2-stroke oil
5 litre 100 ml (Only for Cheetah Formula V 2-stroke Oil)
Mixing procedure: 50 parts unleaded petrol to 1 part 2-stroke oil
• Do not use a fuel mixture which has been kept for longer than 90
days, it may damage the unit.
• Only use containers designed and approved for the purpose to
transport and store fuel.
• The use of other oils and or ratios will affect the engine lubrication,
which may cause engine damage and void engine manufacturer's
warranty.
• Cheetah recommends the use of Cheetah Formula V 2-stroke oil at
50:1 fuel to oil ratio only.
Not for
Reproduction
12
Check and starting
Never use the machine without a guard nor with a defective
guard.
- All covers must be correctly fitted and undamaged before you
start the machine.
- Check the blade to ensure that no cracks have formed at the
bottom of the teeth or by the centre hole. The most common
reason why cracks are formed is that sharp corners have
been formed at the bottom of the teeth while sharpening or
that the blade has been used with dull teeth. Discard a blade
if cracks are found.
- Check that the support flange is not cracked due to fatigue or
due to being tightened too much. Discard the support flange
if it is cracked.
- Ensure the locking nut has not lost its captive force. The nut
lock should have a locking force of at least 1.5 Nm. The
tightening torque of the locking nut should be 35-50 Nm.
- Check that the blade guard is not damaged or cracked.
Replace the blade guard if it is exposed to impact or is
cracked.
- Check that the trimmer head and trimmer guard are not
damaged or cracked. Replace the trimmer head or trimmer
guard if they have been exposed to impact or are cracked.
NOTE: Product may need to be re-primed if it has run out of fuel.
OPERATING INSTRUCTIONS

Not for
Reproduction
ASSEMBLY PROCEDURES
The choke knob will automatically return to RUN position by pressing
the throttle trigger again. If you manually turn the choke knob from
choke position to run position, the cutting attachment will start to rotate
immediately when the engine is started.
13
• The complete clutch cover and shaft must be fitted before the machine is
started, otherwise the clutch can come loose and cause personal injury.
• Always move the machine away from the refuelling area before starting.
Place the machine on a flat surface. Ensure the cutting attachment cannot
come into contact with any object.
• Make sure no unauthorised persons are in the working area, otherwise
there is a risk of serious personal injury. The safety distance is 15 metres.
Operation
Starting the Engine
Cold Start -
1. Ignition: Press down the “I” side of the engine switch.
2. Set the choke knob in the choke position
3. Press the primer bulb repeatedly until fuel begins to fill
the bulb. The bulb need not be completely filled.
4. Hold the body of the machine on the ground using your left hand.
Grip the starter handle, slowly pull out the cord with your right hand
until you feel some resistance (the starter pawls grip), now quickly
and powerfully pull the cord. Repeat pulling the cord until engine firing
occur.
CAUTION! Not with your foot!
Never twist the starter cord around your hand.
5. Operate the throttle trigger slightly, let the choke knob return to the
run position
6. Repeat pulling the cord until engine start. When the engine starts
allow the engine to warm up with the throttle pulled slightly.

Not for
Reproduction
14
OPERATING INSTRUCTIONS
Do not pull the starter cord all the way out and do not let
go of the starter handle when the cord is fully extended.
This can damage the machine.
Do not put any part of your body in marked area. Contact
can result in burns to the skin, or electrical shock if the
spark plug cap has been damaged. Always use gloves. Do
not use a machine with damaged spark plug cap.
IMPORTANT If the starter rope is pulled repeatedly with
the choke on, it may flood the engine and make starting
difficult.
If you happen to food the engine, repeat the hot start
procedure a few times to eliminate any excess fuel.
Operation
Starting the Engine
Hot Start
To hot start the engine immediately after it has stopped, follow steps 1– 4 – 6 of the above
procedure, making sure the primer bulb is activated 2-3 times only.
Stopping
Press down the “O” side of the engine switch to stop the engine.
Machine Safety Equipment
Throttle Lockout
The throttle lockout is designed to prevent accidental operation of the
throttle control. When you press the lock-out (A) (i.e. when you grasp the
handle) it releases the throttle trigger (B).
When you release the handle the throttle control and the throttle lockout
both move back to their original positions. This movement is controlled
by two independent return springs. This arrangement means that the
throttle control is automatically locked at the idle setting.
Make sure the throttle control is locked at the idle setting when the
throttle lockout is released. Press the throttle lockout and make sure it
returns to its original position when you release it. Check that the throttle
control and throttle lockout move freely and that the return springs work
properly.
See instructions under the heading Start. Start the machine and apply
full throttle. Release the throttle and check that the cutting attachment
stops and remains at a standstill. If the cutting attachment rotates with
the throttle in the idle position then the carburettor idle setting must be
checked. (See instructions under the heading Maintenance)
Never use a machine with faulty safety equipment. The machine’s safety
equipment must be checked and maintained as described in this section.
If your machine fails any of these checks contact your service agent to
get it repaired.
Not for
Reproduction
15
OPERATING INSTRUCTIONS
Look around you:
- To ensure that people, animals or other things cannot affect your
control of the machine.
- To ensure that people, animals, etc., do not come into contact with
the cutting attachment or loose objects that are thrown out by the
cutting attachment.
- Do not use the machine unless you are able to call for help in the
event of an accident.
Inspect the working area. Remove all loose objects, such as stones,
broken glass, nails, steel wire, string, etc. that could be thrown out or
become wrapped around the cutting attachment.
Do not use the machine in bad weather, such as dense fog, heavy
rain, strong wind, intense cold, etc. Working in bad weather is tiring and
often brings added risks, such as icy ground, unpredictable felling direction,
etc.
Make sure you can move and stand safely. Check the area around you for
possible obstacles (roots, rocks, branches, ditches, etc.) in case you have to
move suddenly.
Take great care when working on sloping ground.
Keep a good balance and a firm foothold.
Always hold the machine with both hands. Hold the machine on the right
side of your body.
Keep the cutting attachment below waist level.
Switch off the engine before moving to another area. Fit the transport guard
before carrying or transporting the equipment any distance.
Never put the machine down with the engine running unless you have it in clear sight.
Operation
General Working Instructions
This section describes the basic safety precautions for working with
brush cutters and trimmers.
If you encounter a situation where you are uncertain how to proceed
you should ask an expert. Contact your dealer or your service
workshop.
Avoid all usage which you consider to be beyond your capability.
You must understand the difference between forestry clearing, grass
clearing and grass trimming before use.
Neither the operator of the machine nor anyone else may attempt
to remove the cut material while the engine is running or the cutting
equipment is rotating, as this can result in serious injury.
Stop the engine and cutting equipment before you remove material that
has wound around the blade shaft as otherwise there is a risk of injury.
The bevel gear can get hot during use and may remain so for a while
afterwards. You could get burnt if you touch it.
Watch out for thrown objects. Always wear approved eye protection.
Never lean over the cutting attachment guard. Stones, rubbish, etc. can
be thrown up into the eyes causing blindness or serious injury.
Keep unauthorised persons at a distance. Children, animals, onlookers
and helpers should be kept outside the safety zone of 15 m. Stop the
machine immediately if anyone approaches. Never swing the machine
around without first checking behind you to make sure no‐ one is
within the safety zone.

Not for
Reproduction
OPERATING INSTRUCTIONS
Operation
General Working Instructions
16
Basic working techniques
Always slow the engine to idle speed after each working operation. Long periods at full
throttle without any load on the engine can lead to serious engine damage.
Grass Clearing Using A Grass Blade
Grass blades and grass cutters must not be used on
woody stems.
A grass blade is used for all types of tall or coarse grass.
The grass is cut down with a sideways, swinging
movement, where the movement from right-to-left is the
clearing stroke and the movement from left-to- right is the
return stroke. Let the left-hand side of the blade (between
8 and 12 o’clock) do the cutting.
If the blade is angled to the left when clearing grass, the
grass will collect in a line, which makes it easier to collect,
e.g. by raking.
Try to work rhythmically. Stand firmly with your feet apart.
Move forward after the return stroke and stand firmly again.
Let the support cup rest lightly against the ground. It is used to protect the blade from
hitting the ground.
Reduce the risk of material wrapping around the blade by following these instructions:
- Always work at full throttle.
- Avoid the previously cut material during the return stroke.
Stop the engine, unclip the harness and place the machine on the ground before you start
to collect the cut material.
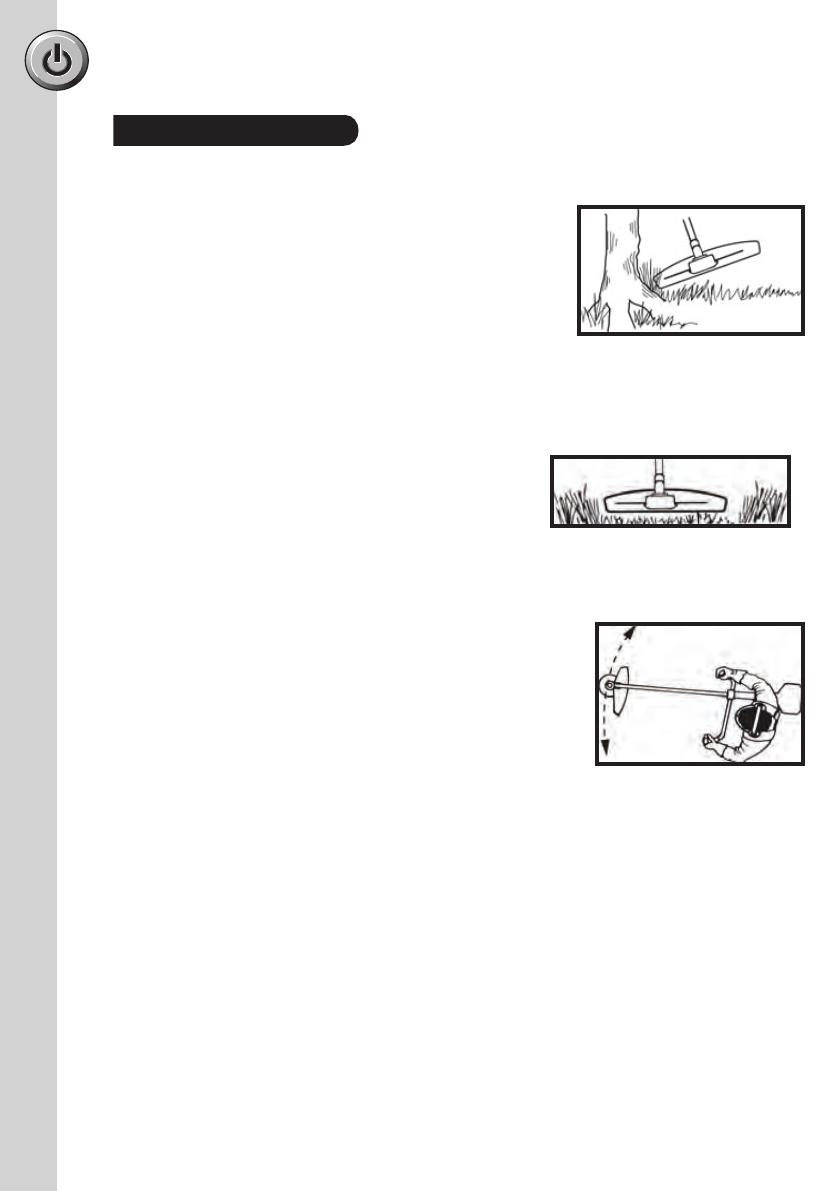
Grass Trimming With A Trimmer Head
Hold the trimmer head just above the ground at an
angle. It is the end of the cord that does the work. Let
the cord work at its own pace. Never press the cord
into the area to be cut.
The cord can easily remove grass and weeds up
against walls, fences, trees and borders, however it can
also damage sensitive bark on trees and bushes, and
damage fence posts.
Reduce the risk of damaging plants by shortening the cord to 10-12 cm and reducing the
engine speed.
Sometimes branches or grass get caught between the guard and
cutting attachment. Always stop the engine before cleaning.
Machines fitted with grass blades can be thrown violently to the
side when the blade comes into contact with a fixed object. This is
called blade thrust. A blade thrust can be violent enough to cause the
machine and/or operator to be propelled in any direction, and possibly
lose control of the machine. Blade thrust can occur without warning if
the machine snags, stalls or binds. Blade thrust is more likely to occur
in areas where it is difficult to see the material being cut.
Avoid cutting with the area of the blade between the 12 o'clock and 3
o'clock positions. Because of the speed of rotation of the blade, blade
thrust can occur if you attempt to cut thick stems with this area of the
blade.
Not for
Reproduction
17
OPERATING INSTRUCTIONS
Trimming Procedures
Clearing
The clearing technique removes all unwanted vegetation.
Keep the trimmer head just above the ground and tilt it. Let
the end of the cord strike the ground around trees, posts,
statues and the like.
CAUTION! This technique increases the wear on the cord.
The cord wears quicker and must be fed forward more
often when working against stones, brick, concrete, metal
fences, etc., than when coming into contact with trees and
wooden fences.
When trimming and clearing you should use less than full throttle so that the cord lasts
longer and to reduce the wear on the trimmer head.
Cutting
The trimmer is ideal for cutting grass that is difficult
to reach using a normal lawn mower. Keep the cord
parallel to the ground when cutting. Avoid pressing the
trimmer head against the ground as this can ruin the
lawn and damage the tool.
Do not allow the trimmer head to constantly come into
contact with the ground during normal cutting. Constant contact of this type can cause
damage and wear to the trimmer head.
Sweeping
The trimmer is ideal for cutting grass that is difficult to reach
using a normal lawn mower. Keep the cord parallel to the
ground when cutting. Avoid pressing the trimmer head against
the ground as this can ruin the lawn and damage the tool.
Do not allow the trimmer head to constantly come into
contact with the ground during normal cutting. Constant
contact of this type can cause damage and wear to the
trimmer head.
Page is loading ...
Page is loading ...
Page is loading ...
Page is loading ...
Page is loading ...
Page is loading ...
Page is loading ...
Page is loading ...
/