Page is loading ...

LX-SO-215 is a digital low-power smoke alarm, product
design follows the EU EN14604 standard, the use of
high-performance chip as a stand-alone photoelectric smoke
fire alarm MCU, digital signal processing makes the alarm
detection more Accurate, better product sensitivity
consistency, MCU built-in FLASH memory, store the
detector's factory parameters, maintenance information, to
achieve a strong self-diagnostic testing, circuit failure, sensor
failure, battery voltage and other parameters of the detection
and diagnosis. At the same time, adaptive compensation
function will be based on ambient temperature, external
factors such as changes in the conditions of fire sensitivity
compensation to the appropriate range, enhanced product
stability. The average standby current of the product is less
than 3uA standby power consumption, working time up to 10
years.
Summary
(1) When the power is on, the buzzer beep beep prompts
power-on success.
(2) When the battery enters the low voltage, half-beep beep
LED synchronization light.
(3) In the smoke-free alarm, press the button for 3 seconds,
the alarm will beeps and beeps three times, the same sound
as the smoke alarm sound.
(4) When the smoke alarm, press the button to enter the mute
mode, the buzzer is muted, the LED will continue the light
alarm when there is smoke, the mute time is 10 minutes, when
mute, press the button is invalid.
Function
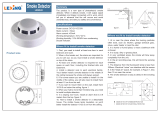
32.5mm
66mm
88mm
7.8mm
3.2mm
125mm
LX-SO-215
Product size
Product test button
The mute button
Working indicator
light
3, One for each bedroom
;
4, If the bedroom corridor length of more than 40 feet (12
meters) long, both ends of the corridor fitted with alarm
;
5. Put one in the semi-closed or fully closed sleeping room
because the smoke will be blocked by the closed door. If the
door is closed, the alarm sound in the corridor calls for the
awakened asleep
;
6, At the bottom of the basement stairs to install alarm
;
7, On the first floor to the top of the second floor of the stairs
to install alarm
;
8, The other in the living room, kitchen, attic and storage room
to install alarm
;
9, Try to alarm close to the middle of the ceiling, if this is
impractical, the distance from the wall or corner in the ceiling
can not be less than 20 inches (50CM), as shown in Figure 3
;
10, If the roof is oblique or sharp, the installation location from
the top of the highest point can not be less than 3 feet (0.9 m),
as shown in Figure 4.
Fiure 1
living room
family room
bedroom
kitchen
bedroom
bedroom
bedroom
smoke alarm
alarm
for minimum security
smoke for more security
Figure 2
smoke for minimum security
floor
garage
basement
kitchen
ground
bedroom
bedroom
bedroom
alarm
Figure 3
WALL
best location
acceptable location
50CM(20'')
MINIMUM
never here
CEILING
certer of ceiling
Figure 4
0.9M(3ft)
horizontal distance from peak
alarm
Power source: DC3V
Battery Specifications: CR123A
Battery life: 10 years
Static current: ≤3uA
Alarm current: <30mA
Low voltage alarm: 2.7V±0.05V
Alarm sonority: >85 db (3m)
Working temperature:0°C~40°C
Working humidity: 10%-95%RH
Specifications
Where to install smoke alarms
1, In each separate bedroom outside the hallway installed
one, shown in Figure 1
;
2, In a multi-family home or apartment building on each floor
to install one, shown in Figure 2
;
Digital Smoke Alarm
R

In order to ensure the normal operation of the detector, the
detector must be tested weekly. Refer to the section "Testing
the Smoke Alarm"
;
1. Replace the product as soon as the detector beeps every
half minute. Low voltage alarm sounds for at least 30 days
;
2. Clean at least once a year: Open the lid and slowly remove
the dust from the detector's sensing window. Use a soft brush
to clean up. Be sure to carefully clean the dust, especially at
the opening of the sensing window. Retest the detector to
make sure the battery is working properly. Check the test
button inside the obstruction.
• The alarm may be due to some other nasty situation. Such as
smoke or dirty stoves in the kitchen, sometimes called "friendly
fireworks" will cause alarm alarms. In this case, open the
window or the fan will smoke or dust. As long as the air clean
the alarm will be automatically stopped.
• If the alarm beeps a low "beep" every half minute, indicating
that the battery is low, replace the product immediately.
False positives can occur when smoke detectors are installed
where they are not working properly. To prevent false alarms,
do not install the product in the following locations:
1, burning places such as non-ventilated kitchen, garage, etc .;
2, Do not install the product less than 20 feet (6 meters) away from
the burning place, like the kitchen, if the distance of 20 feet is not
possible, as in moving Room, but also have to keep away from
burning things, in order to prevent false positives, in these places
should maintain good ventilation;
3, Moist or humid areas: or near a bathroom with a shower;
4, below 4 or above 38 environment, such as outdoor, not
built completed loft;
5, dirty place, the laundry room must ensure that clean square
fitted alarm;
6, Ventilation is excellent, it will diffuse the smoke completely;
7, the air dead ends, such as the roof of the ramp, or the corner
between the ceiling and the wall, dead air will prevent smoke from
reaching the detector;
8, with flying insects access to places, insects will enter the sensor
window lead to false alarms;
9, In the vicinity of a fluorescent lamp, the electronic "noise" of the
fluorescent lamp will cause a false positive and the detector will be
installed at least 5 feet (1.5 meters) from these lamps.
Where not to install smoke alarms
Test smoke alarm
Install the alarm on the ceiling as follows:
1, Hold down the base counterclockwise rotation of the base
(Figure 5);
2, According to the base in the installation position, with a
pencil in the base of the two holes to do the installation hole
punching mark (Figure 6);
3, Take off the base;
4, With a drill with a 6.5mm drill in the mark at the two mounting
holes (Figure 7), the plastic expansion body into the hole
(Figure 8). Place the product in a dust-free location when
drilling the mounting hole;
5, Screw the base fixed on the ceiling (Figure 9);
6, Remove the battery, tear open the battery insulation
packaging film, and then put the battery correctly;
7, Align the keyhole cover with the lock on the base, and
tighten the main body of the alarm clockwise to the bottom
cover (Figure 10).
Note: When the battery is turned on for the first time, a beep
sounds, which means the battery is properly plugged in. Press
the test button for three seconds to send three drops of alarm
sound. The alarm is loud and rhythmic, indicating that the
product is working properly.
Note: Before installing the alarm, be sure to tear the
battery insulation plastic sheet, to ensure that the product
work properly.
Installation
Routine maintenance
Figure 7 Figure 8
Ceiling
Figure 6
Figure 9 Figure 10
Figure 5
Warning: Do not stop the alarm by removing the battery. Open the
window near the detector or the fan to smoke, when the smoke is
exhausted, the alarm will automatically stop, if still alarm, according
to the instructions to clean the detector test method.
Warning: Do not close the alarm when the alarm occurs, the alarm is
loud to avoid panic.
Warning: The smoke alarm and battery should be away from direct
heat and water source.
Periodic test: press the test button for three seconds to send
three beeps alarm, normal alarm. This is the only way to
ensure that your product is working properly. If the test is not
normal, should be repaired or replaced immediately.
Warning: Do not test the detector with an open flame. This can
damage the detector and cause damage to your home. The
built-in tactile switch accurately tests all functions of the
detector. This is the only correct way to test the detector.
Warning: The detector may detect smoke or because of the
burning of particles in the air when the detector does not sound
an alarm when testing the detector.
In determining the alarm may be a serious situation warning, it
should immediately attract attention:
Battery:
This product is recommended to be replaced 10 years
from date of installation.
battery model:CR123A
Customer Service:
For all Customer Service and Technical Support enquires please call Monday
to Friday during business hours.
No.35 Zhuquan Road,Science & Technology Area.
E-mail:[email protected] www.lexing.com.cn www.lexing.com
Ninghai,Ningbo,Zhingjiang,China Tel:+86-574-65335088 P.C.:315600
Ningbo Lexing Inductor Electronic co.,LTD
/