Page is loading ...

1
2
3
6
8
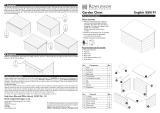
Before assembly
•We recommend that time is taken to
read the instructions before starting
assembly, then follow the easy step by
step guide. The instruction sheet is only
a guide to the assembly.
Certain items may not be shown
to scale.
•Check all components prior to assembly
•This product should be assembled
by no less than two people
•Drill all components where indicated
x 2 Drill
5
4
7
14
15
10
9
Recommended tools for assembly
•Powered drill/driver
•Cross head screwdriver bit
•3mm drill bit
•Hammer
•Sharp knife
30mm
Overlap Patio Chest
Assembly Instructions
English SS427
2018 © Rowlinson Garden Products Ltd
If in doubt of any aspect regarding the assembly, use or safety of your Patio Chest please contact us :
Help Line: (Normal Office Hours) 01829 261 121
Email: support@rowgar.co.uk
ROWLINSON GARDEN PRODUCTS LIMITED
Green Lane
Wardle Nr. Nantwich
Cheshire
CW5 6BN
www.rowgar.co.uk
We constantly improve the quality of our products, occasionally the
components may differ from the components shown and are only
correct at time of printing. We reserve the right to change the spec-
ification of our products without prior notice.
Important information
Timber Information.
As timber is a natural material, there are certain weather conditions that may affect the materials properties. In times of excessive dry
spells the material may lose some of its internal moisture causing a certain degree of shrinkage on a panel and in periods of excessive rain
there will be a certain amount of swelling throughout the wooden panels. This process can not be avoided. If you have problems with
certain boards shrinking in dry spells try to decrease the amount of direct sunlight on the building or the amount of air passing over the
building. During hot spells spray water directly onto the panels with the aid of a garden hose.
No. Components Qty.
1Floor (11x580x1065mm) 1
2Floor bearers (35x28x1065mm) 3
3Back panel 1
4Left panel 1
5Right panel 1
6Front panel 1
7Lid (11x700x1170mm) 1
8Lid front/rear frame (28x28x1170mm) 2
9Lid side frame (28x28x645mm) 2
10 Lid stay (28x28x555mm) 1
11 Roofing felt 1
12 Side bargeboard 2
13 Front bargeboard 1
No. Fixings Qty.
14 T-hinge 2
15 Chain 1
16 50mm screws 9
17 25mm screws 14
18 30mm nails 48
19 19mm Roundhead screw 2
20 13mm felt nails 36
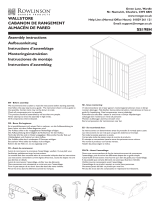
9. Bargeboards
Attach a short bargeboard to each side ensure the top and front edges are flush with the roof line and secure each board
in place using 3 x 30mm nails. Attach the long bargeboard to the front of the roof make sure it is flush to the roof line use
4 x 30mm nails as shown.
30mm
11
12
13
13mm
Felt
nails
13mm
Felt
nails
4. Roofing felt
Lay the felt over the lid ensuring that there is an equal overhang all round. Fold the felt over the front of the lid and secure
to the lid framing using 12 x 13mm felt nails evenly spaced. Tension the felt over the back edge of the lid, fold down and
secure using 12 x 13mm felt nails evenly spaced to the frame of the lid. Neatly fold the felt down on each side of the lid
and secure using 6 x 13mm felt nails evenly spaced per side. Once the felt is fully secured trim off any excess felt. with a
sharp knife.
13mm
Felt
nails
13mm
Felt
nails

50mm
50mm
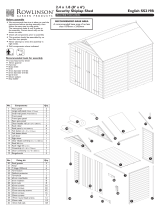
3. Secure walls to floor
Secure the front and back panels to the floor using 4 x 30mm nails for each. Nail through the shiplap of the panels into the
floor bearer. Secure each side panel using 2 x 30mm nails. Nail through the shiplap into the ends of each floor bearer.
25mm
Back view
Note:
The hinges should be
positioned on the
outside in line with the
back panel framing.
50mm
Note:
Ensure the stay bar is
able to pivot and will fit
inside the chest to allow
the lid to shut.
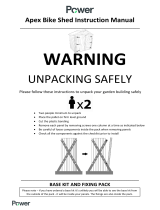
2. Wall panels
Position the left panel and back panel as shown. Note how the panel frames sit on the floor with the panel cladding
overhanging the floor edge. Ensure square and secure using 2 x 50mm screws through the frame of the back panel into
the frame of the left panel. In the same way attach the right-hand panel. Place the front panel between the sides and attach
in the same way using 4 x 50mm screws.
1. Floor
Attach the three floor bearers to the floor using 4 x 30mm nails per bearer. Have the two outer bearers flush with the
edge of the floor and centre the middle bearer. Nail through the floor into the narrow edge of the bearers.
5. Lid
Place the lid into position. Locate the hinges and mark the position of the screw holes on the lid ensuring they are in line
with back panel framing. Remove the lid and secure the two hinges in the marked position using 3 x 25mm screws per
hinge. Replace the lid and secure the hinges to the back panels using 4 x 25mm per hinge. Secure the lid stay to the frame
of the left side panel using 1 x 50mm screw. Make sure that the bar is able to pivot and will fit inside the chest to allow the
lid to shut.Open and hold the lid it so it stands vertical. Using the two 19mm screws, secure one end of the chain to the
inside of the lid side frame and the other end to the outside of the side panel. The chain should be positioned so it prevents
the lid from opening beyond the vertical position.
50mm
50mm
Back panel
Side panel
Panel frames
rest on floor. Panel cladding
overhangs floor
edge.
It is recommended to drill pilot
holes for each screw in this section.
3mm
Drill
Front panel attached
from the inside.
30mm 30mm 30mm
30mm
35mm
Floor
28mm 4. Lid frames
To the lid panel, attach the front/rear frames flush with the long edges of the panel using 4 x 30mm nails. Nail through the
panel into the framing. At each end, position the side frames between the front and rear frames, ensure they are flush
with the ends of the lid panel and secure each side frame using 3 x 30mm nails.
30mm
Floor
bearer
Side view
Lid
Hinge
19mm
19mm
/