Page is loading ...

INSTALLATION TIME SKILL LEVEL
TOOLS
Vehicle Application
www.Bestop.com - We’re here to help! Visit our web site and click on “Ask a Question”. Click here for more Jeep Accessories by Bestop.
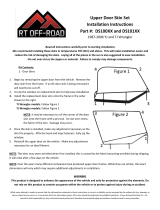
Installation Instructions
HighRock 4x4TM Element™
Enclosure Kit
1/2 Hour 1 - Easy
3/8"
• Jeep JK Wrangler and JK Wrangler Unlimited
(2 Door and 4 Door Models)
2007 – Current
Part Number: 51803

HighRock 4x4™ Element™ Enclosure Kit – Installation Instructions
Rev. F 0611 51803 pg. 2
Parts List
Remove Paddle Handle and Latch Plate
Remove the four #10-32 x 1 Truss Head Machine Screws and Locknuts
that secure the Paddle Handle and Latch Plate to the door.
#10-32 x 1 Truss Head
Machine Screws and
Locknuts
Inside of Door
Rear of
Door
Paddle Handle
Assembly
Rotary Latch
Mechanism
Latch
Plate
Install Foam Tape on
Enclosure Hooks
Cut the Foam Tape to fi t the hooks on the Enclo-
sure. Peel the backing off a piece and press it fi rmly
into the curve of the hook. Repeat for all hooks on
both Door Enclosures.
Enclosure
Hook
Enclosure
Hook
Foam Tape
#10-32 x 1 Truss Head
Machine Screw - Black, Part
Number 389.71, Qty - 8
#10-32 Low Profi le Nut - Black,
Part Number 316.94, Qty - 8
Enclosure Seal, Part
Number 445.84,
Qty - 1
Right Door Enclosure, Part Number 444.38 Qty - 1
Left Door Enclosure, Part Number 444.39 Qty - 1
Foam Tape, Part Number 449.09 Qty - 1
1/4-20 Truss Head
Machine Screw, Part
Number 257.92,
Qty - 6

HighRock 4x4™ Element™ Enclosure Kit – Installation Instructions
Rev. F 0611 51803 pg. 3
Insert the Paddle Handle into the opening in the door
plate so that the latch mechanism is inside of the
vehicle and the Rotary Latch Mechanism is toward
the rear of the door. Place the Latch Plate over the
Paddle Handle on the inside of the door. Align the
holes in the Paddle Handle and Latch Plate. Insert
four #10-32 x 1 Truss Head Machine Screws from
the outside and secure them with #10-32 Locknuts.
Do not tighten the screws until all four are in place.
Make sure to install the Element Door
Sport Bag with the pockets toward the
inside of the vehicle when using both the Enclosure
and the Sport Bag.
Install Enclosure Panel
Engage hooks onto Element Door Tube frame and
pivot into position. Make sure that the hooks are
fully seated onto the tube. Align paddle latch, and
mirror holes.
Enclosure
Panel
Element™
Door Frame
Tube
Enclosure
Hooks
Reinstall Paddle Handle
It is important that the
Paddle Handle must
align correctly with the
automobile manufacturer’s original equipment steel
latch pin located on the vehicle. Failure to properly
install the paddle handle may result in the door ac-
cidently opening. IMPROPER CLOSURE COULD
RESULT IN SERIOUS INJURY OR DEATH TO THE
OCCUPANTS. WEAR SEAT BELTS AT ALL TIMES.
DRIVE CAREFULLY. The Element Door Sys-
tem is equipped for pro-
tection against the ele-
ments. The door will not contain occupants during
an accident. Wear Seatbelts at all times
#10-32 x 1 Truss Head
Machine Screws and
#10-32 Locknuts
Inside of Door
Rear of
Door
Mounting
Plate
Paddle Handle
Assembly
Rotary Latch
Mechanism
IMPORTANT: You should check alignment of the
Paddle Handle to the steel latch pin before tightening
the screws. If out of alignment, align and retighten the
screws securely. Repeat for both lower doors.
Latch Plate
Paddle Handle
Assembly

HighRock 4x4™ Element™ Enclosure Kit – Installation Instructions
Rev. F 0611 51803 pg. 4
LIMITED WARRANTY
We warrant our product to be free from defects in material and workmanship, for the terms specifi ed below, provided there has been normal use and proper
maintenance. This warranty applies to the original purchaser only. All remedies under this warranty are limited to the repair or replacement of any item or items found
by the factory to be defective within the time period specifi ed. If you have a warranty claim, fi rst you must call our factory at the number below for instructions. You
must retain proof of purchase and submit a copy with any items returned for warranty work. Upon completion of warranty work, if any, we will return the repaired or
replaced item or items to you freight prepaid. Damage to our products caused by accidents, fi re, vandalism, negligence, misinstallation, misuse, Acts of God, or by
defective parts not manufactured by us, is not covered under this warranty.
THE WARRANTY TIME PERIOD IS AS FOLLOWS FOR REPLACE-A-TOP™, SAILCLOTH REPLACE-A-TOP™, SUPERTOP®, SUPERTOP® REPLACEMENT
SKINS, SUNRIDER®, AND TIGERTOP®: TWO YEARS FROM DATE OF PURCHASE.
THE WARRANTY TIME PERIOD IS AS FOLLOWS FOR ALL OTHER “SOFT GOODS” MANUFACTURED BY OUR COMPANY (USING PRIMARILY VINYLS,
PLASTICS, AND/OR FOAM): ONE YEAR FROM DATE OF PURCHASE.
THE WARRANTY TIME PERIOD IS AS FOLLOWS FOR ALL OTHER “HARD GOODS” MANUFACTURED BY OUR COMPANY (USING PRIMARILY METALS,
PLASTICS, AND/OR FIBERGLASS): ONE YEAR FROM DATE OF PURCHASE.
ANY IMPLIED WARRANTIES OF MERCHANTABILITY AND/OR FITNESS FOR A PARTICULAR PURPOSE CREATED HEREBY ARE LIMITED IN DURATION
TO THE SAME DURATION AND SCOPE AS THE EXPRESS WRITTEN WARRANTY. OUR COMPANY SHALL NOT BE LIABLE FOR ANY INCIDENTAL OR
CONSEQUENTIAL DAMAGE.
Some states do not allow limitations on how long an implied warranty lasts, or the exclusion or limitation of incidental or consequential damages, so the above
limitations or exclusions may not apply to you. This warranty gives you specifi c legal rights, and you may also have other rights which vary from state to state.
For further information or request for warranty work, please contact:
Bestop Inc., Customer Service
Toll-Free: (800) 845-3567
Main: (303) 465-1755
E-mail: [email protected]
Website: www.Bestop.com *All or a portion of this product may be made in China or South Africa.
Install Enclosure Seal
Once Enclosure panel is in place,
install the Enclosure Seal. Peel
off the adhesive tape on one
end of the seal and press it onto
the inside top back corner of the
Enclosure panel. Work towards
the front of the door aligning the
seal to the outer most edge of
the Enclosure panel and peeling
off the backing tape as you go.
Trim the excess seal on the
ends and cut the seal where it is
over the door pins.
Enclosure
Seal
Cut Seal
over Pins
Secure Enclosure
Mirror Mount
Holes
1/4-20
Truss Head
Screws
Secure the Enclosure
Kit with three (3) 1/4-20
Truss Head Screws. The
Enclosure can also be
secured by removing OE
mirrors from OE doors
and installing them on the
Element Doors. You can
also use Bestop aftermarket
mirror part number 5126101
for this application.
/