Dante DLI1972 Operating instructions
- Category
- Security cameras
- Type
- Operating instructions

DLI1972
Mini PTZ Dome
Installation and Operations Manual
Model Number: DLI1972
Description: 1/3”, Mini PTZ Dome
Day/Night 10X Optical / 12X Digital Zoom

Installation and Operation Manual
Mini High Speed Dome
DLI1972 10x Optical 12x Digital Zoom

TABLE OF CONTENT
1. Precaution----------------------- --------------- --------------------------------------------- 1
-- --
4. Function instruction----------------------------------------- ---------------- -------------- -7
----
4.1 Auto-fun motion------------- ----- -- -------------------------------------------------7
4.2 Camera control----------- --------------------------- 7---------------------------- -------
4.3 Monitor function----- ----------------------- 8----------------------------- ----------------
5. System setting---------------------------------------------------------- ---------------------9
--
3. Dome performance-------------------------------------- ------- ------------------------------5
--
5.1 Basic operation------------------ --------------- --------------------------- ---------------9
5.2 Edit dome label----------- ------- ----------------------------------------- - ----------------10
5.3 Initial information------------ -- ------- -- ---------------11---------------------- ---------- - -
5.4 Display setup--------------- - --- ---------------------------------- ------- ----------------12
5.5 Systematic motion control------------ --- ----------------------13------------------------ -
5.6 Clear-------------------- - --------- -- 15------------------ ------- ------------ ---------------
5.1.1self-testing -- ---------------- -- -----------------------------------------------------9
5.1.2 Call the main menu------------ ----- ------------------------------- - ---------------9
5.1.3 Menu and keyboard ------- -------- - ----operation ----- --------- -- ---------------9
5.5.1 Auto-flip------------ ----------- 13------------------------- ---------------------------
5.5.2 Speed proportion pan ----------- 13----- ---------------------------------------------
5.5.3 Park action-------------- -------- 14------------------------- ---- ---------------------
3.1 Dome parameter--------------- --- ----------------------5------------------------------- ---
3.2 Camera parameter----------- ------------------------5-------------------------------------
3.3 Dome performance and feature----------- -------------------------6---------------------
5.5.4 Power up action--------------------------------------------------- --------------- 14
5.5.5 Fan startup by temperature-------------------------------------------------------14
4.4 Constant temperature function----- ----------------------- 8-----------------------------
5.7 Password setting-------------------- - --------- -- 16------------------ ------- ------------ --
5.8 Clock setting------------------ -- - --- ------ 17---------- ------------------ ------- ----------
5.9 COMM setting-------------------- - -- --------------------------------- ------- ----------18
2. Installation instruction--------------------------------------------------------------------------2
2.1 Ceiling mount---------------------------------------------------------------------- 2
2.2 Wall mount--------------------------------------------------------------------------3
6. Camera setting------------------------------------------------ ---------- - ----------------19
---
6.1 Zoom speed------------- ------- ---------------------- ------- ---------------------------19
6.5 IR cut filter ---------------------------------------------------------------------------23
6.4 Slow shutter control------------- ------- ---------------------- ------- ------------------22
6.2 Digital zoom control------------- ------- ---------------------- ------- ---------- -------20
6.3 Back light compensation------------- ------- ---------------------- ------- -------------21
6.6 Advanced setting ---------------------------------------------------------------------24
6.6.1 AE mode ------------------------------------------------------------------------24
6.6.2 White balance mode -----------------------------------------------------------25
5.5.6 Head-up mounting setting--------------------------------------------------------14
6.6.3 Camera menu setting ----------------------------------------------------------25

9. Appendix-------------------------------------------------------------------------------------33
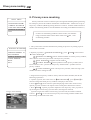
8. Privacy zone masking------------------------------------------------------------------------32
9.1 Menu index---------------------------------------------------------------------------33
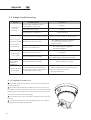
9.2 Trouble shooting--------------------------------------------------------------------- 34
9.3 The cleaning of the transparent cover---------------------------------------------- 34
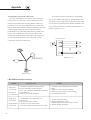
9.4 RS485 Bus basic knowledge----------- ------ ----------------------- --- ---------------35
10. Maintenance service terms--------------------------------------------------------------------37
7.4 Tour-------------------------------------------------------
-------------------------------- 29
7.5 Zone -------------------------------------------------------
-------- -----------------------30
7.6 ---------------------------------------------------------
--------------------31Time running
7. Function setting-------------- ------------------------------------- ------- ------------------26
7.1 Preset ------------- ------- -------------- ------------------- ------- ---------------------- 26
7.2 Scan------------- ------- --------------------- ------- -------
-------------------------------27
7.3 Pattern-------------------------------------------------------
-----------------------------28

1. Precaution
1
Precaution
Ø
Ø
Ø
Ø
Ø
Ø
Ø
Ø
Ø
Law
Environmental requirements
Cleaning of down cover
W
The product installation and use of the product must comply with the relevant laws of the country.
power supply. About the rated input
voltage, please refer to power label.
hen the image is unclear or there iso much dust on the down cover, please use soft cloth to clean or please
use the water to wash the down cover and then wipe up.
Electrical safety
Transportation
Installation of care
Requirements to service personnel
Do not disassemble the pan/tilt module
Don't place lens of the camera to strong light objects
1. Strictly conform to country and local electrical safety standard when using or installing the product.
2. Using factory's power adapter. This dome uses DC12V/1500mA
1. The dome should be protected against extremes of pressure, vibration humidity and other damage during
storage and transportation.
2. This dome is packed as a whole part. When the buyer send it back to factory to maintain, the damage caused
by improper transportation is not within the warranty.
1. Please refer to user manual when installation, and sufficient strength of the wall or ceiling should be ensured .
2. Power must be cut off when installation.
3. Please handle with care ,do not squeeze and press structure parts, which may cause mechanical damage.
4. Down cover and lens of camera are precise optical items. Please don't touch it directly to avoid scratch
which will affect the image quality.
All the service work should be done by qualified technicians.
(like sun etc.)
Operation environment temperature -10 -+50
Humidity < 95%
Air pressure 86-106Kpa
Please read the manual and product label carefully before installing the speed dome.
NOTICE

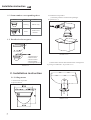
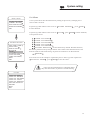
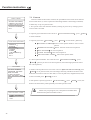
2.1 Ceiling mount
1. Dimension of product
as picture below
2. Installation of product
(1) Get the products out from the packages.
As picture 2.1-2.
(2) Drill holes and fix base board on the ceiling floor
by using of 3 M4 bolts. As picture 2.1-3.
Picture 2.1-2
2. Installation instruction
Picture
Mount
Place
Wall
Ceiling
Indoor only
Indoor and
outdoor
1. 2 Item number corresponding sheet
1. 3 Details of relevant parts
1
2
3
4
5
1. Wall bracket
2. Base board
3. Power cable
4. Speed dome
5. Transparent cover
Picture 2.1-3
Picture 1.3
Installation instruction
Picture 2.1-1

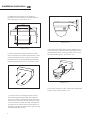
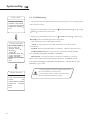
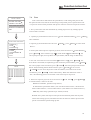
2.2 Wall mount
1. Dimension of product
as picture below
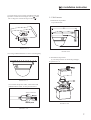
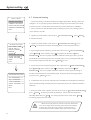
(5) Connect the power cable, video cable and
RS485control-cable. As the picture below.
Video connector
Picture 2.1-6
Picture 2.2-1
(3) Insert three screws in the mini dome into the
apertures on the base board(pls refer to ), then
turn 15 degrees in clockwise(pls refer to ).
Picture 2.1-4
(4) Using 3 additional M3*5 screws to lock tightly.
Picture 2.1-5
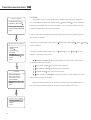
2. Installation of product
(1) Get the products out from the packages.
As picture 2.2-2
Picture 2.2-2
Installation instruction

Picture 2.2-3
Picture 2.2-4
(2) Make the wall bracket as the model on
installation wall, and draw the central position
of the drill hole. (As picture 2.2-3)
(3) Please drill four installation holes for M8
metal expand screw with the lashed electric drill
on the installation surface, and be sure with the
installation hole of 75mm depth approximately
and M8 expand metal screw. (As picture 2.2-4)
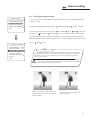
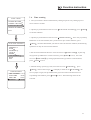
( 4) Get the water-proof output cable of mini
dome through the wall bracket, and make the
three screw of base board in the mini dome into
the aperture on the base board, then turn 15 deg-
rees in clockwise, and be sure that central posit-
ion of the two ear holes of base board and cover
board are matched, and then lock it tightly using
the additional M3*5 screw.
Installation instruction
4
Picture 2.2-6
(6) Connect the power cable, video cable and RS485
control-cable. As the picture 2.1-6.
(5) Pls make the wall bracket aims at the M8 screw,
so that the output cable will be locked in the hole of
motherboard bracket, and use the M8 screw to lock
the wall bracket tightly. As picture 2.2-6.
Picture 2.2-5

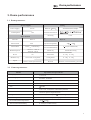
3. 2 Camera parameter
Power supply
Decoder
Built-in
Power supply
DC12V
Consumption
12W
Rotation speed
Pan 0.5 - 160 /S
3. 1 Dome parameter
Operational
Pan rotation
360
Monitor way
Preset/ tour/ scan/ pattern
Physical
Operation temperature
-10 +50
Mount way
Material
Aluminum, iron and carbon alloy, plastic alloy
Setting
Baud rate RS485
2400/4800/9600/19200bps
Communication Protocol
ID setting
0-255
Speed
Limitless variable-speed controlling
Preset
128
Wall mount
Tilt rotation
Tilt90 with auto-flip
Environmental humidity
0 95%(no condensation)
3. Dome performance
Tilt 0.5 - 90 /S
Wall mount/Ceiling
Model
Specification/parameter
Dome performance
N: 2.2kg G: 2.8kg
Imaging Element
1/4"CCD
Scanning System
625lines, 50field/s
White Balance
Auto/manual
Gain Control
Auto Gain Control
S/N
50dB
Shutter
Auto: 1/50-1/120,000 s continuously/manual
Lens
10 times optical magnified lens
Magnification
120times(10 times optical 12 times digital)
Video Output
Multiple Video Output, 1.0Vp-p
Environmental Temperature
-10 50
Environmental Humidity
0~95%(no condensation)
Ceiling mount
N: 1.4kg G: 1.8kg
5

3. 3 Dome performance and features
6
Dome performance
a. Iron and carbon alloy structure, high intensity, and good heat dissipation.
b. Precise stepping motor, rotate smoothly, react sensitivity and orientate accurately.
c.
d. Rotate slowly at pan 1 /s, and the image doesn't jitter.
(4) Built-in pan/tilt
Exquisite mechanical drive, support pan 360 continuously and tilt 0-90 , and may rotate180
with auto flip.
This product is high-technology surveillance product with high definition and color camera, variable-speed pan/tilt
and multifunction decoder. It can reduce the connection and installation process between systematic parts at a max
limit, and also can improve the stability and reliability of the system. Meanwhile it is easy to install and repair, and
it has the following advantages: beautiful shape, rotate lightly and neatly, little noise, simple operation and so on.
(2) Built-in high resolution color camera with pre-focus lens.
a. Prefocus lens 6mm, 8mm, 12mm(Optional)
b. Auto brightness controlling
c. Auto white balance
d. Auto back-light compensation
e. Auto iris
f. Auto focus
(3) Integrated and multi-protocol decoder
a. Figure design, all the data are stored in the inner of camera pan/tilt,when power off, the storage data
can't be lose.
b. Built-in decoder Integrated and multi-protocol include PELCO-D PELCO-P SAMSUNG PANASONIC
and mainstream protocols The protocols can automatically recognised by the dome, and which can choose
corresponding protocol to communicate with host, it need not to be set by customers
c. 128 presets can be stored, support auto tour(but only can transfer 1-80 presets), and 1 tour can store up to 32
presets.
d. 4 pattern tour
e. 4 scan
f. Built-in direction indicator
g. Built-in temperature indicator
h. Built-in clock setting
I. Rs485 bus controlling in series, and dome ID;1-255(optional)
(5) OS
a. All the menu option are displayed in English.
b. Video OSD menu. It is direct and simple to revise the dome information and parameter by keyboard and
menu display.
c. May set park action, and set power up action or arrive an appointed action.
Dmenu
(1) Built-in digital camera
a. High sensitivity, high resolution, and integrated digital processing
b. Auto-focus f. Auto-Iris
c. Auto brightness control g. Auto white balance
d. IR cut filter h. Auto back light compensation
e. Auto slow shutter
a. W
b.
hen the temperature exceeds the upper limit, the screen will display alarm information.
According to the real-time temperature, the fan will measure if it starts or not, and prolong the life of fan.
(6) Internal temperature test

4. Function instruction
When manual adjusting, for far focus situation, the dome responds at a high-speed so that touching
rocker slightly may make picture move rapidly, thus cause the picture to lose. To base on humanized design,
the dome automatically adjust pan and tilt rotation according to zoom near and far, which make it is
convenient to operate manually to make tracks for the object. In the menu, you may change system
parameter setting proportion pan as "ON", thus you may run this function.
If user holds the joystick in the down position, the camera rotates pan 180 degrees, he camera rotates
tilts up to 90 degrees, you may directly watch the rear view ocesses in portrait 180
degrees . In the menu, you may set the system parameter setting AUTO FLIP as ON, thus you may run this
function.
(1)
(2) Auto flip
Focus/speed proportion pan
then t
to realize surveillance all pr
This paragraph mainly describes the main function and general principle of integrated speed dome, and
does not refer to the concrete operation methods. Different system has different operation methods, generally
we should operate according to the system manufactory's operation manual. Please contact dealer to get
necessary information, under some conditions there are have some particular requirements and operations.
4. 1 Auto-run motion
(3) Park action
(4) Power up action
(1)
(2) Focus control
By the menu park time and park action , user may set auto-call preset or run tour, pattern, and scan, etc
after pointing a few minutes if the dome doesn't run any motions.
By the menu power up action , after the dome powers up or restarts, user may set auto- resume motions before
power up and auto- call preset or run tour, pattern, and scan etc .
The user can adjust zoom far and near of the image by keyboard controller Wide/Tele to obtain panoramic
image or close view that you need. The speed dome support digital zoom and optical zoom.
System defaults Auto focus. When the lens changes, camera will auto-adjust focus according to the centre of the
image to get legible image; user also can manually focus to get desirable image by operating keyboard FAR/NEAR .
When operating keyboard joystick, camera resumes to auto focus.
The camera cannot auto focus in the following status:
Target is not the centre of the image
Target is a strong light object, such as spotlight & etc.
Target moves too fast
Target area such as wall
Target is too dark or vague
Target image is too small
4 Camera control.2
Magnification control
Observe the target near and far an the same time, can not be clear at the same time.
7
Function instruction

(1) Set and call preset
(2) Tour
(3) Scan
(4) Pattern
(5) Lens position display
Preset function is that dome stores the horizontal angle, slope angle, camera lens focus position and
parameters of current pan/tilt into the memory. When necessary, dome can call these parameters, and
adjust pan/tilt and camera to this position.
User can call presets easily and promptly by using keyboard controlling. The dome can support 128 presets.
Tour is the built-in function in the speed dome. It can appoint setting in advance, and make presets
arranged in needful order in tour dwell. By inserting presets in tour dwell, to make the camera tour between
these presets. Tour order can be programmed, each time you run tour, you can set park time. A tour can store
32 presets.
User can easily preset right limit and left limit by controlling menu and menu, in order to make the
camera scanned between right limit and left limit at a setting speed.
Pattern is built-in function in the speed dome; the dome can record the tracks that are no less than 180s,
when running pattern, the dome moves repeatedly according to the recorded tracks. A dome can set up to 4
pattern tours.
The position that the speed dome has finished to self-testing as 0 point of pan rotation and tilt
rotation. The pan range is 0-360 , and tilt range is 0-90 . According to the displayed information, to set the
position of camera lens, and the position can display on the screen.
4. 4 Constant temperature Function
Inner temperature sensor check temperature inside of the dome. When the dome work at the high temperature,
the dome will automatically to start-up the fan to reduce the heat, to make sure the dome work in the reliable
temperature environment, increase its stability and prolong the life time of the dome.
4. 3 Monitor function
(3) Iris control
(4) Auto back light compensation
(5) Auto white balance
System defaults as auto Iris. Camera can rapidly adjust size of Iris, through automatically induct the
changing of environment ray, and thus make the brightness of deferent image stable.
User may adjust Iris by controller keyboard open/close to get required brightness that you need.
User also can resume auto Iris by joystick operation. When controlling the Iris manually, the dome locks current
position you manually controlled; when operating joystick, the dome resume auto Iris.
Camera sub-area can carry out auto back light compensation. Under a strong light background, camera
will auto compensate light for the darker object and adjust daylight to the bright background. In order to avoid
making the image mess by the background is too high in luminance, and the object is unable to recognize
because of darkness, thus gain legible image.
Camera can automatically adjust white balance in accordance with the alteration of background ligh
tness to reach a true colour.
Function instruction
8

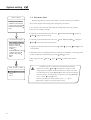
The dome conducts self-testing after current-carrying,and it rotates slowly until displaying pan origin that is
default setting, then moving to tilt origin, the lens will be pulled far to near and near to far, when self-testing is
finished, there is relevant system information displaying on the screen, as follow:
The system enters into the main menu by 95preset or twice transfer 9 preset within 3 seconds .All the menu
setting must enter into the main menu at first.
OPEN
Close
FAR
NEAR
TELE Increase
WIDE Reduce
Press TELE and WIDE at the same time, it means 3D joystick rotates joystick cap.
On :Open some setting
Off :close some setting
5. 1. 2 Call the main menu
5. 1. 3
Ø
Ø
.
The information will not disappear until you stop to operate the system. If you set power up action , the
dome will automatically activate motions after self-testing. How to operate the function? We will explain detail
introduction in following passages.
You need input password when you sign in the menu if you set up
password and have a super- password for the time of forget the password (super-password "892226"), then the
password will turn to factory setting (original password"000000". You need set the password again if you need it,
the detail of information show in password setting 4.7.
when choosing pictures, it means to increase Iris; when setting menu, it means to enter into the
next menu or setting, or save after finishing setting.
when choosing pictures, it means to reduce Iris; close to cancel.
Focus to far
Focus to near
magnification
magnification
Joystick to up: When choosing menu, it means to choose the former one; when choosing picture, it means
camera tilt up.
Joystick to down: when choosing menu, it means to choose the next one; when choosing picture, it means
camera tilt down.
Joystick to left: when choosing menu, it is equal with Close , when choosing picture, it means camera
tilt left
Joystick to right: when choosing menu, it is equal with Open , when choosing picture, it means
camera tilt right.
Back : Back to the former menu
Exit : Exit to menu
Menu and keyboard operation
Keyboard operation:
Menu operation
S/N of the dome
Soft edition
Dome ID
Communication parameter
5. 1 Basic operation
S/N 4JKAA7824000058S/N 4JKAA7824000058
PROTOCOL:FACTORYPROTOCOL:FACTORY
DOME ADDRESS 001DOME ADDRESS 001
COMM 4800,N,8.1COMM 4800,N,8.1
5. System setting
System setting
9
5. 1. 1 Self-testing
FIRMWARE V2.50FIRMWARE V2.50
Protocol

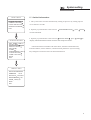
When using a lot of systems of the dome , in order to identify each dome,
the systems support title setting. The setting ways as follow:
1.
2. SYSTEM SETTING , and press
OPEN to enter the next menu.
3. EDIT DOME LABEL , and press
OPEN to enter the label setting menu.
4. LABEL , pressing OPEN to edit
current label.
5. When the cursor is twinkling in the first character of the label, moving
to choose character, after editing, pressing OPEN to save.
6. Moving joystick to BACK , press OPEN to back to the former
menu.
The system enters into the main menu by calling 95 preset or by calling
9 preset twice within 3 seconds.
Operate joystick and move the cursor to
Operate joystick and move the cursor to
Operate joystick and move the cursor to
joystick
Press CLOSE to exit.
Character of label can choose from:0-9,A-Z, :<>-.,Space.
Other labels input ways are the same as above.
The label may set 16 characters, and doesn't need editing
characters. Pressing OPEN continuously to jump over and
using spacebar to replace the deleted characters. When you finish
to e dita character, pressing OPEN to enter into the next editing
character, when y ou editing the last character, pressing OPEN
to save.
MAIN MENU
SYSTEM SETTING
CAMERA SETTING
FUNCTION SETTING
WINDOW BLANKING
EXIT
EDIT DOME LABEL
LABEL SPEED DOME
BACK
EXIT
SYSTEM SETTING
EDIT DOME LABEL
INITIAL INFO
DISPLAY SETUP
MOTION
CLEAR
PASSWORD SETTING
CLOCK SETTING
COMM SETTING
BACK
EXIT
System setting
5. 2 Edit dome label
10
NOTICE

2.
to
SYSTEM SETTING , press
to enter submenu.
3. INITIAL INFO , press
display initial information which as below the left picture shows.
1.
OPEN
OPEN
The system enters into the main menu by calling 95 preset or by calling 9 preset
twice within 3 seconds.
Operate joystick move the cursor to
Operate joystick move the cursor to
and
and
5. 3 Initial information
INITIAL INFO
S/N 4JKAA7824000058
FIRMWARE V2.50
PROTOCOL FACTORY
DOME ADDRESS 001
COMM 4800,N,8,1
BACK
EXIT
SYSTEM SETTING
EDIT DOME LABEL
INITIAL INFO
DISPLAY SETUP
MOTION
CLEAR
PASSWORD SETTING
CLOCK SETTING
COMM SETTING
BACK
EXIT
MAIN MENU
SYSTEM SETTING
CAMERA SETTING
FUNCTION SETTING
WINDOW BLANKING
EXIT
Initial information includes S/N of the dome, the name of manufact
software edition, camera address, communication parameter. System
change the numerical value of initial information.
urer,
setting
may
System setting
11

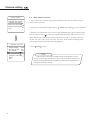
5. 4 Display setup
1.
2. OPEN
to enter
OPEN to
enter display setup as follow:
process.
Move joystick tilts up/down OFF ,
the cursor
displaying
cursor jump
the cursor to
displayed,
means
SYSTEM SETTING , press
submenu.
3. DISPLAY SETUP , press
display setup menu, may setting the content of the
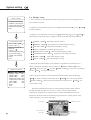
DOME LABEL : dome label display setting
PRESET LABEL : preset label or scan label display setting
ZOOM LABEL : magnification display setting
ZONE LABEL : zone label display setting
DIRECTION LABEL : direction label display setting
TEMPERATURE LABEL : temperature label display setting
TIME LABEL time label display setting
DATE LABEL date label display setting
4. Taking "display dome label" as an example to explain the operation
to move cursor to DOME LABEL press
OPEN , there is a sign " " besides DOME LABEL , is twinkling
besides OFF , as left picture shows.
5. Move joystick up/down, setting switch between ON/OFF, when
ON , it means to display dome label, press OPEN , the back to
DOME LABEL , label setting is finished, move EXIT , exit
to the menu setting.
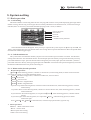
The display information on the screen will change with the dome rotation
through the information on the screen, user can see current dome inside
temperature, magnification, display zone etc. When all the labels have been
the dome works as the following picture shows: (in the picture "305"
pan angel," 45" means tilt angle.)
The system enters into the main menu by calling 95 preset or by calling 9 preset
twice within 3 seconds.
Operate joystick and move the cursor to
Operate joystick move the cursor toand
PRESET-05PRESET-05
305 45305 45
EASTEAST
Zone label
Direction label
Preset label
01X01X
Zoom magnification label
DISPLAY SETUP
DOME LABEL OFF
PRESET LABEL OFF
ZOOM LABEL OFF
ZONE LABEL OFF
DIRECTION LABEL OFF
OFF
TIME LABEL OFF
DATE LABEL OFF
BACK
EXIT
TEMPERATURE LABEL
MAIN MENU
SYSTEM SETTING
CAMERA SETTING
FUNCTION SETTING
WINDOW BLANKING
EXIT
SYSTEM SETTING
EDIT DOME LABEL
INITIAL INFO
DISPLAY SETUP
MOTION
CLEAR
PASSWORD SETTING
CLOCK SETTING
COMM SETTING
BACK
EXIT
System setting
15:11:4115:11:41
07/08/2707/08/27
Time label
Date label
032032
Temperature label

MAIN MENU
SYSTEM SETTING
CAMERA SETTING
FUNCTION SETTING
WINDOW BLANKING
EXIT
SYSTEM SETTING
EDIT DOME LABEL
INITIAL INFO
DISPLAY SETUP
MOTION
CLEAR
PASSWORD SETTING
CLOCK SETTING
COMM SETTING
BACK
EXIT
System setting
""
2.
3.
.5.1
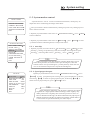
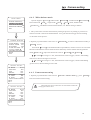
System motion can set a series of canonical movement, which plays an
important role in controlling the image of the dome.
. The system enters into the main menu by calling 95 preset or by calling 9 preset
twice within 3 seconds.
Operate joystick and move the cursor to SYSTEM SETTING , press OPEN
to enter submenu.
Operate joystick and move the cursor to MOTION , press OPEN to enter
systematic motion controlling menu, as left picture shows.
1. Operate joystick, move the cursor to AUTO FLIP : press OPEN to enter
auto flip setting, tilt up/down joystick, for example: choosing ON to open
auto flip ; choosing OFF to close auto flip . Press OPEN to save.
Operate joystick and move the cursor to PROPORTIONAL PAN ; press
OPEN to enter proportion pan setting, move up/down to choose,
if choosing ON , it means to open proportion pan; if choosing OFF , it
means to close proportion pan , press OPEN to save.
5 Auto flip
joystick
5. 5 System motion control
5. 5. 2 Speed proportion pan
When opening the auto flip function, operator holds the joystick
in the down position, the camera rotates pan 180 degrees, after the
camera rotates tilts up to 90 degrees, you may directly watch the rear
view to surveillance all processes in portrait 180 degrees.
When manually adjusting, for far focus situation, the dome
responds at a high-speed so that touching rocker slightly may
make picture move rapidly, thus cause the picture to lose. To
base on humanized design, the dome automatically adjust pan
and tilt rotation according to zoom near and far, which make it
is convenient to operate manually run after object.
13
MOTION
AUTO FLIP ON
PROPORTION PAN ON
PARK TIME 005
PARK ACTION SCAN
FAN ENABLED 040
TEMP C/F CENT
BACK
EXIT
POWER UP ACTION AUTO
HEAD-UP OFF
TIPS
TIPS

14
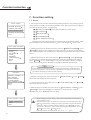
5. 5. 3 Park action
5. 5. 4
NONE - (default)
PRESET -call
SCAN -
PAT1 -
TOUR -
NONE -
AUTO -
PRESET - call
SCAN -
PAT1 -
TOUR -
Power up action
This setting allows the dome to run an appointed action after it enters vacancy
for a few time (1-240minutes). If default sets as 0, it means not to run this action.
1. Operate joystick and move the cursor to PARK TIME , press OPEN , and
move joystick up/down to set park time, the range is 0-240 (minute), press
OPEN to save. PARK ACTION is the action running at park time, when
PARK TIME sets as 0, it is invalid.
2. Operate joystick and move the cursor to PARK ACTION , press OPEN .
There will be a sign in the front of PARK ACTION , the cursor jump
to the right, after moving joystick up/down to choose park action , there are
options for choosing as follow, and then press OPEN to save.
none action
preset
run scan
run pattern
run tour
The dome startup to run actions after self-test, if nobody intervenes with it ,
the dome will repeatedly run this action continuously , if default sets as NONE .
Operate joystick, move the cursor to POWER UPACTION : press
OPEN to jump to the following choice, move joystick up/down to choose
power up action , press OPEN to save.
direction before
run scan
run pattern
run tour
none action
the dome resumes the primary action and
power off
preset
5. 5. 5
.
Fanstartbytemperature
The temperature of the dome will rise when its environment is in high
temperature. The fan will start automatically when the temperature reaches to a
temperature in order to make sure the stability of the dome.
Operate joystick, move the cursor to FAN ENABLED : press OPEN ,
the cursor will skip to the back option. Operator can press OPEN to save it in
actual condition.
The default setting temperature of the fan start is 40 Operator also can enter
into the fan startup setting to adjust the temperature of fan startup.
TEMP can switch temperature between Fahrenheit and centigrade.
ON means Head monut;
OFF means Head-up monut.
5. 5. 6 Head-up mounting setting
System setting
MOTION
AUTO FLIP ON
PROPORTION PAN ON
PARK TIME 005
PARK ACTION SCAN
FAN ENABLED 040
TEMP C/F CENT
BACK
EXIT
POWER UP ACTION AUTO
HEAD-UP OFF
MOTION
AUTO FLIP ON
PROPORTION PAN ON
PARK TIME 005
PARK ACTION SCAN
FAN ENABLED 040
TEMP C/F CENT
BACK
EXIT
POWER UP ACTION AUTO
HEAD-UP OFF
MOTION
AUTO FLIP ON
PROPORTION PAN ON
PARK TIME 005
PARK ACTION SCAN
FAN ENABLED 040
TEMP C/F CENT
BACK
EXIT
POWER UP ACTION AUTO
HEAD-UP OFF

5. 6 Clear
1.
2. SYSTEM SETTING press OPEN
to enter submenu.
3. CLEAR , press OPEN to enter submenu,
as left picture shows.
CLEAR ALL ZONES
CLEAR ALL PRESETS
CLEAR ALL PATTERNS
CLEAR ALL TOURS
CLEAR ALL WINDOWS
FACTORY DEFAULTS : resume the Factory default. Run this function,
the camera parameter and system parameter will resume to the initialized state, and
clear all windows and alarm setting. So please be cautious to use this function.
RESTART
4. Set clear zone as an example to explain the process. Move joystick up/down to
CLEAR ALL ZONES , press OPEN to clear all zones.
Once clear all commands in te controlling menu
they does not resume, so please be careful of using.
The system enters into the main menu by calling 95 preset or by calling9 preset
twice within 3 seconds.
Operate joystick and move the cursor to
Operate joystick and move the cursor to
MAIN MENU
SYSTEM SETTING
CAMERA SETTING
FUNCTION SETTING
WINDOW BLANKING
EXIT
SYSTEM SETTING
EDIT DOME LABEL
INITIAL INFO
DISPLAY SETUP
MOTION
CLEAR
PASSWORD SETTING
CLOCK SETTING
COMM SETTING
BACK
EXIT
CLEAR
CLEAR ALL ZONES
CLEAR ALL PRESETS
CLEAR ALL PATTERNS
CLEAR ALL TOURS
FACTORY DEFAULTS
RESTART
BACK
EXIT
CLEAR ALL WINDOWS
System setting
15
NOTICE

MAIN MENU
SYSTEM SETTING
CAMERA SETTING
FUNCTION SETTING
WINDOW BLANKING
EXIT
OLD PASSWORD:******
NEW PASSWORD:******
CONF PASSWORD:******
BACK
EXIT
ENABLE PASSWORD OFF
PASSWORD SETTING
SYSTEM SETTING
EDIT DOME LABEL
INITIAL INFO
DISPLAY SETUP
MOTION
CLEAR
PASSWORD SETTING
CLOCK SETTING
COMM SETTING
BACK
EXIT
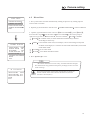
Password setting is the built-in function of high speed dome. Setting password
(6 figures) is very useful to protect the dome setting. If you do not have password,
you can't enter the setting menu. The initial password of the dome is "000000".
1. The system enters into the main menu by calling 95 preset or by calling 9 preset
twice within 3 seconds.
2. SYSTEM SETTING ,
to call the submenu.
3. PASSWORD SETTING ,
OPEN to call System motion controlling menu, as the left picture shows.
4. Input old password: Operate joystick, move the cursor to OLD PASSWORD ,
press OPEN , there will be a sign to display in the front of OLD
PASSWORD , the cursor jumps to the first character on the right, move joystick
up and down to set the first password, its option rage is 0-9, by tilting left and right
the joystick to input the other bits, press OPEN to save.
5. Input new password: Operate joystick, move the cursor to NEW PASSWORD ,
press OPEN , there will be a sign to display in the front of NEW
PASSWORD , the cursor jumps to the first character on the right, according to
the above instruction user can ordinally input the password by moving up/down
joystick, press OPEN to over.
6. Confirm the new password: Input the user's needful password again according to
above method. Failing to modify the password if this password is different with the
fifth step.
7. Start password or not: operate joystick, move cursor to ENABLE PASSWORD ,
press OPEN , and move joystick up and down, then it will switch between
ON/OFF. When choose ON , the setting of password is valid, when OFF ,
the setting of password is invalid.
Operate joystick and move the cursor to
Operate joystick and move the cursor to
press OPEN
press
5. 7 Password Setting
16
System setting
While user forgot password, and can't enter into main menu,
user can use super password, PTZ's password will be changed
as initial one, at this time User need to reset the password.
PTZ's initial password is 000000, Super password is 892226
NOTICE
Page is loading ...
Page is loading ...
Page is loading ...
Page is loading ...
Page is loading ...
Page is loading ...
Page is loading ...
Page is loading ...
Page is loading ...
Page is loading ...
Page is loading ...
Page is loading ...
Page is loading ...
Page is loading ...
Page is loading ...
Page is loading ...
Page is loading ...
Page is loading ...
Page is loading ...
Page is loading ...
Page is loading ...
-
 1
1
-
 2
2
-
 3
3
-
 4
4
-
 5
5
-
 6
6
-
 7
7
-
 8
8
-
 9
9
-
 10
10
-
 11
11
-
 12
12
-
 13
13
-
 14
14
-
 15
15
-
 16
16
-
 17
17
-
 18
18
-
 19
19
-
 20
20
-
 21
21
-
 22
22
-
 23
23
-
 24
24
-
 25
25
-
 26
26
-
 27
27
-
 28
28
-
 29
29
-
 30
30
-
 31
31
-
 32
32
-
 33
33
-
 34
34
-
 35
35
-
 36
36
-
 37
37
-
 38
38
-
 39
39
-
 40
40
-
 41
41


Dante DLI1972 Operating instructions
- Category
- Security cameras
- Type
- Operating instructions
Ask a question and I''ll find the answer in the document
Finding information in a document is now easier with AI
Related papers
Other documents
-
COP-USA CD55NVT Owner's manual
-
 Facina VKFCSD22IR Engineer Manual
-
Optiview TRKPTZ -26NX User manual
-
 Santec VDC-295IDH User manual
-
Eneo EDCH/143E/C User manual
-
i3 International PTZ Speed Dome User manual
-
-
-
Hitachi FCB-EX45Cp User manual
-
Costar CDC3600X User manual

