Page is loading ...
Page is loading ...
Page is loading ...
Page is loading ...
Page is loading ...

6
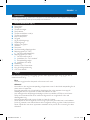
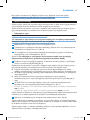
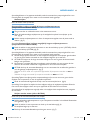
Congratulations on your purchase and welcome to Philips! To fully benet from the support that
Philips offers, register your product at www.philips.com/welcome.
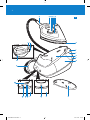
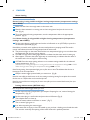
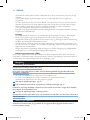
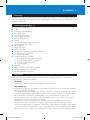
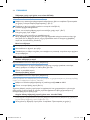
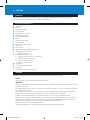
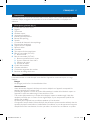
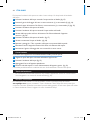
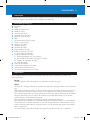
Supply hose
Handle
Temperature dial
Steam trigger
Temperature light
Temperature indicator
Steam boost button
Soleplate
Filling funnel lid
Filling funnel
Iron platform
Water tank
Steam tank
Heat-resistant iron resting mat
Control panel (GC7422)
On/off switch
Control panel (GC7440)
On/off button with power-on light
‘Water tank empty’ light
Steam setting selector
Steam lights
Mains cord
Calc-clean tablet holder
Cord storage hook
Calc-Clean rinsing cap
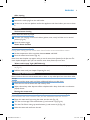
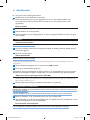
Read this user manual carefully before you use the appliance and save it for future reference.
- Never immerse the iron or the steam tank in water.
- Check if the voltage indicated on the appliance corresponds to the local mains voltage before
you connect the appliance.
- Do not use the appliance if the plug, the mains cord, the supply hose or the appliance itself
shows visible damage, or if the appliance has been dropped or leaks.
- If the mains cord or the supply hose is damaged, you must have it replaced by Philips, a service
centre authorised by Philips or similarly qualied persons in order to avoid a hazard.
- Never leave the appliance unattended when it is connected to the mains.
- This appliance is not intended for use by persons (including children) with reduced physical,
sensory or mental capabilities, or lack of experience and knowledge, unless they have been given
supervision or instruction concerning use of the appliance by a person responsible for their
safety.
- Children should be supervised to ensure that they do not play with the appliance.
- Do not let the mains cord and supply hose come into contact with the hot soleplate of the iron.
4239.000.7518.1.indd 6 02-11-09 11:29

- If steam escapes from under the Calc-Clean rinsing cap when the appliance heats up, switch off
the appliance and tighten the Calc-Clean rinsing cap. If steam continues to escape when the
appliance heats up, switch off the appliance and contact a service centre authorised by Philips.
- Never remove the Calc-Clean rinsing cap when the steam tank is hot.
- Do not use any other cap on the steam tank than the Calc-Clean rinsing cap that has been
supplied with the appliance, as this cap also functions as a safety valve.
- Check the mains cord and the supply hose regularly for possible damage.
- Always place and use the iron and the steam tank on a stable, level and horizontal surface.
- The iron platform and the soleplate of the iron can become extremely hot and may cause burns
if touched. If you want to move the steam tank, do not touch the platform.
- When you have nished ironing, when you clean the appliance and also when you leave the iron
even for a short while: put the iron on the iron platform, switch off the appliance and remove
the mains plug from the wall socket.
- Rinse the steam tank regularly according to the instructions in the chapter ‘Cleaning and
maintenance’.
- This appliance is intended for household use only.
This Philips appliance complies with all standards regarding electromagnetic elds (EMF). If handled
properly and according to the instructions in this user manual, the appliance is safe to use based on
scientic evidence available today.
Never immerse the steam tank in water.
Do not put hot water, perfume, vinegar, starch, descaling agents, ironing aids or other chemicals in
the water tank.
- GC7440: Fill the water tank when the ‘water tank empty’ light ashes.
- GC7422: Fill the water tank when the water in the water tank has reached the MIN level.
- You can rell the water tank at any time during ironing.
1 Open the lling funnel lid. (Fig. 2)
2 Fill the water tank with tap water up to the maximum level (Fig. 3).
Note: You can use normal tap water. If the tap water in your area is very hard, we advise you to mix it
with an equal amount of distilled water.
3 Properly close the lling funnel lid (‘click’).
Do not tilt or shake the steam tank when the water tank is full. Otherwise water may spill out of
the lling funnel.
Note: Some smoke and particles may come out of the iron when you use it for the rst time. This is
normal and stops after a short while.
Note: When you switch on the appliance, the steam tank produces a pumping sound. This sound is
normal and indicates that water is being pumped into the steam tank.
7
4239.000.7518.1.indd 7 02-11-09 11:29

Never direct the steam at people.
2
1 Make sure that there is enough water in the water tank.
2 Place the heat-resistant iron resting mat on the ironing board and put the iron on the
mat. (Fig. 4)
3 To set the required ironing temperature, turn the temperature dial to the appropriate
position. (Fig. 5)
Note:
2
4 Put the mains plug in a wall socket and set the on/off switch to on (GC7422) or press the
on/off button (GC7440) (Fig. 6).
Note: When you switch on the appliance, the steam tank produces a pumping sound. This sound is
normal and indicates that water is being pumped into the steam tank.
, The power-on light on the steam tank and the iron temperature light go on to indicate that
the steam tank and the iron start to heat up.
, GC7440: The high steam setting light ashes to indicate that the steam tank is heating up.
, After approx. 2 minutes, the steam light stays on continuously, to indicate that the water in
the steam tank is hot enough for steam ironing.
5 GC7440: Press the steam setting selector to set a steam setting suitable for the selected
ironing temperature: (Fig. 7)
- Select the ECO setting for optimum ironing performance at temperature settings 2 to MAX.
- Select the high steam setting for temperature settings 3 to MAX.
Note: During ironing, the temperature light goes on from time to time. This indicates that the iron is
heating up to the set temperature.
6 Keep the steam trigger pressed while you steam iron. (Fig. 8)
Note: You can safely put the hot iron on the iron resting mat during ironing. Do not place the mat with
the hot iron on a surface that can be scorched by heat.
Note: Do not touch the iron resting mat for some time after you have removed the hot iron from it, as
the mat is hot.
Do not press the steam trigger while you iron.
1 Set the required ironing temperature (see chapter ‘Preparing for use’, section ‘Setting the
temperature’). (Fig. 5)
2 Put the mains plug in a wall socket and press the on/off button (Fig. 9).
, The soleplate starts to heat up.
3 Press the steam selector and select ‘no steam’. (Fig. 7)
, The ‘no-steam’ light goes on.
4 Iron without pressing the steam trigger.
, If the steam tank is empty or has not heated up yet, you hear a clicking sound inside the tank.
This sound is caused by the opening of the steam valve and is perfectly harmless.
8
4239.000.7518.1.indd 8 02-11-09 11:29

1 Switch off the appliance.
2 Remove the mains plug from the wall socket.
3 Put the iron on the iron platform and let the appliance cool down before you start to clean
it.
Never direct the steam at people.
1 To steam iron hanging curtains and clothes (jackets, suits, coats), hold the iron in vertical
position (Fig. 10).
2 Press the steam trigger.
Never direct the steam at people.
During steam ironing, you can use the steam boost function to remove stubborn creases.
1 Set the temperature dial to a position between 3 and MAX.
2 Press the steam boost button (Fig. 11).
Note: Some water droplets may appear when you use the steam boost function for the rst time. The
water droplets disappear after you have used the steam boost function for some time.
- When the water in the water tank runs low during use, the ‘water tank empty’ light goes
on (Fig. 12).
1 Rell the water tank (see chapter ‘Preparing for use’).
Never immerse the iron and the steam tank in water or any other liquid, nor rinse them under
the tap.
Let the iron and the steam tank cool down sufciently before you clean them.
1 Clean the iron and the steam tank with a damp cloth.
2 Wipe scale and any other deposits off the soleplate with a damp cloth and a non-abrasive
(liquid) cleaner.
Let the appliance cool down sufciently before you remove the Calc-Clean rinsing cap.
Rinse the steam tank once a month or after you have relled the water tank 10 times.
1 Empty the water tank by pouring the water into the sink (Fig. 13).
2 Turn the cord storage hook anticlockwise (1) and remove it (2) (Fig. 14).
3 Turn the Calc-Clean rinsing cap anticlockwise (1) and remove it (2) (Fig. 15).
4 Shake the steam tank well over the sink.
9
4239.000.7518.1.indd 9 02-11-09 11:29

5 Empty the steam tank by pouring the water into the sink.
6 Pour fresh water through the Calc-Clean hole with the lling cup. (Fig. 16)
7 Shake the steam tank well over the sink (Fig. 17)
8 Pour the water into the sink again. (Fig. 18)
9 Repeat steps 6 and 7 if there are still impurities in the water.
10 Firmly screw the Calc-Clean rinsing cap clockwise onto the steam tank.
11 Reattach the cord storage hook by turning it clockwise.
Make sure the appliance has cooled down sufciently before you put it away.
1 Remove the mains plug from the wall socket and let the appliance cool down.
2 Empty the water tank (Fig. 13).
3 Place the iron on the iron platform.
4 Fix the supply hose and mains cord in the cord storage hook. (Fig. 19)
Regularly check if the mains cord and the supply hose are still undamaged and safe.
- Do not throw away the appliance with the normal household waste at the end of its life, but
hand it in at an ofcial collection point for recycling. By doing this, you help to preserve the
environment (Fig. 20).
If you need information or if you have a problem, please visit the Philips website at
or contact the Philips Consumer Care Centre in your country (you nd its
phone number in the worldwide guarantee leaet). If there is no Consumer Care Centre in your
country, go to your local Philips dealer.
10
4239.000.7518.1.indd 10 02-11-09 11:29
Page is loading ...
Page is loading ...
Page is loading ...
Page is loading ...
Page is loading ...
Page is loading ...
Page is loading ...
Page is loading ...
Page is loading ...
Page is loading ...
Page is loading ...
Page is loading ...
Page is loading ...
Page is loading ...
Page is loading ...
Page is loading ...
Page is loading ...
Page is loading ...
Page is loading ...
Page is loading ...
Page is loading ...
Page is loading ...
Page is loading ...
Page is loading ...
Page is loading ...
Page is loading ...
Page is loading ...
Page is loading ...
Page is loading ...
Page is loading ...
Page is loading ...
Page is loading ...
Page is loading ...
Page is loading ...
Page is loading ...
Page is loading ...
Page is loading ...
Page is loading ...
Page is loading ...
Page is loading ...
Page is loading ...
Page is loading ...
Page is loading ...
Page is loading ...
Page is loading ...
Page is loading ...
Page is loading ...
Page is loading ...
Page is loading ...
Page is loading ...
Page is loading ...
Page is loading ...
Page is loading ...
Page is loading ...
Page is loading ...
Page is loading ...
Page is loading ...
Page is loading ...
Page is loading ...
Page is loading ...
Page is loading ...
Page is loading ...
Page is loading ...
Page is loading ...
Page is loading ...
Page is loading ...
-
 1
1
-
 2
2
-
 3
3
-
 4
4
-
 5
5
-
 6
6
-
 7
7
-
 8
8
-
 9
9
-
 10
10
-
 11
11
-
 12
12
-
 13
13
-
 14
14
-
 15
15
-
 16
16
-
 17
17
-
 18
18
-
 19
19
-
 20
20
-
 21
21
-
 22
22
-
 23
23
-
 24
24
-
 25
25
-
 26
26
-
 27
27
-
 28
28
-
 29
29
-
 30
30
-
 31
31
-
 32
32
-
 33
33
-
 34
34
-
 35
35
-
 36
36
-
 37
37
-
 38
38
-
 39
39
-
 40
40
-
 41
41
-
 42
42
-
 43
43
-
 44
44
-
 45
45
-
 46
46
-
 47
47
-
 48
48
-
 49
49
-
 50
50
-
 51
51
-
 52
52
-
 53
53
-
 54
54
-
 55
55
-
 56
56
-
 57
57
-
 58
58
-
 59
59
-
 60
60
-
 61
61
-
 62
62
-
 63
63
-
 64
64
-
 65
65
-
 66
66
-
 67
67
-
 68
68
-
 69
69
-
 70
70
-
 71
71
-
 72
72
-
 73
73
-
 74
74
-
 75
75
-
 76
76


Philips GC7422 User manual
- Category
- Steam ironing stations
- Type
- User manual
Ask a question and I''ll find the answer in the document
Finding information in a document is now easier with AI
in other languages
- italiano: Philips GC7422 Manuale utente
- français: Philips GC7422 Manuel utilisateur
- español: Philips GC7422 Manual de usuario
- Deutsch: Philips GC7422 Benutzerhandbuch
- Nederlands: Philips GC7422 Handleiding
- português: Philips GC7422 Manual do usuário
- dansk: Philips GC7422 Brugermanual
- Türkçe: Philips GC7422 Kullanım kılavuzu
- svenska: Philips GC7422 Användarmanual
- suomi: Philips GC7422 Ohjekirja
Related papers
-
Philips GC2910 Owner's manual
-
Philips GC1480/02 Important information
-
Philips GC7430/07 User manual
-
Philips GC 160 User manual
-
Philips GC6819/20 Important information
-
Philips gc 7240 User manual
-
Philips GC7230 Owner's manual
-
Philips GC350/40 Important information
-
Philips COMFORT 2000W User manual
-
Philips GC135/00 User manual
Other documents
-
Rowenta DG8626FO PERFECT STEAM PRO Owner's manual
-
OK. OSI 3211 User manual
-
Bosch TDS25PRO1/01 User manual
-
Tefal GV7315E0 Owner's manual
-
-
-
-
Siemens TS25 Serie Owner's manual
-
Becken FERRO VAPOR BSI3860 Owner's manual
-