I
Ar'rENTION IN
LLER:
FOR A QUALITY INSTALLATION,
FOLLOW THESE INSTRUCTIONS.
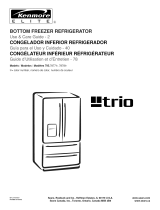
[_ LIFT UNIT OFF SHIPPING
BASE (Requires 2 people)
Lift
• Using the handles at the back top
of the cabinet, and supporting the
refrigerator at the bottom front,
lift the unit off the shipping base.
• Use padded hand truck to protect
_,efrigerator finish.
,J
r -%
---_ TRUCKING REFRIGERATOR
• LEAVE TAPE AND ALL PACKAGING
ON DOORS until refrigerator is in its
final location.
• TRUCK FROM SIDE ONLY.
• Avoid overtightening strap to prevent
damaging doors. ,,_
f
_ EVEL UNIT AND INSTALL
BASE COVER
If the doors are misaligned, realign as
follows.
• Remove basecover by loosening
two screws.
• Turnthe leveling screw clockwiseto
raise that side of the refrigeratoror
counterclockwise to lower it.
• When doors arealigned, they will
close smoothly.
• Replace base cover.
F
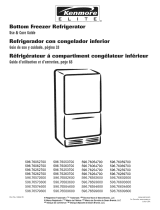
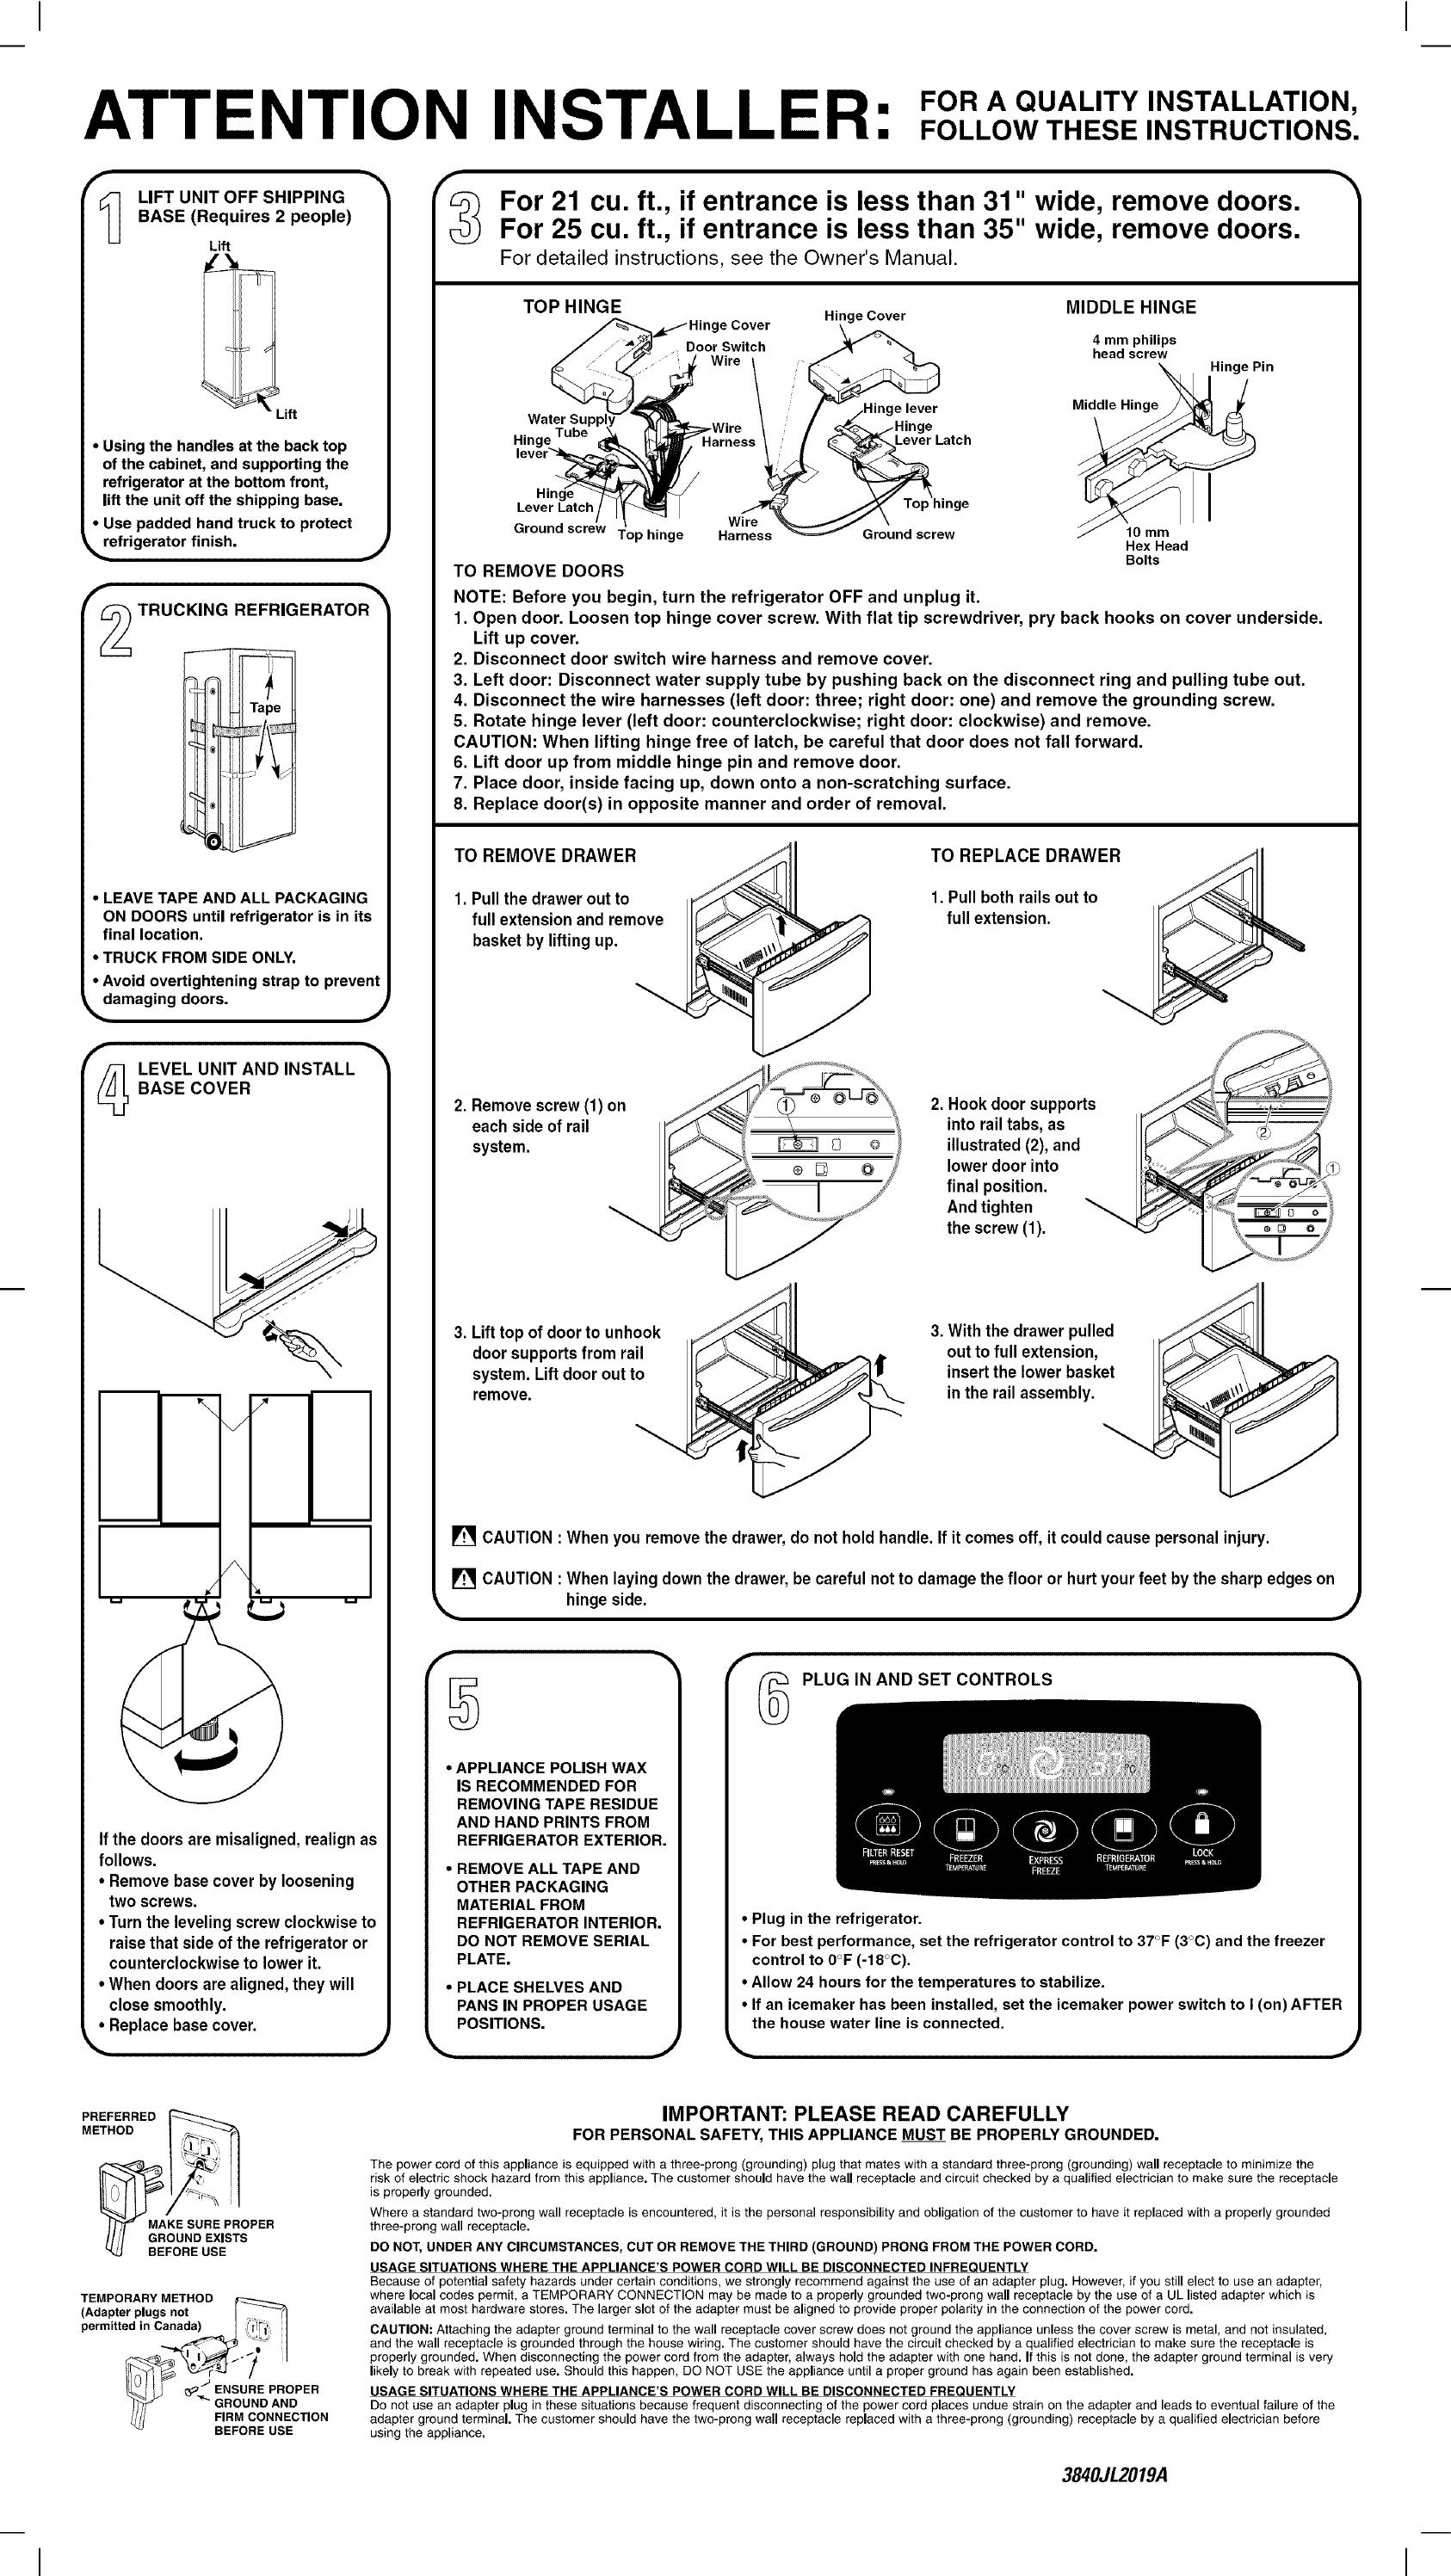
For 21 cu. ft., if entrance is less than 31" wide, remove doors.
For 25 cu. ft., if entrance is less than 35" wide, remove doors.
For detailed instructions, see the Owner's Manual.
TOP HINGE
.=Cover
Door Switch
Wire /
,Wire \
Hing_ Harness _
Hinc
Lever Latch
Wire
Ground screw Top hinge Harness
Hinge Cover
/ %-'_-_-"-_.j Hinge
>_ Latch
TO REMOVE DOORS
NOTE: Before you begin, turn the refrigerator OFF and unplug it.
MIDDLE HINGE
4 mm philips
head screw
_ jHinge Pin
:// 10 mm
Hex Head
Bolts
1. Open door. Loosen top hinge cover screw. With flat tip screwdriver, pry back hooks on cover underside.
Lift up cover.
2. Disconnect door switch wire harness and remove cover.
3. Left door: Disconnect water supply tube by pushing back on the disconnect ring and pulling tube out.
4. Disconnect the wire harnesses (left door: three; right door: one) and remove the grounding screw.
5. Rotate hinge lever (left door: counterclockwise; right door: clockwise) and remove.
CAUTION: When lifting hinge free of latch, be careful that door does not fall forward.
6. Lift door up from middle hinge pin and remove door.
7. Place door, inside facing up, down onto a non-scratching surface.
8. Replace door(s) in opposite manner and order of removal.
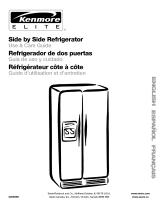
TO REMOVE DRAWER
1. Pullthe drawerout to
full extension and remove
basket bylifting up.
TO REPLACE DRAWER
1. Pull both rails out to
full extension.
2. Remove screw (1) on
each side of rail
system.
2. Hook door supports
into rail tabs, as
illustrated (2), and
lower door into
final position.
Andtighten
the screw (1).
3. Lift top ofdoor to unhook
door supportsfrom rail
system. Lift door out to
remove.
3. With the drawer pulled
out to full extension,
insert the lower basket
in the railassembly.
-%
[] CAUTION : When you remove the drawer, do not hold handle. Ifit comes off, it could cause personal injury.
[] CAUTION : When laying down the drawer, becareful not to damage the floor or hurtyour feet by the sharp edges on
hinge side. J
APPLIANCE POLISH WAX
IS RECOMMENDED FOR
REMOVING TAPE RESIDUE
AND HAND PRINTS FROM
REFRIGERATOR EXTERIOR.
REMOVE ALL TAPE AND
OTHER PACKAGING
MATERIAL FROM
REFRIGERATOR INTERIOR.
DO NOT REMOVE SERIAL
PLATE.
J
f
PLUG IN AND SET CONTROLS
• Plug in the refrigerator.
• For best performance, set the refrigerator control to 37°F (3°C) and the freezer
control to 0°F (-18°C).
• Allow 24 hours for the temperatures to stabilize.
• If an icemaker has been installed, set the icemaker power switch to I (on)AFTER
the house water line is connected.
PLACE SHELVES AND
PANS IN PROPER USAGE
POSITIONS.
P F" o?EO
KESURE PROPER
II/I GROUNDEXISTS
BEFORE USE
TEMPORARY METHOD _
(Adapter plugs not I _(1
permitted in Canad:, _ ._:! I
J
IV !! _- _ ENSURE PROPER
_ GROUND AND
_/// FIRM CONNECTION
BEFORE USE
IMPORTANT: PLEASE READ CAREFULLY
FOR PERSONAL SAFETY, THIS APPLIANCE MUST BE PROPERLY GROUNDED.
The power cord of this appliance isequipped with a three-prong (grounding) plug that mates with a standard three-prong (grounding) wall receptacle to minimize the
risk of electric shock hazard from this appliance. The customer should have the wall receptacle and circuit checked by a qualified electrician to make sure the receptacle
is properly grounded.
Where a standard two-prong wall receptacle is encountered, it is the personal responsibility and obligation of the customer to have it replaced with a properly grounded
three-prong wall receptacle.
DO NOT, UNDER ANY CIRCUMSTANCES, CUT OR REMOVE THE THIRD (GROUND) PRONG FROM THE POWER CORD.
USAGE SITUATIONS WHERE THE APPLIANCE'S POWER CORD WILL BE DISCONNECTED INFREQUENTLY
Because of potential safety hazards under certain conditions, we strongly recommend against the use of an adapter plug. However, if you still elect to use an adapter,
where local codes permit, a TEMPORARY CONNECTION may be made to a properly grounded two-prong wall receptacle by the use of a UL listed adapter which is
available at most hardware stores. The larger slot of the adapter must be aligned to provide proper polarity in the connection of the power cord.
CAUTION: Attaching the adapter ground terminal to the wall receptacle cover screw does not ground the appliance unless the cover screw is metal, and not insulated,
and the wall receptacle is grounded through the house wiring. The customer should have the circuit checked by a qualified electrician to make sure the receptacle is
properly grounded. When disconnecting the power cord from the adapter, always hold the adapter with one hand. If this is not done, the adapter ground terminal is very
likely to break with repeated use. Should this happen, DO NOT USE the appliance until a proper ground has again been established.
USAGE SITUATIONS WHERE THE APPLIANCE'S POWER CORD WILL BE DISCONNECTED FREQUENTLY
Do not use an adapter plug in these situations because frequent disconnecting of the power cord places undue strain on the adapter and leads to eventual failure of the
adapter ground terminal. The customer should have the two-prong wall receptacle replaced with a three-prong (grounding) receptacle by a qualified electrician before
using the appliance.
3840JL2019A