
User’s Guide
Kodak Digital Science
(TM)
DC40 camera

i
1/96
Contents
Introduction 1. . . . . . . . . . . . . . . . . . . . . . . . . . . . . . . . . . . . . . . . . . . . . . . . . . .
About the
Kodak Digital Science
(TM) DC40 camera 1. . . . . . . . . . . .
Features 1. . . . . . . . . . . . . . . . . . . . . . . . . . . . . . . . . . . . . . . . . . . . . . . . .
1 Getting Started 2. . . . . . . . . . . . . . . . . . . . . . . . . . . . . . . . . . . . . . . . . . . . .
Checking Package Contents 2. . . . . . . . . . . . . . . . . . . . . . . . . . . . . . . . .
Parts of the Camera 3. . . . . . . . . . . . . . . . . . . . . . . . . . . . . . . . . . . . . . . .
Installing the Batteries 4. . . . . . . . . . . . . . . . . . . . . . . . . . . . . . . . . . . . . .
Turning the Camera On and Off 7. . . . . . . . . . . . . . . . . . . . . . . . . . . . . .
2 Using the Camera 8. . . . . . . . . . . . . . . . . . . . . . . . . . . . . . . . . . . . . . . . . .
Accessing Controls 8. . . . . . . . . . . . . . . . . . . . . . . . . . . . . . . . . . . . . . . . .
Moving Between Features 9. . . . . . . . . . . . . . . . . . . . . . . . . . . . . . . . .
Making Feature Selections 10. . . . . . . . . . . . . . . . . . . . . . . . . . . . . . . . .
Setting the Flash 11. . . . . . . . . . . . . . . . . . . . . . . . . . . . . . . . . . . . . . . . . . .
Flash Setting Descriptions 11. . . . . . . . . . . . . . . . . . . . . . . . . . . . . . . . .
Setting the Timer 14. . . . . . . . . . . . . . . . . . . . . . . . . . . . . . . . . . . . . . . . . . .
Timer Setting Descriptions 14. . . . . . . . . . . . . . . . . . . . . . . . . . . . . . . . .
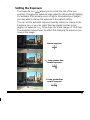
Setting the Exposure 17. . . . . . . . . . . . . . . . . . . . . . . . . . . . . . . . . . . . . . .

ii
1/96
Waking the Camera 19. . . . . . . . . . . . . . . . . . . . . . . . . . . . . . . . . . . . . . . .
Taking Pictures 19. . . . . . . . . . . . . . . . . . . . . . . . . . . . . . . . . . . . . . . . . . . .
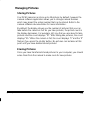
Managing Pictures 21. . . . . . . . . . . . . . . . . . . . . . . . . . . . . . . . . . . . . . . . .
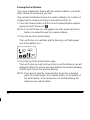
Storing Pictures 21. . . . . . . . . . . . . . . . . . . . . . . . . . . . . . . . . . . . . . . . . .
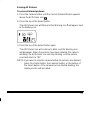
Erasing Pictures 21. . . . . . . . . . . . . . . . . . . . . . . . . . . . . . . . . . . . . . . . . .
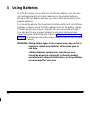
3 Using Batteries 24. . . . . . . . . . . . . . . . . . . . . . . . . . . . . . . . . . . . . . . . . . . . .
Battery Charge Level 25. . . . . . . . . . . . . . . . . . . . . . . . . . . . . . . . . . . . . . .
Battery Safety Information 26. . . . . . . . . . . . . . . . . . . . . . . . . . . . . . . . . . .
Improving Battery Performance 27. . . . . . . . . . . . . . . . . . . . . . . . . . . . . .
About NiCad Batteries 28. . . . . . . . . . . . . . . . . . . . . . . . . . . . . . . . . . . . . .
4 Using a Power Adapter 29. . . . . . . . . . . . . . . . . . . . . . . . . . . . . . . . . . . . .
5 Connecting to a Computer 31. . . . . . . . . . . . . . . . . . . . . . . . . . . . . . . . . .
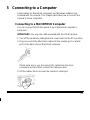
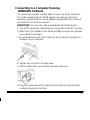
Connecting to a MACINTOSH Computer 31. . . . . . . . . . . . . . . . . . . . . .
Connecting to a Computer Running WINDOWS Software 33. . . . . . . .
6 Maintenance 34. . . . . . . . . . . . . . . . . . . . . . . . . . . . . . . . . . . . . . . . . . . . . . .
General Guidelines 34. . . . . . . . . . . . . . . . . . . . . . . . . . . . . . . . . . . . . . . . .
Cleaning the Lens 34. . . . . . . . . . . . . . . . . . . . . . . . . . . . . . . . . . . . . . . . . .
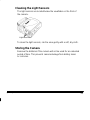
Cleaning the Light Sensors 35. . . . . . . . . . . . . . . . . . . . . . . . . . . . . . . . . .
Storing the Camera 35. . . . . . . . . . . . . . . . . . . . . . . . . . . . . . . . . . . . . . . .

iii
1/96
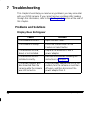
7 Troubleshooting 36. . . . . . . . . . . . . . . . . . . . . . . . . . . . . . . . . . . . . . . . . . . .
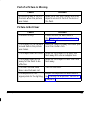
Problems and Solutions 36. . . . . . . . . . . . . . . . . . . . . . . . . . . . . . . . . . . . .
Getting Help 41. . . . . . . . . . . . . . . . . . . . . . . . . . . . . . . . . . . . . . . . . . . . . . .
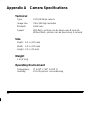
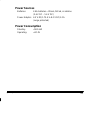
Appendix A Camera Specifications 42. . . . . . . . . . . . . . . . . . . . . . . . . . . .
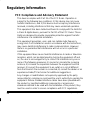
Regulatory Information 44. . . . . . . . . . . . . . . . . . . . . . . . . . . . . . . . . . . . . . . .
FCC Compliance and Advisory Statement 44. . . . . . . . . . . . . . . . . . . . .
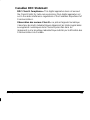
Canadian DOC Statement 45. . . . . . . . . . . . . . . . . . . . . . . . . . . . . . . . . . .
Index 46. . . . . . . . . . . . . . . . . . . . . . . . . . . . . . . . . . . . . . . . . . . . . . . . . . . . . . . . .

1
January 1996
Introduction
About the
Kodak Digital Science
(TM) DC40 camera
The
Kodak Digital Science
(TM) DC40 camera (DC40 camera) allows
you to capture images and then quickly transfer the images to your
computer so that you can save or manipulate them using image
editing software.
Features
The DC40 camera is very easy to use and offers the following features:
– flash settings
– timer settings
– exposure settings
– energy saving “sleep” mode
– built-in lens cover
– your choice of battery or power adapter as power supply
– battery use display
– capability for accessory lens attachments
– standard tripod mount

2
January 1996
1 Getting Started
Checking Package Contents
As you unpack your new DC40 camera, make sure the following items
are included:
– 1 DC40 camera
– 4 lithium batteries
– 1 serial cable for use with Macintosh computers
– 1 serial cable for use with Windows computers
– 1 warranty registration card
– 1 9-pin adapter for a 25-pin serial port
–1
Kodak Digital Science
(TM) Digital Camera Reference CD
– 1 camera software application kit

3
January 1996
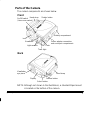
Parts of the Camera
The camera components are shown below.
Battery compartment
Power adapter connection
and serial port compartment
Shutter button
On/Off switch
(Lens cover switch)
Lens
Flash
Viewfinder
Light sensors
Timer light
Hand strap
Front
Hand strap
Viewfinder
eye piece
Display
Feature button
Select button
Back
NOTE: Although not shown in the illustrations, a standard tripod mount
is located on the bottom of the camera.

4
January 1996
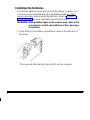
Installing the Batteries
Four lithium batteries come with your DC40 camera, however, you
can also use rechargeable NiCad or AA alkaline batteries. This
section describes how to install the batteries. Refer to Chapter 3,
Using Batteries
, for more information about battery use.
WARNING:
Mixing battery types in the camera may cause a fire
or explosion. Install only batteries of the same type
at one time.
1.Push firmly on the battery compartment cover in the direction of
the arrow.
The cover will slide along its track until it can be removed.

5
January 1996
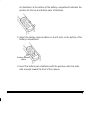
An illustration at the bottom of the battery compartment indicates the
position for the top and bottom pairs of batteries.
2.Adjust the battery removal ribbon so that it rests on the bottom of the
battery compartment.
Battery removal
ribbon
3.Insert the bottom pair of batteries with the positive ends (the ends
with a bump) toward the front of the camera.

6
January 1996
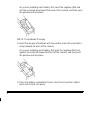
As you are installing each battery, first insert the negative (flat) end
into the recessed area toward the back of the camera, and then push
the positive end into place.
NOTE: The batteries fit snugly.
4.Insert the top pair of batteries with the positive ends (the ends with a
bump) toward the back of the camera.
As you are installing each battery, first push the negative (flat) end
against the metal tab toward the front of the camera, and then push
the positive end into place.
5.Place the battery compartment cover into its track and then slide it
back until it clicks into place.

7
January 1996
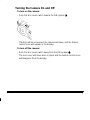
Turning the Camera On and Off
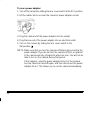
To turn on the camera:
– Push the lens cover switch toward the ON symbol
.
The lens will be uncovered, the camera will beep, and the feature
control icons will appear in the display.
To turn off the camera:
– Push the lens cover switch away from the ON symbol
.
The lens cover will move back in place and the feature control icons
will disappear from the display.

8
January 1996
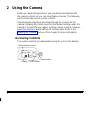
2 Using the Camera
Before you begin taking pictures, you should become familiar with
the camera controls so you can make feature choices. The following
sections describe how to use the controls.
Camera feature selections are made through the controls on the
camera’s display. All controls revert to their default settings when the
camera is turned off and on again. Settings remain in place, however,
when the camera is wakened from its inactive state. Refer to the
“Waking the Camera” section of this chapter for more information.
Accessing Controls
The camera controls are manipulated using the icons in the display.
Select button
Feature button
Current feature marker
Display

9
January 1996
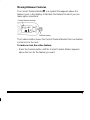
Moving Between Features
The Current Feature Marker is a symbol that appears above the
feature icons in the display. It indicates the feature for which you can
make option selections.
Current feature marker
Feature button
The Feature button moves the Current Feature Marker from one feature
control icon to the next.
To make an icon the active feature:
– Press the Feature button until the Current Feature Marker appears
above the icon for the feature you want.

10
January 1996
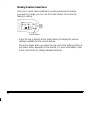
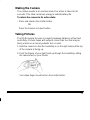
Making Feature Selections
Once the Current Feature Marker is positioned above the feature
you want to change, you can use the Select button to choose the
feature’s setting.
Select button
– Press the top or bottom of the Select button to display the various
settings available for the current feature.
The action taken when you press the top versus the bottom portion of
the Select button depends on the feature. For more information, refer
to the instructions for setting individual features.

11
January 1996
Setting the Flash
The effective range for the flash is between four and nine feet.
In order for the flash to have an impact on the picture, make
sure you are between four and nine feet away from the subject.
The Flash icon
allows you to change flash settings.
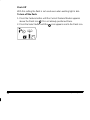
Flash Setting Descriptions
The three flash settings are described below.
Automatic Flash
With this setting, the camera determines whether or not the flash should
be used based on the existing light. This is the default setting.
To use automatic flash, do not make any changes to the flash feature.

12
January 1996
Flash Off
With this setting the flash is not used even when existing light is dim.
To turn off the flash:
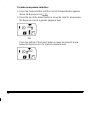
1.Press the Feature button until the Current Feature Marker appears
above the Flash icon
if it is not already positioned there.
2.Press the Select button until the
icon appears next to the Flash icon.

13
January 1996
Flash On
With this setting, the flash is used even when existing light is bright.
To turn on the flash:
1.Press the Feature button until the Current Feature Marker appears
above the Flash icon
if it is not already positioned there.
2.Press the Select button until the
icon appears to the right of the
Flash icon.

14
January 1996
Setting the Timer
The timer allows you to specify the period of time that the camera
should wait after the shutter button is pressed before taking a picture.
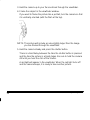
You can set the timer and then move in front of the camera so you
can be in the picture.
The Timer icon
allows you to change timer settings.
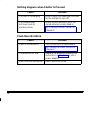
Timer Setting Descriptions
The three timer settings are described below.
No Wait
With this setting, the camera takes the picture as soon as the shutter
button is pressed. This is the default setting.
To take pictures immediately, do not make any changes to the
timer feature.

15
January 1996
Ten Seconds
With this setting, the camera waits ten seconds after the shutter button
is pressed before taking pictures.
When you press the shutter button, the red timer indicator on the front
of the camera illuminates for eight seconds, then blinks for two
seconds. At ten seconds, the picture is taken.
To set the timer to ten seconds:
1.Press the Feature button until the Current Feature Marker appears
above the Timer icon
.
2.Press the Select button until the “10” icon appears to the right of the
Timer icon.

16
January 1996
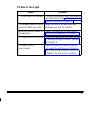
Twenty Seconds
With this setting, the camera waits twenty seconds after the shutter
button is pressed before taking pictures.
When you press the shutter button, the red timer indicator on the front
of the camera illuminates for eighteen seconds, then blinks for two
seconds. At twenty seconds, the picture is taken.
To set the timer to twenty seconds:
1.Press the Feature button until the Current Feature Marker appears
above the Timer icon
.
2.Press the Select button until the “20” icon appears to the right of the
Timer icon.
Page is loading ...
Page is loading ...
Page is loading ...
Page is loading ...
Page is loading ...
Page is loading ...
Page is loading ...
Page is loading ...
Page is loading ...
Page is loading ...
Page is loading ...
Page is loading ...
Page is loading ...
Page is loading ...
Page is loading ...
Page is loading ...
Page is loading ...
Page is loading ...
Page is loading ...
Page is loading ...
Page is loading ...
Page is loading ...
Page is loading ...
Page is loading ...
Page is loading ...
Page is loading ...
Page is loading ...
Page is loading ...
Page is loading ...
Page is loading ...
Page is loading ...
Page is loading ...
Page is loading ...
Page is loading ...
Page is loading ...
Page is loading ...
Page is loading ...
Page is loading ...
-
 1
1
-
 2
2
-
 3
3
-
 4
4
-
 5
5
-
 6
6
-
 7
7
-
 8
8
-
 9
9
-
 10
10
-
 11
11
-
 12
12
-
 13
13
-
 14
14
-
 15
15
-
 16
16
-
 17
17
-
 18
18
-
 19
19
-
 20
20
-
 21
21
-
 22
22
-
 23
23
-
 24
24
-
 25
25
-
 26
26
-
 27
27
-
 28
28
-
 29
29
-
 30
30
-
 31
31
-
 32
32
-
 33
33
-
 34
34
-
 35
35
-
 36
36
-
 37
37
-
 38
38
-
 39
39
-
 40
40
-
 41
41
-
 42
42
-
 43
43
-
 44
44
-
 45
45
-
 46
46
-
 47
47
-
 48
48
-
 49
49
-
 50
50
-
 51
51
-
 52
52
-
 53
53
-
 54
54
-
 55
55
-
 56
56
-
 57
57
-
 58
58


Ask a question and I''ll find the answer in the document
Finding information in a document is now easier with AI
Related papers
Other documents
-
Hasbro JP Lost WorldT-Rex Tranq Gun Operating instructions
-
Canon PowerShot SD770 IS User manual
-
Canon Digital IXUS 95 IS Owner's manual
-
Canon IXUS 95 IS User manual
-
-
-
-
-
-