Leica M6-TTL Owner's manual
- Category
- Camera flashes
- Type
- Owner's manual
This manual is also suitable for

Not For Resale – Free Download at http://www.joe-chan.com/manuals

Not For Resale – Free Download at http://www.joe-chan.com/manuals

Not For Resale – Free Download at http://www.joe-chan.com/manuals

Not For Resale – Free Download at http://www.joe-chan.com/manuals
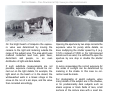
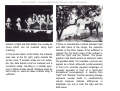
Leica Akademie
Leica not only manufactures high-performance
products for everything from observation to
reproduction: it offers a special service in the
form of the Leica Akademie. For many years,
this internationally famous facility has taught
photographic expertise in practical seminars
and training courses. It meets the needs of
keen photographers, both beginners and
advanced students, for special training in
demanding areas of 35 mm photography,
projection, and enlargement.
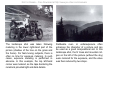
Up-to-date, well-equipped seminar rooms are
available at our Solms headquarters and at the
nearby "Gut Altenberg" for these courses,
which are held by experienced instructors, the
content of which ranges from general
photography to specialised fields of interest.
They provide a wealth of practical suggesti-
ons, help, and advice. Further information and
details of seminars are available from:
Leica Camera AG
Leica Akademie
Oskar Barnack Str. 11
D- 35606 Solms
Tel: 06442208421
Fax: 06442 208 425
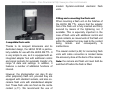
Dear Customer,
Congratulations on your decision to purchase
the LEICA M6 TTL. You have chosen an
excellent and unique rangefinder camera.
We wish you many years of pleasure and
successful photography with your camera.
We recommend that you read these instruc-
tions first in order to derive full benefit from the
photographic possibilities offered by your new
camera.
1

Not For Resale – Free Download at http://www.joe-chan.com/manuals
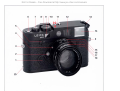
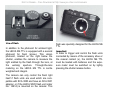
Nomenclature
1. Battery compartment cover
2. Lens release button
3. Eyelets for carrying strap
4. Red button for lens alignment
5. Lever for film rewinding release
6. Automatic frame counter
7. Shutter release button with threaded socket for
cable release
8. Quick-wind lever for film transport and shutter
wind (must be brought in stand-by position when
shooting)
9. Rangefinder window
10. Shutter speed dial with clickstops for:
• Shutter speeds from 1 to 1/1 000s
• " " for 1/50 s synchronising speed for flash
operation
• "B" for long exposures
• "OFF" for switching off the electronics
11. Accessory shoe for flash control with:
• Centre contact
• Contacts for TTL flash control
12. Bright-line frame illumination window
13. Angled rewind crank
14. Viewfinder window with mirrored strip for LED
visibility in bright light
15. Fixed ring with depth-of-field scale
16. Focusing ring
17. Aperture ring
18. Frame preselector
Contents Page
Leica Academy .............................................................. 1
Foreword ....................................................................... 1
Nomenclature ............................................................. 2/3
Viewfinder displays ........................................................ 3
Fitting the carrying strap ................................................ 4
Power supply ............................................................. 5
Batteries..................................................................... 5
Loading and replacing the batteries ........................... 5
Automatic battery check............................................. 6
Quick-wind lever ............................................................ 7
Shutter release button.................................................... 7
Shutter speed dial.......................................................... 7
Loading the film ............................................................. 8
Opening the camera .................................................. 8
Inserting the film......................................................... 9
Closing the camera.................................................. 10
Transport to the first frame....................................... 10
Setting the film speed............................................... 10
Film rewind and removal .......................................... 11
Fitting the lens ............................................................. 12
Removing the lens ....................................................... 13
LEICA M lens design ................................................... 13
Focusing ring ........................................................... 14
Aperture ring ............................................................ 14
Depth-of-field scale .................................................. 15
Lens hoods .............................................................. 16
Use of older LEICA M lenses....................................... 16
How to hold the camera correctly................................. 17
Bright-line viewfinder.................................................... 18
Frame selector......................................................... 20
Rangefinder ................................................................. 22
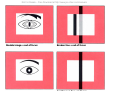
Coincidence (double image) focusing ...................... 22
Split-image focusing................................................. 22
Exposure metering....................................................... 24
Switching on the exposure meter............................. 24
2

Not For Resale – Free Download at http://www.joe-chan.com/manuals
Setting the correct shutter speed/ Page
aperture combination ........................................... 25
Meter sensitivity ................................................... 26
Low light levels .................................................... 26
General information on exposure metering .......... 26
Switching off the exposure meter......................... 26
Metering diagram.............................................27/29
Metering field ....................................................... 30
Tips for exposure metering .................................. 32
Use of flash.............................................................. 38
Compatible flashguns .......................................... 39
Fitting and connecting the flash unit..................... 39
TTL flash mode.................................................... 40
Settings for TTL flash mode................................. 40
Flash exposure displays in the viewfinder in
TTL and automatic mode ..................................... 40
Flash exposure displays in the viewfinder in
manual flash mode .............................................. 41
Flash exposure displays in the viewfinder in
strobe mode......................................................... 41
System accessories for the LEICA M6 TTL ............. 42
Interchangeable lenses........................................ 42
Filters................................................................... 42
Eyesight correction lenses ................................... 42
LEICA WINDER M............................................... 43
Bags and cases ................................................... 43
Tips on maintenance of M6 camera and lenses . .44
Alphabetical index ................................................... 45
Technical data ......................................................... 46
Other LEICA products.............................................. 48
Projectors ............................................................ 48
Binoculars............................................................ 48
LEICA Services ....................................................... 49
Information Service.............................................. 49
Customer Service ................................................ 49
LeicaCard ............................................................ 49
19. Base plate
20. Base plate catch
21. Viewfinder eyepiece
22. Synchronisation socket for flash units with cable
23. Camera back
24. ISO (ASA/DIN) film speed dial
25. Base plate holding pin
26. Tripod bushing A/, DIN 4503 1/4")
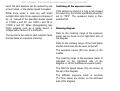
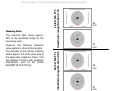
Viewfinder displays
LEDs-(Light Emitting Diode) for:
A Shutter/aperture balance
B Flash operation
C Bright-line frame for
50 mm and 75 mm (Example)
D Metering field for focusing
3

Not For Resale – Free Download at http://www.joe-chan.com/manuals
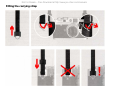
Fitting the carrying strap
4

Not For Resale – Free Download at http://www.joe-chan.com/manuals
Power supply
The LEICA M6 TTL requires two 1.5 volt sil-
ver oxide button cells or one 3 volt lithium cell
for the exposure meter and to trigger
connected flash units.
If the camera is not in use for longer periods of
time or if you wish to keep a battery with you
as replacement, lithium cells are particularly
suitable, as they can be stored for several
years with no loss of energy.
Batteries
Silver oxide button cells Lithium cells
Duracell D 357 (10 L 14) Duracell DL 1/3 N
Everready EPX 76 Kodak K 58 L
Kodak KS 76 Philips CR 1/3 N
Maxell SR 44 Ucar 2 L 76
National SR 44 Varta CR 1/3 N
Panasonic SR 44
Philips 357
Ray-o-vac 357
Sony SR 44
Ucar EPX 76
Varta V 76 PX
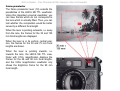
Loading and replacing the batteries
1. Unscrew the battery compartment cover (1).
2. Wipe any oxidation residue off the cells
using a clean cloth.
3. Insert the cells into the holder in the bat-
tery compartment cover. Pay attention to
the polarity.
4. Now screw the cover together with the cells
back into the camera.
5. To remove the batteries, follow the same
procedure in reverse.
A set of fresh batteries has a life of approxi-
mately 8 hours with the exposure meter
switched on continuously. Assuming 10-
second measurements in normal use, one set
of batteries therefore supplies sufficient energy
for approx. 2900 exposures, i.e. 80 films of 36
exposures each.
5

Not For Resale – Free Download at http://www.joe-chan.com/manuals
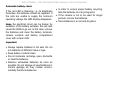
Automatic battery check
If the red LED is flickering, i.e. its brightness
fluctuates, the batteries should be replaced. If
the cells are unable to supply the minimum
operating voltage, the LED display disappears.
Note: the electrical circuit can be broken by
oxidation of the battery surfaces; this will also
cause the LEDs to go out. In this case, remove
the batteries and clean the battery terminals,
camera contacts and battery compartment
cover with a clean cloth.
Important:
• Always replace batteries in full sets. Do not
mix batteries of different make or type.
• Keep battery contacts clean.
• Do not incinerate, recharge, open, dismantle
or heat the batteries.
• Remove exhausted batteries as soon as
possible. Do not dispose of used batteries in
normal garbage as they contain environ-
mentally harmful substances.
• In order to ensure proper battery recycling,
take the batteries to a recycling point.
• If the camera is not to be used for longer
periods, remove the batteries.
• Store batteries in a cool and dry place.
6

Not For Resale – Free Download at http://www.joe-chan.com/manuals
Quick-wind lever
The quick-wind lever (8) is used to advance
the film, to cock the shutter and to automati-
cally advance the frame counter. For rapid
sequences, the user can put the lever into a
"ready position".
Shutter release button
The shutter release button (7) should be
pressed softly (not jerkily) until it clicks and the
shutter is opened. The shutter release has a
threaded socket to accept standard cable
releases.
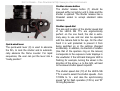
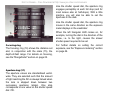
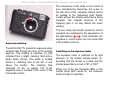
Shutter speed dial
The size and location of the shutter speed dial
of the LEICA M6 TTL are ergonomically
perfect: on the one hand, the dial is extre-
mely easy to use and can also be operated
with the camera held to the eye. On the other
hand it is well protected to prevent it from
being switched on or the settings changed
accidentally. In addition, its direction of rotation
(like that of the aperture ring on the lenses)
corresponds to the exposure meter displays in
the viewfinder: if the left-hand triangular LED is
flashing for example, turning the wheel in the
direction of the arrow, i.e. to the right, will lead
to the slower shutter speed required.
The shutter speed dial (10) of the LEICA M6
TTL is used to select the shutter speeds - from
1/1000s to 1s - and also the synchronising
speed " " for flash operation (1/50 s) and "B"
for long exposures.
7

Not For Resale – Free Download at http://www.joe-chan.com/manuals
When the dial is set to "B", the shutter remains
open until the shutter release button is
released.
The "OFF" position is located between "B" and
the end of the scale. When the dial is turned to
this position, the exposure meter is switched
off.
The speed selector dial engages positively at
all engraved speeds. Intermediate speeds
cannot be selected.
For details on correct exposure, see the
"Exposure metering" section on page 24.
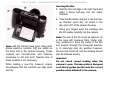
Loading the film
Always start by making sure that there is no
film in the camera by turning the rewind crank
(13) gently in the direction of the arrow. Any
resistance indicates that a film is already
loaded; see rewinding instructions on page 11.
Begin by actuating the wind lever and pressing
the release button. Hold the camera in your left
hand with the base plate pointing upwards.
Opening the camera
1. Raise the latch (20) on the base plate (19).
2. Turn the latch to the left.
3. Remove the base plate.
4. Fold the back (23) out towards the rear.
8

Not For Resale – Free Download at http://www.joe-chan.com/manuals
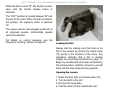
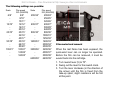
Note: with the camera back open, three gold-
plated electrical contacts (29) are visible on
the back and in the camera housing. These
contacts are corrosion-free, and relatively
insensitive to dirt and dust. Special care of
these contacts is not necessary.
When loading a new film, however, ensure
nevertheless that the contacts are kept clean
and dry.
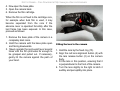
Inserting the film
5. Hold the film cartridge in the right hand and
insert it about half-way into the empty
chamber.
6. Take the film leader and pull it into the take-
up chamber spool (28), as shown in the
dia- gram (27) of the camera housing.
7. Using your fingers push the cartridge and
the film leader carefully into the camera.
Note: the end of the film must be tapered, as
is the case with made-up films. Under ordi-
nary conditions it does not matter if the film
end projects through the three-post assemb-
ly. In extremely cold, dry weather, however,
the end may break off, and the drawing should
then be followed exactly.
Important
Do not check correct loading when the
camera is open. The base plate is designed
such that it guides the film into the correct
position when attached to the camera.
9

Not For Resale – Free Download at http://www.joe-chan.com/manuals
Closing the camera
8. Replace the camera back.
9. Hook the base plate over the external
mounting post on the camera body (25).
10. Fold the base plate back into its normal
position, ensuring that the camera back is
in full contact so that the base plate enve-
lops it.
11. Lock the back using the base plate catch.
Transport of the film to the first frame
12. Advance the film to the next frame by
means of the quick-wind lever, and re-
lease the shutter.
13. Gently pull the film taut by turning the
rewind crank (13) in the direction of the
arrow. The film is properly transported
when the rewind crank turns backwards
when the quick-wind lever is operated
again.
14. Finally, press the shutter release button
again and cock the shutter for the third
time. The frame counter (6) now reads 1
and the camera is ready to shoot.
Setting the film speed
The dial for setting the exposure meter to the
film speed (24) can be used to set values from
ISO 6/9° to ISO 6400/39° (ASA 6/9 DIN to
ASA 6400/39 DIN; the ISO designation is that
generally used internationally). To set the film
speed:
1. Press the centre of the dial down and turn
it until the two triangles are aligned
opposite the desired film speeds (DIN
above, ASA below).
2. When released, the disc will engage and
spring back flush with the surrounding ring
if it has been set properly.
10

The following settings are possible:
Scale
Film speed
ISO (ASA/DIN)
Scale Film speed
ISO (ASA/DIN)
6/9° 6/9° 200/24°
200/24°
- 8/10° - 250/25°
- 10/11° - 320/26°
12/12° 12/12° 400/27°
400/27°
- 16/13° - 500/28°
- 20/14° - 640/29°
25/15° 25/15° 800/30°
800/30°
- 32/16° - 1000/31°
- 40/17° - 1250/32°
50/18° 50/18° 1600/33°
1600/33°
- 64/19° - 2000/34°
Not For Resale – Free Download at http://www.joe-chan.com/manuals
- 80/20° - 2500/35°
Film rewind and removal
100/21°
100/21° 3200/36°
3200/36°
- 125/22° - 4000/37°
When the last frame has been exposed, the
quick-wind lever can no longer be operated.
Before the film can be removed, it must be
wound back into the cartridge.
-
160/23°
- 5000/38°
6400/39° 6400/39°
1. Turn rewind lever (5) to "R".
2. Swing out the lever for the rewind crank.
3. Turn the lever clockwise (in the direction of
the arrow) until the film is freed from the
take-up spool; slight resistance will be felt
at this point.
11

Not For Resale – Free Download at http://www.joe-chan.com/manuals
4. Now open the base plate.
5. Open the camera back.
6. Remove the film cartridge.
When the film is not fixed to the cartridge core,
for example when bulk film is used, it may
become separated from the core if the
advance lever is operated forcefully after the
last frame has been exposed. In this case,
proceed as follows:
1. Remove the base plate of the camera in a
completely dark room.
2. Hold the camera with the base plate open
and facing downwards.
3. Slowly operate the quick-wind lever several
times until the film protrudes far enough to
be grasped and pulled out. If necessary,
gently hit the camera against the palm of
your hand.
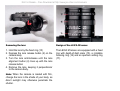
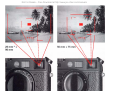
Fitting the lens to the camera
1. Hold the lens by the fixed ring (15).
2. Align the red lens alignment button (4) with
the lens release button (2) on the camera
body.
3. Fit the lens in this position, ensuring that it
is perpendicular to the front of the camera
4. Turn the lens slightly to the right to latch it
audibly and perceptibly into place.
12

Not For Resale – Free Download at http://www.joe-chan.com/manuals
Removing the lens
1. Hold the lens by the fixed ring (15)
2. Depress the lens release button (2) on the
camera body
3. Turn the lens anticlockwise until the lens
alignment button (4) lines up with the lens
release button
4. Remove the lens, keeping it perpendicular
to the camera body.
Note: When the camera is loaded with film,
change the lens in the shade of your body, as
direct sunlight may otherwise penetrate the
shutter.
Design of the LEICA M lenses
The LEICA M lenses are equipped with a fixed
ring with depth-of-field scale (15), a rotatable
focusing ring (16) and an aperture setting ring
(17).
13

Not For Resale – Free Download at http://www.joe-chan.com/manuals
Focusing ring
The focusing ring (16) shows the distance set
and, in conjunction with the scale (15), the
depth-of-field range. For details on focusing,
see the "Rangefinder" section on page 22.
Aperture ring (17)
The aperture values are standardised world-
wide. They are selected such that the amount
of light reaching the film is always halved when
the lens is stopped down between two
successive apertures (stops). One stop
corresponds to one value on the shutter speed
dial (10).
Like the shutter speed dial, the aperture ring
engages perceptibly at each full stop (and for
most lenses also at half-stops). With a little
practice, you will also be able to set the
apertures in the dark.
Like the shutter speed dial, the aperture ring
moves in the same direction as the exposure
meter displays in the viewfinder:
When the left triangular LED comes on, for
example, turning the dial in the direction of the
arrow, i.e. to the right, causes the slower
shutter speed required to be set.
For further details on setting the correct
exposure, see the "Exposure metering" section
on page 24.
14

Not For Resale – Free Download at http://www.joe-chan.com/manuals
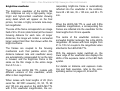
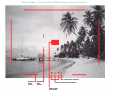
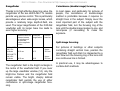
Depth-of-field scale
The plane which is rendered sharpest is the
plane, parallel to the film, upon which the lens
is focused. The optimum sharpness decreases
progressively in front of and behind this plane
such that a certain range exists within which
the image is, to the eye, rendered sharply.
This range is termed the depth of field. It is
dependent on the focus setting, the focal
length of the lens (the two values together
determine the reproduction scale) and the
aperture. Stopping down, i.e. selection of a
larger f-number, increases depth-of-field,
whilst widening the aperture, i.e. selection of a
smaller f-number, decreases it. The depth-of-
field scale in conjunction with the focusing ring
indicates the range of sharpness at the set
focus distance.
For example, using the LEICA SUMMILUX-M
f/1.4/50 mm lens focused at 5 metres, the
depth-of-field at f/4 ranges from approximately
4 to 8 metres. Stopping down to f/11 at the
same focusing distance, however, increases
the range to 3 - 20 metres.
15

Not For Resale – Free Download at http://www.joe-chan.com/manuals
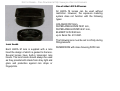
Lens hoods
Each LEICA M lens is supplied with a lens
hood the design of which is geared to the lens.
Several lenses have built-in telescopic lens
hoods. The lens hoods should always be used
as they provide both shade from stray light and
glare and protection against rain drops or
fingerprints.
Use of older LEICA M lenses
All LEICA M lenses can be used without
restriction. However, the exposure metering
system does not function with the following
types:
HOLOGON f/8/15mm,
SUPER-ANGULON-M f/4/21 mm,
SUPER-ANGULON Mf/3.4/21 mm,
ELMARIT-M f/2.8/28 mm
up to Serial No. 231 4921.
The following lens must be set to infinity during
fitting/removal:
SUMMICRON with close focusing f/2/50 mm
16

Not For Resale – Free Download at http://www.joe-chan.com/manuals
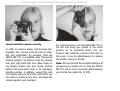
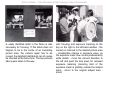
How to hold the camera correctly
In order to achieve sharp, well-focused pho-
tographs, the camera must be held as stea-
dily and comfortably as possible. Hold the
LEICA M6 TTL in a suitable, safe "three-point
holding position" as follows: hold the camera
with your right hand with your index finger on
the release button and your thumb pushed
behind the quick-wind lever in its operating,
standby position. In addition, support the lens
from below with your left hand, with which you
can refocus quickly at any time, and press the
camera against your forehead.
For vertical pictures, turn the LEICA M6 TTL to
the left and keep your hands in the same
position as for horizontal shots. You can
however also rotate the camera to the right. In
this case, it may be advantageous to release
the shutter using your thumb.
Note: We recommend the practical handgrip M
(accessory) to enable you to hold the LEICA
M6 TTL and to carry it securely whilst keeping
your hands free (order No. 14 405).
17
Page is loading ...
Page is loading ...
Page is loading ...
Page is loading ...
Page is loading ...
Page is loading ...
Page is loading ...
Page is loading ...
Page is loading ...
Page is loading ...
Page is loading ...
Page is loading ...
Page is loading ...
Page is loading ...
Page is loading ...
Page is loading ...
Page is loading ...
Page is loading ...
Page is loading ...
Page is loading ...
Page is loading ...
Page is loading ...
Page is loading ...
Page is loading ...
Page is loading ...
Page is loading ...
Page is loading ...
Page is loading ...
Page is loading ...
Page is loading ...
Page is loading ...
Page is loading ...
Page is loading ...
Page is loading ...
-
 1
1
-
 2
2
-
 3
3
-
 4
4
-
 5
5
-
 6
6
-
 7
7
-
 8
8
-
 9
9
-
 10
10
-
 11
11
-
 12
12
-
 13
13
-
 14
14
-
 15
15
-
 16
16
-
 17
17
-
 18
18
-
 19
19
-
 20
20
-
 21
21
-
 22
22
-
 23
23
-
 24
24
-
 25
25
-
 26
26
-
 27
27
-
 28
28
-
 29
29
-
 30
30
-
 31
31
-
 32
32
-
 33
33
-
 34
34
-
 35
35
-
 36
36
-
 37
37
-
 38
38
-
 39
39
-
 40
40
-
 41
41
-
 42
42
-
 43
43
-
 44
44
-
 45
45
-
 46
46
-
 47
47
-
 48
48
-
 49
49
-
 50
50
-
 51
51
-
 52
52
-
 53
53
-
 54
54


Leica M6-TTL Owner's manual
- Category
- Camera flashes
- Type
- Owner's manual
- This manual is also suitable for
Ask a question and I''ll find the answer in the document
Finding information in a document is now easier with AI
Related papers
Other documents
-
Canon F-1 User manual
-
Hasselblad XPan II User manual
-
Canon E-F User manual
-
Zeiss Ikon Contax IIa Color Dial User guide
-
Minox 110S User manual
-
VOIGTLANDER PROMINENT II User guide
-
Vivitar Automatic Fixed Mount Lens 55mm f2.8 Macro User manual
-
Polaroid 600 SE User guide
-
-
 FED stereo Operating instructions
