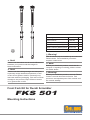
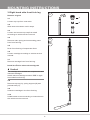
Ohlins FKS501 Mounting Instruction
- Category
- Car kits
- Type
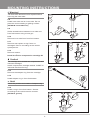
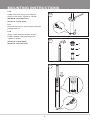
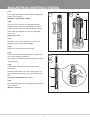
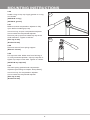
- Mounting Instruction
Ohlins FKS501 is a high-performance front fork kit designed to enhance the handling and stability of your Ducati Scrambler. This kit includes a pair of precision-engineered front forks that feature adjustable compression and rebound damping, allowing you to fine-tune the suspension to suit your riding style and road conditions. Constructed from lightweight and durable materials, the Ohlins FKS501 front fork kit is engineered to provide optimal performance and longevity.
Ohlins FKS501 is a high-performance front fork kit designed to enhance the handling and stability of your Ducati Scrambler. This kit includes a pair of precision-engineered front forks that feature adjustable compression and rebound damping, allowing you to fine-tune the suspension to suit your riding style and road conditions. Constructed from lightweight and durable materials, the Ohlins FKS501 front fork kit is engineered to provide optimal performance and longevity.


-
 1
1
-
 2
2
-
 3
3
-
 4
4
-
 5
5
-
 6
6
-
 7
7
-
 8
8
-
 9
9
-
 10
10
-
 11
11
-
 12
12


Ohlins FKS501 Mounting Instruction
- Category
- Car kits
- Type
- Mounting Instruction
Ohlins FKS501 is a high-performance front fork kit designed to enhance the handling and stability of your Ducati Scrambler. This kit includes a pair of precision-engineered front forks that feature adjustable compression and rebound damping, allowing you to fine-tune the suspension to suit your riding style and road conditions. Constructed from lightweight and durable materials, the Ohlins FKS501 front fork kit is engineered to provide optimal performance and longevity.
Ask a question and I''ll find the answer in the document
Finding information in a document is now easier with AI
Related papers
-
Ohlins FKS504 Mounting Instruction
-
-
-
-
-
-
-
-