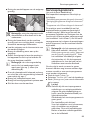
Siemens CT636LES1 User manual
- Category
- Coffee makers
- Type
- User manual
This manual is also suitable for

de Gebrauchsanleitung
en Instruction manual
fr Mode d’emploi
nl Gebruiksaanwijzing
The future moving in.
Siemens Home Appliances
Register your product on My Siemens
and discover exclusive services and offers.
siemens-home.bsh-group.com/welcome
CT636LE.1
Fully automatic coffee machine
Page is loading ...
Page is loading ...
Page is loading ...
Page is loading ...
Page is loading ...
Page is loading ...
Page is loading ...
Page is loading ...
Page is loading ...
Page is loading ...
Page is loading ...
Page is loading ...
Page is loading ...
Page is loading ...
Page is loading ...
Page is loading ...
Page is loading ...
Page is loading ...
Page is loading ...
Page is loading ...
Page is loading ...
Page is loading ...
Page is loading ...
Page is loading ...
Page is loading ...
Page is loading ...
Page is loading ...
Page is loading ...
Page is loading ...
Page is loading ...
Page is loading ...

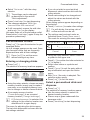
29
en
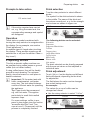
Contents
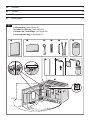
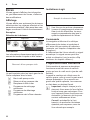
Included in delivery
(for use)
(Figure A on the fold-out pages)
a Fully automatic coee machine
b Instruction manual
c Quick reference guide
d Measuring spoon
e Water hardness testing strip
f Milk tube (set)
g Milk container
h Suction pipe
Contents
Included in delivery (for use) ��������������������29
Congratulations��� �������������������������������������29
Intended use ��������������������������������������������� 30
Important safety information ���������������������30
Overview���������������������������������������������������32
Controls ����������������������������������������������������32
Initial use ��������������������������������������������������33
Display ������������������������������������������������������ 34
Preparing drinks ���������������������������������������35
Preparation using coee beans ���������������� 37
Preparation using milk ������������������������������37
Preparation using ground coee ��������������38
Dispensing hot water ��������������������������������38
Personalised drinks ����������������������������������39
Two cups at once��������������������������������������40
Adjusting the grind setting ������������������������40
Childproof lock ������������������������������������������ 40
Menu���������������������������������������������������������40
Care and daily cleaning ����������������������������42
Service programmes ��������������������������������46
Tips on energy saving ������������������������������48
Frost protection�����������������������������������������48
Storing accessories ����������������������������������48
Accessories ����������������������������������������������49
Disposal ���������������������������������������������������� 49
Guarantee�������������������������������������������������49
Simple troubleshooting �����������������������������50
Technical specications ���������������������������� 53
Congratulations...
��� on purchasing this fully automatic
coee machine! You have now acquired a
high-quality and modern kitchen appliance�
It combines innovative technology with a
range of functions and is easy to use� It will
enable you to prepare a variety of delicious
hot drinks quickly and simply – whether
you’re in the mood for an invigorating
espresso, a creamy cappuccino, a smooth
latte macchiato or white coee, or a tradi-
tional cup of coee. At the same time the
appliance oers you a wide range of options
for adapting it to your individual taste�
To ensure that you can use this fully auto-
matic coee machine with all its functions
and features reliably and safely, we would
like you to familiarize yourself with its com-
ponents, functions, displays and controls�
These instructions are designed to help
you� So please take the time to read them
before you switch on the appliance�
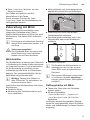
How to use these instructions
You can open up the front cover of this
instruction manual. There you will nd
illustrations of the appliance with each part
numbered� These numbers will be referred
to throughout the text�
Example: brewing unit (15)
These instructions also show display texts
and symbols in a special way� These enable
you to clearly see where we refer to texts
or symbols that are marked or displayed on
the appliance�
Display indicators:
“Espresso”
Buttons and controls on the display:
C
The appliance comes with a quick reference
guide where you can nd the most impor-
tant functions at a glance� It can be stored
in the accessory drawer of the appliance�

30
en Intended use
W Warning
Risk of electric shock!
■ The appliance may only be
connected to a power supply
with alternating current via
a correctly installed socket
with earthing� Ensure that the
protective conductor system
of the domestic supply has
been correctly installed�
■ Connect and operate the
appliance only in accordance
with the speci cations on the
rating plate�
■ Do not use the appliance
if the power cord and/or
appliance are damaged�
■ Only our customer service
may repair the appliance,
e�g� by replacing a damaged
power cord, in order to avoid
hazards�
■ If the supply cord is
damaged, it must be
replaced by a special cord or
assembly available from the
manufacturer or its service
agent�
■ Never immerse the appliance
or mains cord in water�
■ If there is a fault, pull out the
mains plug immediately or
switch o the power supply.
■ Avoid spillage on the
connector�
■ Please note the special
information on cleaning in the
instructions�
Intended use
Check the appliance after
unpacking it� Do not connect the
appliance if it has been damaged
in transit�
This appliance is intended for
domestic use only�
Only use the appliance indoors
at room temperature and up to
2000 m above sea level�
Important safety information
Please read and follow
the operating instructions
carefully and keep them for
later reference! Enclose these
instructions when you give this
appliance to someone else�
This appliance can be used
by children aged from 8 years
and above and by persons
with reduced physical,
sensory or mental capabilities
or lack of experience and
knowledge if they have
been given supervision or
instruction concerning use of
the appliance in a safe way and
if they understand the hazards
involved� Keep children under
8 years of age away from the
appliance and connecting cable
and do not allow them to use
the appliance� Children shall not
play with the appliance� Cleaning
and user maintenance shall
not be made by children unless
they are older than 8 years and
supervised�
Intended use
Important safety information

31
en
Intended use
W Warning
Hazard due to magnetism!
The appliance contains
permanent magnets which can
a ect electronic implants such
as pacemakers or insulin pumps�
Persons wearing electronic
implants must maintain a
minimum distance of 10 cm
from the appliance and from the
following parts upon removal:
milk container, milk system,
water tank and brewing unit�
W Warning
Risk of su ocation!
■ Do not allow children to play
with packaging material�
■ Store small parts safely as
they can be easily swallowed�
W Warning
Risk of injury!
■ Do not reach into the grinding
unit!
■ Be careful not to jam your
ngers when closing the door.
■ A misuse of the appliance can
potentially lead to injury�
W Warning
Risk of burns!
■ The beverage outlet gets very
hot� After use, always let it
cool down before you touch it�
■ After the use the heating
element surfaces can be
subjected to residual heat�
■ Freshly prepared beverages
are very hot� Leave to cool a
little if necessary�
W Warning
Risk of re!
■ The appliance gets hot�
■ Never operate the appliance
with the cupboard door
closed�
■ The cupboard door must be
open during operation�

32
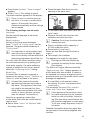
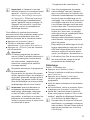
en Overview
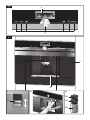
Overview
(Figures B to E on the fold-out pages)
1 Appliance door
a Recessed grip (for opening the door)
b Drip plate
2 Display
3 Controls
4 Outlet system (coee, milk,
hot water), height-adjustable
a Cover
5 Milk system
a Snap lever
b Beverage outlet (upper part,
lower part)
c Milk tube (2 pieces)
d Connecting element, metal
(for magnet holder)
6 Mains switch J (power supply)
7 Accessory drawer
(for quick reference guide and
accessories)
a Quick reference guide
b Measuring spoon
c Water hardness strip
d Milk tube (set)
8 Removable water tank
a Lid for water tank
9 Removable bean container
a Lid for bean container
10 Slide regulator for
grinding degree setting
11 Magnet holder
(for connecting element)
12 Removable drawer
(for ground coee/cleaning tablet)
13 Holder (for milk tube)
14 Protective cover (for brewing unit)
15 Brewing unit
a Locking mechanism
b Cover
16 Eject lever
17 Removable drip tray
a Drip tray cover
b Coee grounds container
18 Collecting tray
19 Holder
a Suction pipe
20 Rating plate (E number, FD)
21 Storage shelf with sensor
(for milk container)
22 Milk container
a Stainless steel container
b Lower part of the lid
c Upper part of the lid
F
Further information about the appli-
ance, such as how to change the
opening angle of the door, can be
found in the assembly instructions�
Controls
The appliance features user-friendly menu
navigation to ensure that operation is as
easy as possible while at the same time
oering a wide range of functions. That
means a range of options can be selected
with just a few operating steps�
Mains switch J
Use the mains switch J (to do so open
the door) to switch on the appliance, or to
switch it o fully (power supply o).
F
Important: Do not press the mains
switch while the appliance is in use�
Switch off the appliance only when
it is in energy saving mode, so that it
can rinse automatically�
Button I
Press button I to switch on the
appliance or change it to energy saving
mode� The appliance is rinsed automatically�
The appliance does not rinse if:
– if it is still warm when switched on, or
– if no coee was dispensed before it was
switched o.
The appliance is ready for use as soon as
the symbols for the drinks selection appear
on the display�
Button A
Press button A to open the menu�
Settings can be made and information
called up (see the section “Menu”)�

33
en
Initial use
Button E
Press button E to open the selection
of service programmes. Run the desired
programme as described in the section
“Service programmes”�
Button B
Press button B to open the selection
of “Personalised beverage preparation”�
Personal settings for coee drinks can
be saved and called up (see the section
“ Personalised drinks”)�
Button G
Press button G after selecting a drink to
prepare two cups simultaneously (see the
section “Two cups at once”)�
F
Press A, E, B
or G again to exit the respective
menu�
Button C
Press C to either begin preparing
a drink or launch a service programme�
Press C again while the drink
is being prepared to prematurely halt
dispensing�
Rotary selector
Turn the rotary selector to navigate in the
display or to change parameters�
Display (Touchscreen)
Information is shown on the display, or
settings can be made by touching the
touchscreen (see the section “Display”)�
Initial use
General
Fill the appropriate container using only
pure, cold, uncarbonated water and solely
roasted beans. Do not use coee beans
that have been glazed, caramelised or
treated with other additives containing
sugar, since they will block the brewing unit�
A
Before the appliance can be switched
on and used, it must be assembled
and connected according to the
enclosed assembly instructions�
Setting up the appliance
■ Remove any protective plastic lm.
F
Important: Only use the appliance
in a frost-free room� If it has been
transported or stored at tempera-
tures below 0°C, wait at least 3 hours
before initial use�
■ Take hold of the appliance door by the
recessed grip and open�
■ Remove the water tank, rinse it and ll it
with fresh water up to the “max” mark�
■ Replace the water tank and click into
place�
■ Remove the bean container, ll with
coee beans and replace.
■ Set the mains switch to I and close the
appliance door�
The appliance heats up and is rinsed�
The display is activated�
“Select language” appears�
■ Turn the rotary selector to select the
desired language and touch [ Continue ]
in the display�
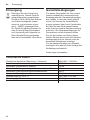
“Set water hardness” appears�
F
It is important to set the water hard-
ness correctly to enable the appli-
ance to accurately indicate when the
descaling programme should be run�
The preset water hardness is level 4�
If a water softener is installed in the
house, please set the water hard-
ness to level 3. You can also check
the water hardness by asking your
local water supplier�
■ Use the enclosed test strip to determine
the water hardness. Briey dip the test
strip in water and check the result after
one minute�
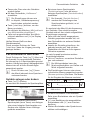
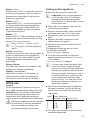
Level Water hardness
German (°dH) French (°fH)
1
2
3
4
1-7
8-14
15-21
22-30
1-13
14-25
26-38
39-54
■ Turn the rotary selector to set the water
hardness determined�

34
en Display
■ Touch [ Continue ]. “Complete set-up?”
appears�
■ Touch [ Apply ]. The settings are saved�
The appliance is ready to use when the
drink symbols are shown on the display�
The integrated fan switches on each time
a drink is dispensed and switches o again
after a few minutes�
When the appliance is used for the rst time
after running a service program, or if it has
not been operated for a long period, the rst
beverage will not have the full aroma and
should not be consumed�
When the fully automatic coee machine
is rst used, a suitably thick and stable
“crema” is only achieved after the rst few
cups have been dispensed�
Switch o appliance
■ Press the I button�
The appliance rinses and switches to
energy saving mode�
Exception: If only hot water is dispensed,
the appliance switches o without rinsing.
■ To switch the appliance o completely,
open the appliance door and set the
mains switch to h�
F
Important: Do not press the mains
switch while the appliance is in use�
Switch off the appliance only when
it is in energy saving mode, so it can
rinse automatically�
The factory settings of the fully
automatic coffee machine are pro-
grammed for optimal performance�
The appliances switches automat-
ically to the energy saving mode
after a congured time and rinses
(duration can be set, see “Switch o
after” in the section “Menu”)�
The appliance is equipped with a
sensor� If there is a milk container,
this will be correspondingly shown
on the display when switching to the
energy saving mode� If there is milk
in the container, please keep in the
fridge�
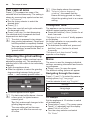
Display
Information is shown on the display, or
settings can be made by touching the
touchscreen�
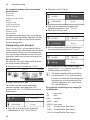
Display
The display shows the selected drinks,
settings and setting options, as well as mes-
sages about the appliance’s operating status�
Examples:
Drink selection
Espresso 40 mlYYY
Adjust
Information
Information disappears after pressing the
button or after a short time�
Water tank almost empty
Instead of text, a small symbol appears in
the lower left area of the display�
a
Bean container almost empty
b
Water tank almost empty
c
Change water lter
d
Cleaning programme required
e
Descaling programme required
f
calc’nClean programme required

35
en
Preparing drinks
Prompts to take action
Fill water tank
F
If the action required was carried
out, e�g� filling the water tank, the
corresponding message and symbol
will disappear�
Operation
Touch texts or symbols combined with
turning the rotary selector to navigate within
the display (for an example, see section
“Drink adjustment”)�
An audible signal is heard when touching
the display� These audible signals can be
switched on or o (see the section “Menu –
Key tones”)�
Preparing drinks
This fully automatic coee machine can
be operated using coee beans or ground
coee (but not instant coee).
If using coee beans, they will be freshly
ground for each brewing� For optimum
quality, store the beans in a cool place in
sealed containers�
F
Important: Fill the water tank with
fresh, uncarbonated, cold water
every day� The tank should always
contain sufficient water for operating
the appliance�
Tip: Cups should be prewarmed,
e�g� with hot water� This applies
particularly to small thick-walled
espresso cups�
For some settings, coffee is pre-
pared in two stages (see the section
“aromaDouble Shot” and “Two
cups at once”)� Please wait until the
process is completely finished�
Drink selection
Turn the rotary selector to select dierent
drinks:
The symbol for the drink selected is shown
in the middle� The name of the drink and
the values currently set, e�g� for the strength
and volume are shown in upper row�
Espresso 40 ml
YYY
Adjust
The following drinks can be selected:
Ristretto
Espresso
Espresso Macchiato
Coffee
Cappuccino
Latte Macchiato
Caffe Latte
Milk froth
Warm milk
Hot water
The drink selected can be directly prepared
with the preset values or rst adjusted to
individual taste�
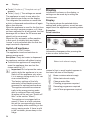
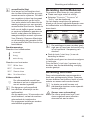
Drink adjustment
Touch [ Adjust ] on the display and dierent
elds will appear, depending on the drink,
for adjustment�
The eld where the value can be changed
has a dark background�
An example:
The values for a cup of coee can be
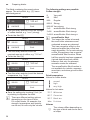
changed as follows:
■ Use the rotary selector to select “Coffee”�
Coffee 120 ml
Adjust
YY
■ Touch [ Adjust ]�

36
en Preparing drinks
The elds containing the preset values
appear. The active eld, e.g. H has a
dark background�
Coffee
120 ml
normal
Back
YY
Y
S
O
■ Turn the rotary selector to set the strength
of coee desired, e.g. “YYYY” (strong)�
■ Touch the eld F
Coffee
120 ml
normal
Back
YYYY
Y
S
O
■ Turn the rotary selector to set the
required amount of coee, e.g. “160 ml”�
■ Touch the eld D�
Coffee
160 ml
normal
Back
YYYY
Y
S
O
■ Turn the rotary selector to set the desired
temperature, e�g� “high”�
Coffee
160 ml
high
Back
YYYY
Y
S
P
■ Save the settings by touching [ Back ] or
by starting to dispense the drink�
F
There are different setting options
depending on the type of drink�
For coffee drinks, for example, the
strength, temperature and quantity
can be set, for milk only the volume�
The following settings are possible:
Coee strength
Y Very mild
YY Mild
YYY Regular
YYYY Strong
YYYYY Very strong
XY aromaDouble Shot strong
XYY aromaDouble Shot strong+
XYYY aromaDouble Shot strong++
F
aromaDouble Shot
The longer the coffee is brewed,
the more bitter substances and
undesired aromas are released�
This has a negative effect on the
taste and makes the coffee less
easily digestible� So for extra strong
coffee, the appliance has a special
aromaDouble Shot function� When
half the quantity has been prepared,
it grinds and brews fresh coee
beans so that only the pleasant,
aromatic scents are released�
The aromaDouble Shot function is
not available for ristretto, espresso
macchiato, and when ground coffee
is used�
Drink temperature
Values for coee drinks:
O
normal
P
high
Q
very high
Values for hot water:
70° C White tea
80° C Green tea
90° C Black tea
Max Fruit tea
Volume
S
The volume diers depending on
the type of drink and can be set in
ml steps�

37
en
Preparation using coee beans
F
The volume dispensed can fluctuate
depending on the quality of the milk�
If no controls are activated for
approx� 30 seconds, the appliance
will automatically exit the settings
mode� The settings made will be
automatically stored�
Preparation using
coee beans
The appliance must be ready for use�
■ Place a cup underneath the beverage
outlet�
■ Use the rotary selector to select
“ Ristretto”, “Espresso” or “Coffee”�
The display shows the selected drink along
with the preset values for the strength of the
coee and the amount for this drink.
Coffee 160 ml
Adjust
YYYY
F
The settings can be changed
as described in the section
“Drink adjustment”�
■ Press C to start dispensing�
The coee is brewed and then dispensed
into the cup�
Press button C again to stop
dispensing prematurely�
Preparation using milk
This fully automatic coee machine has
an integrated beverage outlet� This can be
used to prepare coee drinks with milk or
also milk froth and warm milk�
F
It is also possible to use plant-based
alternatives to milk, e�g� soya milk�
B
Risk of burns!
The beverage outlet gets very hot�
After use, always let it cool down
before you touch it�
Milk container
The milk container has been designed
especially for use together with this fully
automatic coee machine. It is intended
solely for use in the household and for
storing milk in the refrigerator� The insulated
container keeps milk cool for a number of
hours�
F
Important: Remove cups or glasses
before opening the door in case they
fall�
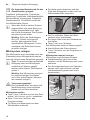
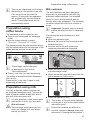
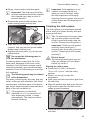
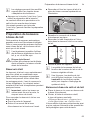
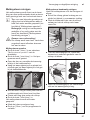
Connecting the milk container or a milk
carton:
■ Open the appliance door�
■ Remove the cover of the beverage outlet
towards the front�
■ Connect and x the milk tubes and
connecting elements as illustrated�
■ Attach the cover rmly from the front on
to the beverage outlet�
■ Attach the suction pipe and insert into the
milk container or a milk carton�
■ Close the appliance door�
F
The quality of the milk froth depends
on the type of milk or the plant-based
alternative used�
F
Dried milk residues are difficult to
remove, therefore always clean (see
the section “Cleaning the milk system”)�

38
en Preparation using ground coee
Coee drinks with milk
■ Place a cup or glass underneath the
beverage outlet�
■ Select “Espresso Macchiato”,
“ Cappuccino”, “Latte Macchiato” or
“Caffe Latte” with the rotary selector�
The display shows the selected drink along
with the preset values for the strength of the
coee and the amount for this drink.
F
The settings can be changed
as described in the section
“Drink adjustment”�
■ Press C to start dispensing�
The milk is dispensed into the cup or glass
rst. Then the coee is brewed and runs
into the cup or glass�
Press button C again to stop the
current step of the process prematurely�
Milk froth or warm milk
■ Place a cup or glass underneath the
beverage outlet�
■ Select “Milk froth” or “Warm milk” with
the rotary selector�
F
The settings can be changed
as described in the section
“Drink adjustment”�
■ Press C to start dispensing�
Milk froth or warm milk is dispensed from
the beverage outlet�
Press button C again to stop the
current step of the process prematurely�
Preparation using
ground coee
F
When using ground coffee, the
setting for the strength of the coffee
and dispensing two cups at once is
not available�
Important: Remove cups or glasses
before opening the door in case
they fall�
The appliance must be ready for use�
■ Open the appliance door�
■ Remove the ground coee drawer. The
removable drawer must be dry�
■ Put in coee powder (maximum 2 level
measuring spoons); do not press rmly.
F
Caution!
Do not use whole beans or instant
coee.
■ Replace the ground coee drawer.
■ Close the appliance door, U will appear
on the display�
F
If coffee is not dispensed within
90 seconds, the brewing chamber
empties automatically to avoid an
overflow� The appliance is then rinsed�
■ Place a cup underneath the beverage
outlet�
■ Using the rotary selector, select a coee
drink or a coee drink with milk.
The display shows the selected drink along
with the preset values for this drink�
F
The settings can be changed
as described in the section
“Drink adjustment”�
For coffee drinks with milk, please
observe the instructions in the
section “Preparation using milk”�
■ Press C to start dispensing�
The coee is brewed and then dispensed
into the cup. When selecting coee drinks
with milk, the milk is rst dispensed and
then the coee brewed.
F
For another drink with ground coffee,
repeat the procedure�
Dispensing hot water
B
Risk of burns!
The beverage outlet gets very hot�
After use, always let it cool down
before you touch it�
The appliance must be ready for use�
■ Remove the milk tube from the milk
container�
■ Remove any milk or coee residue from
the outlet�
■ Place a cup or glass underneath the
beverage outlet�

39
en
Personalised drinks
■ Select “Hot water” with the rotary
selector�
F
The settings can be changed
as described in the section
“Drink adjustment”�
■ Press C to start dispensing�
■ The message appears “Milk tube
removed from milk container?”�
■ If still connected, remove the milk tube
and touch [ Yes ] on the display�
Hot water ows out of the beverage outlet.
Press button C again to stop the
procedure prematurely�
Personalised drinks
Press B to open the selection for per-
sonalised drinks�
Up to 8 storage spaces can be used� Save
your favourite drinks that are frequently
dispensed here with all their settings�
F
Press B to exit the menu
without saving at any time�
Entering or changing drinks
■ Press B�
The selection of memory locations appears�
myCoffee 1
Create beverage
■ Using the rotary selector, choose an empty
memory location (empty cup) to make a
new entry, or an occupied memory loca-
tion to change or delete a favourite drink�
■ At an empty memory location
[ Create beverage ] or an occupied
memory location [ Change beverage ]�
F
If [ Delete beverage ] is selected, the
settings for the memory location are
deleted and it is again empty�
The menu for adjusting the drinks opens�
The last drink dispensed is shown with the
last settings selected�
■ If you do not wish to save last drink
dispensed, select another drink with the
rotary selector�
■ Touch each setting to be changed and
adjust the values as desired with the
rotary selector�
Other setting options appear depending on
the selection�
■ Touch [ Continue ] to make other settings�
F
For milk drinks, the mixing ratio of
coffee and milk can be set�
■ The settings can be stored under an
individual name� Touch [ Save name ].
The mask for entering the name opens�
3456789´_<ABCDEFGHIJK
A_________
SaveCancel
■ Using the rotary selector, select a letter or
a symbol in the upper row�
■ Touch g to conrm the letter selected or
K to delete it�
■ Select other letters or symbols and
conrm.
■ Touch [ Cancel ] to exit the entry without
any modication and open the drinks
menu�
■ With [ Save ] the entry is adopted� The
selection menu opens�
■ Press B to exit the menu�
Select a personalised drink and
dispense
■ Press B�
The selection of memory locations opens�
■ Use the rotary selector to select the
desired memory location�
■ Place a cup or glass underneath the
beverage outlet�
■ Press C to start dispensing�

40
en Two cups at once
Two cups at once
Press G to prepare two cups of the
selected drink simultaneously� The setting is
shown by a second cup symbol and as text,
e�g� “2 x Espresso”�
■ Use the rotary selector to select the
desired drink�
■ Press G�
■ Place two cups left and right underneath
the beverage outlet�
■ Press C to start dispensing�
The selected drink is prepared and then
dispensed into both cups�
F
The drink is prepared in two stages
(two grinding operations)� Please wait
until the process is completely finished�
Two cups at once cannot be dispensed
for the settings “aromaDouble Shot” or
“ground coffee”�
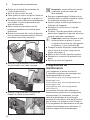
Adjusting the grind setting
This fully automatic coee machine has an
adjustable grinding unit� This enables the
grinding level of the coee to be individually
changed�
■ Open the appliance door�
■ Slide the regulator to select the grinding
degree setting between nely ground
coee V and coarsely ground coee W�
■ Close the appliance door again�
F
For dark roast coffee beans, choose
a finer grind, for lighter beans a
coarser grind�
Tip: Only make small changes to the
grinding degree setting�
The new setting will not become
apparent until after the second cup
of coffee�
F
If the display shows the message
“Select a coarser degree of
grinding”, this means that the
beans are being ground too finely�
Adjust the grinding level to a coarser
setting�
Childproof lock
The appliance can be locked to protect
children against scalding and burns�
■ Press and hold the A button for at
least 4 seconds�
“Childproof lock activated” briey appears
on the display�
No further operation is now possible; only
I can be pressed�
■ To deactivate the child lock, press and
hold the A button for at least
4 seconds�
“Childproof lock deactivated” briey
appears on the display�
Menu
The menu is used for changing individual
settings, accessing information and launch-
ing processes�
■ Press A to open the menu�
The dierent setting options will appear.
Navigating through the menu:
Press K and L to select the various
setting options, e�g� “Language”�
Turn the selector to set, e�g� “English”.
Settings
Language
English
1/12
For example:
Set the appliance at 15 minutes to switch
o automatically:
■ Press button A� The menu opens�
■ Touch L repeatedly until the display
shows “Switch off after”.
■ Turn the rotary selector and select
“0h 15min”.

41
en
Menu
■ Press button A� “Save changes?”
appears�
■ Touch [ Save ]� The setting is saved�
The drink selection appears on the display�
F
Press A to exit the menu at
any time� If no entry is made within
approx� 30 seconds, the menu
closes automatically and the settings
are not saved�
The following settings can be made:
Language
Set the desired language to show the
display texts�
Water hardness
Set this to the local water hardness�
Level “1 (soft)” to “4 (very hard)” can be
selected� The preset water hardness is
“4 (very hard)”�
F
It is important to set the water hard-
ness correctly to enable the appli-
ance to accurately indicate when the
descaling programme should be run�
You can check the water hardness using
the enclosed test strip or by asking your
local water supplier� If a water softening
system is installed in the house, please
select the “Softening device” setting�
Water filter
If a water lter is inserted, renewed or
removed, the setting “Insert”, “Replace” or
“Remove” must be made in the menu�
F
A water filter lessens limescale
deposits and reduces impurities in
the water� The appliance also does
not need to be descaled so often�
Water lters are available from retail
outlets or from customer services
(see the section “Accessories”)�
Inserting or renewing a water lter:
A new water lter must be rinsed before it
can be used�
■ Select either “Insert” or “Replace” with
the rotary selector�
■ Press the water lter rmly into the
opening of the water tank�
■ Fill the water tank with water up to the
“max” mark�
■ Remove the milk tube from the milk
container and close the door�
F
Caution: Do not jam the tube when
closing the door�
■ Place a container with a capacity of
0�5 litre under the outlet �
■ Press button C�
Water will now ow through the lter to
rinse it�
■ Then empty the container�
The appliance is ready for use again�
F
Rinsing the filter simultaneously
activates the setting for the change
filter display�
The lter is no longer eective when the
“Replace water filter” display appears, or
at the latest after two months� It needs to
be replaced for reasons of hygiene and to
prevent a build-up of limescale (which could
damage the appliance)�
■ If a new lter is not inserted, select
the setting “Remove” and press button
C�
The message “Remove filter, reinsert
water tank, close door” appears�
F
If the appliance has not been used
for a prolonged period (for example,
while you are on holiday), the exist-
ing filter should be rinsed before the
first time the appliance is used again�
To do this, simply dispense a cup of
hot water�
Detailed information about the water lter
can be found in the manual supplied with
the lter.

42
en Care and daily cleaning
Switch off after
To set how long the appliance should wait
after the last drink was prepared before it
automatically rinses and switches itself o.
You can specify values from 15 minutes to
8 hours� The factory setting is 30 minutes�
Illumination
Setting the illumination of the beverage
outlet� “On”, “When in use” or “Off” can be
selected�
Brightness illumination
Setting the illumination lightness of the
beverage outlet� “Level 1” to “Level 10” can
be selected�
Brightness display
Setting the illumination lightness of display�
Key tones
Switch the signal tones on or o.
Clock display
Display option for time and date “Off” or
“Digital” (on)� The settings for this can be
changed in the next menu options�
F
If the appliance is switched off at the
mains or there is a power failure, the
settings for the time and date will be
lost�
Clock
Setting for the current time�
Date-day
Setting for the current day�
Date-month
Setting for the current month�
Date-year
Setting for the current year�
Frost protection
Service programme to prevent frost damage
during transportation and storage�
This programme completely empties the
appliance�
■ Touch [ Start ] to begin running the
programme�
■ Empty the water tank and reinsert�
■ If available remove the milk container and
close the door�
The appliance automatically empties all its
pipes�
■ Empty the drip tray and re-insert�
Beverage info
Display shows how many drinks have been
prepared since its initial use�
■ Touch [ Display ] to show the information�
Factory settings
Resets your own settings to the condition
when delivered�
■ Select “Reset” with the rotary selector�
The message “Are you sure?” appears.
■ Touch [ Reset ] or [ Cancel ] to either
conrm or interrupt.
Care and daily cleaning
E
Risk of electric shock!
Never immerse the appliance in
water� Do not steam-clean the
appliance�
■ Wipe the outside of the appliance with a
soft, damp cloth�
■ Clean the display using a micro bre
cloth�
■ Do not use any cleaning agents
containing alcohol or spirits�
■ Do not use abrasive cloths or cleaning
agents�
■ Always remove any limescale, residues
of coee or milk, cleaning or descaling
solution immediately� It is possible for cor-
rosion to form underneath such deposits�
F
New sponge cloths may contain
salts� Salts can cause rust film on
stainless steel and must therefore be
washed out thoroughly before use�
■ Open the door and pull the drip tray out
forwards�
■ Remove drip tray cover and coee
grounds container�

43
en
Care and daily cleaning
■ Empty, clean and dry individual parts�
F
Important: The drip tray and coffee
grounds container should be emptied
and cleaned every day in order to
prevent deposits�
■ Remove the ground coee drawer, clean
under running water and dry well�
■ Wipe and dry the inside of the appliance
(support, drip tray and the ground coee
drawer) and collecting tray�
■ Replace the dried parts, e.g. the ground
coee drawer.
L
Do not put the following parts in
the dishwasher:
Accessory drawer, water tank, lid of the
water tank, beverage outlet cover, bean
container, lid of the bean container, metal
connecting element, ground coee drawer,
protective cover of the brewing unit and the
milk container�
M
The following parts may be cleaned
in the dishwasher:
Drip plate, collecting tray, drip tray, drip tray
cover, coee grounds container, milk tubes,
suction pipes, individual parts of the bever-
age outlet, measuring spoon and individual
parts of the milk container lid�
F
If the appliance is cold when
switched on, or if it is switched off
after dispensing coffee, it rinses
automatically� The system is there-
fore self-cleaning�
F
Important: If the appliance is not
used for a lengthy period (e�g�
while you are on holiday), clean
the entire appliance thoroughly,
including the milk system, the ground
coffee drawer and the brewing unit
before use�
Cleaning the milk system
The milk system is automatically cleaned
with a short jet of steam directly after pre-
paring a milk drink�
F
Tip: For particularly thorough clean-
ing, the milk system can be addi-
tionally rinsed with water (see the
section “Rinsing the milk system”).
Important: Clean the milk system
manually every week and, if
required, also more often (see the
section “Cleaning the milk system
manually”)�
B
Risk of burns!
The beverage outlet gets very hot�
After use, always let it cool down
before you touch it�
Rinsing the milk system
■ Press button E and select
“Rinse milk system” with the rotary
selector�
■ Press C to start the
programme�
■ Open door and remove suction pipe from
the milk tube�
■ Wipe the suction pipe and insert the end
of the suction pipe into the hole on the
coee grounds container.
■ Close the door� Be careful not to jam the
milk tube�

44
en Care and daily cleaning
■ Place an empty glass underneath the
beverage outlet�
■ Press button C�
The milk system is rinsed with water�
■ Then empty the glass�
■ Press E to exit the program�
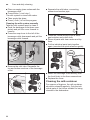
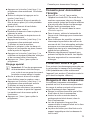
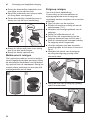
Cleaning the milk system manually
Take the milk system apart to clean it:
■ Push the beverage outlet down com-
pletely and pull the cover forward to
remove�
■ Press the snap lever to the left of the
beverage outlet downwards and pull the
beverage outlet forward�
■ Remove the milk tube. Dismantle the
top and bottom sections of the beverage
outlet�
■ Separate the milk tubes, connecting
element and suction pipe�
■ Clean the individual parts with a deter-
gent solution and a soft cloth�
■ Rinse all parts with clean water and dry
them�
■ Put the individual parts back together
again (see also the quick reference guide)�
■ Attach the beverage outlet directly from
the front rmly to the three connections.
■ Replace the cover.
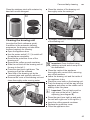
Cleaning the milk container
For reasons of hygiene, the milk container
should be cleaned regularly� Only the indi-
vidual parts of the lid are suitable for being
cleaned in the dishwasher�

45
en
Care and daily cleaning
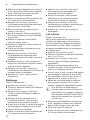
Clean the stainless steel milk container by
hand with a mild detergent�
L M
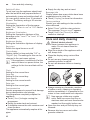
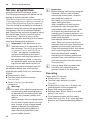
Cleaning the brewing unit
(see also the Quick reference guide)
In addition to the automatic cleaning
programme, the brewing unit should be
removed regularly for cleaning�
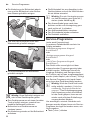
■ Open the appliance door�
■ Use the mains switch J to switch o
the appliance completely�
■ Remove the protective cover of the
brewing unit�
■ Remove the coee grounds container.
■ Slide the red latch on the brewing unit all
the way to the left j�
■ Press the eject lever right down� The
brewing unit will be released�
■ Take hold of the brewing unit by the
recessed grips and carefully remove it�
■ Remove the cover of the brewing unit and
clean thoroughly under running water�
■ Clean the strainer of the brewing unit
thoroughly under the water jet�
■ Thoroughly clean the connecting nozzles
of the brewing unit�
L
Important: Clean it without using
washing-up liquid and do not put it in
the dishwasher�
■ Clean the inside of the appliance
thoroughly with a moist cloth, removing
any coee residues.
■ Leave the brewing unit and the inside of
the appliance to dry�
■ Place the cover back on the brewing unit�
■ Push the brewing unit all the way into the
appliance and press on the middle until it
audibly clicks into place�
F
Important: The red latch must be
right over at the left at j before
replacing (see diagram E)�
■ Press the eject lever right up and push
the red latch right over to the right to k�
■ Insert the coee grounds container.
■ Replace the protective cover.
■ Close the appliance door�

46
en Service programmes
Service programmes
(see also the Quick reference guide)
The following messages will appear on the
display at certain intervals, either
“Descaling programme urgently required!” or
“Cleaning programme urgently required!” or
“calc’nClean programme urgently required!”�
The unit should immediately be cleaned or
descaled using the appropriate programme�
Alternatively, the two processes Descale
and Clean can be carried out together using
the calc’nClean function (see the section
“calc’nClean”)� Failure to carry out the
service programme according to the instruc-
tions may damage the appliance�
F
Important: If the appliance is not
descaled when it is supposed to be,
the message “Descaling programme
is overdue. Device will shortly be
locked.” will appear� Immediately
perform the descaling process in
accordance with the instructions� If
the appliance is locked, it can only
be operated again once the descal-
ing process has been carried out�
To display how many beverages can still
be prepared before one of the service
programmes needs to be run, proceed as
follows:
■ Press button E
■ Turn the rotary selector to select
“Service info”�
■ Touch [ Display ] to call up the
information�
A
Warning!
For each of the service programmes,
use descaling and cleaning agents
as described in the instructions and
observe the (relevant) safety infor-
mation�
Never interrupt a service programme�
Do not drink liquids! Never use citric
acid, vinegar or any vinegar-based
agents to descale the appliance�
Never place descaling tablets or
other descaling materials in the
ground coee drawer!
F
Important:
Before starting each service program
(Descale, Clean or calc’nClean)
remove the brewing unit, clean as
instructed and replace it�
Be careful not to jam the milk tube
when closing the door�
After completion of each service
programme, wipe the appliance
immediately with a soft, damp cloth
to remove any residues from the
descaling and cleaning solution� It is
possible for corrosion to form under-
neath such deposits�
New sponge cloths may contain
salts� Salts can cause rust film on
stainless steel and must therefore be
washed out thoroughly before use�
Clean the beverage outlet, milk tubes
and connecting piece thoroughly�
Specially developed, suitable
descaling and cleaning tablets are
available from retail outlets or from
customer services (see the section
“Accessories”)�
F
Using a water filter increases the
intervals until a descaling pro-
gramme needs to be performed�
Descaling
Takes about 21 minutes�
■ Press button E�
■ Turn the rotary selector to select
“Descale”�
■ Press button C� Display indi-
cates progress of the programme�
■ Empty drip trays and replace�
■ Remove water lter(if there is one) and
press C�
■ Pour lukewarm water into the empty
water tank up to the “0�5 l” mark and then
dissolve one Siemens descaling tablet in
it�

47
en
Service programmes
F
If there is not enough descaling
solution in the water tank, you will
be asked to do the following. Refill
using uncarbonated water and press
C again�
■ Remove the suction pipe from milk
container, wipe it and insert the end of the
suction pipe into the hole on the coee
grounds container�
■ Close the appliance door�
■ Place a container with a capacity of
0�5 litre under the beverage outlet�
■ Press button C� The descaling
programme will now run for about
19 minutes�
■ Remove the container and press
C�
■ Rinse the water tank and (if removed)
replace the water lter.
■ Fill the tank with fresh water up to the
“max” indicator�
■ Replace the water tank and close the
door�
■ Place the container underneath the bev-
erage outlet again�
■ Press button C� The desca-
ling programme will now run for about
2 minutes and rinse the appliance�
■ Remove the container, empty the drip
trays, replace and close the appliance
door�
■ Press C� The appliance has
nished descaling and is ready for use
again�
■ Press E to exit the program�
Cleaning
Takes about 5 minutes�
■ Press button E�
■ Turn the rotary selector to select “Clean”�
■ Press button C� Display indi-
cates progress of the programme�
■ Clean the beverage outlet and replace,
empty the drip trays and replace�
■ Open the ground coee drawer, drop in
a cleaning tablet and close the coee
drawer again�
■ Close the appliance door�
■ Place a container with a capacity of
0�5 litre under the beverage outlet�
■ Press button C� The cleaning
programme will now run for about
5 minutes�
■ Remove the container, empty the drip
trays, replace and close the appliance
door�
■ Press C� The appliance has
nished cleaning and is ready for use
again�
■ Press E to exit the program�
calc’nClean
Takes about 26 minutes�
calc’nClean combines the functions Descale
and Clean� If both programmes are due
to be carried out close together, the fully
automatic coee machine will automatically
suggest this service programme�
■ Press button E�
■ Turn the rotary selector to select
“calc’nClean”�
■ Press button C� The display
indicates the progress of the programme�
■ Clean the beverage outlet and replace,
empty the drip trays and replace�
■ Open the ground coee drawer, drop in
a cleaning tablet and close the coee
drawer again�
■ Remove the water lter (if there is one)
and press C
■ Pour lukewarm water into the empty
water tank up to the “0�5 l” mark and then
dissolve one Siemens descaling tablet in
it�
F
If there is not enough descaling
solution in the water tank, you will
be asked to do the following. Refill
using uncarbonated water and press
C again�
■ Remove the suction pipe from milk
container, wipe it and insert the end of the
suction pipe into the hole on the coee
grounds container�
■ Close the appliance door�
■ Place a container with a capacity of
0�5 litre under the beverage outlet�
Page is loading ...
Page is loading ...
Page is loading ...
Page is loading ...
Page is loading ...
Page is loading ...
Page is loading ...
Page is loading ...
Page is loading ...
Page is loading ...
Page is loading ...
Page is loading ...
Page is loading ...
Page is loading ...
Page is loading ...
Page is loading ...
Page is loading ...
Page is loading ...
Page is loading ...
Page is loading ...
Page is loading ...
Page is loading ...
Page is loading ...
Page is loading ...
Page is loading ...
Page is loading ...
Page is loading ...
Page is loading ...
Page is loading ...
Page is loading ...
Page is loading ...
Page is loading ...
Page is loading ...
Page is loading ...
Page is loading ...
Page is loading ...
Page is loading ...
Page is loading ...
Page is loading ...
Page is loading ...
Page is loading ...
Page is loading ...
Page is loading ...
Page is loading ...
Page is loading ...
Page is loading ...
Page is loading ...
Page is loading ...
Page is loading ...
Page is loading ...
Page is loading ...
Page is loading ...
Page is loading ...
Page is loading ...
Page is loading ...
Page is loading ...
Page is loading ...
Page is loading ...
Page is loading ...
Page is loading ...
Page is loading ...
Page is loading ...
Page is loading ...
Page is loading ...
Page is loading ...
-
 1
1
-
 2
2
-
 3
3
-
 4
4
-
 5
5
-
 6
6
-
 7
7
-
 8
8
-
 9
9
-
 10
10
-
 11
11
-
 12
12
-
 13
13
-
 14
14
-
 15
15
-
 16
16
-
 17
17
-
 18
18
-
 19
19
-
 20
20
-
 21
21
-
 22
22
-
 23
23
-
 24
24
-
 25
25
-
 26
26
-
 27
27
-
 28
28
-
 29
29
-
 30
30
-
 31
31
-
 32
32
-
 33
33
-
 34
34
-
 35
35
-
 36
36
-
 37
37
-
 38
38
-
 39
39
-
 40
40
-
 41
41
-
 42
42
-
 43
43
-
 44
44
-
 45
45
-
 46
46
-
 47
47
-
 48
48
-
 49
49
-
 50
50
-
 51
51
-
 52
52
-
 53
53
-
 54
54
-
 55
55
-
 56
56
-
 57
57
-
 58
58
-
 59
59
-
 60
60
-
 61
61
-
 62
62
-
 63
63
-
 64
64
-
 65
65
-
 66
66
-
 67
67
-
 68
68
-
 69
69
-
 70
70
-
 71
71
-
 72
72
-
 73
73
-
 74
74
-
 75
75
-
 76
76
-
 77
77
-
 78
78
-
 79
79
-
 80
80
-
 81
81
-
 82
82
-
 83
83
-
 84
84
-
 85
85
-
 86
86
-
 87
87
-
 88
88
-
 89
89
-
 90
90
-
 91
91
-
 92
92
-
 93
93
-
 94
94
-
 95
95
-
 96
96
-
 97
97
-
 98
98
-
 99
99
-
 100
100
-
 101
101
-
 102
102
-
 103
103
-
 104
104
-
 105
105
-
 106
106
-
 107
107
-
 108
108
-
 109
109
-
 110
110
-
 111
111
-
 112
112
-
 113
113
-
 114
114
-
 115
115
-
 116
116


Siemens CT636LES1 User manual
- Category
- Coffee makers
- Type
- User manual
- This manual is also suitable for
Ask a question and I''ll find the answer in the document
Finding information in a document is now easier with AI
in other languages
- français: Siemens CT636LES1 Manuel utilisateur
- Deutsch: Siemens CT636LES1 Benutzerhandbuch
- Nederlands: Siemens CT636LES1 Handleiding
Related papers
-
Siemens CT636LEW1 User manual
-
-
Siemens TE605209RW/05 Owner's manual
-
Siemens CT636LES6 Owner's manual
-
-
-
-
-
-
Other documents
-
Bosch TES60321RW User manual
-
Bosch BCM8450UC/03 Owner's manual
-
Bosch BCM8450UC User manual
-
Bauknecht KMT 9145 IXL User guide
-
Whirlpool ACE 102 IXL User guide
-
Whirlpool ACE 102 IX User guide
-
Krups Evidence EA891D User manual
-
Melitta CI Touch® Operating instructions
-
Bauknecht KMT 9145 PT Owner's manual
-
Thermador TCM24RS User manual