LIVING CO GK-500-L User manual
- Category
- Body groomers/shavers
- Type
- User manual

INSTRUCTION MANUAL
GK-500-L
9 in 1 Grooming Kit

CONTENTS
PRODUCT OVERVIEW
2
PARTS DESCRIPTION
3
IMPORTANT SAFETY INSTRUCTIONS 4
GETTING STARTED 5
REMOVAL AND FITMENT OF TRIMMER HEADS AND
ACCESSORIES
6-8
CLEANING AND MAINTAINING YOUR PERSONAL
GROOMER
9
HOW TO USE
10-12
CHARGING THE APPLIANCE
13
WARRANTY
14
2
13 0 0 886 649
A U
13 0 0 886 649
A U
1

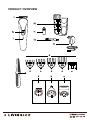
PRODUCT OVERVIEW
3
130 0 886 649
A U
2

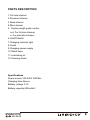
PARTS DESCRIPTION
1.Full size trimmer
2.Precision trimmer
3.Nose trimmer
4.Micro shaver
5. Varying length guide combs
a-d. For full size trimmer
e. For precision trimmer
6.On/Off Switch
7.Charging indicator light
8.Comb
9.Charging power supply
10.Stand base
11.Lubricating oil
12.Cleaning brush
Specifications
Power source:100-240V 50/60Hz
Charging time:2hours
Battery voltage 3.7V
Battery capacity:600mAhx1
2
13 0 0 886 649
A U
13 0 0 886 649
A U
3

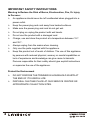
IMPORTANT SAFETY INSTRUCTIONS
Warning to Reduce the Risk of Burns, Electrocution, Fire, Or Injury
to Persons:
An appliance should never be left unattended when plugged into a
power outlet.
Keep the power plug and cord away from heated surfaces.
Make sure the power plug and cord do not get wet.
Do not plug or unplug the product with wet hands.
Do not use the product with a damaged cord.
Charge, use and store the product at a temperature between 15℃
and 35℃.
Always unplug from the mains when cleaning.
Only use the parts supplied with the appliance.
Keep this product out of reach of children. The use of this appliance
by persons with reduced physical, sensory or mental capabilities or
lack of experience and knowledge can give cause to hazards.
Persons responsible for their safety should give explicit instructions
or supervise the use of the appliance.
Protect the Environment
DO NOT DISPOSE THE TRIMMER IN HOUSEHOLD WASTE AT
THE END OF ITS USEFUL LIFE.
DISPOSAL CAN TAKE PLACE AT OUR SERVICE CENTER OR
APPROPRIATE COLLECTION SITES.
3
130 0 886 649
A U
4

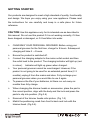
GETTING STARTED
Our products are designed to meet a high standard of quality, functionality
and design. We hope you enjoy using your new appliance. Please read
the instructions for use carefully and keep in a safe place for future
reference.
CAUTION Use this appliance only for its intended use as described in
this manual. Do not use this product if it is not working correctly, if it has
been dropped or damaged, or if it has fallen into water.
CHARGING YOUR PERSONAL GROOMER: Before using your
personal groomer for the first time, charge for 8 hours. Subsequent
charging will take 2 – 4 hours.
Ensure the product is switched off.
Connect the charging adaptor to the mains outlet socket and then
the outlet lead to the product. The charging indicator will light up (red
in colour). Indicator will light up green when charged.
Your personal groomer cannot be overcharged. However, if the
product is not going to be used for an extended period time (2-3
months),unplug it from the mains and store. Fully recharge your
personal groomer when you would like to use it again.
To preserve the life of your batteries, let them run out every six
months then fully charge.
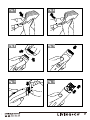
When changing the trimmer heads or accessories, place the part in
the correct position, align with the body and the lock and press the
parts to clip into position. (Fig.3-4)
Removal of the trimmer heads refer picture. (Fig 1-2)
Match the positioning comb from front to back and lock with the
trimmer head. (Fig.5-6).
2
13 0 0 886 649
A U
13 0 0 886 649
A U
5

Removal and Fitment of Trimmer Heads and Accessories
3
130 0 886 649
A U
6

2
13 0 0 886 649
A U
13 0 0 886 649
A U
7

Guide Combs
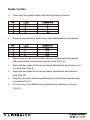
There are four guide combs with varying levels as below.
There is one precision guide comb with Adjustable level as below.
Press down on the arrow button with your thumb and pull upward
with index finger to remove the guide comb.(Fig.7-8)
Press the two sides of the micro shaver attachment and remove out
from the body.(Fig.9)
Press the two sides of the micro shaver attachment and insert to
body.(Fig.10)
Align the precision trimmer positioning comb with the head and clip
in position.(Fig.11)
Choose (one of 4) different level positions by sliding up or down.
(Fig.12)
3
130 0 886 649
A U
8

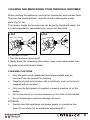
CLEANING AND MAINTAINING YOUR PERSONAL GROOMER
When cleaning the appliance, remove the accessories and trimmer head.
Then use the cleaning brush, clear the dust by cleaning the inside
parts.(Fig.13-14).
The trimmer heads and accessories can be gently rinsed with water, but
it is recommended to immediately dry using a lint free cloth.
AFTER EACH USE
1.Turn the personal groomer off.
2.Gently brush the remaining hairs away / rinse under warm water from
the guide comb and trimmer blade.
CLEANING CAUTIONS
Only the guide comb attachment and trimmer blade may be
removed from the product for cleaning.
Cleaning should only be done with a soft brush, such as the brush
supplied with the product.
Only use the light-grade oil supplied or sewing machine oil on the
blades.
Do not use harsh or corrosive cleaners on the units or their blades.
Do not submerge in water as damage will occur.
STORAGE
Always store this appliance and power supply in a moisture-free
area. Do not store it in temperatures exceeding 60℃.
2
13 0 0 886 649
A U
13 0 0 886 649
A U
9

HOW TO USE
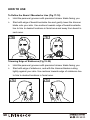
To Define the Beard / Moustache Line (Fig.17-18)
Hold the personal groomer with precision trimmer blade facing you.
Start with edge of beard/mustache line and gently lower the trimmer
blade onto your skin. Use motions towards edge of beard/mustache
line to trim to desired locations in facial area and away from beard in
neck area.
Trimming Edge of Sideburns (Fig.19-20)
Hold the personal groomer with precision trimmer blade facing you.
Start with edge of sideburns, and with the trimmer blades resting
lightly against your skin. Use motions towards edge of sideburns line
to trim to desired locations in facial area.
3
130 0 886 649
A U
10

HOW TO USE (Continued)
To Thin and Taper the Beard / Moustache (Fig.21-22)
Attach a guide comb to full size trimmer. If you are trimming for the
first time start with the maximum trimming length setting.
Turn the unit on.
Place the flat top of the trimmer comb against the skin.
Slowly slide the personal groomer through the hair. Repeat from
different directions as necessary.
If hair builds up in the trimmer comb during the trimming process,
switch the unit off, pull off the comb and brush/rinse off.
Using the Micro Shaver Trimmer (Fig.24)
Attach the micro shaver trimmer
Hold the groomer so the micro shaver gently touches your face in a
45 degree angle.
Use short, well-controlled movements to shave around your
beard/mustache.
Use your free hand to stretch your skin. This encourages the hair to
stand upright, making it easier to shave.
NOTE: The micro shaver was designed to shave the detail areas around
your beard/mustache/sideburns. It was not designed to shave your entire
face.
2
13 0 0 886 649
A U
13 0 0 886 649
A U
11

HOW TO USE (Continued)
To Remove Hair from Nose and Ear (Fig.23)
Attach nose trimmer attachment.
Insert the personal groomer gently into nostril or ear.
Gently move the groomer in and out of the nostril or ear and at the
same time rotate.
Avoid inserting the cutting unit more than 6mm into your nostril or
ear.
ATTACHING AND REMOVING THE TRIMMER COMB ATTACHMENT
CAUTION: Always ensure the personal groomer is switched off before
changing any attachments.
TIPS FOR BEST RESULTS
Beard, mustache and sideburns hairs should be dry.
Avoid using lotions before using your personal groomer. Comb your
hair in the direction that it grows.
Remove trimmer comb attachment if you are defining hairline edges
such as sideburns, trimming the nape of your neck, trimming your
beard line on front of neck.
3
130 0 886 649
A U
12

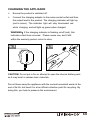
CHARGING THE APPLIANCE
Ensure the product is switched off.
Connect the charging adaptor to the mains socket outlet and then
the output lead to the product. The charging indicator will light up
(red in colour). The indicator light will stay illuminated red
while charging and will light up green when charged.
WARNING!if the charging indicator is flashing on/off (red), this
indicates a fault has occurred. Please cease use, and if still
within the warranty period, return to store.
CAUTION: Do not put in fire or attempt to open the internal battery pack
as it may burst or release toxic materials.
Do not throw away the appliance with the normal household waste at the
end of its life, but hand it in at an official collection point for recycling. By
doing this, you help to preserve the environment.
2
13 0 0 886 649
A U
13 0 0 886 649
A U
13

Warranty
We pride ourselves on producing a range
of quality home appliances that are both packed with features,
and completely reliable. We are so confident in our products,
we pack them up with a 1 year warranty.
Now you too can relax knowing that you are covered.
Customer Helpline NZ: 0800 422 274
This product is covered by a 1 year warranty when
Accompanied by proof of purchase.
IM Version 1.0 – August, 2019
3
130 0 886 649
A U
14
-
 1
1
-
 2
2
-
 3
3
-
 4
4
-
 5
5
-
 6
6
-
 7
7
-
 8
8
-
 9
9
-
 10
10
-
 11
11
-
 12
12
-
 13
13
-
 14
14
-
 15
15


LIVING CO GK-500-L User manual
- Category
- Body groomers/shavers
- Type
- User manual
Ask a question and I''ll find the answer in the document
Finding information in a document is now easier with AI
Other documents
-
Sharper Image 1016972 User manual
-
Sytech SYHC26 Owner's manual
-
-
Kmart 43264056 User manual
-
Remington Titanium PG-250 User manual
-
-
-
Remington Titanium All-in-one PG6020AU User manual
-
Remington PG526 User manual
-
Remington PG520 Navigator User manual