

2
ENGLISH
LICENSE
Each model has different licenses. Visit www.lg.com for more information on the license.
The terms HDMI, HDMI High-Definition Multimedia
Interface, and the HDMI Logo are trademarks or registered
trademarks of HDMI Licensing Administrator, Inc.
*
TABLE OF CONTENTS
LICENSE .........................................................2
OPEN SOURCE SOFTWARE NOTICE
INFORMATION ...............................................3
ASSEMBLING AND PREPARING .....................3
USING THE MONITOR ................................... 13
USER SETTINGS ...........................................16
TROUBLESHOOTING ....................................21
PRODUCT SPECIFICATION ............................23

3
ENGLISH
OPEN SOURCE SOFTWARE NOTICE
INFORMATION
To obtain the source code under GPL, LGPL, MPL, and other open source licenses, that is contained in this
product, please visit http://opensource.lge.com.
In addition to the source code, all referred license terms, warranty disclaimers and copyright notices are
available for download.
LG Electronics will also provide open source code to you on CD-ROM for a charge covering the cost of performing
such distribution (such as the cost of media, shipping, and handling) upon email request to opensource@lge.
com.
This offer is valid for a period of three years after our last shipment of this product. This offer is valid to anyone in
receipt of this information.
ASSEMBLING AND PREPARING
CAUTION
•Always use genuine LG components to ensure safety and product performance.
•The product warranty will not cover damage or injury caused by the use of unauthorized components.
•It is recommended that use the supplied components.
•If you use generic cables not certified by LG, the screen may not display or there may be image noises.
•Illustrations in this document represent typical procedures, so they may look different from the actual
product.
•Do not apply foreign substances (oils, lubricants, etc.) to the screw parts when assembling the product.
(Doing so may damage the product.)
•Applying excessive force when tightening screws may cause damage to the monitor. Damage caused in this
way will not be covered by the product warranty.
•Do not carry the monitor upside down by just holding the base. This may cause the monitor to fall off the
stand and could result in personal injury.
•When lifting or moving the monitor, do not touch the monitor screen. The force applied to the monitor screen
may cause damage to it.

4
ENGLISH
NOTE
•The components may look different from those illustrated here.
•Without prior notice, all product information and specifications contained in this manual are subject to
change to improve the performance of the product.
•To purchase optional accessories, visit an electronics store or an online shopping site, or contact the retailer
from which you purchased the product.
•The power cord provided may differ depending upon the region.
Supported Software
You can download and install the latest version from the LGE website (www.lg.com).
•/ /
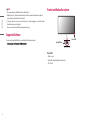
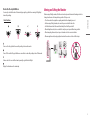
Product and Button Description
Power LED
Joystick Button
Power LED
•White: On mode
•Amber: ABL (Automatic Brightness Limiter) mode
•Off: Off mode

5
ENGLISH
How to Use the Joystick Button
You can easily control the functions of the monitor by pressing the joystick button or moving it left/right/up/
down with your finger.
Basic Functions
Power on: Press the joystick button once with your finger to turn on the monitor.
Power off: Press and hold the joystick button once more than 5 seconds with your finger to turn off the monitor.
Volume control: You can control the volume by moving the joystick button left/right.
Displays the information on the current input.
Moving and Lifting the Monitor
When moving or lifting the monitor, follow these instructions to prevent the monitor from being scratched or
damaged and to ensure safe transportation, regardless of its shape or size.
•Place the monitor in the original box or packing material before attempting to move it.
•Before moving or lifting the monitor, disconnect the power cord and all other cables.
•Hold the bottom and side of the monitor frame firmly. Do not hold the panel itself.
•When holding the monitor, the screen should face away from you to prevent it from being scratched.
•When transporting the monitor, do not expose the monitor to shock or excessive vibration.
•When moving the monitor, keep it upright and never turn the monitor on its side or tilt it sideways.

6
ENGLISH
CAUTION
•Avoid touching the monitor screen as much as possible.
-This may result in damage to the screen or some of the pixels used to create images.
•Standing the monitor panel up vertically may cause the monitor to fall due to the joystick and cause damage
or injury. In addition, this may cause the joystick button to malfunction.
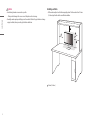
Installing on a Table
•Lift the monitor and place it on the table in an upright position. Place the monitor at least 100mm
(3.9inches) away from the wall to ensure sufficient ventilation.
: 100 mm (3.9inches)

7
ENGLISH
CAUTION
•Unplug the power cord before moving or installing the monitor. There is risk of electric shock.
•Make sure to use the power cord that is provided in the product package and connect it to a grounded power
outlet.
•If you need another power cord, please contact your local dealer or the nearest retail store.
Adjusting the Stand Height
1 Place the monitor mounted on the stand base in an upright position.
2 Handle the monitor with both hands for safety.
Max 110.0 mm
(4.3 inches)
WARNING
•When adjusting the screen height, do not place your hand on the stand body to avoid injury to your fingers.
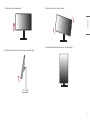
Adjusting the Angle
1 Place the monitor mounted on the stand base in an upright position.
2 Adjust the angle of the screen.
The angle of the screen can be adjusted forward or backward from -5° to 20° for a comfortable viewing
experience.
WARNING
•To avoid injury to the fingers when adjusting the screen, do not hold the lower part of the monitor’s frame as
illustrated below.
•Be careful not to touch or press the screen area when adjusting the angle of the monitor.
NOTE
•The left or right side of the monitor head can be slightly rotated up or down (up to 3°). Adjust the horizontal
level of the monitor head.

8
ENGLISH
Color Calibration Sensor
working
NOTE
•Please download and install the LG Calibration Studio from LG Electronics home page to run monitor color
calibration with calibrator.
•Do not touch the device while the color calibration sensor is operating as it may cause damage to the device if
you pull it or move it forcibly.
•Color Calibration Sensor is a accessory device for screen calibration.
Please connect and use it when you need screen calibration.
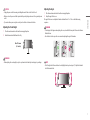
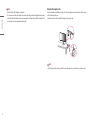
Pivot Feature
The pivot feature allows the monitor to rotate 90° clockwise.
WARNING
•When using the Pivot function, do not rotate the monitor too fast or with excessive force. The table may be
scratched by contact with the monitor’s head.
-The head may come in contact with the stand and scratch the base.
-Be careful as you may injure your finger by jamming it between the head and the stand.
Monitor’s head
Stand

9
ENGLISH
1 Raise the monitor up to the maximum height.
2 Adjust the angle of the monitor in the direction of the arrow as shown in the figure.
3 Rotate the monitor clockwise as shown in the figure.
4 Complete the installation by rotating the monitor 90° as shown in the figure.

10
ENGLISH
NOTE
•Auto Pivot feature of the display is not supported.
•The screen can be rotated easily using the screen pivot shortcut key provided with your Windows operating
system. Note that some Windows versions and some graphics card drivers may use different settings for the
screen pivot key or may not support the pivot key at all.
Using the Kensington Lock
For more information on installation and usage, refer to the Kensington lock owner’s manual or visit the website
at http://www.kensington.com.
Connect the monitor to a table using the Kensington security system cable.
NOTE
•The Kensington security system is optional. You can obtain optional accessories from most electronics stores.

11
ENGLISH
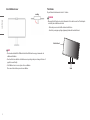
Installing on the Wall
This monitor meets the specifications for the wall mount plate or other compatible devices.
Install the monitor at least 100mm (3.9inches) away from the wall and leave about 100mm (3.9inches)
of space at each side of the monitor to ensure sufficient ventilation. Detailed installation instructions can be
obtained from your local retail store. Alternatively, please refer to the manual for how to install and set up a
tilting wall mounting bracket.
: 100mm (3.9inches)
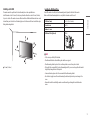
Installing the Wall Mount Plate
To install the monitor to a wall, attach a wall mounting bracket (optional) to the back of the monitor.
Make sure that the wall mounting bracket is securely fixed to the monitor and to the wall.
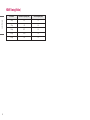
Wall Mount (mm) 100 x 100 (3.9 x 3.9 inches)
Standard screw M4 x L10
Number of screws 4
Wall Mount Plate (Optional) LSW149
NOTE
•Use the screws specified by VESA standards.
•The wall mount kit includes the installation guide and all necessary parts.
•The wall mounting bracket is optional. You can obtain optional accessories from your local dealer.
•The length of the screw may differ for each wall mounting bracket. If you use screws longer than the standard
length, it may damage the inside of the product.
•For more information, please refer to the user manual for the wall mounting bracket.
•Be careful not to apply too much force while mounting the wall mount plate as it may cause damage to the
screen.
•Remove the stand before installing the monitor on a wall mount by performing the stand attachment in
reverse.

12
ENGLISH
CAUTION
•Unplug the power cord before moving or installing the monitor to avoid electric shock.
•Installing the monitor on the ceiling or on a slanted wall may result in the monitor falling off, which could
lead to injury. Use an authorized LG wall mount and contact the local dealer or qualified personnel.
•To prevent injury, this apparatus must be securely attached to the wall in accordance with the installation
instructions.
•Applying excessive force when tightening screws may cause damage to the monitor. Damage caused in this
way will not be covered by the product warranty.
•Use the wall mounting bracket and screws that conform to VESA standards. Damage caused by the use or
misuse of inappropriate components will not be covered by the product warranty.
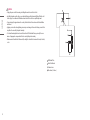
•When measured from the back of the monitor, the length of each installed screw must be 8mm (0.3inches)
or less.
: Wall Mount Plate
: Back of the Monitor
: Standard screw
: Max. 8 mm (0.3 inches)

13
ENGLISH
USING THE MONITOR
•Illustrations in this manual may differ from the actual product.
Press the joystick button, go to [Settings] > [Input], and then select the input option.
CAUTION
•If you use generic cables not certified by LG, the screen may not display or there may be image noises.
•Do not press the screen for a prolonged time. This may cause image distortion.
•Do not display a still image on the screen for a prolonged time. This may cause image retention. Use a PC
screensaver if possible.
•When connecting the power cord to the outlet, use a grounded (3-hole) power strip or a grounded power
outlet.
•The monitor may flicker when turned on in an area where the temperature is low. This is normal.
•Sometimes red, green, or blue spots may appear on the screen. This is normal.
Connecting to a PC
•This monitor supports the feature.
* : A feature that allows you to add a device to your computer without having to reconfigure
anything or install any manual drivers.
HDMI Connection
Transmits digital video and audio signals from your PC to the monitor.
CAUTION
•Using a DVI to HDMI / DP (DisplayPort) to HDMI cable may cause compatibility issues.
•Use a certified cable with the HDMI logo attached. If you do not use a certified HDMI cable, the screen may
not display or a connection error may occur.
•Recommended HDMI cable types
-High Speed HDMI®/™ cable
-High Speed HDMI®/™ cable with Ethernet

14
ENGLISH
DisplayPort Connection
Transmits digital video and audio signals from your PC to the monitor.
NOTE
•There may be no video or audio output depending on the DP (DisplayPort) version of the PC.
•Make sure to use the supplied DisplayPort cable of the product. Otherwise, this may cause the device to
malfunction.
•If you are using a Mini DisplayPort output graphics card, use a Mini DP to DP (Mini DisplayPort to DisplayPort)
cable or gender that supports DisplayPort1.4. (Sold separately)
USB-C connection
Transmits digital video and audio signals from your PC to the monitor.
NOTE
•DP Alternate Mode (DP over USB-C) is supported via USB-C Port.
•Features may not work properly depending on the connected device’s specifications and the environment.
•USB-C port is not for the monitor power source but for a PC power source. Connect adapter to supply power
to the monitor.
Connecting AV Devices
HDMI Connection
HDMI transmits digital video and audio signals from your AV device to the monitor.
CAUTION
•Using a DVI to HDMI / DP (DisplayPort) to HDMI cable may cause compatibility issues.
•Use a certified cable with the HDMI logo attached. If you do not use a certified HDMI cable, the screen may
not display or a connection error may occur.
•Recommended HDMI cable types
-High Speed HDMI®/™ cable
-High Speed HDMI®/™ cable with Ethernet

15
ENGLISH
Connecting Peripherals
USB Device connection
The USB port on the product functions as a USB hub.
NOTE
•It is recommended you install all Windows Updates to keep your Windows up-to-date before connecting to
the product for use.
•Peripheral devices are sold separately.
•A keyboard, mouse, or USB device can be connected to the USB port.
•The charging speed may vary depending on the device.
•To use the monitor’s downstream USB port, connection to the host PC must be established by using a USB C-C
or USB C-A cable for the USB-C port, or a USB B-A cable for the USB-B port.
•When the USB C-C cable is connected between Upstream port of monitor and Host PC, the Downstream port
of monitor support USB 2.0 device.
•When a USB C-A or USB B-A cable is connected to the monitor’s upstream port and host PC, USB 3.0 devices
are supported by the monitor’s downstream port. However, the host PC must support USB 3.0.
CAUTION
•Cautions when using a USB device.
-A USB device with an automatic recognition program installed, or that uses its own driver, may not be
recognized.
-Some USB devices may not be supported or may not work properly.
-It is recommended to use a USB hub or hard disk drive with power supplied. (If the power supply is not
adequate, the USB device may not be recognized properly.)
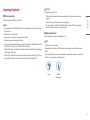
Headphones Connection
Connect peripherals to the monitor via the headphones port.
NOTE
•Peripheral devices are sold separately.
•Depending on the audio settings of the PC and external device, headphones and speaker functions may be
limited.
•If you use angled earphones, it may cause a problem with connecting another external device to the monitor.
Therefore, it is recommended to use straight earphones.
Angled Straight
(Recommend)

16
ENGLISH
USER SETTINGS
NOTE
•Your monitor’s OSD (On Screen Display) may differ slightly from that shown in this manual.
•When Beep Guide is activated, pressing the joystick button will take you to Settings right away.
Activating the Main Menu
1 Press the joystick button on the bottom of the monitor.
2 Move the joystick up/down and left/right to set the options.
3 Press the joystick button once more to exit the main menu.
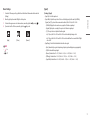
Joystick Button
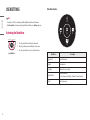
Main Menu Features
A
BC
D
E
Main Menu Description
: [Power Off] Turns off the monitor.
: [Input] Sets input mode.
: [Settings] Configures the screen settings.
: [Picture Mode] Sets the picture mode.
-You can change it in [Settings] > [General] > [Hot key Settings].
: [Exit] Exits the main menu.

17
ENGLISH
Menu Settings
1 To view the OSD menu, press the joystick button at the bottom of the monitor and then enter the
[Settings].
2 Move the joystick up/down and left/right to set the options.
3 To return to the upper menu or set other menu items, move the joystick to or pressing ( ) it.
4 If you want to exit the OSD menu, move the joystick to until you exit.
[Input] [Picture] [General]
NOTE
•: On
•: Off
[Input]
[Settings] > [Input]
•[Input List]: Selects the input mode.
•[Aspect Ratio]: Adjusts the aspect ratio of the screen. The display may look the same for [Full Wide],
[Original], and [1:1] options at the recommended resolution (3840x2160) and 1920x1080.
-[Full Wide]: Displays the video in widescreen, regardless of the video signal input.
-[Original]: Displays video according to the aspect ratio of the video signal input.
-[1:1]: The aspect ratio is not adjusted from the original.
»In [1:1] mode, the 1920 x 1080 and 2048 x 1080 resolutions will output image scaled.
»In [1:1] mode, the 2048 x 1080 and 4096 x 2160 resolutions will show the screen with the left/right
sides cut off.
•[Input Range]: Control the black and white levels in the video signal.
-[Auto]: Automatically recognizes the input range of input signals and displays images appropriately.
-[Full]: Not extended the input signal.
-[Narrow]: Extended from 16 ~ 235 (10bits: 64 ~ 940) to 0 ~ 255 (10bits: 0 ~ 1023).
-[SDI Range]: Extended from 1 ~ 254 (10bits: 4 ~ 1019) to 0 ~ 255 (10bits: 0 ~ 1023).
-[Super White]: Extended from 16 ~ 254 (10 bits: 64 ~ 1019) to 0 ~ 255 (10 bits: 0 ~ 1023).

18
ENGLISH
[Picture]
[Settings] > [Picture]
•[Picture Mode]: Select the Picture mode that suits the each standard mode; [Custom], [BT.2020], [BT.709],
[P3-D65], [(HDR) P3-D65 PQ], [(HDR) BT.2100 PQ], [AdobeRGB], [sRGB], and [Calibration].
-Installation of for [Calibration].
•[Brightness]: Adjusts the brightness of the screen.
•[Contrast]: Adjusts the contrast of the screen.
•[Black Offset] : Adjust the brightness of black.
•[Gamma(EOTF)]: Adjust the Gamma; [Gamma 1.8], [Gamma 2.0], [Gamma 2.2], [Gamma 2.4], [Gamma 2.6],
and [PQ].
•[PQ Clip Point]: Select the clipping points on the EOTF curve.
-It can be set when [PQ] is specified for [Gamma(EOTF)].
•[Color Gamut]: Select the range of colors that can be represented; [Native], [BT.709], [BT.2020], [P3-D65],
[AdobeRGB], and [sRGB].
•[Color Temp]: Set your own color temperature.
-[Custom]: The user can adjust it to red, green, or blue by customization.
-[Manual]: Adjusts the color temperature in 500K increments. (However, supports 9300K instead of 9500K)
•[Red], [Green], [Blue]: You can customize the picture color using [Red], [Green], and [Blue] colors.
•[Hue]: Adjust the hue of the screen.
•[Saturation]: Adjust the saturation of the screen.
•[Six Color]: Meets the user requirements for colors by adjusting the hue and saturation of the six colors (red,
green, blue, cyan, magenta, and yellow) and then saving the settings.
-Hue: Adjusts the tone of the screen colors.
-Saturation: Adjusts the saturation of the screen colors. The lower the value, the less saturated and brighter
the colors become. The higher the value, the more saturated and darker the colors become.
•[Picture Reset]: Returns picture and color to the default settings.
NOTE
•The [Picture Mode] that can be set depends on the Input signal.
•If the [Picture Mode] is changed in the DP (DisplayPort) input, the screen may flicker or the resolution of your
PC screen may be affected.
•HDR content may not display correctly depending on Windows 10 OS settings, please check HDR On/Off
settings in Windows.
•When the HDR function is turned on, the characters or picture quality may be poor according to Graphic card
performance.
•While the HDR function is on, screen flickering or cracking may occur when changing the monitor input or
power on/off according to Graphic card performance.

19
ENGLISH
[General]
[Settings] > [General]
•[Language]: Sets the menu screen to the desired language.
•[USB-C Multi-EDID] : Change the EDID according to the [Picture Mode] setting on [USB-C] input.
-It can be set when [DisplayPort Version] is [1.4].
-If the screen may not work properly depending on the connected device(or operating system), set this
function to off.
•[Peak Brightness]: Control the Panel Peak brightness.
-It can be set when [PQ] is specified for [Gamma(EOTF)].
•[ABL Indicator]: Control the brightness of ABL (Automatic Brightness Limiter) indicator.
-ABL status: Amber
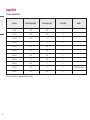
•[HDMI ULTRA HD Deep Color]: Provides sharper images when connected to a device supporting ULTRA HD
Deep Color.
-4K @ 60 Hz Support Format
-Resolution: 3840 x 2160
-Frame rate (Hz): 59.94/ 60.00
-Color Depth / Chroma Sampling
»8 bit: YCbCr 4:2:0/ YCbCr 4:2:2/ YCbCr 4:4:4/ RGB 4:4:4
»10 bit: YCbCr 4:2:0/ YCbCr 4:2:2
•[USB Selection]: Select the USB upstream cable connection port to use USB hub of the monitor.
•[Screen Saver]: Control the [Screen Saver].
-On: The screen automatically turns off when it is idle for a certain period of time.
»Note: The indicator flashes Amber color, while the [Screen Saver] is active. If the still image disappears,
the brightness is automatically restored.
-Off: Turn off the [Screen Saver].
•[Screen Shift]: Control the [Screen Shift].
-On: The screen moves by a few pixels in four directions.
-Off: Turn off the [Screen Shift].
•[Volume]: Adjust the volume.
-You can adjust [Mute] / [Unmute] by a key in the [Volume] menu.
•[Power LED]: When the [Power LED] function is turned on, it operates as follows:
-On mode: Light up
-Sleep Mode (Standby Mode): Blinking
-Off mode: Off
•[Always On Mode]: Control the monitor action when there is no active video input.
-On: prevent the monitor goes to the sleep mode
-Off: monitor goes to the sleep mode
»Automated calibration with LG Calibration Studio is not possible if the monitor goes to sleep mode.
•[Automatic Standby]: If there is no operation on the monitor for a certain period of time, the monitor will
automatically switch to standby mode.

20
ENGLISH
•[DisplayPort Version]: Set DisplayPort Version to the same version as the connected external device. To use the
HDR function, set to [1.4].
•[Hot key Settings]: Select the hot key menu of key in the Main Menu; [Picture Mode], [Peak Brightness],
[PQ Clip Point], [Input Range], and [Information].
•[OSD Lock]: This feature disables the configuration and adjustment of menus.
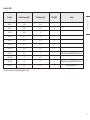
•[Information]: The following display information will be shown; [Input], [Resolution], [Chroma], [Color
Depth], [Input Range], [Picture Mode], [Color Temp], [Color Gamut], [Gamma(EOTF)], [SW Version], [Total
Power On Time].
•[Reset to Initial Settings]: Returns to the default settings.
NOTE
•[HDMI ULTRA HD Deep Color]
-To use [HDMI ULTRA HD Deep Color], turn this function on.
-If the connected device does not support Deep Color, the screen or sound may not work properly. In this
case, set this function to off.
Important Information for Preventing Image Retention
Unlike regular LED/LCD monitors, pixels in the OLED monitors emit light on their own, achieving a perfect black
and creating clear images without blurring of light.
Image retention does not occur in normal use of the product, but can occur if the same screen is watched for a
long time. Built-in features are available to protect the screen from possible image retention.
If a static image persists on the screen, the screen saver will automatically lower the full screen brightness, and
the screen will turn off automatically after a certain period of time. When an image change is detected, the
brightness is automatically restored to its original state. This is not a malfunction of the product.
Examples of Images that may Cause Image Retention
•Static images or images containing objects/information that are constantly visible in a fixed position on the
screen (e.g., icons on the desktop, fixed windows such as menus, or logos while watching broadcasts, etc.)
•Fixed menu/icon on a game console or set-top box
•Fixed menu on the top corner of the web browser
Page is loading ...
Page is loading ...
Page is loading ...
Page is loading ...
Page is loading ...
Page is loading ...
Page is loading ...
Page is loading ...
Page is loading ...
Page is loading ...
Page is loading ...
-
 1
1
-
 2
2
-
 3
3
-
 4
4
-
 5
5
-
 6
6
-
 7
7
-
 8
8
-
 9
9
-
 10
10
-
 11
11
-
 12
12
-
 13
13
-
 14
14
-
 15
15
-
 16
16
-
 17
17
-
 18
18
-
 19
19
-
 20
20
-
 21
21
-
 22
22
-
 23
23
-
 24
24
-
 25
25
-
 26
26
-
 27
27
-
 28
28
-
 29
29
-
 30
30
-
 31
31


