Page is loading ...

user manual
Gebrauchsanweisung
mode d’emploi
Gebruiksaanwijzing
Bird & Cat Protector
Pond protection • Teichschutz
Protection du bassin • Vijverbescherming

2
A C
B

3
ED
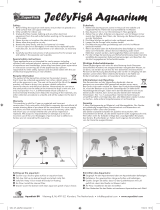
Sensor setting Alarm functions/
Frequency settings
LED ash light
PIR Sensor

4
GB - SuperFish Bird & Cat Protector
Motion activated ultrasonic pond protector. Detecting unwanted visitors, harmlessly
chasing them away with an alarm, ultrasonic sound and/or flashing lights (LED).
Safety
• Read this manual carefully before usage.
• Suitable for outdoor usage.
• Place the stand rmly in the ground next to the pond to prevent the Protector from falling into the pond. Make
sure the Protector is high enough above the ground to prevent ooding.
• This appliance can be used by children aged from 8 years and above and persons with reduced physical, sensory or
mental capabilities or lack of experience and knowledge if they have been given supervision or instructions
concerning the use of the appliance in a safe way and understand the hazards involved. Children may not play
with the appliance. Cleaning and user maintenance shall not be done by children without supervision.
Batteries (charge before usage)
• Place the 3 rechargeable NiMH batteries in the compartment at back. Loosen the 4 screws to open the
compartment, insert the batteries correctly and close the compartiment (g. A).
• Charge the batteries before the rst usage with the supplied USB cable (it can be connected to a 5 volt USB
charger), the connector is located at the bottom (g. B). During charging, a red light will blink in the PIR sensor,
when the batteries are fully charged the red light is on continuously. The Protector is protected against overload.
• Recharging the batteries takes place via the solar panel at the top of the Protector. If the batteries are not
suciently recharged (due to lack of sunlight) a red light will ash in the PIR sensor. The batteries must then be
recharged via the USB cable. Set the alarm function to position 0 (o) when charging. Charging the batteries
with USB cable should always be done indoor.
Installation
• Determine the location for the Protector near your pond, taking into account the range of the PIR sensor and the
alarm.
• Assemble both parts of the stand and attach the stand to bottom of the Bird & Cat Protector (g. C). You can
also hang the Protector on the suspension eye at the back.
• Aim the sensor at the area you want to protect and insert the stand halfway into the ground, holding only the
stand (not the sensor) (g. D).
• The PIR sensor (Infrared motion detector) has a maximum range of 8 metres and a radius of 120°. With the left
rotary knob (Sens.) you can set the range and sensitivity (g. E). To detect small animals and the maximum
range, turn the knob all the way to the right.
• Select an alarm function with the right knob (Freq.) and test the operation by moving your hand in front of the
sensor. The light will ash and depending on the setting, sound will be heard.
Alarm functions (Freq.)
0 = O
1 = Loud sound alarm (4 kHz/110 dB)
2 = Ultrasonic sound (13.5 kHz - 19.5 kHz)
3 = Ultrasonic sound (23.5 kHz - 28.0 kHz)
4 = Flash lights
5 = Scrambling ultrasonic sound 2 and 3 in combination with ash lights
• Setting 1: Loud alarm is less suitable in densely populated environments, check whether neighbors are not
disturbed by alarms at night or during the day.
Maintenance
• Clean the Bird & Cat Protector (especially the solar panel) regularly with a (slightly damp) cloth.

5
D - SuperFish Bird & Cat Protector
Ultraschall-Teichschutz mit Bewegungssensor, der unerwünschte Besucher erkennt
und sie mit Alarm, Ultraschall und/oder Lichtblitzen (LED) vertreibt.
Sicherheit
• Lesen Sie vor Gebrauch diese Gebrauchsanweisung sorgfältig durch.
• Geeignet für den Außeneinsatz.
• Stellen Sie den Ständer neben dem Teich fest auf den Boden, damit der Protector nicht in den Teich fällt. Stellen
Sie sicher, dass der Protector hoch genug über dem Boden ist, damit er nicht überuten kann.
• Dieses Gerät kann von Kindern ab 8 Jahren sowie von Personen mit reduzierten physischen, sensorischen oder
mentalen Fähigkeiten oder Mangel an Erfahrung und/oder Wissen benutzt werden, wenn sie beaufsichtigt oder
bezüglich des sicheren Gebrauchs des Gerätes unterwiesen wurden und die daraus resultierenden Gefahren
verstanden haben. Kinder dürfen nicht mit dem Gerät spielen. Reinigung und Benutzer-Wartung dürfen nicht
durch Kinder ohne Beaufsichtigung durchgeführt werden.
Batterien (vor Gebrauch aufladen)
• Legen Sie die 3 NiMH-Batterien in das Fach auf der Rückseite. Lösen Sie die Schrauben, um das Fach zu önen,
legen Sie die Batterien richtig ein und schließen Sie das Ganze (Abb. A).
• Laden Sie die Batterien vor dem ersten Gebrauch mit dem mitgelieferten USB-Kabel auf (Sie können dieses an ein
5-Volt-USB-Ladegerät anschließen), der Anschluss bendet sich an der Unterseite (Abb. B). Während des
Ladevorgangs wird ein rotes Licht im PIR-Sensor blinken, sobald das rote Licht kontinuierlich leuchtet, sind die
Batterien vollständig aufgeladen. Der Protector ist gegen Überlastung geschützt.
• Das Auaden der Batterien erfolgt über das Solarpanel. Wenn die Batterien nicht ausreichend aufgeladen
werden (aufgrund fehlenden Sonnenlichts), wird ein rotes Licht im PIR-Sensor blinken. Die Batterien müssen
dann über das USB-Kabel aufgeladen werden. Stellen Sie die Alarmfunktion beim Laden auf Position 0 (Aus).
Auaden der Batterien mit USB-Kabel sollte immer im Hause durchgeführt werden.
Installation
• Bestimmen Sie den Standort des Protectors in der Nähe Ihres Teichs unter Berücksichtigung der Reichweite des
PIR-Sensors und das Alarm.
• Montieren Sie beide Teile des Ständers und befestigen Sie den Ständer am Boden des Bird & Cat Protectors
(Abb. C). Sie können den Protector auch hinten an die Aufhängeöse hängen.
• Richten Sie den Sensor auf das Gebied, welches Sie schützen möchten, und setzen Sie den Ständerzur Hälfte in
den Boden ein. Halten Sie dabei nur den Ständer (nicht den Sensor) (Abb. D).
• Der PIR-Sensor (Infrarot-Bewegungsmelder)hat eine Reichweite von bis zu 8 Metern und einen (horizontalen)
Radius von 120°. Mit dem linken Drehknopf (sens) können Sie die Sensorempndlichkeit und -reichweite
einstellen (Abb. E). Um kleine Tiere zu detektieren und den maximalen Bereich drehen Sie den Knopf komplett
nach Rechts.
• Wählen Sie eine Alarmfunktion mit dem rechten Knopf (Freq.) und testen Sie den Betrieb, indem Sie Ihre Hand
vor den Sensor bewegen. Das Licht blinkt und je nach Einstellung ist ein Ton zu hören.
Alarmfunktionen (Freq.)
0 = Aus
1 = Lauter Alarm (4 kHz/110 dB)
2 = Ultraschall (13,5 kHz - 19,5 kHz)
3 = Ultraschall (23,5 kHz - 28 kHz)
4 = BLitzlicht
5 = Ultraschall 2 und 3 mit Blitzlicht
• Die Einstellung: lauter Alarm ist in dicht besiedelten Umgebungen weniger geeignet, prüfen Sie, ob die Nachbarn
nachts oder tagsüber nicht durch den Alarm gestört werden.
Wartung
• Reinigen Sie den Bird & Cat Protector (insbesondere das Solarpanel) regelmäßig mit einem (leicht feuchten) Tuch.

6
F - SuperFish Bird & Cat Protector
Protecteur de bassin à ultrasons activé par le mouvement qui détecte les visiteurs
indésirables et les éloigne avec une alarme, des ultrasons et / ou des flashs lumineux.
Sécurité
• A lire attentivement avant l’emploi.
• Convient pour un usage extérieur.
• Placez le support fermement dans le sol à côté du bassin pour éviter que le Protecteur ne tombe dans le bassin.
Assurez-vous que Protecteur soit susamment élevé au-dessus du sol pour qu’il ne puisse pas être inondé.
• Cet appareil peut être utilisé par des enfants âgés de 8 ans et plus et des personnes ayant des capacités ou un
manque d’expérience et de connais sances physiques, sensorielles ou mentales réduites si elles ont été formées et
encadrées d’instructions concernant l’utilisation de l’appareil en toute sécurité et de comprendre les risques
encourus. Les enfants ne peuvent pas jouer avec l’appareil. Le nettoyage et l’entretien de ne doivent pas être
eectués par des enfants sans surveillance.
Piles (charge avant utilisation)
• Placez les 3 piles NiMH rechargeables dans le compartiment à l’arrière. Desserrez les quatre vis pour ouvrir le
compartiment, insérez les piles correctement et fermez le tout (g. A).
• Chargez les piles avant la première utilisation avec le câble USB fourni (il peut être connecté à un chargeur USB
de 5 volts), le connecteur est situé en bas (g. B). Pendant la charge, une lumière rouge clignote dans le capteur
PIR, lorsque les batteries sont chargées, le voyant rouge est allumé en permanence. Le Protecteur Bird & Cat est
protégé contre la surcharge.
• La recharge des piles s’eectue via le panneau solaire. Si les piles ne sont pas susamment rechargées (à cause
du manque de lumière solaire), la lumière rouge clignotera dans le capteur PIR. Les piles doivent alors être
rechargée via le câble USB. Réglez la fonction d’alarme sur la position 0 (arrêt) pendant la charge. La charge des
piles avec un câble USB doit toujours être eectuée à l’intérieur.
Installation
• Déterminez l’emplacement du Protecteur près de votre bassin, en tenant compte de la portée du capteur PIR et
de l’alarme.
• Assembler les deux parties du support et xer le support en bas du Protecteur Bird & Cat (g. C). Vous pouvez
également xer/visser le protecteur en utilisant le trou à l’arrière.
• Dirigez le capteur vers la zone que vous souhaitez protéger et insérez le support à moitié dans le sol, en ne tenant
que le support (pas le capteur) (g. D).
• Le capteur PIR (détecteur de mouvement infrarouge) a une portée maximale de 8 mètres et un rayon (horizontal)
de 120°. Vous pouvez régler la sensibilité et la portée à l’aide du bouton rotatif gauche (g. E). Pour détecter les
petits animaux et avoir une portée maximale, tournez le bouton complètement à droite.
• Sélectionnez la fonction d’alarme avec le bouton droit (Fréq.) et testez-la en déplaçant la main devant le capteur.
Le voyant clignotera et, en fonction du réglage, un son sera entendu.
Fonctions d’alarme (Fréq.)
0 = O
1 = Alarme forte (4 kHz/110 dB)
2 = Ultrasons (13.5 kHz - 19.5 kHz)
3 = Ultrasons (23.5 kHz - 28.0 kHz)
4 = Flash lumineux
5 = Ultrasons 2 et 3 avec ashs lumineux
• L’alarme forte est moins approprié dans des environnements à forte densité de population. Vériez si les voisins
ne sont pas dérangés par l’alarme la nuit ou le jour.
Entretien
• Nettoyez le Protecteur Bird & Cat (en particulier le panneau solaire) avec un chion (légèrement humide).

7
NL - SuperFish Bird & Cat Protector
Ultrasone vijverbeschermer met bewegingssensor die ongewenste bezoekers
detecteert en verjaagt met een alarm, ultrasoon geluid en/of lichtflitsen (LED).
Veiligheid
• Lees voor gebruik eerst deze gebruiksaanwijzing zorgvuldig door.
• Geschikt voor buitengebruik.
• Plaats de standaard stevig in de grond naast de vijver om te voorkomen dat de Protector in de vijver valt. Zorg
dat de Protector hoog genoeg boven de grond staat zodat deze niet kan overstromen.
• Dit apparaat kan worden gebruikt door kinderen van 8 jaar en ouder en personen met beperkte lichamelijke,
zintuiglijke of geeste lijke vermogens of gebrek aan ervaring en/of kennis, indien zij onder toezicht staan of
instructies met betrekking tot het veilig gebruik van het toestel en de daaruit voortvloeiende risico’s begrepen
hebben. Kinderen mogen niet met het apparaat spelen. Schoonmaak en onderhoud mag niet worden gedaan
door kinderen zonder toezicht.
Batterijen (opladen voor gebruik)
• Plaats de 3 oplaadbare NiMH batterijen in het compartiment aan de achterzijde. Draai de 4 schroeven los om het
compartiment te openen, plaats de batterijen op de juiste wijze en sluit het geheel (tek. A).
• Laad de batterijen voor het eerste gebruik op m.b.v. de meegeleverde USB-kabel (deze kunt u aansluiten op een
5 Volt USB-oplader), de aansluiting bevindt zich aan de onderzijde (tek. B). Tijdens het opladen zal in de PIR
sensor een rood lichtje knipperen, zodra het rode lichtje continue brandt, zijn de batterijen geheel opgeladen.
De Bird & Cat Protector is beschermd tegen overbelasting.
• Het herladen van de batterijen gebeurt via het zonnepaneel aan de bovenzijde van de Protector. Indien de
batterijen onvoldoende worden herladen (bij gebrek aan zonlicht) zal in de PIR sensor een rood lichtje gaan
knipperen. De batterijen dienen dan weer via de USB-kabel te worden opgeladen. Zet de alarmfunctie op stand 0
(uit) als u gaat opladen. Het opladen van de batterijen met USB-kabel dient altijd binnen te gebeuren.
Installatie
• Bepaal de plaats voor de Protector in de buurt van uw vijver, houdt hierbij rekening met het bereik van de PIR
sensor en het alarm.
• Bevestig beide delen van de staander aan de onderzijde van de Bird & Cat Protector (tek. C). U kunt de Protector
ook ophangen aan het ophangoog aan de achterzijde.
• Richt de sensor op het gebied dat u wilt beschermen en steek de staander tot halverwege in de grond, houd
hierbij alleen de staander vast (niet de sensor) (tek. D).
• De PIR sensor (Infrarood bewegingsdetector) heeft een maximale reikwijdte van 8 meter en een straal van 120°.
Met de linkerknop (Sens.) stelt u de reikwijdte en gevoeligheid in (tek. E). Voor het detecteren van kleine
dieren en het maximale bereik dient u de knop helemaal naar rechts te draaien.
• Kies een alarmfunctie met de rechterknop (Freq.) en test de werking door met uw hand voor de sensor te
bewegen. Het licht zal itsen en afhankelijk van de instelling zal geluid hoorbaar zijn.
Alarm instellingen (Freq.)
0 = Uit
1 = Luid alarm (4 kHz/110 dB)
2 = Ultrasoon geluid (13,5 kHz - 19,5 kHz)
3 = Ultrasoon geluid (23,5 kHz - 28 kHz)
4 = Flitslicht
5 = Ultrasoon geluid 2 en 3 in combinatie met itslicht
• De instelling: luid alarm is minder geschikt in dichtbevolkte omgevingen, controleer of buren ‘s-nachts of
overdag niet door het alarm worden gestoord.
Onderhoud
• Reinig de Bird & Cat Protector (vooral het zonnepaneel) regelmatig met een (licht vochtige) doek.

www.aquadistri.com
Vlietweg 8, NL-4791 EZ Klundert The Netherlands, info@aquadistri.com
10-2019-MH
GB - Recycle information
The bin symbol printed on the product means
that this product must be disposed of
separately to standard refuse, whereby the
user delivers to a refuse centre applicable for
electrical devices. Alternatively the product can be
returned to the seller when purchasing a new unit. A
bespoke refuse centre is environmentally friendly and it
helps the recycling of the materials. Any other collection
procedure is unlawful and will be subject to the law in
force.
D - Recycling-Information
Das Kennzeichen auf der Verpackung bedeutet, dass es
getrennt von normalem Müll gesammelt werden muss,
wenn das Gerät nicht mehr nutzbar ist. Wenn das
Produkt kaputt ist, soll der Besitzer es zu einem
Sammelpunkt für elektrische Haushaltgeräte bringen.
Oder wenn der Besitzer ein neues Gerät kaufen möchte,
kann das Altgerät beim Verkäufer hinterlassen werden;
nur 1 zu 1 austauschbar. Getrenntes Sammeln ist
umweltfreundlich und hilft, alte Materialien neu
nutzbar zu machen. Jede andere/sonstige Weise der
Verwertung ist nicht Rechtes.
F - Information de recyclage
Le symbole de la poubelle barrée indique que l’appareil
doit être recyclé. L’utilisateur, à la n de la vie de l’appa-
reil, doit le ramener à son revendeur qui doit lui le
remettre à un centre de recyclage des appareils élec trique.
Le recyclage est obligatoire et important pour l’environ-
nement, ne pas recycler peut être puni par la loi.
NL - Recycling informatie
Het symbool van de afvalbak geeft aan dat het product
(als het niet meer wordt gebruikt) niet in de afvalbak
mag. Maar dat het op de speciaal hiervoor ingerichte
milieustraat/containerpark moet worden aangeboden
voor recycling. Ook kunt u het product, op het moment
dat u een soortgelijk product koopt, achterlaten bij het
verkooppunt. Dit mag alleen op basis van 1 op 1. Door
recycling kunnen grondstoen weer opnieuw gebruikt
worden, dit zorgt voor minder afval en is goed voor het
milieu. Elke andere manier van afvalverwerking m.b.t.
dit product is strafbaar.
GB - Warranty conditions
1 year manufacturer’s warranty on material and construction defects.
For any warranty claims products must be returned complete with all
components, accompanied with an ocial proof of purchase conrming
a purchase date. Incomplete products for which parts are missing and
products without proof of purchase are not eligible for warranty. After
receiving and checking, we will determine whether the product is
eligible for repair or replacement. Please carefully read the instructions
regards installation, use and maintenance. Damage due to incorrect
use, damage due to pollution, not cleaning the product and damage to
the cable are not covered by the warranty.
D - Garantiebedingungen
1 Jahre Herstellergarantie auf Material- und Konstruktionsfehler. Das
Gerät muss komplett mit allen Teilen und dem Kaufbeleg mit Kaufdatum
für Garantieansprüche vorgelegt werden. Ein Gerät, bei dem Teile
fehlen oder ohne Kaufbeleg, hat keinen Anspruch auf Garantie. Nach
dem Empfang werden wir das Gerät überprüfen, um festzustellen ob das
Produkt für die Reparatur oder einen Ersatz in Betracht kommt. Bitte
lesen Sie die Hinweise zu Sicherheit, Gebrauch und Wartung sorgfältig.
Schäden durch unsachgemäßen Gebrauch, Schäden durch Verschmutzung,
Nichtreinigung des Gerätes und Beschädigungen des Kabels sind von
der Garantie ausgeschlossen.
F - Conditions de garantie
Garantie du fabricant de 1 an sur les défauts de matériaux et de
construction. Les appareils doivent être retournés avec tous les
composants, accompagnés d’une preuve d’achat ocielle conrmant la
date d’achat pour toute réclamation de garantie. Les appareils
incomplets sur lesquels il manque des pièces, et les appareils sans
preuve d’achat ne sont pas couverts par la garantie. Après réception et
vérication, nous déterminerons si l’appareil est admissible à la
réparation ou le remplacement. Lisez attentivement les instructions
d’installation, d’utilisation et de maintenance. Les dommages dus à une
utilisation incorrecte, aux déchets accumulés ou à un mauvais entretien
de l’appareil, et les dommages sur la prise ou le câble ne sont pas
couverts par la garantie.
NL - Garantievoorwaarden
1 jaar fabrieksgarantie op materiaal en constructie fouten. Het apparaat
dient compleet, met alle onderdelen en het originele aankoopbewijs
met daarop de aankoopdatum, ter garantie aangeboden worden. Een
apparaat waarvan onderdelen missen of zonder aankoopbewijs komt
niet in aanmerking voor garantie! Na ontvangst zullen wij het apparaat
controleren. Daarna wordt door ons bepaald of het apparaat in
aanmerking komt voor reparatie of vervanging. Lees de instructies over
installatie, gebruik en onderhoud zorgvuldig door. Schade door
verkeerd gebruik, door vervuiling of het niet reinigen van het apparaat
en schade aan de kabel, vallen niet onder de garantie.
Date of purchase/Kaufdatum/Date d’achat/ Aankoopdatum: _____-_____-_____
Dealer stamp/Händlerstempel/Sceau du poit de vente/Dealerstempel
/