

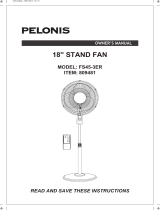
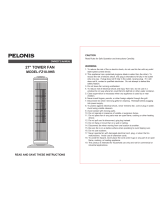
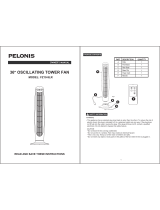
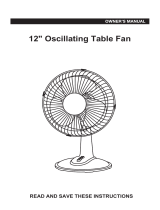
OWNER’S MANUAL
Tower Fan
MODEL: PFT40A4AGB
READ AND SAVE THESE INSTRUCTIONS
Attention: Pictures in the IM are for reference only.

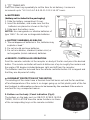
IMPORTANT SAFETY INSTRUCTIONS
CAUTION
Read Rules for Safe Operation and Instructions Carefully.
WARNING
1. To reduce the risk of fire or electric shock, do not use this fan with any solid
state speed control device.
2. This appliance has a polarized plug (one blade is wider than the other). To
reduce the risk of electric shock, this plug is intended to the fit in a polarized
outlet only one way. If plug does not fit fully in the outlet, reverse plug. If it
still does not fit, contact a qualified electrician. Do not attempt to modify this
safety feature.
3. This appliance is not intended for use by persons (including children) with
reduced physical, sensory or mental capabilities,or lack of experience and
knowledge, unless they have been supervised or instructed related to
use of the appliance by a person responsible for their safety.
4. Do not leave the fan running unattended.
5.
Unplug or disconnect the appliance from the power supply before servicing.
READ AND SAVE THESE INSTRUCTIONS
RULES FOR SAFE OPERATION
1. The rules about cord and plug as below:
(1) This product employs overload protection (fuse). A blown fuse indicates an
overload or short-circuit situation. If the fuse blows, unplug the product from
the outlet. Replace the fuse as per the user servicing instructions (follow
product marking for proper fuse rating) and check the products. If the
replacement fuse blows, a short-circuit may be present and the product should
be discarded or returned to an authorized service facility for examination and/
or repair.
(2) Do not operate any fan with a damaged cord or plug. Discard fan or return to
an authorized service facility for examination and/or repair.
(3) Do not run cord under carpeting. Do not cover cord with throw rugs, runners,
or similar coverings. Do not route cord under furniture or appliances. Arrange
cord away from traffic area and where it will not be tripped over.
2. Fan should be used under rated voltage.
3. Connect power after the fan is fully assembled.
4. Never insert fingers, pencils, or any other object through the guard when fan is
running.
5. Unplug from outlet when not in use, when moving fan from one location to
another, before putting on, or taking off parts, and before cleaning.
6. Be sure fan is on a stable surface when operating to avoid overturning.
7. DO NOT use fan in window. Moisture may create electrical hazard.
1

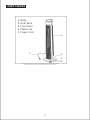
1. Body
2. Rear base
3. Front base
4. Plastic nut
5. Power cord
1
5
2
3
4
PART FIGURE
Note: All the pictures in this manual are for explanation purpose only. Any discrepancy between
the real object and the illustration in the drawing shall be subject to the real subject.
2

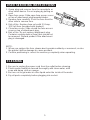
ASSEMBLY INSTRUCTIONS
1. Take out the fan body and the spare parts from the box. Put the front base onto
rear base and join them together. (See Fig. 1)
2. Unlock the plastic nut from the fan body.
3. Pass the power cord through the flute, then insert the fan body into the base.
(See Fig. 3)
4. Fix the fan body on the base with the plastic nut. (See Fig. 2)
Fig.1
The outlet through
Fig.2 Fig.3
OPERATION INSTRUCTION
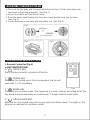
I. Remote Controller (Fig.4)
a. KEY INSTRUCTION
1. “ ” ON/OFF KEY
Press this key to switch on/switch off the fan.
2. “ ” SPEED KEY
When the fan started, press this key repeated, the fan will
work with “1-2-3” circulatory.
3. “ ” MODE KEY
Fig.4
Press this key to select mode. The sequence is normal, natural, and sleep when this
key being touched repeatedly or continuously. The light indicate mode state.
4. “ ” OSC/LOUVER KEY
After the fan has started, press this key to select oscillation mode. The lights on the
display can indicate fan oscillation mode.
3

5. “ ” TIMING KEY
Press this timer key repeatedly to set the time for air delivery. Increase in
increments up to "1-2-3-4-5-6-7-8-9-10-11-12-13-14-15" hours.
b. BATTERIES
(battery not included in the packaging)
1. Slide the battery compartment Cover.
2. Insert the batteries, and make sure that the
batteries are placed as shown in the Fig.5.
3. Slide back the battery cover.
NOTES: Use manganese or alkaline batteries of
type "AAA". Do not use rechargeable batteries.
c. BATTERY WARNING AS BELOW
1. “Do not dispose of batteries in fire, batteries may
explode or leak.”
2. Do not mix old and new batteries.
3. Do not mix alkaline, standard (carbon-zinc) or
rechargeable (nickel-cadmium) batteries.
Fig.5
AAA Battery, 1.5V
d. REMOTE CONTROLLER OPERATION
Point the remote controller at the receptor on body of the fan and press the desired
button. The remote controller will work at distances of up to roughly five meters and
the angle of 30 degree included between right and left from the receptor.
The batteries must be removed from the remote controller before it is scrapped and
that they are disposed of safely.
e. OVERHEAT PROTECTION OF THE MOTOR
The windings of the motor have a thermal-fuse that burns out and the fan switches
off and temperature of the motor is no longer going up so that plastic parts of the fan
don’t subject to deformation so far so to be burned by the overheat if the motor is
overheat for any unexpected reason.
II. Buttons on fan body / Panel indication (Fig.6)
The buttons on the body such as ON/OFF,SPEED, MODE,
TIMER, OSCILLATION have the same functions as those
of the corresponding keys on the remote controller.
Fig.6
4

USER SERVICING INSTRUCTIONS
1. Grasp plug and remove from the receptacle or
other outlet device. Do not unplug by pulling on
cord.
2. Open fuse cover. Slide open fuse access cover
on top of attachment plug towards blades.
3. Remove fuse carefully. Push the fuse from the
other side to remove fuse.
4. Risk of fire. Replace fuse only with 2.5 Amp,
125 Volt fuse (provided with product.)
5. Close fuse cover. Slide closed the fuse access
cover on top of attachment plug.
6. Risk of fire. Do not replace attachment plug.
Contains a safety device (fuse) that should not
be removed. Discard product if the attachment
plug is damaged.
NOTE:
1. When you replace the fuse, please don’t operate suddenly or overexert, or else
the product will be damage or cause accident.
2. Confirm positioning is correct to avoid any complexity when operating.
CLEANING
1. Be sure to unplug the power cord from the outlet before cleaning.
2. Plastic parts should be cleaned thoroughly with clean water, mild
soap and damp cloth or sponge.
3. Be sure not to get water or other liquid enter the inside of the motor.
4. Dry all parts completely before plugging into socket.
5


Ceramic Tower
Heater
Ceramic Tower
Heater
Ceramic Tower
Heater
Ceramic Tower Heater
7
-
 1
1
-
 2
2
-
 3
3
-
 4
4
-
 5
5
-
 6
6
-
 7
7
-
 8
8
-
 9
9


Pelonis PFT40A4AGB Owner's manual
- Type
- Owner's manual
- This manual is also suitable for
Ask a question and I''ll find the answer in the document
Finding information in a document is now easier with AI
Related papers
-
 Pelonis FZ10-19JR Owner's manual
-
 Pelonis FZ10-17JR Owner's manual
-
 Pelonis FZ10-19JR User manual
-
 Pelonis FS45-3ER Owner's manual
-
 Pelonis FS45-3ER Owner's manual
-
 Pelonis FZ10-9HB Owner's manual
-
 Pelonis FZ10-9LR Owner's manual
-
 Pelonis HC-0119A User manual
-
World Marketing of America HC0119A Owner's manual
-
 Pelonis FT40-8HC Owner's manual


Other documents
-
Aigostar 718356204934 User manual
-
SPT SF-1536BK Operating instructions
-
Sunpentown SF-1536WA User manual
-
Kenmore 35040 Owner's manual
-
 Avalon A2TOWERFAN360 Operating instructions
-
BLACK DECKER BFTR36B User manual
-
Sunpentown SF-16W81A User manual
-
-
 AmazonBasics FZ10-18TR User manual
-
Hurricane 736565 User manual

