Ilve XLP90FDT User manual

Category
Hobs
Type
User manual
1
BUILT-IN COOKTOP OPERATING &
INSTALLATION MANUAL
2 3
OPEN 24
/
7
ILVE ACCESSORIES ONLINE SHOP
For a wide range of coee machines and other genuine
ILVE accessories at the click of a button
shop.ilve.com.au
4 5
iWarranty
REGISTER YOUR WARRANTY ONLINE NOW
GO TO: https://support.eurolinx.com.au/#/form/warrantyregistration
As a part of our continued customer service
oering, you can now register your ILVE products online at
https://support.eurolinx.com.au/#/form/warrantyregistration
Just follow our simple online registration process.
Please ensure that you always keep your proof of purchase
in order for your warranty to remain valid should you ever
need to use it.
As always, you can contact us on
1300 856 411
076
Safety Precautions 8
Operating Instructions 9
Operating - Gas Cooktop 10
Tepanyaki Plate (Fry Top) 12
Electric BBQ (Lava Grill) 14
Ceramic Electric Hot Plate 16
Cooktop Installation Instructions 18
Installation - Gas Supply 20
Installation - Electrical Supply 21
Adaptation to Different Types of Gas 22
Installation Instructions 24
Ancillary Service Information 26
Guarantee 27
Cleaning, Care & Maintenance 29
ILVE Cooktop Recipes 30
Warranty Information 36
Trouble Shooting Guide 38
you are now the proud owner of an ILVE cooking appliance.
Thank you for purchasing ILVE and welcome to the exciting
world of cooking the ILVE way.
This instruction manual has been specially created to inform
you of the full range of features your ILVE appliance has to offer
and serves as an introduction to the wonderful benefits of ILVE’s
dynamic cooking systems.
We present detailed information on each of the advanced
cooking systems built into ILVE appliances. Once you have read
this section you will be able to choose the most appropriate
settings for your appliance when cooking different types of
food.
We ask you to read the instructions in this booklet very carefully
as this will allow you to get the best results from using your
appliance. KEEP THE DOCUMENTATION OF THIS PRODUCT
FOR FUTURE REFERENCE.
Congratulations,
CONTENTS
BUILT-IN COOKTOPS
ILVE COOKTOPS OPERATING MANUAL
08 09
BUILT-IN COOKTOPS
Before installing and operating the hotplate, read these instructions completely and carefully.
IMPORTANT To be installed only by an authorised person
- Remove all packaging material and literature from the hotplate before connecting the gas and electrical
supplies
INSTALLATION
– Observe all governing codes e.g. AS5601, council ordinances and local authority rules.
- The hotplate must be installed by an authorised person
- The hotplate must be grounded
- Save these instructions for the local inspectors use
TO THE INSTALLER
After connecting the gas supply, turn on the gas and check for leaks at all joints with soapy water or
other approved methods
UNDER NO CIRCUMSTANCES USE A NAKED FLAME IN CHECKING FOR LEAKS. NOT FOR USE
IN MARINE CRAFT, CARAVANS OR MOBILE HOME UNLESS EACH BURNERS IS FITTED WITH A
FLAME SAFE GUARD
WARNINGS
Before using the cooker, read the instructions booklet carefully. This contains very important information
concerning safety during installation, use and maintenance. The instructions booklet must be kept with
care for later consultation.
Do not use or store flammable materials in the appliance storage drawer or near this appliance.
Do not spray aerosols in the vicinity of this appliance when it is in operation. Where this appliance is
installed in a marine craft or in caravans, it shall not be used as a space heater.
Do not modify this appliance.
If the hotplate fails to operate correctly, contact Eurolinx Pty ltd or their appointed agent for service.
DO NOT ATTEMPT REPAIRS YOURSELF; repairs and servicing shall only be carried out by
Authorised Personnel.
This appliance is not intended for use by persons (including children) with reduced physical, sensory or
mental capabilities, or lack of experience and knowledge, unless they have been
given supervision or instruction concerning use of the appliance by a person responsible for their
safety.
Children should be supervised to ensure that they do not play with the appliance.
Never place unsteady or deformed pans on the burners or on the electric hotplates as they could
overturn accidentally. When placing pans on the hob, always ensure that the handles are facing inward
so that there is no risk of knocking against them.
When the cooker is not in use, ensure that all knobs are exactly in position “o / o”
Never leave the hotplate switched on without a pan on it, otherwise it will reach a very high temperature
quickly and the cooker or furniture in the vicinity could be damaged.
SAFETY PRECAUTIONS
OPERATING INSTRUCTIONS
BUILT-IN COOKTOPS
ILVE COOKTOPS OPERATING MANUAL ILVE COOKTOPS OPERATING MANUAL
10 11
LIGHTING BURNERSsimply press the knob in, turn anti-clockwise to maximum, the electronic
igniter will spark and ignite the burner. Check that the gas has been lit; if the burner fails to
ignite repeat the above process.
For models with Flame Failure follow the above procedure but keep the knob fully depressed for up to
10 seconds after ignition to allow the safety to lock in. Check that the gas has been lit; if the burner fails
to ignite repeat the above process. If the burner still fails to ignite, a match or lighting device can be used,
but care must be taken. Keep igniters dry. If the problem persists, contact Eurolinx Pty Ltd or their
appointed agent for service.
DO NOT TOUCH HOT SURFACES, ALLOW HOB TO COOL BEFORE WIPING SPILLAGE.
PRACTICAL HINTS FOR USE
WARNING
Do not use pots which exceed the width of the trivet (the trivet is the frame with fingers that
the pot sits on). If pot size exceeds the edge of the trivet, flames could cause damage to work
surfaces either side of the burner. Do not use pots which are too small for the burner size,
they become unstable on the trivet.
Always use a vessel for cooking that is appropriate in size for the size of burner. Never use
pots that are too small or too large. For wok cooking it is recommended that a domestic size
wok, no larger than 400mm in diameter be used.
Always use the small star trivet for pots with a base smaller than 100mm.
Use a strong flame to bring liquids to boil, seal meat and generally for all food which must be
cooked rapidly i.e. when using a wok.
Use a low flame for sauces or stews.
Do not cook food over too strong a heat. Boiling food fast does not cook any faster but
violently stirs up the food causing it to lose flavour.
OPERATING - GAS COOKTOP
BUILT-IN COOKTOPS
BUILT-IN COOKTOPS
ILVE COOKTOPS OPERATING MANUAL ILVE COOKTOPS OPERATING MANUAL
12 13
Control Knob Settings
COOKING TABLE
(purely indicative values after 10 minutes of preheating with the burner at maximum power)
CLEANING AND CARING FOR THE TEPANYAKI PLATE
Tepanyaki plate
Allow the tepanyaki plate to cool slightly and pour on white vinegar. Allow to sit for five minutes then
scrape the plate with a flat spatula. For heavy build up a scourer may be required.
A = cooking tray
B = drip tray
C = exhaust flue for combustion fumes
The Fry-Top is composed of a special stainless steel plate (8mm thick), specially designed to have
temperatures evenly distributed over the whole surface so that you can utilise the complete
cooking surface. The plate also has hygienic advantages.
Another advantage is the high heat accumulation of the plate, with very low heat loss. To use
the appliance, light the flame below the plate by means of the corresponding knob
(see “Lighting the burners”) and ensure that the flame is burning.
Leave the knob in this position for about 10 minutes at the most and wait for the plate to heat
up. Once this period has elapsed, the plate is ready to start cooking.
By adjusting the flame, there is no limit to your culinary imagination. If you turn the knob to
minimum, you can do slow cooking or types of cooking in which you want to maintain the
organic properties of the foods. Higher temperatures are suitable for cooking meat, fish and
vegetables.
The Fry-Top plate is ideal for Japanese Tepanyaki cooking: the special lid needed for this type of
Oriental cooking is available as an optional accessory.
Some models are supplied with the spatula shown in above, which is useful for both cooking
and for cleaning the plate.
KNOB POSITION TYPE OF COOKING
B egg’s in 2 minutes
B sliced eggplant (0.5cm thick) from 9 to 13 minutes
B sliced potatoes from 5 to 7 minutes
B sliced courgettes from 3 to 5 minutes
B fish (portions of about 200g) in 15 minutes
B steak in 3 minutes
A T-bone steak (2cm thick) in 5 minutes
A
B
C
TEPANYAKI PLATE (FRY TOP)
BUILT-IN COOKTOPS
BUILT-IN COOKTOPS
ILVE COOKTOPS OPERATING MANUAL ILVE COOKTOPS OPERATING MANUAL
14 15
The Lava Stone BBQ allows you to BBQ meats and fish with out the use of oils. The lava stones placed
under the electric element enables a constant temperature (250°C) and the absorption of fats without
smell and vapor. The grid, tray and lava stones are easily removed for cleaning. Before turning on the
appliance, check that all parts are well installed. To turn on the BBQ rotate the knob to the desired
setting between “1” and “12”; the indicator light will be illuminated, indicating that the appliance is
working. When the knob is turned to the “0” position the appliance is turned OFF and the indicator
light will go out. Important: To grill, we recommend pre-heating the grill element and lava stones
for approximately 10 minutes on position “12”, this allows the lava stones to reach the required
temperature to vapourise the fats and liquids from the meat to enhance the flavour of the produce
being cooked.
Cooking Table
CARING AND CLEANING FOR YOUR LAVA STONE BBQ
Before cleaning, disconnect the appliance from the mains. Cleaning must be carried out when the
appliance is cold. Remove all the removable parts. Remove the grid, lift the heating element and take
away the hob bed with lava stones. Stainless steel parts must be cleaned with water and detergent, then
dry with a soft cloth carefully. Under no circumstances use corrosive or abrasive detergent, this could
damage the appliance. Stainless steel, brass or copper parts must be treated by using the proper
products, thus keeping the brightness for a long time.
Control Panel and aluminium parts must be cleaned by means of de greasing detergent.
To clean the Lava Stones, you can wash them gently in hot soapy water and then allow them to dry well
before re-use. Alternatively, you can put them into a stocking or perforated sleeve/cloth, place them on the
top basket of your dishwasher and use a hot wash cycle with NO powder.
ELECTRIC BBQ (LAVA GRILL)
BUILT-IN COOKTOPS
BUILT-IN COOKTOPS
ILVE COOKTOPS OPERATING MANUAL ILVE COOKTOPS OPERATING MANUAL
16 17
INSTRUCTIONS FOR USE OF THE ELECTRIC PLATE
The vitreous ceramic electric plate (5) is controlled by a knob (as above energy regulator). A pilot light
comes on as soon as the heating element is activated. The control knob is graded from 0 to 12. Position 0
indicates that the corresponding cooking area is switched off. Position 1 indicated that the corresponding
cooking area is at the minimum power, while position 12 indicates that the cooking area is at maximum
power.
The energy regulator controls the cooking area with two circuits (5). When the knob is turned clockwise
from position (off) to the desired position (1-12), the primary part of the cooking area is switched on. To
switch on the secondary part, turn the knob to position 12 and then turn it past position 12 as far as it will
go in a clockwise direction. At this point the secondary circuit switches on and it is possible to vary
the power from 1 to 12 (1 = minimum, 12 = maximum).
RESIDUAL HEAT WARNING LIGHTS
There is a residual heat warning light (Q) on vitreous ceramic hob. Its purpose is to increase the safety
of the appliance because when it is lit it indicates that the cooking area is still very hot. The residual
heat warning light stays lit even after the cooking area has been switched off to warn you that it is still
hot.
Important: The ceramic hob cooking surface remains hot for a long time after use. Do not touch the
hob with your hands or let children near it. The residual heat indicator will remain lit until the hob has
cooled down. If any cracks appear in the ceramic hot, disconnect the appliance immediately from the
mains and call an authorized technical service centre.
ELECTRIC HOTPLATE
For efficient use and low energy consumption, it is advised to use pans specifically designed for electric
cooking on ceramic hobs. The bottom of the pan must be thick and flat. Its diameter must be as similar as
possible to that of the cooking ring. The surface of the hob and the bottom of the pan must be kept clean.
A – Do not leave the hotplate switched on without a pan
B – Do not wet or overheat the plates
C Avoid sudden changes of temperature on the ceramic hob. For example, do not pour cold water onto
the hot hob.
D – Ensure that the pan covers the whole cooking area.
E – The bottom of the pan must be flat and dry so as to use less energy and keep your ceramic hob in
good condition.
F – Do not leave the pan handles sticking out as they could be knocked over accidentally.
G – Do not forget that the cooking area remains hot for quite a long time even after it has been switched
off. Make intelligent use of this characteristic by switching off the cooking area a few minutes before
completing cooking. The residual heat that has been accumulated in the ceramic will thus enable you
to complete cooking without using more electric power.
H – It is preferable not to cook on the ceramic hob with pans that have been used on gas burners. The
flames may of deformed the bottom of the pans. Do not use aluminium pans on your ceramic cook
top as this metal is very soft and can damage and/or permanently stain your cook top.
Cooking Table - (The following table is a guide only to settings for a variety of foods.)
CLEANING THE CERMAIC HOB
The flat surface of the ceramic hob makes it considerably easier to clean than traditional hobs. Clean the
hob in the same way as any glass surface in your home. Never use abrasive products. Routine cleaning
must be carried out when the hob is cold. Caution: take care not to drop substances containing sugar on
the hob during operation. If this should happen, immediately turn off the respective heating element and
clean with warm soapy water before the glass cools. When performing this special cleaning, take
particular care not to burn yourself.
We recommend cleaning the cooking top once it has cooled down. The stainless steel and painted parts
must be cleaned with lukewarm water and anti-corrosive liquid detergents. Dry the parts with a soft cloth.
Never use steel wools or abrasive detergents. To keep the surface clean, we recommend Hillmark
Cerapol or Ceraseal alternatively, detergents or similar products. The instrument panel and all the
aluminium parts must be cleaned only with alcohol or de greasing products.
Never use lemon on
MATT / GRAPHITE.
CERAMIC ELECTRIC HOT PLATE
BUILT-IN COOKTOPS
BUILT-IN COOKTOPS
ILVE COOKTOPS OPERATING MANUAL ILVE COOKTOPS OPERATING MANUAL
18 19
Cut Out Dimensions for Built-in H / HF Series
Cut Out Dimensions for Built-in HP / XLP Series
Overall Dimensions for P Series Freestanding
BUILT-IN INSTALLATION
To avoid liquid infiltrations under the working tops, it is necessary to apply a gasket which is supplied with
the top. The fixing to the furniture is carried out with clamps assembled on the appliance as per Figure 2.
For Freestanding cooking hob models (P665, P965, P1265) must be installed with the top of the hob level
with the bench and must support a minimum weight of 100 kg.
Mod P665 P965 P1265
A
600 900 1200
B
650 650 650
Height
85 85 85
GENERAL
1. The requirements of local Gas and Electrical authorities must be adhered to, Consult AG 601 / ASNZS
5601 and SAA Wiring Rules as appropriate
2. Location of gas inlet- At rear of the cook top located on the right, left or centre depending on the
model (Refer to model specifications)
3. Electrical connection - 240mm C/L from RH side (as viewed from front) 40mm C/L from rear Connection
is by means of flexible cord and plug to 10 amp GPO
4. Overall dimensions of hotplate - Refer to dimensions chart in following pages
5. Eurolinx Pty Ltd and their appointed agents decline any responsibilities in the case of installation not
according to these instructions.
HOTPLATE CLEARANCES
The hotplate is to be installed as detailed below When the hotplate is installed abutting a side or rear wall,
the wall must be of non-combustible material, eg ceramic tiles.
The following minimum clearances to combustible materials must be observed: Minimum clearance from
hotplate edge to side wall must be 200mm.
Minimum clearance from hotplate edge to rear wall must be 200mm
Minimum clearance from hotplate to cupboard above hob burners must be 600mm
Range hoods and overhead exhaust fans must be installed according to the manufacturers’ instructions
but in no case shall clearance from hob burners be less than 600mm for the range hood and 750mm for
the overhead exhaust fan.
It is recommended that the adjacent kitchen surfaces should be capable of withstanding
temperatures of 100°C
FITTING THE COOKING HOB ONTO THE BASE UNIT WITH DOOR
The unit must be made in such a way that the flames are not blown out if the doors are opened
or closed rapidly. The bottom of the cooking hob must not be subject to depression or pressure
when the doors are opened or closed. We advise working as shown in figure A). The panel
under the hob must be easy to remove for maintenance purposes.
Mod H30 H360 H60 H70 H38 H39 HF40
A
270 555 555 555 755 835 360
B
475 475 475 475 475 475 490
Mod HP45 HP65 HP95 HP75 HP125 HP1230 XLP90
A
380 570 850 680 1130 1120 875
B
481 485 485 490 480 300 570
Figure 2
COOKTOP INSTALLATION INSTRUCTIONS
BUILT-IN COOKTOPS
ILVE COOKTOPS OPERATING MANUAL ILVE COOKTOPS OPERATING MANUAL
20 21
Ensure when fitting the elbow supplied with the appliance that the sealing washer is used to
prevent gas leaks.
Warning: on the cooking top, it is forbidden to carry out the gas connection by means of the rubber
flexible pipe fixed onto the rubber hose, as it is not possible to inspect the pipe.
Warning: Once the installation has been completed check if there is any gas leakage by using soapy
water or other suitable leak detection fluids.
DO NOT USE FLAMES TO CHECK ANY GAS LEAKAGES.
Installation - Electrical Connection
BEFORE CONNECTING THE PLUG INTO THE POWER SOCKET, FOLLOW THESE INSTRUCTIONS
The electrical supply for the upright cooker must be a 240 volt 50 Hz. The fuse and electrical wiring of the
home / premises must support the load of the appliance.
The hotplate must be earthed. Connect the hotplate to a properly earthed and rated power socket, as
appropriate. The flexible cord of the appliance must not be subject to direct heat and must be positioned
after installation of the hotplate so that its temperature does not exceed 75°C.
IMPORTANT if a power socket needs to be installed or relocated, the work must be done by a
licensed electrician.
These technical instructions have been prepared for use by Authorised persons. This unit must only be
installed by an Authorised person. The installation must be carried out by qualified personnel in
accordance with the relevant requirements of the Gas Safety Regulations, the local Building Regulations.
Gas connection
Gas-powered devices for home use, which are not connected to a conduit for the evacuation of
combustion products, must not cause a concentration of carbon monoxide that could pose a health risk
to the persons exposed in relation to the time of exposure. We recommend checking that the appliance is
properly set up for the type of gas distributed. The connection to the gas pipes must be made in a
workman like manner, in compliance with current standards that prescribe the installation of a safety tap at
the end of the pipe. The Gas Connection is male ½” BSP and is situated at the right hand rear of the
appliance.
During installation ensure that the flexible connection be located so as to prevent excessive operating
temperatures affecting the hose. Under no circumstance is the temperature of the flexible connection to
exceed its approved rating. The flexible connection should also be checked visually for any abrasion,
defect or kinking and replaced or repositioned to prevent abrasion, kinking and permanent deformation if
necessary. Always ensure that a restraining chain, if fitted, be correctly fitted so that strain is not placed on
the household plumbing.
It is recommended that an isolating valve and union be fitted, to enable simple disconnection for servicing.
These are to be in an accessible location.
Natural Gas
The appliance is factory set for Natural gas and is supplied with a 1kPa regulator that must be fitted to the
gas supply to the appliance.
ULPG Gas
The ULPG gas pressure regulator must be set to provide a supply pressure of 2.75kPa conforming to
standards regulations in force should be fitted. Fit the test point assembly supplied with the appliance to
the gas connection when installing for use with ULPG Gas.
It is possible to connect the gas in the following ways:
This appliance is suitable for use with either a flexible connection or rigid copper connection. If installing
the appliance with a flexible connection the flexible connection must be Australia Gas Association
approved to class B of AS/NZS1869 as a minimum. Using a Plumbezy flexible hose, AGA approval
number 6196, 10mm ID, class D and between 1-1.2m long in accordance with AG601 for a
“high level connection”.
INSTALLATION - GAS SUPPLY
BUILT-IN COOKTOPS
BUILT-IN COOKTOPS
ILVE COOKTOPS OPERATING MANUAL ILVE COOKTOPS OPERATING MANUAL
22 23
Burners, Injectors & Mega-joules
AIR ADJUSTMENT
The air adjustment is to be carried out with the flame at the maximum, with a screwdriver loosen screw
“F” and move the cylindrical sleeve “R” towards the injector to decrease the air, move it away from the
injector to increase the air. Once the correct aeration is achieved tighten screw “F” to fix the position.
The cooking hob is supplied as a natural gas unit and should not require any adjustment of the aeration. If
the appliance is ordered and specified as a ULPG gas then it will be converted by Eurolinx prior to
dispatch and should not require any adjustment to the aeration. Follow the steps below to convert to LPG
and to adjust the aeration of the burners. Remove the pan supports, caps and burners from the hob.
Remove the screws from under each burner that are securing the hob to the base and lift top up to gain
access to the burner venturie.
Note: Some models that do not have a one piece hob will have securing around the outside edge of the
spillage bowl that will also need to be removed to gain access to the underside of the cooking hob.
Remove screw “F” and remove air damper “R” Replace the Natural gas injector
that is located at entry point of the venturie “U” with the ULPG injector. Use the
chart below to identify the correct injector for each type of burner. Replace the
air damper “R” and refit screw “F” leave lose to allow adjustment of aeration.
BURNER NATURAL GAS
Inj Mj/h Kpa
ULPG
Inj Mj/h Kpa
DUAL WOK
1.60/0.68 14/2.2 1.00 0.86/.040 11.5/2 2.75
SINGLE WOK
1.70 13.8 1.00 0.92 11.00 2.75
LARGE
1.40 10.0 1.00 0.82 9.00 2.75
MEDIUM
1.10 6.2 1.00 0.68 6.00 2.75
FISH / TEPANYAKI
1.60 12.5 1.00 0.85 10.00 2.75
ADAPTATION TO DIFFERENT TYPES OF GAS
BUILT-IN COOKTOPS
BUILT-IN COOKTOPS
ILVE COOKTOPS OPERATING MANUAL ILVE COOKTOPS OPERATING MANUAL
24 25
Examples:
A. Flame with excess of air: it is small, tight and
separated. Move forward the cylindrical sleeve R
placed in front of the injector.
B. Flame with lack of air; it is floppy with yellow
streaks. Move backward the cylindrical sleeve R
placed in front of the injector.
C. Normal flame: its colour is light blue
Low Flame Adjustment of Burners
When installing the appliance it is recommended to
check that the burner minimum speed
(Low Flame Setting) has been correctly adjusted.
If it is necessary to change the type of gas,
adjustment of the low flame setting must be
completed by the installer. To adjust the minimum
setting for the burners the following steps must
be complete.
Recommended Bypass
(Low Flame Settings) Turns from fully in position
Minimum flow of cooking hob taps (Figure 1)
• Switch on the burner and turn the control knob towards the minimum flow position;
• Remove the knob;
• Using a screwdriver, adjust the internal screw until the correct low flame is obtained, the screw is
located just to the right of the shaft see figure 1
• Refit the knob.
Minimum flow of non-valved cooking hob taps (Figure 2)
• Switch on the burner and turn the control knob towards the minimum flow position;
• Remove the knob;
• Insert a small screwdriver into the shaft of the gas valve and adjust the internal screw until the
correct low flame is obtained; see figure 2
• Refit the knob.
• Unscrew the adjustment screw to increase the flow, or tighten it to reduce the flow.
• The adjustment is correct when the low flame measures approximately 3 or 4 mm.
• For ULPG the adjustment screw should be tightened all the way.
• When changing quickly from maximum to minimum flow and vice versa make sure that the flame
does not go out.
ENSURE THE MINIMUM FLAME WILL NOT BE EXTINGUISHED BY AIR DRAUGHTS
Check that the igniter for each burner successfully ignites the gas and that the burner remains
alight. If an igniter fails to work or a burner fails to remain alight, first remove the plug from the
electrical power outlet, and then check that all electrical connections are in place. If the hotplate fails
to operate correctly, contact Eurolinx Pty Ltd or their appointed agent for service. When satisfied that
the hotplate is operating correctly, instruct the customer in its safe operation. Ensure the customer
understands fully by having them operate the hotplate in all its functions.
INSTALLATION INSTRUCTIONS
BUILT-IN COOKTOPS
BUILT-IN COOKTOPS
ILVE COOKTOPS OPERATING MANUAL ILVE COOKTOPS OPERATING MANUAL
26 27
Pressure Adjustment
First turn the gas off to the appliance. Remove the sealing screw from the regulator’s test point at the
rear of the appliance and place the hose of the Manometer onto it. Turn the gas on to the appliance and
light the Wok Burner and Small Burner at maximum setting. Check the pressure and adjust at the regulator
if necessary to the setting in the table on the last page or the Data plate. For ULPG Gas adjust at the
regulator on the cylinder – Turn regulator adjusting screw clockwise increases pressure whilst
anti-clockwise decreases pressure. Refit the test point sealing screw when finished.
Electrical Equipment and Components
Electrical componentry is primarily located below the hob surface. Removal of the hob is straightforward
by removing the control knobs, trivets, the burner caps and burner head assemblies and skirts. Using
a flat bladed screwdriver remove the five screws, one in each corner of the hotplates left and right spillage
bowls and one centrally located at the rear of the centre spillage bowl. Than lift the hob upwards.
Replacement is a reversal of the above procedure. Care must be taken to ensure that no damage occurs
to the spark ignition leads or the igniters. The electronic ignition pack is easily accessible for service or
replacement below the hob centrally at the rear.
ALWAYS ENSURE THAT THE POWER SUPPLY IS DISCONNECTED BEFORE SERVICING APPLIANCE
Gas Controls And Gas Manifold
Removal of the gas manifold is accomplished by removing the control knobs, the trivets, the
burner caps and burner head assemblies and skirts. Using a flat bladed screwdriver remove the five
screws, one in each corner of the hotplates left and right spillage bowls and one centrally located at the
rear of the centre spillage bowl. Care must be taken to ensure that no damage occurs to the spark ignition
leads, igniters or thermocouples (if fitted). Disconnect all ancillary gas piping. Remove the two securing
screws from the positioning brackets at the front and also the securing bracket near the gas inlet point to
the burner compartment. The gas manifold may then be extracted. Replacement is a reversal of the above
procedure.
ALWAYS ENSURE THAT THE GAS CONNECTION IS DISCONNECTED BEFORE SERVICING APPLIANCE
Conversion
If the appliance is to be used with another gas type, either ULPG Gas or Natural Gas, it must be converted
by an Authorised Person. Contact Eurolinx Pty Ltd or their unathorized agent for details. For Natural and
ULPG Gas Injector Sizes and Mj/H refer to tables on pages 21 & 22. The table on page 22 shows the
appropriate injector sizes for either ULPG Gas or Natural Gas.
NOTE
After conversion check the GAS PRESSURE and IGNITER OPERATION for the burners. If the hotplate
cooker cannot be adjusted to perform correctly, or if there is excessive flame discolouration, yellow tipping
or excessive noise contact ILVE or their authorised agent for advice. It is also recommended
that this appliance be serviced at 12 months minimum intervals or sooner as required. Please also ensure
that the duplicate data plate supplied be attached to the appliance or in an accessible place such as a
cupboard for future reference.
IMPORTANT:
Verify periodically the gas connection pipe and replace it as soon as any irregularity is present.
IMPORTANT: Correct positioning of the brass flame distributor is very important. For this purpose, ensure that
the flame distributor tooth coincides with the notch on the aluminum base. To keep the flame
distributor covers new, you are advised to remove them before lighting the flame.
The Manufacturer declines any liability in case of direct or indirect damages caused by an incorrect
installation, changes, poor servicing or incorrect use.
Eurolinx Pty Ltd
48-50 Moore Street Leichhardt NSW 2040
T: 1300 MY ILVE (694 563)
F: 02 8569 4699
ACN: 001 473 347
SERVICE
All warranty service calls must be booked though ILVE’s Customer Care Department at
customercar[email protected] or 1 300 85 64 11 option 1 . For out-of-warranty service you can find
authorised service agents in your area at
https://support.eurolinx.com.au/#/map/retailers
or by contacting us via email at: customercar[email protected]
ANCILLARY SERVICE INFORMATION
GUARANTEE
BUILT-IN COOKTOPS
BUILT-IN COOKTOPS
ILVE COOKTOPS OPERATING MANUAL ILVE COOKTOPS OPERATING MANUAL
28 29
Rangehoods
Rangehood filters need to be washed regularly by using warm soapy water and dried using a soft
dry cloth. There are various commercial products available which also may be used. Follow
manufacturers’ directions for use. Cleaning filters in the dishwasher: The heavy alkalinity of dish washing
detergents could damage filters. If you choose to wash the filters in the dishwasher we recommend you
use a hot rinse mode with no detergent.
Recommended cleaning products
Burner Skirts and Brass Burners:
• Autosol metal polish, available at automotive shops
• Autosol shine, available at Car auto retailers
Solid Plates:
• Hillmark solid hotplate protector, available at supermarkets
Ceramic Plates:
• Hillmark Cera-clean, available at electrical stores
• Hillmark CeraPol, available at Supermarkets
Take care not to drop substances containing sugar on the hob,
if this does happen clean with warm water immediately
Enamel Interior of Ovens:
• Non-Caustic oven cleaner. Spray the cleaner onto a damp cloth rather than spraying directly into oven to
prevent the spray getting onto the catalytic liners, which can cause damage.
Stainless Steel:
• Cut back stainless steel solution for initial use only, available from ILVE Showrooms or shop.ilve.com.au
• 3M Stainless Steel Cleaner and Polisher, available at supermarkets
• Gumption, available at supermarkets
• Watered down Windex (1/3 Windex to 2/3 water) available at supermarkets
IMPORTANT: Always use non-caustic cleaners on Ilve products The above products are
recommendations only. ILVE will not be held responsible for any non ILVE product.
NOTE: ILVE sells a select range of cleaning products through our showrooms
and on our NEW online shop.
Cooktops
Clean the stainless steel cooktop surface after each use with a clean cloth and normal detergent. Make
sure the detergent does not contain chloride or any chloride compound. For persistent stains use warm
vinegar or a non-abrasive cleaner. To make cleaning easier always wipe spills when they occur, do not
leave them to dry as this makes cleaning harder.
Trivets
Trivets should only be cleaned once they have cooled, to stop crazing from occurring. To clean trivets,
wash in sink with warm soapy water then dry immediately using a clean dry cloth. Do not use anything
too abrasive such as a chrome detergent as this may cause damage. The alkalinity of dishwashing
detergents could damage the trivets. If you choose to wash the trivets in the dishwasher we recommend
you use a hot rinse mode with no detergent. Enameled trivets may over a period of time discolour, this is
due to exposure to a naked flame which may burn the enamel edge off the tips of trivets. This will not
affect the performance of the cooktop. To remove surface staining use any cooking oil and a fine brush or
scourer, lightly oiling trivets will also help in keeping their new appearance.
Burner caps
The burner caps sit on the brass burners. To clean, remove and wash in warm water. Burner caps should
not be put into cold water immediately after use, as crazing will occur, always allow caps to cool before
cleaning. ILVE recommend removing the burner caps when cooking as they are only cosmetic.
Brass burners
The brass burners will tarnish to a brown colour with use. To clean simply soak in white vinegar for 20
minutes to remove food splatter.
Aluminium skirts
The aluminium skirt from the base of the burner may be washed in warm soapy water using a gentle
scouring pad to remove any burnt on food splatter. A commercial product such as Autosol, which is
designed for cleaning aluminium, can be used following makers’ instructions. Do not put skirts in the
dishwasher as this will cause the aluminium to discolour. ILVE recommend burner skirt covers to help
protect the Aluminium Skirts
(available at all ILVE Showrooms or shop.ilve.com.au).
Stainless steel
Stainless steel can be cleaned using a range of commercial products and stainless steel cleaners. Follow
makers’ instructions, taking care when cleaning around the graphics. When cleaning, be sure to follow the
grain of the stainless steel as much as possible. Never use abrasive products on the stainless steel as it
will scratch the stainless steel. Take care not to drop substances containing sugar on the hob, if this does
happen clean with warm water immediately.
Oven light replacement
Replacement globes are available from the Ilve service department. When changing over the lamp always
switch off the power first. Unscrew the glass cover over the globe by twisting it anti-clockwise. If glass
cover is hard to unscrew, heat oven slightly, as this will heat any fat that might be congealed around the
glass, and unscrew using a cloth. Remove existing globe and fit new ‘edison screw’ bulb, refit the glass
cover and switch on the power.
NOTE: The light may be difficult to remove over time. Try using Multi-Grips being sure NOT to break the
bulb and/or glass.
ILVE DVD available for purchase
at shop.ilve.com.au
CLEANING, CARE & MAINTENANCE
BUILT-IN COOKTOPS
BUILT-IN COOKTOPS
ILVE COOKTOPS OPERATING MANUAL ILVE COOKTOPS OPERATING MANUAL
3130
TEPANYAKI
ILVE RECIPES
Steamed Trout with
Dill & Lemon
Marinated Seafood
Skewers
Fettuccine with
Chilli & Garlic
Australian BreakfastTepanyaki
Serves 2
Preparation time:
10 minutes
Cooking time:
10 minutes
Ingredients:
2 piece of trimmed steak
(the cut of meat is up to you)
2 pieces of salmon steaks
(or any other fish steak)
½ a capsicum
4 mushrooms
½ a bunch of rosemary leaves
½ an onion chopped
1 bunch of shallot tails
1 garlic clove
Extra virgin olive oil
Salt and pepper
Cut and trim vegetables place in
deep bowl and mix in rosemary
leaves garlic and extra virgin olive
oil and mix well.
Pre heat teppanyaki plate on high for
10 minutes.
Brush steak and chicken with extra
virgin olive oil and season to task
with salt and pepper then add to the
teppanyaki plate.
Once the steak and salmon require
turning add the vegetables to the
teppanyaki plate and work the
vegetables until meat has finished
cooking then serve.
More recipes are available on
the ILVE operating Instructions DVD
available for purchase at shop.ilve.com.au
32 33
FETTUCCINE WITH
CHILLI & GARLIC
AUSTRALIAN
BREAKFAST
Serves 2
Preparation time
10 minutes
Cooking time
10 minutes
Ingredients:
4 eggs
4 sausages
6 rashes or bacon
2 large mushrooms sliced
2 tomatoes halved
Heat teppanyaki plate up for
10 minutes then brush plate with
extra virgin olive oil.
Place sausages on teppanyaki
plate and cook for 5 minutes
turning as needed.
Add bacon, mushroom, tomatoes
and cook for a further 5 minutes.
Add eggs onto the plate and remove
all food from the teppanyaki plate
when the eggs have cooked.
ILVE COOKING TIP
To avoid splatter and trap
heat, use ILVE’s teppanyaki
dome cover accessory.
Serves 4
Preparation time
10 minutes
Cooking time
10 minutes
Ingredients:
500g fettuccine
Salt
1 chilli sliced thinly
2 cloves garlic crushed
3 tablespoons olive oil
Grated parmesan
Bring large saucepan of
salted water to the boil.
Cook fettuccine, uncovered,
until just tender then drain.
Heat oil in a large frying pan,
add chilli and garlic,
frying gently for 2 minutes.
Add drained pasta to chilli
and garlic mix, toss gently to
combine. Divide pasta among
serving bowls and top with
grated parmesan.
ILVE COOKING TIP
For variations of this dish add
seafood, meats, cream or
tomato sauces according to
your taste.
34 35
STEAMED TROUT WITH
DILL & LEMON
MARINATED SEAFOOD
SKEWERS
Serves 4
Preparation time
20 minutes
Cooking time
5 minutes
Ingredients:
1kg seafood, salmon,
green prawns and octopus
½ cup (125ml) olive oil
Juice 1 lemon
2 cloves garlic, crushed
1 tablespoon parsley or
dill, chopped
Freshly ground pepper, to taste
Bamboo skewers, soaked
in water
Cut salmon into cubes, peel prawns
and cut tentacles off octopus,
leaving on tails.
Mix together oil, lemon, parsley or
dill and pepper to taste in a bowl,
making marinade.
Add seafood and marinate for about
15 minutes.
Heat teppanyaki plate or grill
plate to hot.
Place skewers on heated plate and
cook for approximately 5 minutes,
turning frequently.
Serve immediately.
ILVE COOKING TIP
Do not overcook seafood,
generally once it has lost
its opaque appearance the
seafood is ready.
Serves 6-8
Preparation time
10 minutes
Cooking time
15 minutes
Ingredients:
1 500g trout, cleaned
and scaled
1-2 cups (500mL) fish stock
or water
Sprigs of dill
1 lemon, sliced
1 spanish onion, sliced
Place trout, dill, lemon slices
and spanish onion slices onto a
perforated tray into fish kettle.
Carefully pour in 1-2 cups of water
or stock in fish kettle and lower tray
with trout carefully into fish kettle,
cover with lid.
Steam the fish with a gentle simmer
for approximately 10-15 minutes.
Test fish after 10 minutes by using a
fork to flake the thickest part of the
trout. It is ready when it flakes easily.
ILVE COOKING TIP
Check fish with point of knife
by lifting the flesh, fish will be
ready when the opaque
appearance of the flesh is gone.
36 37
Eurolinx Pty Limited A.B.N. 50 001 473 347
trading as ILVE (“ILVE”)
Office:
48-50 Moore Street, Leichhardt N.S.W 2040
Post:
Locked Bag 3000, Annandale, N.S.W 2038
P: 1300 856 411
WARRANTY REGISTRATION
Your ongoing satisfaction with your ILVE product
is important to us. We ask that you complete the
enclosed Warranty Registration Card and return
it to us so that we have a record of the ILVE
product purchased by you, Alternitivley, you can
now register your warranty online at
http://support.eurolinx.com.au/
PRIVACY
ILVE respects your privacy and is committed
to handling your personal information in
accordance with the National Privacy Principles
and the Privacy Act 1988 (Cth). A copy of the
ILVE Privacy Policy is available at www.ilve.
com.au. ILVE will not disclose any personal
information set out in the Warranty Registration
Card (“Personal Information”) without your
consent unless required by:
1. law;
2. any ILVE related company;
3. any service provider which provide services
to ILVE or assist ILVE in providing services
(including repair and warranty services) to
customers. Our purpose in collecting the
Personal Information is to keep a record of
the ILVE product purchased by you, in order
to provide a better warranty service to you in
the unlikely event that there is a problem with
your ILVE product. ILVE may contact you at any
one or more of the addresses, email addresses
or telephone numbers set out in the Warranty
Registration Card. Please contact ILVE on 1300
694 583 should you not wish to be contacted by
ILVE.
WARRANTY
1. Warranty
ILVE warrants that each ILVE product will
remain, for a period of twenty four (24) months
computed from the date of purchase of the
ILVE product, free from defects arising in the
manufacture of the ILVE product (“Warranty”).
Except for consumer guarantees set
out in the Competition and Consumer Act 2010
(Cth) (“Act”), ILVE does not make any further
warranties or representations in relation to ILVE
products.
2. What is not Covered by the Warranty.
The Warranty does not apply if an ILVE product is
defective by a factor other than a defect arising
in the manufacture of the ILVE product, including
but not limited to:
(a) damage through misuse (including failure
to maintain, service or use with proper care),
neglect, accident or ordinary wear and tear
(including deterioration of parts and accessories
and glass breakage);
(b) use for purpose for which the ILVE product
was not sold or designed;
(c) use or installation which is not in accordance
with any specied instructions for use or
installation;
(d) use or operation after a defect has occurred or
been discovered;
(e) damage through freight, transportation or
handling in transit (other than when ILVE is
responsible);
(f) damage through exposure to chemicals, dusts,
residues, excessive voltage, heat, atmospheric
conditions or other forces or environmental
factors outside the control or ILVE;
(g) repair, modication or tampering by the
purchaser or any person other than ILVE, an
employee of ILVE or an authorised ILVE service
contractor*;
(h) use of parts, components or accessories
which have not been supplied or specically
approved by ILVE.
(i) damage to surface coatings caused by cleaning
or maintenance using products not recommended
in the ILVE product handbook provided to the
purchaser upon purchase of the ILVE product;
(j) damage to the base of an electric oven due to
items having been placed on the base of the oven
cavity or covering the base, such as aluminium
foil (this impedes the transfer of heat from the
element to the oven cavity and can result in
irreparable damage); or
(k) damages, dents or other cosmetic
imperfections not aecting the performance of the
ILVE in respect of an ILVE product purchased as a
“factory second” or from display
The Warranty does not extend to light globes
used in ILVE products.
3. Domestic Use
Each ILVE product is made for domestic use. This
Warranty may not extend to ILVE products used
for commercial purposes.
4. Time for Claim under the Warranty
You must make any claim under this Warranty
within twenty eight (28) days after the occurrence
of an event which gives rise to a claim pursuant
to the Warranty, by booking a service call on the
telephone number below.
Continued over...
5. Proof of Purchase
Customers must retain proof of purchase in order
to be eligible to make a warranty claim in respect
of an ILVE product.
6. Claiming under the Warranty
Customers will bear the cost of claiming under this
Warranty unless ILVE determines the expenses
are reasonable, in which case the customer
must claim those expenses by providing written
evidence of each expense to ILVE at the address
on the Warranty Registration Card.
7. Statutory Rights
(a) These terms and conditions do not aect your
statutory rights.
(b) The limitations on the Warranty set out in this
document do not exclude or limit the application
of the consumer guarantees set out in the Act or
any other equivalent or corresponding legislation
in the relevant jurisdiction where to do so would:
(i) contravene the law of the relevant jurisdiction;
or
(ii) cause any part of the Warranty to be void.
(c) ILVE excludes indirect or consequential loss
of any kind (including, without limitation, loss of
use of the ILVE product) and (other than expressly
provided for in these terms and conditions)
subject to all terms,
conditions and warranties implied by custom, the
general law, the Act or other statute.
(d) The liability of ILVE to you for a breach of any
express or non-excludable implied term, condition
or warranty is limited at the option of ILVE to:
(i) replacing or repairing the defective part of the
ILVE product;
(ii) paying the cost of replacing or repairing the
defective part of the ILVE product;
(iii) replacing the ILVE product; or
(iv) paying the cost of replacing the ILVE product.
(e) Our goods come with guarantees that cannot
be excluded under the Australian Consumer
Law. You are entitled to a replacement or refund
for a major failure and for compensation for any
other reasonably foreseeable loss or damage.
You are also entitled to have the goods repaired
or replaced if the goods fail to be of acceptable
quality and the failure does not amount to a
major failure.
8. Defects
Any part of an ILVE product deemed to be
defective and replaced by ILVE is the property of
ILVE. ILVE reserves the right to inspect and test
ILVE products in order to determine the extent of
any defect and the validity of a claim under the
Warranty.
*For your closest ILVE authorised service
agent go to
https://support.eurolinx.com.au/#/map/retailers
All warranty service calls must be booked
through ILVE’s Customer Care Centre on
customercar[email protected] or
1300 85 64 11 option 1
01012018
37ILVE Operating Manual
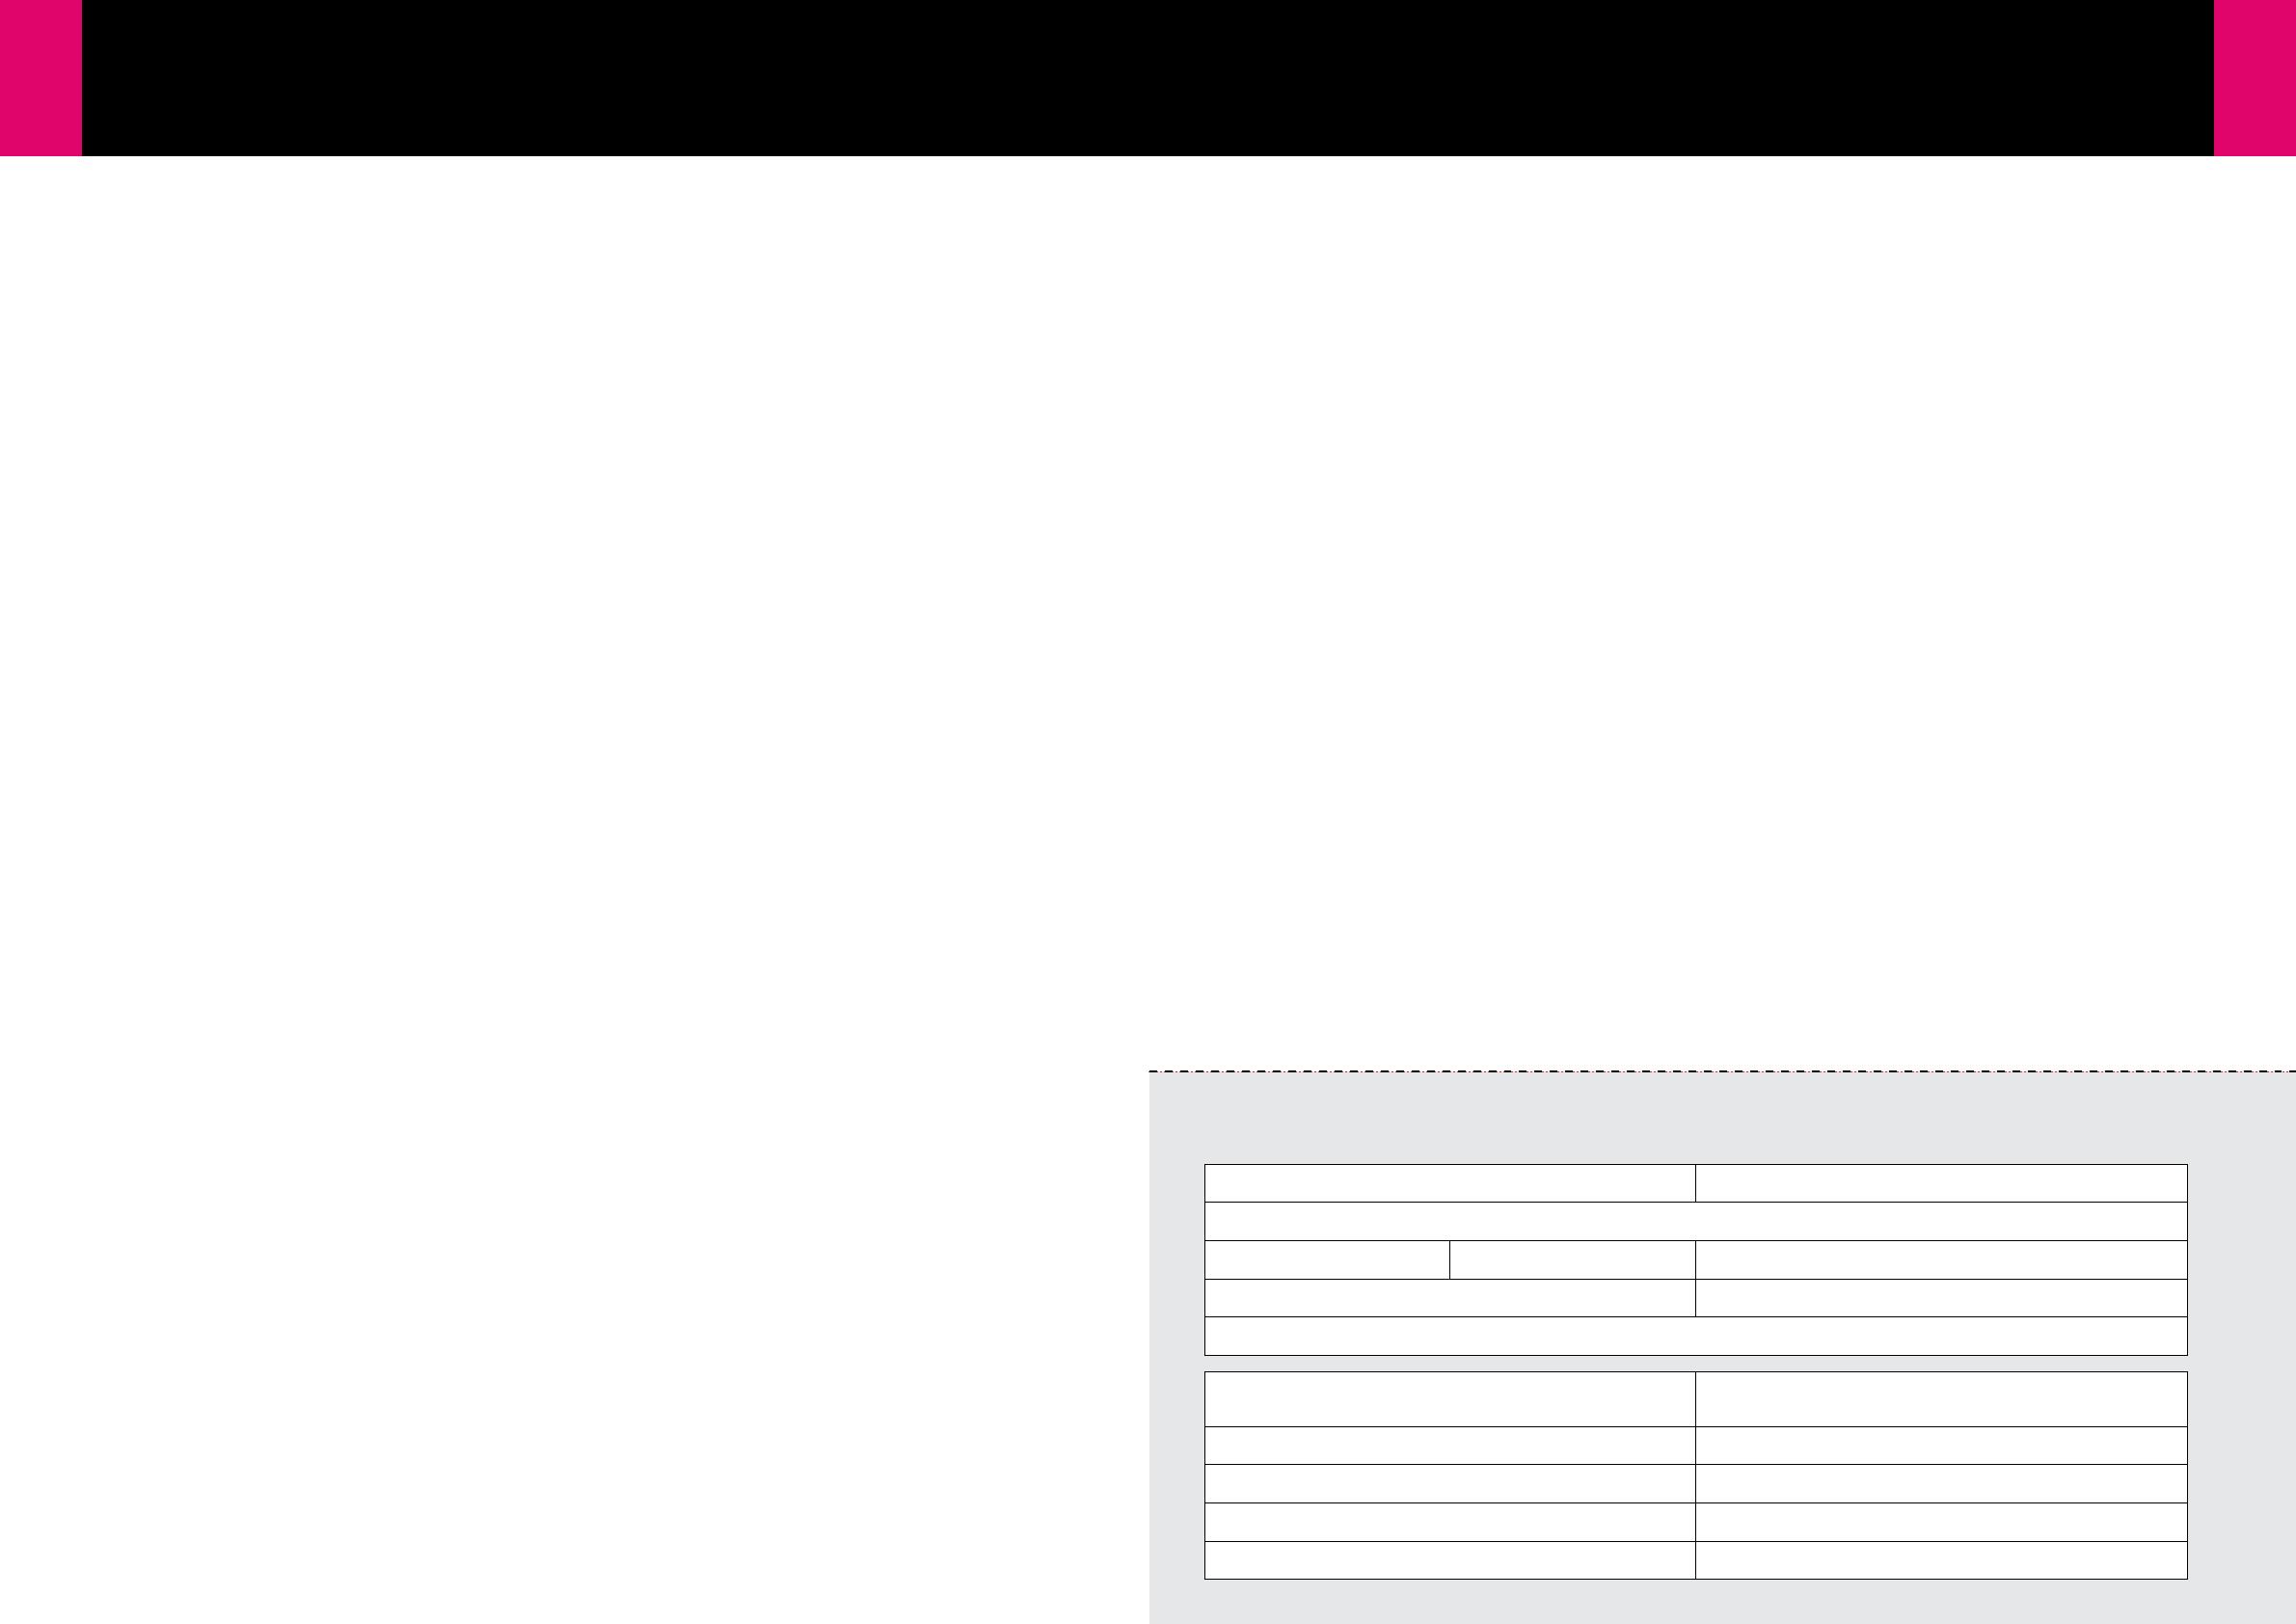
Please complete and send to ILVE at: REPLY PAID 83617
LEICHHARDT NSW 2040
Last Name: First Name:
Address:
State: Postcode: Email:
Home Phone: Mobile:
Purchase Date: / /
(Please attach proof of purchase to validate warranty)
MODEL NUMBER
SERIAL NUMBER
(if you cannot locate the serial number please call ILVE on 1300 85 64 11)
1
2
3
4
WARRANTY REGISTRATION CARD
01032017
01012018
Warranty Card tear off
WARRANTY CARD
WARRANTY CARD
CONTINUED
ILVE.COM.AU
ILVE.COM.AU
BUILT-IN COOKTOPS
BUILT-IN COOKTOPS
ILVE COOKTOPS OPERATING MANUAL
38 39
01012018
facebook.com/ILVEappliances
twitter.com/ILVE_appliances
youtube.com/ILVEappliances
livewithilve.com
You can now find us on:
PROBLEM ANSWER
COOKTOPS
My burners will not ignite
• Check to see if the brass burners are placed correctly into the aluminium base. This is very
important as it will ensure the flame holes line up with the ignition post and spark. It will also
ensure correct combustion when alight.
• Does your ILVE cooktop have flame failure devices fitted? Ensure burners are located correctly
as above. When burner is lit, ensure knob is firmly depressed for 5 to 10 seconds.
• If their is a saucepan (or similar) on the burner, remove it before igniting
• Check to see that the electric igniter is lined up with the solid part of the burner
Does your ILVE cooktop have
flame failure devices fitted?
Ensure burners are located correctly as above. When burner is lit, ensure knob is firmly depressed
for 5 to 10 seconds. If new, ensure knobs are firmly fitted, check by pushing knobs down firmly
with the palm of your hand.
My ignition continually sparks
This may be due to a liquid spill over, which can cause moisture to enter into ignition micro
switches under knobs. Spraying liquid type cleaners can also create a problem. If this does
occur, the cooktop should be turned off at power point and left to dry out. Removing all knobs
and using a hair dryer on the control panel, will assist the drying out process.
All the igniters spark at the same
time when lighting
This is normal and how they are designed to operate.
The knob is loose on shaft
Knob retaining spring clip has come out. This does not require a service technician and can be
replaced by the customer. Please contact your ILVE state office, who will arrange for a clip to be
sent to you.
The burner is extinguished when
the cupboards or drawers are
opened or shut
In this case, the underside of the cooktop needs to be totally sealed off from the surrounding
cupboards or drawers.
The flame tips are yellow causing
the pots to blacken on the
underside
The gas type may be incorrect contact your installer and have him check the gas type and the
injector size and or the aeration needs adjusting see pages 40-41
The low flame is still to high The low flame bypass screw needs to be adjusted contact your installer and have him adjust the
low flame setting as per the specification on page 41.
iWarranty
REGISTER YOUR WARRANTY ONLINE NOW
GO TO: https://support.eurolinx.com.au/#/form/warrantyregistration
TROUBLESHOOTING
NOTES
ILVE.COM.AU
ILVE.COM.AU
BUILT-IN COOKTOPS
BUILT-IN COOKTOPS
ILVE COOKTOPS OPERATING MANUAL ILVE COOKTOPS OPERATING MANUAL
  • Page 1 1
  • Page 2 2
  • Page 3 3
  • Page 4 4
  • Page 5 5
  • Page 6 6
  • Page 7 7
  • Page 8 8
  • Page 9 9
  • Page 10 10
  • Page 11 11
  • Page 12 12
  • Page 13 13
  • Page 14 14
  • Page 15 15
  • Page 16 16
  • Page 17 17
  • Page 18 18
  • Page 19 19
  • Page 20 20
  • Page 21 21

Ilve XLP90FDT User manual

Category
Hobs
Type
User manual

Ask a question and I''ll find the answer in the document

Finding information in a document is now easier with AI