BURY CC 9060 Time Owner's manual

Type
Owner's manual

This manual is also suitable for

BURY Time Suite
Index
Introductory Information 2
1. General 2
Installation and types of use 3
2. Technical Requirements 3
3. Installation of the Software 3
4. The first time you use the BURY Time Suite 5
5. Installation of Software Updates 6
6. Use of the software with other users in the network 8
First steps 11
7. Overview of the menu items 11
8. Creating additional drivers 13
9. Create vehicles 14
10. Create destinations / contacts 15
11. Create journey reasons 18
12. Back-up / restore the database 19
Creating a drivers logbook 20
13. Importing positional data 20
14. Changing the positional data 25
15. Concluding tours 29
16. Print out the driver’s logbook 30
17. Removal of the old cars from driver’s logbook 31
18. Replacement of the device 32
Configuring BURY Time Products 34
19. The Configuration menu item 34
Further Information 38
20. Service 38
2
Introductory Information
1. General
Dear Customer,
We are pleased that you have decided to buy an electronic driver’s logbook system by BURY. This system,
which will be installed in your vehicle, also includes an administration program – the BURY Time Suite –
the operation of which is explained in detail below.
Please read through these instructions carefully to be able to use the full functional scope of the soft-
ware. If you have any further questions, please ask your specialist BURY retailer or ring our hotline.
The telephone and fax numbers are provided under the Services heading.
3
Installation and types of use
2. Technical Requirements
Prior to the installation of the BURY Time Suite, please check that your PC / laptop satisfies the follow-
ing technical conditions:
Processor: Intel Pentium (or equivalent) with 2 GHz
Operating system: Microsoft Windows 10, Windows 8, 8.1, Windows Vista, Windows 7,
.NET 3.5 Service Pack 1 (supplied on DVD)
Datenbank: Firebird SQL 2.1 (Integrated into installation package)
Working memory: at least 512 MB
Hard disk drive: at least 6 GB
Screen resolution: at least 1024x768 pixels
USB interface
If your PC / laptop does not correspond with the requirements then it may not be possible for the
software to be installed.
3. Installation of the Software
Place the DVD with the BURY Time Suite Software in the DVD drive of your PC / laptop. Your computer
will now start the installation routine automatically.
Note:
If the installation routine does not start automatically, please open Windows explorer and click X
on your DVD drive. Now open the ‘BuryTimeSuite’ drive and double click on the ‘BURYTimeSuite-
Setup.exe.’ file to start the installation routine manually.
Full installation package and/or update package are also available online at www.bury.com. X
Now select a language for the installation routine. You will then receive the descriptions for the instal-
lation which will be shown in this language. This does not have any affect on the subsequent menu
language in the BURY Time Suite. You can set this separately later on.
Please now read through the licence agreement. Once you have accepted this the installation can
continue.
Now select a path in which you would like to install the fields for the BURY Time Suite. If you are not
sure simply use the target directory that is provided. Make sure you also comply with the saving infor-
mation for the software and the memory that is available on your PC / laptop. Depending on the using
of the BURY Time Suite (single user / several users / amount of mapdata), the database and the saved
journeys may require several megabytes of memory. For this reason, please make sure that sufficient
resources are available in this context.
4
Installation and types of use
The installation process starts with a click on ‘install’ and the data will be transferred to the hard disc.
Depending on the hardware configuration of your PC / laptop, this may take 10 – 15 minutes. You can
see its progress on the green status bars.
Note:
You can cancel the installation process at any time. The files that have already been installed X
will then be deleted.
From software version 1.26 onwards (the update
1.26) the BURY Time Suite also supports the legal
regulations that apply in the Netherlands. In this
country, the law requests fewer details concerning
an electronic logbook than the laws that apply in
Germany, for instance. For you the user, in the fu-
ture the selection ‘Netherlands’ will mean less out-
lay, as certain compulsory fields are omitted. Fur-
ther details are provided in the following chapters.
Note:
If you do not submit your tax declaration X
in the Netherlands or Germany but in another coun-
try, for example, then you must click on the ‘Rest
of Europeduring the selection. You can also choose
‘Private’ (without required fields and logbook veri-
fication).
After all of the larger program files have been transferred you will be asked whether you would like to
create a desktop link. If you would like to do this, an icon will then appear on your desktop’s window.
You can then open the BURY Time Suite by double clicking on this symbol. Otherwise please click on
‘start in the taskbar, proceed to ‘all programs and look for an entry with the name BURY Time
Suite’.
Now click on ‘finish’ in order to complete the installation. The BURY Time Suite will then be started.
5
4. The first time you use the BURY Time Suite
When you open the BURY Time Suite for the first
time, you must set an administrator and enter
a user name and password. If you use the software
on a private basis, then you only manage your own
data. If you use the software in a network and sev-
eral people need to be able to work with it, than
the roles of the persons (who is the administrator)
should be defined in advance. Further information
about this subject is provided in the following
chapters.
In the User details window, now enter a password.
This can be alphanumerical and can also consist of
just one character. Passwords are case-sensitive,
so please take care when you are entering it.
The password will only be displayed to you in aster-
isks, which means that making a typo is quite
easy.
For this reason, you have to enter your password
a second time. The details that you enter are com-
pared against each other. You can only click
on ‘Save’ and finish entering the data if both sets
of details match.
Note:
You can also amend the details of the user X
subsequently within the software program.
The BURY Time Suite does not support a pass-X
word reset for an administrator-user. Therefore
please keep this password safe in another way;
via a password manager, for example.
The login for the BURY Time Suite now appears. Enter
your password once again and set the menu language
with which you wish to use the BURY Time Suite.
The software will start when you click on “OK”.
Immediately after the password input in the window above, the window that asks for automatic search
for update is displayed: “You would like to activate the automatic search for updates for the BURY Time
Suite. For this purpose, as long as your computer is set up accordingly, a connection will be made with
the internet. After starting the BURY Time Suite a connection will be made with our server and it will be
6
Installation and types of use
checked as to whether an update is available there.
In this case, this will be highlighted to you in the
menu bar on the right next to the ‘Help’ item. No
data from the BURY Time Suite will be transmitted
during this task.
Would you like to activate the automatic search
feature now?
Only after reply to this question, if no detailed
maps are installed (that is the default, if the user has downloaded the software and opens it for the
first time) a message will be shown: “No map data has been found. Please select at least one country
from the list. The map data will be downloaded and installed.” (Map material - see page 35)
Note:
If the software is installed from DVD, map material of the following countries: Germany, X
Switzerland, Austria, the Netherlands, Denmark will be installed automatically.
Important note:
The use of Cleaning or Performance Tools software for the cleansing of old data and settings X
in the Windows registration database that are apparently no longer used may mean that it is no
longer possible to start the BURY Time Suite. In this case, the suite must be reinstalled.
If your PC / laptop just fulfils the minimum technical requirements for the installation and X
operation of the BURY Time Suite, then you should close all of the other applications when you
work with this software.
5. Installation of Software Updates
When purchasing your BURY product including electronic logbook you automatically receive the latest
version of the BURY Time Suite on DVD or you can download it from the web page www.bury.com.
It can be the case, however, that depending on the number of intermediaries, your product may have
been in circulation for a certain period of time before you are finally in receipt of it. For this reason,
after installation and long term use, you should check the software to see whether an update is avail-
able for your version. To check this, please note the version number that is displayed on starting the
software:
7
The version number shown in the example is 1.13. Several updates are available on the internet for this
version on the page www.bury.com with the version numbers 1.24, ..., 1.37 and 2.0 (as at October
2015) Save the files that are provided there onto your computer and install them successively starting
with 1.37 and 2.0.
Note:
It is not possible to update from version 1.13 to 2.0 directlyX !
Your BURY Time Suite software is then up to date again. You can read about the alterations
to the recorded updates in the ‘Release Notes.
Update of the software can be performed automatically by selecting File -> Settings and selecting
Check for updates.
If an update is available one should click the information in the toolbar. A window with current information
about the current update version opens.
In the case of clicking OK/Update, downloading and installation of the update takes place.
Update will be downloaded and it will be installed. Please wait…
After clicking No/Cancel you will return to the main menu.
Note:
If you use BURY Time Suite in the network you should first update an installation X
on the server.
Installation of an update finished successfully. BURY Time Suite will be started once again.
Installation of an update failed. Please try again.
After installation of BURY Time Suite update the computer should be restarted.
If the new update is available with each start of BURY Time Suite there will appear a notification win-
dow informing of the new update and possibility of performing it directly in this window.
8
Installation and types of use
é
6. Use of the software with other users in the network
Premise:
Your company owns several company vehicles which some employees are also able to use privately
in addition to their work-related use. The vehicles are equipped with an electronic driver’s logbook
from BURY Technologies. The administration and storage of the recorded positional data of all vehicles
shall take place centrally in a database. The employees work locally at their workstations using
the BURY Time Suite and are able to create their individual logbooks.
Step 1:
Appoint an administrator / personal contact in your company who enters and maintains the users,
vehicles and drivers within the BURY Time Suite. Depending on the structure and size of your company,
these employees can be entrusted with additional tasks, such as read-out of the positional data of the
vehicle systems, if this is not to be carried out by the individual employees.
Note:
Please note that these employees are able to access the personal data of other persons. X
The corresponding confidentiality obligations should therefore be agreed with these employees.
The employee should be suitable for carrying out the activity, e.g. through demonstrating X
special knowledge regarding the German Federal Data Protection Act, data protection in general
and data security.
Step 2:
Install the BURY Time Suite on a server which all employees who are going to work with this adminis-
tration software are able to access. Note down the path (IP address / drive letters and directory
names) for the directory in which the GPSLOGGERDATABASE.FDB database is to be found.
The data for the user administration and positional data is saved in this file.
Step 3:
Copy and paste the additional program users into
the master data. In order to create a new data set,
click on the ‘plus’ symbol, which is situated at the
bottom of the screen. Up to 1,000 additional users
can be added and can subsequently work simulta-
neously with the BURY Time Suite.
9
An input window appears for the user details.
Here, first of all enter the user name. This should
be chosen so that is as clear as possible and,
if available, corresponds with your in-house desig-
nation guidelines.
Subsequently enter all of the additional details in as
far as you want to maintain the secondary data of
the employee here. A photograph of the employee
can also be added by clicking on the photo
section.
The compulsory fields are equipped with a red
frame. These have to be filled in to be able to input
the data set. Finally, specify a password for the
user. Next, click on ‘save’ in order to input the data
set. The new user now appears under the entry for
the administrator who you entered when you first
started the administration software.
Repeat step 3 until all of the users have been registered.
Step 4:
Also install the software on the PC systems of the employees who are to use the BURY Time Suite
software later.
Start the BURY Time Suite and enter a password for the administrator. This password is completely
independent of the one which you used on the server during the installation. For safety reasons,
it should differ from it, however. You can use this new password with all subsequent installations.
As a rule, it won’t be needed any more in the future, as the users don’t use the local database but
the database of the server.
After the appearance of the user interface, click on File and then on Settings in the upper left corner.
In the window which then opens, please enter the IP address of the server and the noted path details
of the database. By clicking on test connection’ you can check your inputs and the access. A corre-
sponding message appears. If the details are correct, please click on ‘save’. The BURY Time Suite
is subsequently closed.
10
Installation and types of use
The employees can now log on with their user
name and the passwords which you have previ-
ously entered during the server installation.
The setting up of network is now complete.
Note:
The users are no longer able to log in with ad-X
ministrator rights unless you have granted them
this user right for their user account.
If a user activates their local database, then they
are not able to log on again after closing the soft-
ware as they do not know the (second) password of
the administrator and no additional users are stored
in their local database. Only the administrator
is able to specify the correct database again.
11
First steps
7. Overview of the menu items
In the BURY Time Suite you will find the three subject areas Logbook, Own data and Configura-
tion. You can activate these sections and their sub-functions via the menu bars.
Menu items in the logbook section
You can enter the missing data for your journeys under Processing routes.
Clicking on View map opens a map of Europe, on which you can zoom into your corresponding area
of application. To do this, please use your mouse wheel or press “+” or “-” in the zoom bar on the left.
Under Driver’s logbook you will find your journeys, and you can display and print these in different
ways using the filter settings.
Menu items in the own data section
If you are logged on as an administrator, you can create other users under Program users who are
allowed to work with the program. Double-click with the left mouse button on an existing entry to edit
it. Click on +to create additional users. A window opens in which the user data can be entered. Here,
you must pay attention to the assignment of user rights. If you are using the administrative program
without administrative rights, you will not be able to see this menu entry.
If you have locations that you frequently drive to, you can enter the data of persons or companies
under Destinations/Contacts. These can later be easily applied to your journeys or are automati-
cally recognised and entered with data import.
If you use or manage more than one vehicle, these can be assigned and maintained under Cars.
12
First steps
If a vehicle is used by several drivers (e.g. in the family or in fleets), these can be entered under Driv-
ers. The drivers, however, are not program users, and can therefore not manage their journeys
themselves.
Various Journey reasons can be entered under the same menu item. This is an advantage
if the journey is made regularly, e.g. journeys to customers, service trips, commuting trips etc.
Menu items in the configuration section
In this menu, the functional scope is dependent on several factors. The menu item Backup database
Restore database, Reset database and Delete all tours from database can only be used and
viewed if you have administrator rights. With the first two features, you can save your data
on a separate drive at any time and recopy any lost data.
The other menu items can only be used when the corresponding BURY product is connected to the PC
using an USB cable or an SD card with position data.
In Device configuration you can, for example, define the standard journey type. This is then auto-
matically set when the power supply to the system in the vehicle is established (ignition/engine on).
Clicking on Danger zones, brings up a new window. Here you can play a file on your BURY product
or the SD card, in which more than 25,000 danger zones are saved for the whole of Europe. If the file
is available on the BURY product, a warning function is automatically activated in front of these loca-
tions.
Using the Factory reset menu item, you can delete the entire memory of connected BURY system
or the SD card. This should be carried out after the data is read for the driver’s log and in the case that
the system is used in a new vehicle.
With the Firmware update menu item, you can update the connected BURY system. In the event
that an SD card is connected, the new firmware is stored to this and the system is later updated
in the vehicle.
If you would like to read data from an SD card, the administrative program must first be notified
of the drive. This can be carried out in the next menu item Connect to UNI CarTalk Time card.
If you would like to read out data from other BURY products with an electronic logbook, you can also
do that here.
13
Additional menu items
In the top menu bar you can find the two items of File and Help.
Using the Settings menu item under file, you can enter an alternative path to your database. This is
useful when saving the database on another drive or with several users who only have to use one
database. You can also specify here as to whether the journeys that you make are being displayed in
the distance measurement unit of kilometres or English miles (stat.mi.). Via the next entry of Exit ap-
plication, you close the BURY Time Suite subsequent to a security question.
Under the menu item Help, you can find the contact details and telephone numbers of the manufac-
turer for possible questions.
8. Creating additional drivers
Every program user is automatically entered as
a driver in the driver administration. If it should
come to occur that another driver drives the vehicle
than the one to which the vehicle is assigned (and
they themselves are not a program user) then this
driver should be included in the driver administra-
tion separately.
Example for the private sphere:
You also use the company vehicle privately and a family member drives the car.
Example for the business sphere:
A colleague drives your car who does not have their own company vehicle.
Every program user is able to create additional drivers. During network operation, it is recommended
not making the drivers who are of a private nature visible to all users.
To enter an additional driver, please select Own data -> Drivers and click on the plus symbol on the
bottom of the screen. Enter the driver details in the window which then opens. These consist of the
driver ID and the first name and surname of the employee. The only compulsory field is the surname.
The driver ID can be an alphanumerical value with a total of 20 characters. In the event of business
use, personnel numbers can be used here, for instance. For an improved overview, the driver IDs
should be logically designed. After the data has been saved, the new driver is displayed in the list.
Note:
You can delete a driver again as long as no tours are booked in their name.X
14
First steps
9. Create vehicles
Before you create one or several vehicles, you
should acquire the vehicle documentation (regis-
tration document / certificate) and note down the
corresponding number of kilometres/mileage.
Under Own data, open the vehicle administration
using the Cars icon. Enter a new car by clicking on
the ‘plus symbol on the bottom of the screen.
In the window which opens next, you must fill in
the compulsory fields Licence, Mileage, From
date, User and Driver that are framed in red.
The number of kilometres/mileage should corre-
spond with the value that was displayed during the
installation of the electronic driver’s log system in
the vehicle. As an owner, please select either your-
self or a user who is able to use the vehicle pri-
vately. If no other drivers are available, the user
will be entered as the standard driver at the same
time.
The vehicle is listed subsequent to the saving of the information.
If several vehicles are created and you want to list these later according to your categories, then please
click on the corresponding category of licence plate, manufacturer or vehicle type. You will then be
shown the listing in ascending or descending form.
15
10. Create destinations / contacts
You can also store destinations/contacts here, such as your own address, that of your employer or your
office and frequently visited customers so you don’t have to enter them separately for every journey.
In the destination/contact administration you are able to enter new contact data or import existing
contact data from other software programs. It is also possible to import so-called CSV files.
Note:
In the descriptions/instructions concerning the software programs that you use, please read X
about how you can export the contact data you have stored in a CSV file.
Importing contact data
Please click once on the “Import contacts from...
button.
After the import, the contacts are listed in the form
of a table. To edit a contact, please click on the
corresponding line. If you would like to enter an-
other contact, please click on the Plussymbol on
the lower image border. The Details window then
opens in both cases.
16
First steps
Enter / edit new contacts
To enter a new contact, please click on the ‘Plus’ symbol. The Details window then opens with
the Address data and Map tabs. Using your address data, you then have to fill in compulsory fields
such as Name/Company, the Street and the City yourself.
If the contact you entered is for instance your employer’s address then entering a standard journey
purpose is recommended. You might decide to call this Journey to office’. This journey purpose is then
automatically used for all journeys that subsequently end at this address and does not need
to be entered manually.
You can optionally save the details of a contact partner. If you would like to enter a contact partner
(several are possible), please click on the ‘plus’ symbol behind the email entry field, to accept it.
If you have entered your contacts as appropriate, please click on save. Your contact will now be dis-
played in the list.
17
Entering coordinates via the Map tab
The BURY product that you use in your vehicle captures geographical coordinates from the GPS signals
it receives. These coordinates and/or positions can be displayed visually using the map material
in the BURY Time Suite. In order to display a contact you have entered or imported (the address)
and to be able to allocate your trips correctly, you also have to assign the contact coordinates.
This is only possible in the Map tab.
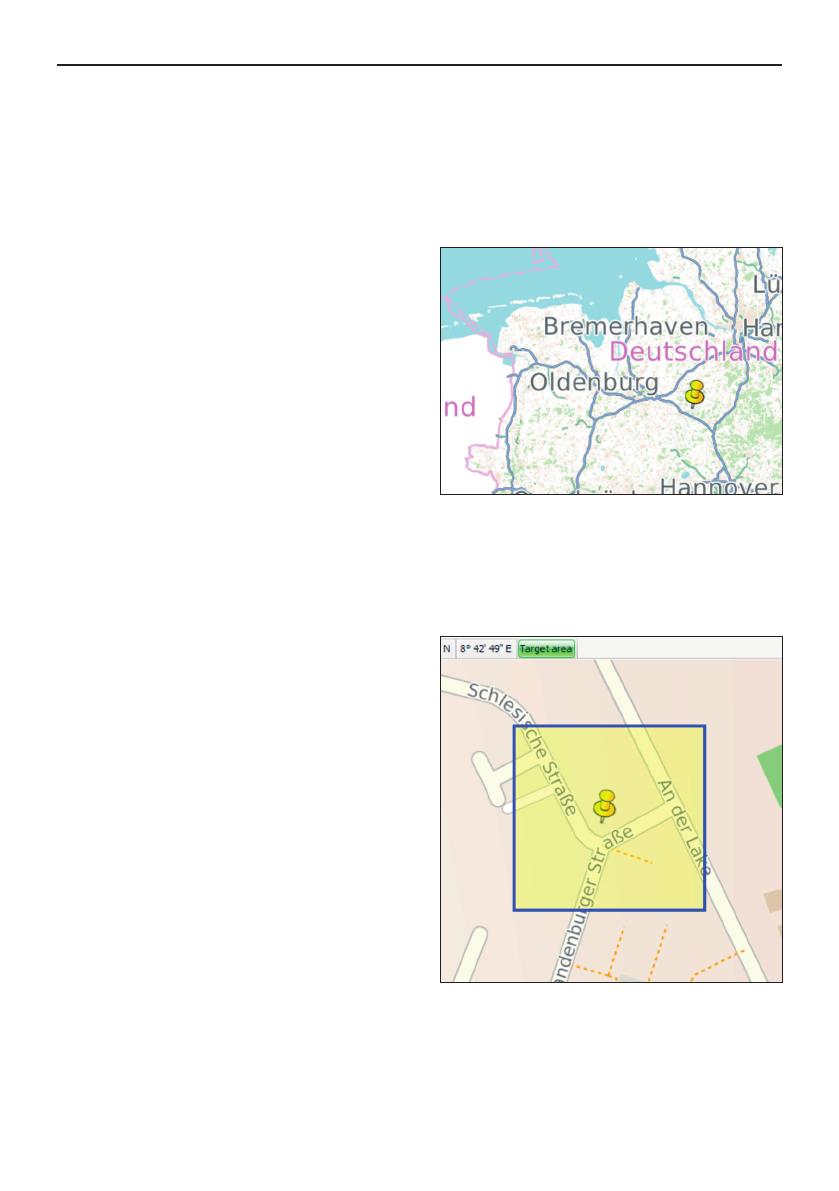
Using the left hand mouse key, you can highlight
a position on the map (yellow pin-tack). Since it is
difficult to enter a correct address in the initial view
you have to increase the level of detail. You can
zoom in on the map via the scroll column on the left
hand side or using the mouse wheel. You zoom in
on the map by moving the mouse wheel upwards
(away from yourself). If you move the mouse wheel
in the other direction (towards yourself), the scale
of the map excerpt becomes smaller and you don’t
see as many details.
Zoom in on the area in which the address of your
contact is located. If the map has been magnified
sufficiently then the pin-tack can positioned at the
correct place.
Since it is likely, however, that you are not always
able to drive to and call at these individual coordi-
nates with your vehicle, please set up a Target
area surrounding the specific position. To do this,
click on the button of the same name that is above
the map display so that this is deposited in green.
Next, press and hold down the left hand mouse key
and draw a sufficiently large frame around the
highlighted position.
As soon as you drive into this section later, the ad-
dress that was entered is automatically assigned.
This is an advantage if you have to park a few me-
ters away from it, e.g. because parking places are
occupied or due to building work. The same applies
if an address of a contact stretches over a large
area, e.g. an industrial estate.
Now, please click on ‘Apply. If information has already been entered for the addresses a warning no-
tice appears stating that this data will be overwritten.
18
First steps
Note:
If ‘Apply button is not pressed then address data from the selected position on the map will X
not be adopted.
After correct transfer of address information from Map tab to Address data tab one should save it by
pressing ‘Save’ button.
You can find a similar function in the function View map in the Logbook menu item.
These addresses can be used as templates when you are editing tours.
11. Create journey reasons
When managing several drivers, entering pre-de-
fined Journey reasons and making these visible
for all users is recommended. This means, for in-
stance, that certain journeys can be entered by us-
ers that have the same wording in all cases.
This increases the degree of clarity in the subse-
quent logbook.
19
12. Back-up / restore the database
Once all of the basic settings have been completed, backing up the database prior to importing
the first data is recommended. This means you can try out all of the functions at your ease during
the initial phase – when you may input test data for instance.
Note:
Only users who have been assigned administrator rights are able to backup and restore X
the database.
Open the menu item Configuration and then click on Backup database. A new window opens with
a wizard who leads you through the subsequent steps. The file ending for your back up file is *.fbk and
the file name consists of the current date and time as follows: backup_YYYYMMDDHHMMSS.
To restore a backup, a wizard is also initialised in a separate window. To carry out such a task, please
click on Restore database and follow the corresponding instructions.
Note:
The database should be backed up on a regular basis, and if possible on a separate data storage X
unit. Carrying out a back up prior to the importing of new position data is also recommended.
Back-up is carried out automatically before each import of the new data. This function X
can be disabled in the import window by unchecking the box in the field Backup database
before import.
In Reset database you can reset the database. All previously entered and scanned in data is perma-
nently lost! The BURY Suite Time will be restarted.
Under Delete all tours from database, all trips by all users will be permanently deleted from
the database.
20
Creating a drivers logbook
13. Importing positional data
In the BURY Time Suite, it is possible to load positional data from four electronic driver’s logbooks.
The differing work steps are described below for all of the products.
Important note:
Be sure, that the map material of the trips, we want to import, are installed. Otherwise no ad-X
dress for start- or destination position can be found.
Note:
After having connected BURY device to the computer with Windows 10 operating system X
the following window will be displayed:
Press “Cancel” button.
Important note:
Pressing “Format disk” may cause loss of data saved on the device.X
Please proceed as follows:
How to use the CC 9060 Time
1) Remove the CC 9060 Time monitor from your vehicle and note down the number of kilometres/
mileage.
2) Start the BURY Time Suite on your PC.
3) Connect the CC 9060 Time monitor to your PC via USB cable.
The automatic data import will start.
4) Select a user, if several have already been created.
5) Select a vehicle if several have already been created, or create a vehicle now.
6) Now select a driver if several have already been created, or create a new driver now.
7) Enter the current number of kilometres/mileage of the vehicle.
8) Now click on Import data.
  • Page 1 1
  • Page 2 2
  • Page 3 3
  • Page 4 4
  • Page 5 5
  • Page 6 6
  • Page 7 7
  • Page 8 8
  • Page 9 9
  • Page 10 10
  • Page 11 11
  • Page 12 12
  • Page 13 13
  • Page 14 14
  • Page 15 15
  • Page 16 16
  • Page 17 17
  • Page 18 18
  • Page 19 19
  • Page 20 20
  • Page 21 21
  • Page 22 22
  • Page 23 23
  • Page 24 24
  • Page 25 25
  • Page 26 26
  • Page 27 27
  • Page 28 28
  • Page 29 29
  • Page 30 30
  • Page 31 31
  • Page 32 32
  • Page 33 33
  • Page 34 34
  • Page 35 35
  • Page 36 36
  • Page 37 37
  • Page 38 38

BURY CC 9060 Time Owner's manual

Type
Owner's manual
This manual is also suitable for

Ask a question and I''ll find the answer in the document

Finding information in a document is now easier with AI