Page is loading ...

NOTICE D’EMPLOI ET D’INSTALLATION
TABLES VITROCERAMIQUES
INSTRUCTIONS FOR USE AND INSTALLATION
GLASS CERAMIC HOBS

CONSEILS DE SÉCURITÉ..............................................................5
1. Instruction générales ...................................................................5
2. Installation Encastrement .............................................................6
3. Encastrement ...............................................................................6
4. Le Raccordement électrique ........................................................6
5. Présentation selon modèle ...........................................................7
6. Le choix des ustensiles ................................................................7
7. Utilisation de la table ....................................................................7
8. Entretien .......................................................................................9
9. Problèmes et solutions ...............................................................9
10. Assistance technique ................................................................9
11. Protection de l’environnement...................................................10
CONTENU FR
SAFETY INSTRUCTIONS..............................................................11
1. General warnings .......................................................................11
2. Installation ..................................................................................12
3. Built-in ........................................................................................12
4. Electrical connection ..................................................................12
5. Presentation according to model ................................................13
6. Hob cookware advice .................................................................13
7. Use the ceramic hob ...................................................................13
8. Cleaning and maintenance ........................................................15
9. Problem solving ..........................................................................15
10. Aftercare ...................................................................................15
11. Protection of the environment ..................................................15
CONTENT GB-IE

60 cm
75 cm
A = 560 mm
B = 490 mm
A = 740 mm
B = 490 mm
B
LAYOUT 1
A
B
C
D
LAYOUT 2
B
C
A
LAYOUT 4
A
C
B
A
B
C
D
AB C D
LAYOUT1
1200 W 1800 W
2300 W
1800 W
LAYOUT2
1500+
900 W
3200 W 1200 W --------
LAYOUT3
1200 W
1050+900
+750 W
1800 W
LAYOUT4
3200 W
1500+
900 W
1800 W 1200 W
--------
LAYOUT 3
C
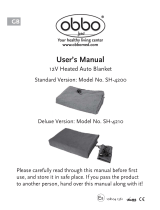
Plaque signalétique
(située sous le caisson inférieur de la table)
Identification Plate
(located under the hob’s bottom casing)
Code produit / Product code
Numéro de série / Serial N°
A

1 Touche MARCHE-ARRÊT / HOB ON-OFF Button
2 Touche de selection du FOYER DE CUISSON / COOKING ZONE selection button
3 AFFICHAGE: puissance, indicateur de chaleur résiduelle / DISPLAY : Heat level display, Residual heat indicator
4 Touche “-” / Touch “-”
5 Touche “+” / Touch “+”
6 Touche de selection du “MINUTEUR” / TIMER selection button
7 Affichage du MINUTEUR / TIMER display
8 Touche de VERROUILLAGE AVEC VOYANT / Control LOCKING button WITH INDICATOR LAMP
9 REPERE DU FOYER PROGRAMMÉ : lorsqu’il s’affiche, il indique que le foyer est pris en charge par le minuteur -
COOKING ZONE PROGRAMMING INDICATOR : when displayed, it shows that the timer controls the cooking zone
10 DIODE DE COMMANDE :
. allumé: le foyer ou le minuteur est actif, une modification est possible,
. éteint: le foyer ou la minuterie est figé sur la dernière information enregistrée
CONTROL LED :
. on: the cooking zone or timer is active, modification is possible
. off: the cooking zone or timer is set to the last recorded data
11 Touche de fonctionnement du FOYER COMPLEMENTAIRE* / ADDITIONAL COOKING ZONE control touch*
* selon modèle / according to model
E
D
Joint/Seal
Caisson de table
Hob
10 mm
mini
50 mm
Ouverture
Opening
500 X 50
Ouverture
Opening
500 X 10
Il est interdit d’enchâsser un four non ventilé sous la plaque de cuisson
It is forbidden to fit the hob above a non-ventilated oven
min 10 mm
de 25 à 45 mm
Niche accessible
Accessible space
min 70 cm
min 15 cm
min 5,5 cm

1. INSTRUCTIONS GENERALES
LIRE ATTENTIVEMENT LA NOTICE POUR VOUS PERMETTRE DE TIRER LE MEILLEUR PARTI DE VOTRE APPAREIL.
Nous vous conseillons de conserver la notice d'installation et d'utilisation pour toute consultation ultérieure, et de noter, avant installation de la
table, le numéro de série de l'appareil en cas d'éventuelle demande d'intervention du service après-vente (Fig. A).
Toutes ces caractéristiques sont données à titre indicatif. Soucieux de toujours améliorer la qualité de sa production, le constructeur pourra
apporter à ses appareils des modifications liées à l'évolution technique en respectant les conditions fixées à l'article R 132-2 du Code de la
Consommation.
Produit compatible avec les Directives Européennes 73/23/EEC et 89/336/EEC, remplacées par 2006/95/EC et 2004/108/EC, et les
modifications successives.
CONSEILS DE SÉCURITÉ
/HVHQIDQWVQHGRLYHQWMRXHUDYHFODSSDUHLO
&HWDSSDUHLOQHVWSDVGHVWLQpjrWUHXWLOLVpSDUGHVSHUVRQQHV\FRPSULVOHVHQIDQWVGRQWOHVFDSDF-
ités physiques, sensorielles ou mentales sont réduites, ou ayant un manque d'expérience et de con-
naissances, à moins qu'elles n'aient été formées à l'utilisation de l'appareil, par une personne respon-
sable de leur sécurité
/HQHWWR\DJHHWOHQWUHWLHQSDUOXWLOLVDWHXUQHGRLWSDVrWUHIDLWSDUGHVHQIDQWVVDQVVXUYHLOODQFH
6LOH FRUGRQGDOLPHQWDWLRQ HVWHQGRPPDJp LOGRLW rWUHUHPSODFp SDUOH IDEULFDQWXQH VWDWLRQGH
dépannage agrées ou une personne qualifiée afin d'éviter un danger.
$77(17,213RXUpYLWHUWRXWGDQJHUGjXQHUpLQLWLDOLVDWLRQDFFLGHQWHOOHFHWDSSDUHLOQHGRLWSDV
rWUHDOLPHQWpSDUXQGLVSRVLWLIGHFRPPXWDWLRQH[WHUQHFRPPHXQHPLQXWHULHRXFRQQHFWpjXQFLUFXLW
qui est régulièrement allumé et éteint par l'utilitaire.
/HVHQIDQWVGHPRLQVGHDQVGRLYHQWrWUHWHQXVjOpFDUWjPRLQVGrWUHVXUYHLOOpVFRQWLQXHOOHPHQW
ODSSDUHLOQHVWSDVGHVWLQpjrWUHXWLOLVHUDYHFXQHPLQXWHULHH[WHUQHRXXQV\VWqPHGHFRQWU{OHj
distance.
8Q V\VWqPH GH GpFRQQH[LRQ GRLW rWUH LQFRUSRUp GDQV OH FRPSWHXU FRQIRUPpPHQW DX[ UqJOHV GH
câblage.
/HV LQVWUXFWLRQV QGLTXHQW OH W\SH GH FRUGRQ j XWLOLVHU HQ WHQDQW FRPSWH GH OD WHPSpUDWXUH GH OD
surface arrière de l'appareil.
$9(57,66(0(17/DSSDUHLOHWOHVSDUWLHVDFFHVVLEOHVGHYLHQQHQWFKDXGVSHQGDQWOXWLOLVDWLRQ'HV
SUpFDXWLRQVGRLYHQWrWUHSULVHVSRXUpYLWHUGHWRXFKHUOHVpOpPHQWVFKDXIIDQWV
$77(17,21/DFXLVVRQVDQVVXUYHLOODQFHVXUXQHSODTXHGHFXLVVRQDYHFGHODJUDLVVHRXGKXLOH
SHXWrWUHGDQJHUHXVHHWSHXWHQWUDvQHUXQLQFHQGLH
Ne jamais tenter d'éteindre un incendie avec de l'eau, mais éteindre l'appareil, puis couvrir la flamme
par exemple avec un couvercle ou une couverture anti-feu.
1HSDVXWLOLVHUGHQHWWR\DQWVYDSHXUSRXUOHQHWWR\DJH
7RXWOLTXLGHGRLYHQWrWUHHQOHYpGXFRXYHUFOHDYDQWRXYHUWXUH
,OHVWUHFRPPDQGpGHODLVVHUUHIURLGLUODWDEOHGHFXLVVRQDYDQWGHUHIHUPHUOHFRXYHUFOH
/HIR\HUKDORJqQHpTXLSDQWODWDEOHYLWURFpUDPLTXHGpJDJHXQHOXPLqUHIRUWHQHSDVUHJDUGHUIL[H-
ment les lampes de ce foyer.
$SUqVFKDTXHXWLOLVDWLRQXQSHWLWQHWWR\DJHGHODWDEOHHVWQpFHVVDLUHSRXUpYLWHUODFFXPXODWLRQGHV
salissures et des graisses. Cellesci recuiraient à chaque nouvel usage et se carboniseraient en dégag-
eant une fumée et des odeurs désagréables, sans compter les risques de propagation d'incendie.
/DSODJHGHFRPPDQGHGHODWDEOHHVWVHQVLEOHQHSDVSODFHUGHVVXVGHVUpFLSLHQWVFKDXGV
1HMDPDLVFXLVLQHUGLUHFWHPHQWVXUODWDEOHHPSOR\HUGHVUpFLSLHQWV
3ODFHUWRXMRXUVODFDVVHUROHELHQFHQWUpHVXUOHIR\HUXWLOLVp
1HSDVXWLOLVHUODVXUIDFHGHODWDEOHFRPPHSODQFKHjGpFRXSHURXSODQGHWUDYDLO
1HSDVIDLUHJOLVVHUOHVFDVVHUROHVVXUODWDEOHULVTXHGHUD\XUHV
1HSDVVWRFNHUGREMHWVORXUGVDXGHVVXVGHODWDEOHLOVSRXUUDLHQWWRPEHUHWHQGRPPDJHUODWDEOH
1HSDVHQWUHSRVHUVXUODWDEOHGHVREMHWVTXHOVTXLOVVRLHQW
'DQVOHFDVLPSUREDEOHRXQHIrOXUHDSSDUDvWUDLWVXUOHYHUUHGpFRQQHFWHULPPpGLDWHPHQWODSSDUHLO
de l'alimentation et adressezvous directement au Service après-vente.
05 FR

La mise en place fonctionnelle des appareils ménagers dans leur environnement est une opération délicate qui, si elle n'est pas
correctement effectuée, peut avoir de graves conséquences sur la sécurité des consommateurs. Dans ces conditions, il est impératif
de confier cette tâche à un professionnel qui la réalisera conformément aux normes techniques en vigueur. Si malgré cette recom-
mandation, le consommateur réalisait lui-même l'installation, le constructeur déclinerait toute responsabilité en cas de défaillance
technique du produit entraînant ou non des dommages aux biens et/ou aux personnes.
2. INSTALLATION
3. ENCASTREMENT
/H PHXEOH RX OH VXSSRUW GDQV OHTXHO GRLW rWUH HQFDVWUpH OD WDEOH
ainsi que les parois du meuble qui pourraient juxtaposer celui-ci,
GRLYHQWrWUHGXQHPDWLqUHUpVLVWDQWjXQHWHPSpUDWXUHpOHYpH'H
SOXVLOHVWQpFHVVDLUHTXHOHUHYrWHPHQWTXLUHFRXYUHOHPHXEOH
ou le support soit fixé par une colle résistant à la chaleur afin d'éviter
le décollement.
Installation (Fig. B / D) :
8QMRLQWGpWDQFKpLWpHVWOLYUpDYHFODWDEOHGHFXLVVRQ3RXU
procéder à sa mise en place,
- retourner la table, face verre vers le bas, en prenant soin de
protéger le verre.
- placer le joint tout autour de la table.
- veiller particulièrement à le placer correctement afin d'éviter
toute infiltration dans le meuble support.
3UpYRLUXQHVSDFHGHFPPLQLPXPHQWUHODSSDUHLOHWOHVSDURLV
verticales avoisinantes.
6LHQIRQFWLRQGHOLQVWDOODWLRQGHODWDEOHODSDUWLHLQIpULHXUHGHVRQ
caisson se trouve à proximité d'une zone normalement accessible
lors de manipulations et/ou de rangements, placer une cloison à 1
FP GX IRQG GX FDLVVRQ SRXU pYLWHU WRXV ULVTXHV GH EUOXUH RX GH
détérioration.
"L'installation recevant l'appareil cité en référence doit être
conforme à la norme en vigueur dans le pays d'installation".
Le constructeur décline toute responsabilité en cas de non
respect de cette disposition.
Attention : vérifier la continuité de la terre de l'installation avant
de procéder au raccordement. Notre responsabilité ne saurait
être engagée pour tout incident ou ses conséquences
éventuelles qui pourraient survenir à l'usage d'un appareil non
relié à la terre, ou relié à une terre dont la continuité serait
défectueuse.
$YDQWGH SURFpGHU DX UDFFRUGHPHQW OH WHFKQLFLHQ GRLW YpULILHU OD
tension d'alimentation indiquée au compteur, le réglage du disjoncte-
ur, le calibre du fusible et la continuité de la terre de l'installation.
/H UDFFRUGHPHQW pOHFWULTXH DX UpVHDX GRLW rWUH HIIHFWXp SDU XQH
prise de courant avec prise de terre, ou par l'intermédiaire d'un
dispositif à coupure omnipolaire ayant une distance d'ouverture des
contacts d'au moins 3 mm.
Si l'appareil comporte une prise de courant, il doit être installé de
telle façon que la prise de courant soit accessible.
/HILOGHSURWHFWLRQYHUWMDXQHGRLWrWUHUHOLpDX[ERUQHVGHWHUUHGH
l'appareil d'une part, et de l'installation d'autre part.
7RXWH LQWHUYHQWLRQ VH UDSSRUWDQW DX FkEOH GDOLPHQWDWLRQ GRLW
LPSpUDWLYHPHQW rWUH UpDOLVpH SDU OH 6HUYLFH DSUqVYHQWH RX XQH
personne de qualification similaire.
4. LE RACCORDEMENT ELECTRIQUE
'pYLVVHUODYLVGXVHUUHFkEOH
UHSpUHUOHVGHX[ODQJXHWWHVVLWXpHVVXUFKDTXHF{Wp
SODFHUODODPHGXQWRXUQHYLVjODYDQWGHFKDTXHODQJXHWWHHW
HQIRQFHUHWSUHVVHU
VRXOHYHUOH capot.
- Libérer le câble d'alimentation :
GpYLVVHUOHVYLVGHODSODTXHjERUQHVTXLPDLQWLHQQHQWOHV
barrettes shunts et les fils conducteurs du câble d'alimentation.
5HWLUHUOHFkEOHGDOLPHQWLRQ
- Opérations à effectuer pour réaliser le nouveau raccordement:
- Choisir le câble d'alimentation en fonction des recommandations
du tableau.
- Passer le câble d'alimentation dans le serre-câble.
- Dénuder l'extrémité de chaque conducteur du câble d'alimentation
sur une longueur de 10 mm, en tenant compte
de la longueur nécessaire du câble
d'alimentation pour le raccordement à la
plaque à bornes.
- Comme il est indiqué sur le tableau, position-
ner les barrettes shunts que vous aurez
récupérées lors de la première opération en
respectant les marquages sur la plaque à
bornes (les barrettes shunts permettent
d'établir un pont entre deux bornes), et fixer les
conducteurs.
Veiller à l'efficacité du serrage sur les
différentes bornes.
- Refermer le capot et revisser le
serre-câble.
5DFFRUGHUjXQHSULVHGHFRXUDQWSRXUOHFKRL[GXIXVLEOHVH
reporter au tableau.
Il est toutefois possible d'adapter l'appareil pour un raccorde-
ment en :
. Triphasé 220-240 V3~ 50/60 Hz
. Triphasé 380-415 V3N~ 50/60 Hz
Pour procéder à un nouveau raccordement, il est impératif de
respecter les consignes citées ci-dessous.
7RXWGDERUGYpULILHUTXHOLQVWDOODWLRQHVWSURWpJpHSDUXQIXVLEOH
approprié, voir tableau, et que l'installation comporte des fils d'une
section suffisante pour alimenter normalement l'appareil.
5HWRXUQHUODWDEOHIDFHYHUUHFRQWUHOHSODQGHWUDYDLOHQSUHQDQW
soin de protéger le verre.
- Ouvrir le capot en suivant les étapes suivantes :
06 FR
ATTENTION:
$XFDVRLOVHUDLWQpFHVVDLUHGHUHPSODFHUOHFDEOHG¶DOLPHQWDWLRQ
assurez vous de respecter les codes-couleur suivants dans le
branchement de chacun des fils:
BLEU - NEUTRE (N)
MARRON - PHASE (L)
VERT-JAUNE - TERRE ( )
La table est livrée avec un câble d'alimentation sans prise permet-
tant le raccordement exclusivement sous une tension de 230V entre
phases ou entre phase et neutre:

Les informations suivantes vous aideront à choisir les récipients
les mieux adaptés pour obtenir de bons résultats.
Inox : conseillé.
6SpFLDOHPHQWERQDYHFIRQG6DQGZLFK/HIRQG6DQGZLFKDOOLH
les qualités de l'inox (aspect, durabilité et stabilité) avec les
avantages de l'aluminium ou cuivre (transmission de la chaleur et
répartition uniforme).
Aluminium : fond épais recommandé. Bonne conductivité.
Attention : les résidus d'aluminium apparaissent quelquefois sous
IRUPHGHWUDFHVVXU OD WDEOH PDLVSHXYHQWrWUHHQOHYpV VL LOV VRQW
nettoyés rapidement. L'aluminium de faible épaisseur ne doit pas
rWUHXWLOLVp
Fonte / Vitrocéramique : déconseillé.
Faible performance. Peut rayer la surface.
Fond en cuivre : fond épais recommandé.
Bonne performance, mais le cuivre peut laisser des traces qui
SHXYHQWDSSDUDvWUHFRPPHGHVUD\XUHV(OOHVSHXYHQWrWUHHQOHYpHV
si la table est nettoyée rapidement.
Cependant, ne pas laisser évaporer l'eau des récipients complète-
ment, le métal surchauffé peut adhérer à la surface. Un récipient en
cuivre surchauffé peut laisser des traces qui risque de tacher défini-
tivement la table.
Porcelaine / Acier émaillé : bonne performance.
Seulement avec fond plat, peu épais et lisse.
$SUqVODPLVHVRXVWHQVLRQGHODWDEOHDWWHQGUHTXHOTXHV
secondes pour activer les commandes électroniques
- Presser la touche .
La commande électronique de la table est activée. Dans chaque
zone d'affichage le niveau de puissance s'affiche et la diode
de commande clignote.
- Sans intervention dans les 10 secondes, la commande
pOHFWURQLTXHVpWHLQW HWORSpUDWLRQ GHPLVH HQ URXWH GRLW rWUH
renouvelée.
5. PRESENTATION selon modèle (Fig. C)
/HIR\HUKLOLJKW
une lame métallique conductrice est répartie
uniformément sur toute la surface du foyer. Efficace en trois
secondes, il permet la réalisation de cuissons régulières,
homogènes, mais également les cuissons soutenues.
La table vitrocéramique permet de mieux tirer profit de la chaleur
élevée générée par les foyers hilight, accélérant ainsi la cuisson.
$YHFOHSULQFLSH&RXSGH)HXRQREWLHQWXQHSUHVWDWLRQDPpOLRUpH
de 15% en fin d'efficacité de cuisson.
Le foyer 3200 W : il offre a l'utilisateur un foyer hilight à forte
puissance.
Le temps d'ébullition est réduit de 15 à 25% par rapport à un foyer
standard (l'amélioration dépendra du type de récipient utilisé et de la
quantité de liquide à chauffer).
:DWWVGHSOXVTXHOHPRGqOHVWDQGDUGGHPrPHGLDPqWUH
LE CHOIX DES USTENSILES
Utiliser des récipients de bonne qualité à fond plat : le fond
rigoureusement plat supprimera les points de surchauffe sur
lesquels les aliments attachent, et l'épaisseur du métal permettra
une parfaite répartition de la chaleur.
Veiller à ce que le fond des récipients soit sec : lors du
remplissage du récipient ou lorsqu'on utilise une casserole sortant
du réfrigérateur, par exemple, s'assurer que l'ustensile est bien sec;
cette précaution évitera toute salissure sur le plan de cuisson.
Utiliser des récipients d'un diamètre suffisant pour recouvrir
entièrement le foyer : il convient de veiller à ce que le fond soit au
moins aussi grand que la zone de cuisson. Si le fond est légèrement
plus grand, l'énergie est utilisée de manière optimale.
L'utilisation de récipients de qualité est nécessaire pour
obtenir de bons résultats de cuisson :
$55(7'¶81)2<(5'(&8,6621
- Presser la touche de sélection du foyer désiré.
3UHVVHUODWRXFKH-MXVTXjDIILFKHUOH QLYHDX GHSXLVVDQFH
,QVWDQWDQpPHQW OH IR\HU VpWHLQW OLQGLFDWLRQ VHIIDFH DSUqV
secondes.
- Pour un arrrWUDSLGHDSSX\HUVLPXOWDQpPHQWVXUODWRXFKH- " et
+"/HQLYHDXGHSXLVVDQFHUHGHVFHQGDXWRPDWLTXHPHQWj/H
foyer s'éteint.
RACCORDEMENT SUR LA PLAQUE A BORNES:
LAY OUT
“ 2 “
LAY OUT
“ 1 “
LAY OUT
“ 4 “
LAY OUT
“ 3 “
07 FR
7.UTILISATION DE LA TABLE (Fig. E)
Ph = Phase N = Neutre T = Terre
Monophasé 220-240 V~
Biphasé 220-240 V2~
Triphasé 220-240 V3~ Triphasé 380-415 V2N~
- Presser la touche “ + ” ou “ - ” pour un niveau de puissance entre
1 et 9. En maintenant la pression sur la touche “ + ” ou “ - ”, le niveau
de puissance augmente ou diminue progressivement.
Les exemples suivants sont donnés à titre indicatif. L'expérience
SHUVRQQHOOHSHUPHWHQVXLWHGDGDSWHUFHVUpJODJHVDX[JRWVHWDX[
habitudes de chacun.
$UUrW
1 : )
2 : ) ..... Fondre
3 : Maintien de la chaleur
4 : Réchauffage
5 : Décongélation, cuisson à l'étuvée, cuisson à
point, cuisson à faible température
6 : Cuisson sans couvercle
6DXWpVULVVROpVGHYLDQGHHWU{WLV
&XLVVRQVHWU{WLVjKDXWHWHPSpUDWXUHVDLVLU
9 : Friture, portée à ébullition de grandes quantités
d'eau.......
$&7,9$7,21'¶81)2<(5'(&8,6621
- Presser la touche de sélection du
foyer désiré. Dans la zone
d’affichage, la diode de commande
devient fixe. Elle indique que la
zone est active.

Position
de
cuisson
Puissance
libérée
(%)
Durée
d'accélération
de chauffe
(minutes)
Durée de
fonctionnement
maxi avant
coupure
automatique*
0 : 0 % : 0 : 0 H
1 : 3 % : 1 : 6 H
2 : 6 % : 3 : 6 H
3 : 11 % : 5 : 5 H
4 : 16 % : 6,5 : 5 H
5 : 19 % : 8,5 : 4 H
6 : 32 % : 2,5 : 1,5 H
7 : 45 % : 3,5 : 1,5 H
8 : 65 % : 4,5 : 1,5 H
9 : 100 % : 0 : 1,5 H
)21&7,211(0(17'(/¶$&&(/(5$7(85'(&+$8))(
Les foyers de cuisson* équipant la table sont équipés d'un
accélérateur de chauffe qui permet d'obtenir une montée en
température plus rapide des zones de cuisson:
* excepté le foyer 3200 W
Pour activer l'accélérateur de chauffe :
$SSX\HUVXUODWRXFKH0DUFKH$UUrW
0HWWUHHQURXWHOHIR\HUVRXKDLWpDSSX\HUVXUODWRXFKH+
jusqu'à la position 9, relâcher brièvement la pression et réappuyer
VXUODWRXFKH+ODIILFKHXULQGLTXHHQDOWHUQDQFHADFFpOpUDWHXU
GHFKDXIIHHW9QLYHDXGHSXLVVDQFH
- Réduire si besoin à la position de chauffe souhaitée, l'afficheur
LQGLTXHHQDOWHUQDQFHADFFpOpUDWHXUGHFKDXIIHHWODQRXYHOOH
position de chauffe.
La fonction verrouillage permet de figer les réglages du moment, ou
évite que quiconque ne mette en route la table. Elle est utilisée
également pour le nettoyage du bandeau des commandes puisqu'il
est possible de verrouiller les commandes sans que les foyers soient
en fonctionnement.
$SSX\HUVXUODWRXFKH0DUFKHDUUrW
- Selon votre besoin, mettre ou non les foyers en fonctionnement,
$SSSX\HUODWRXFKHYHUURXLOODJHSRXUILJHUOHVGRQQpHVGHFH
fait plus aucune autre touche n'est accessible, exceptée la touche
0DUFKHDUUrWLe voyant de verrouillage s'allume.
Pour stopper la fonction verrouillage, il suffit de réappuyer sur la
WRXFKHYHUURXLOODJHOHYR\DQWVpWHLQWWRXWHVOHVFRPPDQGHVVRQW
à nouveau accessibles.
Si lors du verrouillage des commandes, le minuteur est actif, le
temps sera décompté automatiquement et coupera le foyer à la fin
du temps programmé.
Si la commande de verrouillage est active lors de l'extinction défini-
tive de la table, la commande de verrouillage reste opérationnelle et
HPSrFKHWRXWHDFWLRQORUVGXQHQRXYHOOHPLVHHQURXWHDSSX\HUOD
WRXFKHYHUURXLOODJHSRXUGpYHUURXLOOHU
)21&7,211(0(17'(/$728&+(9(5528,//$*(
08 FR
Chaque foyer de cuisson est programmable pour une durée
maximale de 99 minutes.
- Mettre en route le foyer désiré.
/D GLRGH GH FRPPDQGH SUqV GX QLYHDX GH SXLVVDQFH GRLW rWUH
affichée, elle indique que le foyer est actif.
- Appuyer sur la touche Minuterie
Le répère de foyer autour de l'affichage du minuteur rappelle le foyer
commandé.
5pDSSX\HU VXU OD WRXFKH 0LQXWHXU SRXU FKRLVLU XQH GXUpH HQ
PLQXWHV GH j PLQXWHV RX DSSX\HU VXU OD WRXFKH SRXU
diminuer le temps de 60 minutes à 0.
OHWHPSVSURJUDPPpSHXWrWUHPRGLILpjWRXWPRPHQWHQUpDFWL-
vant le foyer et la touche de sélection du minuteur.
Une fois le temps écoulé, le foyer de cuisson s'éteint automatique-
PHQWHWXQELSVRQRUHUHWHQWLWDSSX\HUVXUODWRXFKH0LQXWHXUSRXU
le stopper.
/H PLQXWHXU SHXW rWUH XWLOLVp VHXO FRPPH DLGH PpPRLUH XQH
sonnerie retentira à la fin du temps programmé.
352*5$00$7,21'¶81)2<(5'(&8,6621
Le foyer deux zones équipe certains modèles de table.
Pour activer le foyer complémentaire :
$SSX\HUVXUODWRXFKH)RQFWLRQFRPSOpPHQWDLUH/DGLRGH
correspondante au foyer complémentaire s'affiche lorsque ce foyer
est activé.
Pour désactiver le foyer complémentaire :
$SSX\HUVXUODWRXFKH )RQFWLRQ FRPSOpPHQWDLUH/DGLRGH
correspondante au foyer complémentaire s'éteint lorsque ce foyer
est désactivé.
)21&7,211(0(17'8)2<(5'(8;=21(6
,1',&$7(85'(&+$/(855(6,'8(//(
Le tableau de commande informe l'utilisateur lorsque la température
de surface des zones de cuisson dépasse 60°C environ, par
ODIILFKDJH VXLYDQW + /RUVTXH OD WHPSpUDWXUH UHGHVFHQG HQ
GHVVRXVGH&ODIILFKDJH+VHIIDFH
Pour les fins de cuisson, nous conseillons d'éteindre la zone de
cuisson et de profiter de la chaleur résiduelle du foyer de cuisson
pour terminer la cuisson en douceur.
N.B. : après coupure de courant, l'indicateur de chaleur résiduelle
GLVSDUDvW GpILQLWLYHPHQW HW FH PrPH VL OD WHPSpUDWXUH GH VXUIDFH
dépasse 60°C.
$55(7*(1(5$/
/HIRQFWLRQQHPHQWGHVIR\HUVHWGHODPLQXWHULHSHXWrWUH
stoppé à tout moment par une pression sur la touche
0DUFKH$UUrW
)21&7,211(0(17'8)2<(5752,6=21(6
Le foyer trois zones équipe un modèle de table.
- Appuyer sur la touche du foyer trois zones, le foyer central se met
en fonctionnement.
Pour activer le premier foyer complémentaire :
$SSX\HUVXUODWRXFKH)RQFWLRQFRPSOpPHQWDLUH/DGLRGH
correspondante au foyer complémentaire s'affiche lorsque ce foyer
est activé.
Pour activer le deuxième foyer complémentaire extérieur :
$SSX\HUXQH GHX[LqPH IRLV VXU OD WRXFKH )RQFWLRQ FRPSOpPHQ-
WDLUH/DGHX[LqPHGLRGHVDIILFKH
Pour désactiver le ou les foyers complémentaires, appuyer une
fois pour le foyer extérieur, et deux fois pour le premier foyer complé-
mentaire.
Le foyer central reste en mode standard, donc il s'éteint norma-
lement.
)21&7,211(0(17'8)2<(5:
- Appuyer sur la touche du foyer.
Dès le premier appui sur la touche du foyer, le foyer fonctionne en
mode standard avec une puissance maxi de 2100 W, ajustable de 0
à 9.
Pour le fonctionnement du foyer 3200 W (2100 W + 1100 W),
0HWWUHHQURXWHOHIR\HUDSSX\HUVXUODWRXFKHMXVTXDXQLYHDX
UHOkFKHUEULqYHPHQWODSUHVVLRQHWUpDSSX\HUVXUODWRXFKHOH
deuxième foyer de 1100 W se met alors en fonctionnement en
FRPSOqPHQWGXSUHPLHU/LQGLFDWLRQ3VDIILFKH
3RXUDUUrWHUOHIR\HUFRPSOpPHQWDLUHDSSX\HUVXUODWRXFKH
OLQGLFDWLRQ3VHIIDFHHWOHIR\HUIRQFWLRQQHDORUVHQPRGHVWDQG-
ard.
Ce foyer n'est pas doté de l'accélérateur de chauffe.

9. PROBLEMES ET SOLUTIONS
Les foyers ne maintiennent pas les petits bouillons ou friture
peu vive.
1XWLOLVHUTXHGHVUpFLSLHQWVjIRQGSODW6LXQHOXPLqUHHVWYLVLEOH
entre le récipient et la table, le foyer ne transmet pas la chaleur
correctement.
/HIRQGGXUpFLSLHQWGRLWUHFRXYULUHQWLqUHPHQWOHGLDPqWUHGXIR\HU
choisi.
Cuissons trop lentes.
8WLOLVDWLRQGHUpFLSLHQWVQRQDGDSWpV1XWLOLVHUTXHGHVXVWHQVLOHV
avec fond plat, lourd et d'un diamètre au moins égal au foyer.
Petites rayures ou éraflures sur la surface vitrée de la table.
8QHPDXYDLVHPpWKRGHGHQHWWR\DJHRXGHVUpFLSLHQWVDYHFIRQG
rugueux sont utilisés, des particules tels que grains de sable, ou sel
se trouvent entre la table et le fond du récipient.
6HUHSRUWHUDXFKDSLWUH(175(7,(1VDVVXUHUTXHOHVIRQGVGHV
récipients sont propres avant utilisation et n'utiliser que des récipi-
HQWVDYHFIRQGOLVVH/HVUD\XUHVSHXYHQWrWUHDWWpQXpHVVHXOHPHQW
si un bon nettoyage est réalisé.
Marques de métal.
1HSDVIDLUHJOLVVHUGHVUpFLSLHQWVHQDOXPLQLXPVXUODWDEOH6H
reporter aux recommandations d'entretien.
9RXVQXWLOLVH]SDVOHVERQVPDWpULDX[OHVWDFKHVTXHOOHVTXHOOHV
soient persistent. Aidez-vous d'une lame de rasoir et suivre le chapi-
WUH(175(7,(1
Taches sombres.
8WLOLVHUXQHODPHGHUDVRLUHWVXLYUHOHFKDSLWUH(175(7,(1
Surfaces claires sur la table.
0DUTXHV SURYHQDQW GH UpFLSLHQW HQ DOXPLQLXP RX FXLYUH PDLV
DXVVLGHGpS{WVGHPLQpUDX[GHOHDXRXGHVDOLPHQWVLOVSHXYHQW
rWUHHQOHYpVDYHFGHODFUqPHQHWWR\DQWH
Caramélisation ou plastique fondu sur la table.
6HUHSRUWHUDXFKDSLWH(175(7,(1
La table ne fonctionne pas.
/HVEDUUHWWHVVKXQWVQHVRQWSDVSRVLWLRQQpHVFRUUHFWHPHQWVXUOD
plaque à bornes. Faire vérifier que le raccordement est effectué
conformément aux recommandations.
6XU OD WDEOH YLWURFHUDPLTXH DYHF WRXFKHV VHQVLWLYHV XQ JURV
débordement ou objet recouvre au moins 2 touches, pendant 10
secondes au minimum.
Nettoyer le débordement ou retirer l'objet.
/HWDEOHDXGHERUGHVWYHUURXLOOp3URFpGHUDXGHYHUURXLOODJH
La table ne se coupe pas.
/HWDEOHDXGHERUGHVWYHUURXLOOp3URFpGHUDXYHUURXLOODJH
La table s'arrête automatiquement.
8QGpERUGHPHQWUHFRXYUHSHQGDQWSOXVGHVHFRQGHVDXPRLQV
2 touches, la table se met en sécurité, et un bip sonore fonctionne
tant que les touches sont recouvertes. Nettoyer le débordement ou
retirer l'objet.
/HVIR\HUVVDUUrWHQWDXWRPDWLTXHPHQWVLRQOHVODLVVHIRQFWLRQQHU
pendant une période assez longue.
Fréquence de fonctionnement arrêt/marche sur foyers.
/HVF\FOHVFRXSXUHIRQFWLRQQHPHQWYDULHQWHQIRQFWLRQGXQLYHDX
de puissance demandé :
- niveau faible : temps de fonctionnement court,
- niveau élevé : temps de fonctionnement long.
Affichage "H", indicateur de chaleur résiduelle, clignote.
/D WHPSpUDWXUH pOHFWURQLTXH HVW WURS pOHYpH 8Q WHFKQLFLHQ GRLW
procéder à la vérification de l'encastrement en respectant les recom-
mandations.
Avant d’appeler le Service d’Assistance Technique
Si la table de cuisson ne fonctionne pas, nous vous conseillons de:
- vérifier que la fiche soit bien introduite dans la prise de courant; Si
la cause du dysfonctionnement n’est pas trouvée:
- éteindre l’appareil ne pas y toucher et appeler le Service
d’Assistance Technique.
Veillez à ce que le coupon de garantie fourni avec le produit soit
correctement rempli, avec la date d’achat de la table de cuisson.
- Eviter d'employer une éponge trop humide.
- Ne jamais utiliser un outil en acier tel que couteau ou tournevis.
- L'utilisation du grattoir avec lame de rasoir ne peut endommager la
surface si un angle de 30°est respectée.
- Ne pas laisser le racloir avec lame de rasoir à la portée des
enfants.
- Ne pas utiliser de produits abrasifs ou de poudres récurantes.
- Ne jamais utiliser de nettoyeur vapeur pour le nettoyage de la table.
/HFDGUHGHODWDEOHVHORQPRGqOH
Pour nettoyer sans endommager le cadre de votre table, le laver
avec du savon et de l'eau, rincer, puis sécher avec un chiffon doux.
NOTA :
30° Maxi
LA TABLE VITROCERAMIQUE:
,OHVWLPSRUWDQWORUVGXQHWWR\DJHGHODVXUIDFHYLWURFpUDPLTXH de
la table, d'attendre le refroidissement complet de cette dernière.
6HXOV OHV SURGXLWV VSpFLILTXHV SRXU OH QHWWR\DJH GH OD VXUIDFH
YLWURFpUDPLTXH FUqPH HW JUDWWRLU GRLYHQW rWUH XWLOLVpV 9RXV OHV
trouverez facilement dans le commerce.
(YLWHUOHVGpERUGHPHQWVOHVVDOLVVXUHVTXLWRPEHQWVXUOHSODQGH
cuisson se carbonisent rapidement et sont donc plus difficiles à
nettoyer.
,OHVWUHFRPPDQGpGHWHQLUjOpFDUWGXSODQGHFXLVVRQWRXWFHTXL
est susceptible de fondre tels que les objets en matière plastique,
sucre ou produits à forte teneur en sucre.
ENTRETIEN :
- disposer quelques gouttes d'un produit nettoyant spécifique pour la
surface vitrocéramique.
- frotter, en insistant sur les parties tachées s'il en existe, à l'aide d'un
chiffon doux ou d'un papier essuie-tout légèrement humide.
- essuyer avec un chiffon doux ou papier essuie-tout sec jusqu'à ce
que la surface soit nette.
Si après cet entretien courant des taches persistent :
- disposer à nouveau quelques gouttes d'un produit spécifique.
- gratter à l'aide d'un grattoir en respectant un angle de 30° par
rapport à la table jusqu'à disparition des taches récalcitrantes.
- essuyer avec un chiffon doux ou un papier essuie-tout sec jusqu'à
ce que la surface soit nette.
- répèter l'opération si nécessaire.
CONSEILS :
Un nettoyage fréquent laisse une couche protectrice essentielle pour
la prévention des rayures et de l'usure.
S'assurer que la surface soit propre avant de réutiliser la table.
Pour enlever les traces d'eau et de calcaire, utiliser quelques gouttes
de vinaigre blanc, ou jus de citron. Pour terminer essuyer à l'aide
d'un papier absorbant puis appliquer quelques gouttes de produit
spécifique et essuyer.
Le verre vitrocéramique supporte le frottement des ustensiles de
FXLVVRQjIRQGSODWPDLVLOHVWTXDQGPrPHFRQVHLOOpGHOHVVRXOHYHU
pour les déplacer.
8. ENTRETIEN
Ex. Foyer de 1800 W à la position 6 = puissance libérée 32 % de
1800 W lorsque la fonction "Accélérateur de chauffe" est activée, le
foyer fournit une puissance de 1800 W pendant 2,5 minutes, et
régule à 576 W après ce laps de temps.
* Les foyers se coupent automatiquement si on les laisse trop
longtemps fonctionner. La coupure dépend du niveau de puissance
utilisé.
Pour désactiver l'accélérateur de chauffe :
0HWWUHHQURXWHOHIR\HUVRXKDLWpDSSX\HUVXUODWRXFKH -SRXU
revenir à une position de chauffe normale, réduire à la position
VRXKDLWpHRXjODSRVLWLRQSRXUDUUrWHUOHIR\HU
09 FR
10. ASSISTANCE TECHNIQUE

Le présent appareil est marqué conformément à la
directive 2012/19/UE relative aux déchets
d'équipements électriques et électroniques
(DEEE). Les DEEE contiennent à la fois des
substances polluantes (qui peuvent avoir des
conséquences négatives sur l'environnement) et
des éléments de base (réutilisables). Il est
important de soumettre les DEEE à des traitements
spécifiques, en vue d'extraire et d'éliminer de façon appropriée
toutes les substances polluantes, puis de récupérer et recycler
tous les matériaux.
&KDFXQSHXW MRXHU XQU{OH LPSRUWDQW TXDQWj OD SURWHFWLRQ GH
l'environnement contre les DEEE. Pour atteindre cet objectif, il
est impératif de suivre quelques règles élémentaires :
/HV '((( QH GRLYHQW SDV rWUH WUDLWpV FRPPH GHV GpFKHWV
ménagers.
,OVGRLYHQWrWUHUHPLVDX[SRLQWVGHFROOHFWHDSSURSULpVJpUpV
par la municipalité ou par des sociétés immatriculées. Dans
plusieurs pays, il est possible de collecter à domicile les DEEE
volumineux.
/RUVTXH YRXV DFKHWH] XQ QRXYHO DSSDUHLO YRXV GHYH]
retourner l'ancien au vendeur qui le récupère gratuitement, au
cas par cas, à condition que l'équipement soit de type
pTXLYDOHQWHWSRVVqGHOHVPrPHVIRQFWLRQVTXHFHOXLIRXUQL
11. PROTECTION ENVIRONNEMENT
10 FR

READ THE INSTRUCTIONS BOOKLET CAREFULLY TO MAKE THE MOST OF YOUR HOB.
We recommend you keep the instructions for installation and use for later reference, and before installing the hob, note its serial number below
in case you need to get help from the after sales service (Fig. A).
1. GENERAL WARNINGS
&KLOGUHQPXVWQRWSOD\ZLWKWKHDSSOLDQFH
7KLV DSSOLDQFH FDQ EH XVHGE\ FKLOGUHQ DJHG IURP \HDUV DQG DERYH DQG SHUVRQVZLWKUHGXFHG
physical, sensory or mental capabilities or lack of experience and knowledge if they have been given
supervision or instruction concerning use of the appliance in a safe way and understand the hazards
involved.
&OHDQLQJDQGXVHUPDLQWHQDQFHVKDOOQRWEHPDGHE\FKLOGUHQZLWKRXWVXSHUYLVLRQ,IWKHVXSSO\FRUG
is damaged, it must be replaced by the manufacturer, its service agent or similarly qualified persons in
order to avoid a hazard.
&$87,21,QRUGHUWRDYRLGDKD]DUGGXHWRLQDGYHUWHQWUHVHWWLQJRIWKHWKHUPDOFXWRXWWKLVDSSOLDQFH
must not be supplied through an external switching device, such as a timer, or connected to a circuit
that is regularly switched on and off by the utility.
&KLOGUHQXQGHU<HDURIDJHPXVWEHNHSWDZD\IURPWKHDSSOLDQFHXQOHVVWKH\DUHFRQWLQXRXVO\
supervised.
7KLVDSSOLDQFHLVQRWLQWHQGHGWREHRSHUDWHGE\PHDQVRIDQH[WHUQDOWLPHURUVHSDUDWHUHPRWHFRQWURO
system.
7KHPHDQVIRUGLVFRQQHFWLRQPXVWEHLQFRUSRUDWHGLQWKHIL[HGZLULQJLQDFFRUGDQFHZLWKWKHZLULQJ
rules.
7KHLQVWUXFWLRQVVWDWHWKHW\SHRIFRUGWREHXVHGWDNLQJLQWRDFFRXQWWKHWHPSHUDWXUHRIWKHUHDU
surface of the appliance.
:$51,1*7KHDSSOLDQFHDQGLWVDFFHVVLEOHSDUWVEHFRPHKRWGXULQJXVH&DUHVKRXOGEHWDNHQWR
avoid touching heating elements.
:$51,1*8QDWWHQGHGFRRNLQJRQDKREZLWKIDWRURLOFDQEHGDQJHURXVDQGPD\UHVXOWLQILUH
NEVER try to extinguish a fire with water, but switch off the appliance and then cover flame e.g. with a
lid or a fire blanket.
'RQRWXVHDVWHDPFOHDQHUIRUFOHDQLQJRSHUDWLRQV$Q\VSLOODJHVKRXOGEHUHPRYHGIURPWKHOLGEHIRUH
opening.
7KHKREVXUIDFHPXVWEHDOORZHGWRFRROGRZQEHIRUHFORVLQJWKHOLG
$OXPLQLXPIRLODQGSODVWLFSDQVPXVWQRWEHSODFHGRQKHDWLQJ]RQHV
$IWHUHYHU\XVHVRPHFOHDQLQJRIWKHKRELVQHFHVVDU\WRSUHYHQWWKHEXLOGXSRIGLUWDQGJUHDVH,I
left, this is recooked when the hob is used and burns giving off smoke and unpleasant smells, not to
mention the risks of fire propagation.
,WLVDGYLVDEOHQRWWRVWDUHGLUHFWO\DWWKHKDORJHQHOHPHQWV
'RQRWWRXFKWKHKHDW]RQHVGXULQJRSHUDWLRQRUIRUDZKLOHDIWHUXVH
1HYHUFRRNIRRGGLUHFWO\RQWKHJODVVFHUDPLFKRE$OZD\VXVHWKHDSSURSULDWHFRRNZDUH
$OZD\VSODFHWKHSDQLQWKHFHQWUHRIWKHXQLWWKDW\RXDUHFRRNLQJRQ
'RQRWXVHWKHVXUIDFHDVDFXWWLQJERDUG
'RQRWVOLGHFRRNZDUHDFURVVWKHKRE
'RQRWVWRUHKHDY\LWHPVDERYHWKHKRE,IWKH\GURSRQWRWKHKREWKH\PD\FDXVHGDPDJH
'RQRWXVHWKHKREDVDZRUNLQJVXUIDFH
'RQRWXVHWKHKREIRUVWRUDJHRIDQ\LWHPV,QWKHXQOLNHO\HYHQWRIDVXUIDFHFUDFNDSSHDULQJGR
not use the hob. Immediately disconnect the hob from the electrical power supply and call the After
Sales Service
&KLOGUHQVKRXOGEHVXSHUYLVHGWRHQVXUHWKDWWKH\GRQRWSOD\ZLWKWKHDSSOLDQFH
SAFETY INSTRUCTIONS
11 GB - IE
We are constantly striving to improve product quality and as such may modify appliances to incorporate the latest technical improvements.
Induction hobs conform to European Directives 73/23/CEE and 89/336/CEE, replaced by 2006/95/EC and 2004/108/EC, and subsequent
amendments.

3. BUILT-IN
The furniture in which your hob will be installed and all adjacent
furniture, should be made from materials that can withstand high
temperatures. In addition, all decorative laminates should be fixed
with heat-resistant glue.
Installation (Fig. B / D) :
A watertight seal is supplied with the hob.
To install it:
- turn the hob upside down, with the glass surface facing downwards.
Make sure the glass is protected.
- fit the seal round the hob.
- make sure that it is correctly fitted to avoid any leakage into the
supporting cabinet.
/HDYHDJDSRIDWOHDVWFPEHWZHHQWKHDSSOLDQFHDQGWKH
vertical sides of the adjacent furniture.
,IZKHQLQVtalling the hob, the lower hob face is adjacent to an area
normally accessible when handling or cleaning, fit a partition 1 cm
below the base of the hob to avoid any risk of scorching or damage.
2.INSTALLATION
7KHLQVWDOODWLRQPXVWFRQIRUPWRWKHVWDQGDUGGLUHFWLYHV
The manufacturer declines all responsibility for any damage that
may be caused by unsuitable or unreasonable use.
Warning: we cannot be held responsible for any incident or its
consequences that may arise during the use of an appliance not
linked to the earth, or linked to an earth whose continuity is
defective.
$OZD\V FKHFN EHIRUH DQ\ HOHFWULFDO RSHUDWLRQ WKH VXSSO\ WHQVLRQ
shown on the electricity meter, the adjustment of the circuit-breaker,
the continuity of the connection to earth to the installation and that
the fuse is suitable.
7KHHOHFWULFDOFRQQHFWLRQWRWKHLQVWDOODWLRQVKRXOGEHPDGHYLDD
socket with a plug with earth, or via an omnipole cut-out switch with
an opening gap of at least 3 mm.
If the appliance has a socket outlet, it must be installed so that the
socket outlet is accessible.
7KH \HOORZJUHHQ ZLUH RI WKH SRZHU VXSSO\ FDEOH PXVW EH
connected to the earth of both power supply and appliance
terminals.
$Q\TXHULHVUHJDUGLQJWKHSRZHUVXSSO\FRUGVKRXOGEHUHIHUUHGWR
After Sales Service or a qualified technician.
Installing a domestic appliance can be a complicated operation which if not carried out correctly, can seriously affect consumer
safety. It is for this reason that the task should be undertaken by a professionally qualified person who will carry it out in accordance
with the technical regulations in force. In the event that this advice is ignored and the installation is carried out by an unqualified
person, the manufacturer declines all responsibility for any technical failure of the product whether or not it results in damage to
goods or injury to individuals.
4. ELECTRICAL CONNECTION
12 GB - IE
It is however possible to connect the hob to :
. Three phase 220-240 V3~ 50/60 Hz
. Three phase 380-415 V3N~ 50/60 Hz
To proceed to the new connection, you must adhere the
following instructions.
Before making the connection, make sure that the installation is
protected by a suitable fuse, see table, and that it is fitted with wires
of a large enough section to supply the appliance normally.
7XUQRYHUWKHKREJODVVVLGHDJDLQVWWKHZRUNWRSWDNLQJFDUH
to protect the glass.
2SHQWKHFRYHULQ the following sequence:
XQVFUHZWKHFDEOHFODPS
ILQGWKHWZRWDEVORFDWHGRQWKHVLGHV
SXWWKHEODGHRIDIODWVFUHZGULYHULQIURQWRIHDFKWDEH
push in and press,
UHPRYHWKHFRYHU
To release the power supplying cord.
UHPRYHWKHVFUHZVUHWDLQLQJWKHWHUPLQDOEORFNZKLFKFRQWDLQV
the shunt bars and the conductors of the supply cord,
3XOORXWWKHVXSSO\FRUG
Operations to be carried out to make a new connection :
- Choose the power supply cable in accordance with the
recommendations in the table.
- Pass the power supply cable into the clamp.
- Strip the end of each conductor of the supply
cord on a 10 mm length, by taking in account
the requested length of the cord for the
connection to the terminal block.
- According to the installation and with the help
of shunt bars which you should have recovered
in the first operation, fix the conductor as
shown on the chart.
- Fix the cover.
- Screw the cable clamp.
Note: make sure the terminal board screws are tight.
&RQQHFW WR D VRFNHW WR FKRRVH WKH FRUUHFW IXVH \RX PXVW
refer on the table.
The hob is fitted with a power supply cord which allows it to be
connected only to a power supply of 220-240 V between phases
or between phase and neutral.
ATTENTION:
should it be necessary to replace the supply cord, connect the wire
in accordance with the following colours/codes:
BLUE - NEUTRAL (N)
BROWN - LIVE (L)
YELLOW-GREEN - EARTH ( )

LAY OUT
“ 1 “
LAY OUT
“ 3 “
5. PRESENTATION according to the model (Fig. C)
KLOLJKW]RQH
a metallic conductor strip is spread uniformly over
the whole surface unit. It is effective within 3 seconds and is suitable
for steady, homogeneous and also sustained cooking.
The glass-ceramic hob benefits from greater heat output which is
generated by the hilight cooking zones thereby accelerating the
cooking process. Modifications to the design of the hob have not
affected the capacity of the glass to withstand high temperatures, but
they have improved controllability.
:LWKWKH&RXSGHIHXIDFLOLW\UHGXFHGFRRNLQJWLPHVRIXSWR
can be achieved, depending upon the method of cooking and the
type of saucepans being used.
hilight zone 3200 W : provides user a super high speed burner.
Boil up times 15/25 % faster then standard ribbon heater (level of
improvement depends on cookware quality and quantity of liquid
heated).
700 more watts that standard hilights in the same diameter spacing.
6. HOB COOKWARE ADVICE
Always use good quality cookware with perfectly flat and thick
bases : using this type of cookware will prevent hot spots that cause
food to stick. Thick metal pots and pans will provide an even distribu-
tion of heat.
(QVXUHWKDWWKHEDVHRIWKHSRWRUSDQLVGU\when filling pans
with liquid or using one that has been stored in the refrigerator,
ensure that the base of the pan is completely dry before placing it on
the hob. This will help to avoid staining the hob.
8VHSDQVZKRVHGLDPHWHULVZLGHHQRXJKWRFRPSOHWHO\FRYHU
the surface unit : the size of the pan should be no smaller than the
heating area. If it is slightly wider the energy will be used at its
maximum efficiency.
Using good quality cookware is critical for setting the
best performance from your hob.
Connection to the terminals on the terminal block
LAY OUT
“ 2 “
LAY OUT
“ 4 “
13 GB - IE
Ph = Phase N = Neutral T = Earth
Monophase 220-240 V~
Two phases 220-240 V2~
Three phases 220-240 V3~ Three phases 380-415 V2N~
THE CHOICE OF COOKWARE - The following information will help
you to choose cookware which will give good performance.
Stainless Steel : highly recommended. Especially good with a
sandwich clad base. The sandwich base combines the benefits of
stainless steel (appearance, durability and stability) with the advan-
tages of aluminium or copper (heat conduction, even heat distribu-
tion).
Aluminium : heavy weight recommended. Good conductivity.
Aluminium residues sometimes appear as scratches on the hob, but
can be removed if cleaned immediately.
Because of its low melting point, thin aluminium should not be used.
Cast Iron : usable, but not recommended. Poor performance. May
scratch the surface.
Copper Bottom / stoneware: heavy weight recommended. Good
performance, but copper may leave residues which can appear as
scratches. The residues can be removed, as long as the hob is
cleaned immediately. However, do not let these pots boil dry.
Overheated metal can bond to glass hobs. An overheated copper pot
will leave a residue that will permanently stain the hob.
Porcelain/enamel : Good perfomance only with a thiny smooth, flat
base.
Glass-ceramic : not recommended. Poor performance. May scratch
the surface.
7. USE THE CERAMIC HOB (Fig. E)
$IWHU SRZHULQJ XS WKH KRE ZDLW VRPH VHFRQGV WR DFWLYDWH WKH
electronic controls.
- Press the button .
Electronic control of the hob is activated. In each display zone the
heat level "0" is displayed and the control LED blinks.
- After 10 seconds whithout use, the electronic control goes off and
the starting operation has to be repeated.
6TOPPING A COOKING ZONE
- Press the selection button of the required cooking zone.
3UHVVWKH-"EXWWRQWRGLVSOD\KHDWOHYHO1RZWKH]RQHJRHVoff,
WKHLQGLFDWRUJRHVRIIDIWHUVHFRQGV
- To stop rapidly, press the - and + buttons at the same time. The heat
OHYHODXWRPDWLFDOO\JRHVGRZQWR7KHFRRNLQJ]RQHJRHVRII
- Press the - or + button to select a heat level between 1 and 9. Hold
down the + or - button and the heat level increases or decreases
gradually.
The following examples are for information only. Personal experi-
ence should then let you adapt these settings to your taste and
habits.
0 : Off
1 : )
2 : ) ..... Melting heat
3 : Keeping hot
4 : Heating up
5 : Thawing, stewing, full cooking, low temperature
cooking
6 : Cooking without lid
7 : Frying, meat browning and roasting
8 : High temperature cooking and roasting, seizing
9 : Frying, boiling large quantities of water.......
6TARTING A COOKING ZONE
- Press the selection button of
the required cooking zone. In the
display zone, the control LED is
on steady. It shows that the zone
is live.

23(5$7,1*7+($'',7,21$/&22.,1*=21(
(THREE ZONES)
A triple circuit cooking zone is fitted on one model.
- Press on the cooking zone button, the central cooking zone is
activated.
To activate the first additional cooking zone :
- Press on the additional cooking zone button . The control led
corresponding comes on.
To activate the second additional cooking zone :
- Press again on the additional cooking zone button . The second
control led corresponding comes on.
To deactivate one or the two additionnal cooking zones, press
once time or two times on the additional cooking zone button.
The central cooking zone operates in standard mode, it switches off
normally.
14 GB - IE
5(6,'8$/+($7,1',&$725
The control panel tells the user when the surface temperature of
the cooking zones exceeds about 60°C, by the following display-
LQJ+:KHQWKHWHPSHUDWXUHJRHVEDFNEHORZ&WKH+
display goes off.
For ending the cooking, we advise switching off the cooking zone
and using the residual heat of the zone to finish cooking gently.
N.B. After a cut in the current, the residual heat indicator disap-
pears completely, even if the surface temperature exceeds 60°C.
23(5$7,1*7+($'',7,21$/&22.,1*=21(
(TWO ZONES)
The cooking zone with two zones is fitted certain models.
To activate the additional cooking zone :
- Press on the additional cooking zone button .
The corresponding control led for the additional cooking zone is
active.
To desactivate the additional cooking zone :
- Press on the additional cooking zone button .
The corresponding control led for the additional cooking zone goes
off when it is desactivated.
*(1(5$/6723
The cooking zones and the timer can be stopped at
any moment by pressing the On-Off button.
23(5ATING THE 3200 W COOKING ZONE
- Press on the button of this cooking zone.
The first touch activates the standard cooking zone 2100 W, adjust-
able from 0 to 9.
To operate the 3200 W cooking zone (2100 W + 1100 W),
- Press RQ WKH FRRNLQJ ]RQH EXWWRQ SUHVV WKH EXWWRQ XQWLO WKH
OHYHO UHOHDVHWKH EXWWRQ EULHIO\ DQG SUHVV LW DJDLQ WKH VHFRQG
cooking zone 1100 W comes on and completes the first. The indica-
tion "P" comes on.
- To VWRSWKHDGGLWLRQDOFRRNLQJ]RQHSUHVVWKHEXWWRQWKHLQGLFD-
WLRQ3JRHVRIIDQGWKHFRRNLQJ]RQHLVIXQFWLRQQLQJLQV W D QGDUG
mode.
This cooking is not supplied with the fast heater operation.
E.g. 1800 W zone at position 6 = 32% of 1800 W power released When
the “Fast heater” is on, the zone supplies 1800 W power for 2.5 minutes,
and adjusts to 576 W after this time.
* For increased safety, the cooking zones cut off automatically if they are
left on too long. The cut off depends on the heat level used.
To desactivate the fast heater
6ZLWFKRQWKHFRRNLQJ]RQHSUHVVWKH-EXWWRQWRFRPHEDFNWRD
QRUPDOKHDWOHYHOGHFUHDVHWRWKHKHDWOHYHOUHTXLUHGRUWRWRVWRS
the cooking zone.
Cooking
position
Power
released
(%)
Time of
fast heater
(minutes)
Maximum
operating time
before automatic
cut off*
0 : 0 % : 0 : 0 H
1 : 3 % : 1 : 6 H
2 : 6 % : 3 : 6 H
3 : 11 % : 5 : 5 H
4 : 16 % : 6,5 : 5 H
5 : 19 % : 8,5 : 4 H
6 : 32 % : 2,5 : 1,5 H
7 : 45 % : 3,5 : 1,5 H
8 : 65 % : 4,5 : 1,5 H
9 : 100 % : 0 : 1,5 H
)$67+($7(523(5$7,21
Every cooking zone* on the hob is equipped with a fast heater for
raising the cooking zone's temperature faster.
* except the 3200 W cooking zone.
Starting the fast heater
- Press the on/off button .
6WDUW WKH UHTXLUHG ]RQHSUHVV WKH + EXWWRQ WR REWDLQ SRVLWLRQ ³9”,
UHOHDVHWKHEXWWRQEULHIO\DQGSUHVVDJDLQWKH+EXWWRQWKHGLVSOD\
DOWHUQDWHVVKRZLQJA³IDVWKHDWHU´DQG9KHDWOHYHO
- If necessary reduce to the required heat position, the display alternates
VKRZLQJ$³IDVWKHDWHU´DQGWKHQHZKHDWSRVLWLRQ
The locking function holds the current settings, or prevents anyone from
starting the hob. It is also useful for cleaning the control strip as the
controls can be locked without the cooking zones being on.
. Press the On/off button.
. According to your choice, start or not the cooking zones.
. Press the locking button to set the data ; in this way no other button
works, except the On/Off button. The locking indicator lamp comes on.
To release the locking function, just press the locking button ; the
indicator lamp goes off, all the controls work again.
If when the controls are locked, the timer is on, the time will be counted
automatically and the zone switched off at the end of the programmed
time.
If the locking control is on when the hob is finally shut down, the locking
control stays operational and prevents any action when the hob is
restarted. Press the locking button to unlock.
/2&.,1*%87TON OPERATION
352*5$00,1* A COOKING ZONE
Every cooking zone can be programmed for a maximum time of 99
minutes.
- Start the required zone.
The control LED near the heat level must be displayed, it shows that
the zone is live.
- Press the Timer button
The zone mark around the timer display shows the controlled zone.
- Press again on the timer button to select a time in minutes between
DQG PLQXWHV RU SUHVV RQ WKH EXWWRQ WR GHFUHDVH WKH WLPH
between 60 minutes and 0.
the programmed time can be modified at any moment reactivat-
ing the cooking zone and then the timer button.
When the time is run, the cooking zone goes off automatically and an
audible beep sounds for 1 minute, press the timer button to stop it.
the time can be used alone as reminder, it will ring at the end of
the programmed time.

NB:
Do not use a sponge which is too wet.
Never use a knife or a screwdriver.
A scraper with a razor blade will not damage the surface, as long as
it is kept at an angle of 30°.
Never leave a scraper with a razor blade within the reach of
children.
Never use abrasive products or scouring powders.
Steam cleaners are not suitable for use.
7KH PHWDO VXUURXQG DFFRUGLQJ WR WKH PRGHO to safely clean the
metal surround wash with soap and water, rinse, then dry with a soft
cloth.
30° Maxi
%HIRUHFDUU\LQJRXWDQ\PDLQWHQDQFHZRUNRQWKHKREDOORZLWWRFRRO
down.
2QO\SURGXFWVFUHDPVDQGVFUDSHUVVSHFLILFDOO\GHVLJQHGIRU glass
ceramic surfaces should be used. They are obtainable from hardware
stores.
$YRLG VSLOODJHV DV DQ\WKLQJ ZKLFK IDOOV RQ WR WKH KRE VXUIDFH ZLOO
quickly burn and will make cleaning more difficult.
,WLVDGYLVDEOHWRNHHSDZD\IURPWKHKREDOOVXEVWDQFHVZKLFKDUHOLDEOH
to melt, such as plastic items, sugar, or sugar-based products.
MAINTENANCE:
- Place a few drops of the specialised cleaning product on the hob
surface.
- Rub any stubborn stains with a soft cloth or with slightly damp kitchen
paper.
- Wipe with a soft cloth or dry kitchen paper until the surface is clean.
If there are still some stubborn stains:
- Place a few more drops of specialised cleaning fluid on the surface.
- Scrape with a scraper, holding it at an angle of 30° to the hob, until the
stains disappear.
- Wipe with a soft cloth or dry kitchen paper until the surface is clean.
- Repeat the operation if necessary.
A FEW HINTS:
Frequent cleaning leaves a protective layer which is essential to prevent
scratches and wear.
Make sure that the surface is clean before using the hob again. To
remove marks left by water, use a few drops of white vinegar or lemon
juice. Then wipe with absorbent paper and a few drops of specialised
cleaning fluid.
The glass ceramic surface will withstand scraping from flat-bottomed
cooking vessels, however, it is always better to lift them when moving
them from one zone to another.
8. CLEANING AND MAINTENANCE
15 GB - IE
9. PROBLEM SOLVING
Metal marks
'R QRW VOLGH DOXPLQLXP SDQV RQ WKH KRE 5HIHU WR WKH FOHDQLQJ
recommendations.
<RXXVHWKHFRUUHFWPDWHULDOVEXWWKHVWDLQVSHUVLVW
Use a razor blade and follow the “CLEANING” section.
Dark stains
8VHDUD]RUEODGHDQGIROORZWKH³&/($1,1*´VHFWLRQ
Light surfaces on the hob
0DUNVIURPDQDOXPLQLXPRUFRSSHUSDQEXWDOVRPLQHUDOZDWHURU
food deposits; they can be removed using the cream cleaner.
Caramelisation or melted plastic on the hob.
5HIHUWRWKH³&/($1,1*´VHFWLRQ
The hob does not operate or certain zones don’t work
7KHVKXQWVDUHQRWSRVLWLRQHGFRUUHFWO\RQWKHWHUPLQDOERDUG
Have a check made that the connection is done in compliance with
the electrical recommendations.
+REVZLWKVHQVLWLYHFRQWUROVDELJVSLOORUREMHFWFRYHUVDWOHDVWWZR
buttons, for at least 10 seconds. Clean up the spill or remove the
object.
7KHFRQWUROSDQHOLVORFNHG8QORFNWKHKRE
The hob does not cut off.
7KHFRQWUROSDQHOLVORFNHG8QORFNWKHKRE
The hob stops automatically
$VSLOOFRYHUVDWOHDVWWZREXWWRQVIRUPRUHWKDQVHFRQGVWKH
hob switches to safety, and an audible beep sounds. Clean up the
spill or remove the object.
7KHFRRNLQJ]RQHVVWRSDXWRPDWLFDOO\LIWKH\DUHOHIW on for too long.
Refer to the section, “operating time”.
Frequency of on/off operations for cooking zones
7KHRQRIIF\FOHVYDU\DFFRUGLQJWRWKHUHTXLUHGKHDWOHYHO
- low level: short operating time,
- high level: long operating time.
“H” display, residual heat indicator, blinking.
7KHHOHFWURQLFWHPSHUDWXUHLVWRRKLJK$WHFKQLFLDQVKRXOGYHULI\
the fitting in compliance with the electrical recommendations.
This appliance is marked according to the European
directive 2012/19/EU on Waste Electrical and
Electronic Equipment (WEEE). WEEE contains both
polluting substances (which can cause negative
consequences for the environment) and basic
components (which can be re-used). It is important
to have WEEE subjected to specific treatments, in
order to remove and dispose properly all pollutants, and recover and
recycle all materials.
Individuals can play an important role in ensuring that WEEE does
not become an environmental issue; it is essential to follow some
basic rules:
:(((VKDOOQRWEHWUHDWHGDVKRXVHKROGZDVWH
:(((VKDOOEHKDQGHGRYHUWRWKHUHOHYDQWFROOHFWLRQSRLQWV
managed by the municipality or by registered companies. In many
countries, for large WEEE, home collection could be present.
:KHQ\RXEX\DQHZDSSOLDQFHWKHROGRQHPD\EHUHWXUQHGWR
the retailer who has to collect it free of charge on a one-to-one basis,
as long as the equipment is of equivalent type and has the same
functions as the supplied equipment.
10. AFTERCARE
Before calling out a Service Engineer please check the follow-
ing:
— that the plug is correctly inserted and fused;
If the fault cannot be identified switch off the appliance
— do not tamper with it
— call the Aftercare Service Centre. The appliance is supplied with a
guarantee certificate that ensures that it will be repaired free of
charge at the Service Centre.
11. PROTECTION OF THE ENVIRONMENT
The cooking zones do not simmer or only fry gently
2QO\XVHIODWERWWRPHGSDQV,IOLJKWLVYLVLEOHEHWZHHQWKHSDQDQG
the hob, the zone is not transmitting heat correctly.
7KH SDQ ERWWRP VKRXOG IXOO\ FRYHU WKH GLDPHWHU RI WKH VHOHFWHG
zone.
The cooking is too slow
8QVXLWDEOHSDQV DUH EHLQJ XVHG 2QO\ XVH IODWERWWRPHG utensils,
that are heavy and have a diameter at least the same as the cooking
zone.
Small scratches or abrasions on the hob’s glass surface
,QFRUUHFWFOHDQLQJRUURXJKERWWRPHGSDQVDUHXVHGSDUWLFOHVOLNH
grains of sand or salt get between the hob and the bottom of the pan.
Refer to the “CLEANING” section; make sure that pan bottoms are
clean before use and only use smooth bottomed pans. Scratches
can be lessened only the cleaning is done correctly.

Le constructeur décline toute responsabilité concernant d’éventuelles inexacitudes imputables à des erreurs d’impression ou de transcription contenue
GDQVFHWWHQRWLFH/HFRQVWUXFWHXUVHUpVHUYHOHGURLWGHPRGLILHUOHVSURGXLWVHQFDVGHQpFHVVLWpPrPHGDQVO¶LQWpUrWGHO¶XWLOLVDWLRQVDQVFDXVHUGH
préjudices aux caractéristiques de fonctionnement de sécurité des appareils.
The manufacturer will not be responsible for any inaccuracy resulting from printing or transcript errors contained in this brochure. We reserve the right to
carry out modifications to products as required, including the interests of consumption, without prejudice to the characteristics relating to safety or function.
5(9%
/