Roper RT18AK User manual

Category
Fridges
Type
User manual
UseAndCare
A Note To You
2
Important Safety
Instructions
3
Parts And Features
4
Before Using Your
Refrigerator
6
Using Your
Refrigerator
8
Caring For Your
Refrigerator
17
Food Storage Guide 20
If You Need
ci$iYi:
.
22
Warranty
24
1-800~44-ROPER
Call us with questions or comments.
NO-FROST REFRIGERATOR-FREEZERS
MODELS RT18AK RT18BM RT18HD RT20BK
RT18BK RT18DK RT20AK RT22AK
A Note To You
Thank you for buying a Roper@ appliance.
You purchased a quality, wor/cMass home appliance. Years of engineering experience went
into its manufacturing. To ensure that you enjoy many years of trouble-free operation, we
developed this Use and Care Guide. It is full of valuable information on how to operate and
maintain your appliance properly and safely. Please read it carefully. Also, please complete
and mail the Ownership Registration Card provided with your appliance. This will help us
notify you about any new information on your appliance.
Your safety is important to us.
This guide contains safety symbols and statements. Please pay special attention to these
symbols and follow any instructions given. Here is a brief explanation of the use of each
symbol.
dangers as personal injury burns, fire
1 ad ele&iical shot&.
PI
~~
This symbol will help alert you to such
This symbol will help you avoid actions
which could cause product damage
/
lit01
Our toll-free number, l-800-44-ROPER (l-800-447-67371,
is available 24 hours a day.
If you ever have a question concerning your appliance’s operation, or if you need service, first
see “If You Need Assistance Or Service” on page 22. If you need further help, feel free to call
us. When calling, you will need to know your appliance’s complete model number and serial
number. You can find this information on the model and serial number label (see diagrams on
pages 4 and 5). For your convenience, we have included a handy place below for you to
record these numbers, the purchase date from the sales slip and your dealer’s name and
telephone number. Keep this book and the sales slip together in a safe place for future
reference.
Model Number
Serial Number
Purchase Date
Dealer Name
Dealer Phone
2
Important Safety Instructions
1
To reduce the risk of fire, electrical shock, or Injury when
using your refrigerator, follow these basic
precautions:
l Read all instructions before using the
l Never allow children to operate, play with,
refrigerator.
or crawl inside the refrigerator.
*Child entrapment and suffocation are
l Never clean refrigerator parts with
not problems of the past. Junked or
flammable fluids. The fumes can create a
abandoned refrigerators are still danger-
fire hazard or explosion.
ous . . .
even if they will “just sit in the
l FOR YOUR SAFETY l
DO NOT STORE OR USE GASOLINE OR
OTHER FLAMMABLE VAPORS AND
LIQUIDS IN THE VICINITY OF THIS OR
ANY OTHER APPLIANCE. THE FUMES
CAN CREATE A FIRE HAZARD OR
EXPLOSION.
garage a few days.”
If you are getting rid of your old refrig-
erator, do it safely. Please read the
enclosed safety booklet from the Asso-
ciation of Home Appliance Manufactur-
ers. Help prevent accidents.
I
- SAVE THESE INSTRUCTIONS -
Help us help you
Please:
l Install and level the refrigerator on a floor
that will hold the weight and in an area
suitable for its size and use.
l Do not install the refrigerator near an oven,
radiator or other heat source.
l Do not use the refrigerator in an area
where the room temperature will fall below
55°F (13°C).
l Keep the refrigerator out of the weather.
l Connect the refrigerator only to the proper
kind of outlet, with the correct electrical
supply and grounding. (Refer to the
Electrical Requirements and Grounding
Instructions Sheet.)
l Do not load the refrigerator with food
before it has time to get properly cold.
l Use the refrigerator only for the uses
described in this manual.
l Properly maintain the refrigerator.
l Be sure the refrigerator is not used by
anyone unable to operate it properly.
3
Parts And Features
This section contains captioned illustrations of your appliance. Use them to become familiar
with where all parts and features
are located and what they look like. The model you have
purchased may have all or some of the parts and features shown and may not match the
illustration exactly. This manual is designed to cover several models.
Control panel (all models)
Refrigerator
control
Exterior
moisture
control
Light
Freezer
switch
control
Models RTISDK (shown) and RTISHD
Butter
-compartment
/
Door shelves
(snap-off
door trim on
RTl EIHD)
-Crisper cover
- Crispers
- Base grille
base grille)
4
Models RTISAK (shown), RTlSBK and RT18BM
Automatic ice
maker and bin
(RTlBBM only)
Ice cube trays -
Freezer shelf /
Control panel -
Model and serial
number label
/
(on aide wall)
Meat drawer A
Adjustable
shelves /
(glass or
wire, depending
on model)
Leveling rollers
(behind base
grille)
Models RTZOAK (shown), RT20BK and RT22AK
- Base grille
4J
lutter
only)
Base grille
Before Using Your
Refrigerator
I
In This Section
Page
Page
I
I
Cleaning your refrigerator . . . . . . . . . N . . . . . . . 6
Installing it properly
. . . . . . . . . . . . . . . . . . . . . . . . . . .
7
Plugging it in
6
Leveling it
7
. . . . . . . . . . . . . . . . . . . . . . . . . . . . . . . . . . . . . . .
. . . . . . . . . . . . . . . . . . . . . . . . . . . . . . . . . . . . . . . . . . . .
I
It is important to prepare your refrigerator for use. This section tells you how to clean it,
connect it to a power source, install it and level it.
Cleaning your refrigerator
Removing packaging materials
NOTE:
Do not remove any permanent
Remove tape and any inside labels (except
instruction labels inside your refrigerator. Do
the model and serial number label) before
not remove the Tech Sheet fastened under
using the refrigerator.
the refrigerator at the front.
To remove any remaining glue:
Cleaning it before use
l Rub briskly with your thumb to make a ball,
After removing all packaging materials,
then remove.
clean your refrigerator before using it, if
OR
necessary. See cleaning instructions on
l Soak area with liquid hand-dishwashing
pages 17 and 18.
detergent before removing glue as de-
scribed above. Do not use sharp instru-
ments, rubbing alcohol, flammable fluids or
abrasive cleaners. These can damage the
material. See “Important Safety Instruc-
tions” on page 3.
Plugging it in
Recommended Grounding Method
A 115 Volt, 60 Hz., AC only 15 or 20 ampere
fused and properly grounded electrical
supply is required. It is recommended that a
separate circuit serving only this appliance
be provided. Use a receptacle which cannot
be turned off with a switch or pull chain, Do
not use an extension cord.
See Electrical Requirements and Ground-
ing Instructions Sheet in your Literature
Package.
3-prong grounding
type wall receptacle .
Refrigerator
f
power cord 7
grounding plug
6
Installing it properly
1. Allow % inch (1.25 cm) space on each
side and
at
the top of the refrigerator for
ease of installation.
2. If the hinge side of the irefrigerator is to be
against a wall, you might want to leave
extra space so the door can be opened
wider.
3. The refrigerator can be flush against the
back wall.
4. If your refrigerator has ;an automatic ice
maker, hook up the ice maker water
supply. (See Installation Instructions.)
Leveling it
Your refrigerator has 2 front leveling
screws-one on the right and one on the left.
To adjust one or both of these, follow the
directions below.
1. Remove base grille. (See page 15.)
2. To raise front, turn screw clockwise.
3. To lower front, turn screw counterclock-
Right
to raise;
left to
lower
screwdriver
wise.
4.
Check with level.
5. Replace base grille. (!&e page 15.)
Using Your Refrigerator
In This Section
Page
Setting the controls ............................
8
Changing
the control
settings..
........
.g
Removlng the drop-In trlm pieces
....
..lO
Removlng the snap-off door trlm
.......
10
Adjusting the refrigerator shelves ..ll
Removing the meat drawer
and cover ...........................................
11
Removing the crispers and
crisper cover
12
.....................................
Page
Using the ice cube trays ................
..13
Using the optional automatic
ice maker
...........................................
13
Changing the light bulbs
................
.15
Removing the base grille .................
15
Reversing the door swing..
.............
.16
Understanding the sounds
you may hear ....................................
16
Saving energy .................................
..16
Removlng
the freezer
shelf
................
.13
To obtain the best possible results from your refrigerator, it is important that you operate it
properly. This section tells you how to set the controls, remove and adjust some of the
features in your refrigerator, and how to save energy.
Setting the controls
Temperature controls
Controls for the refrigerator and freezer are
in the refrigerator. When you plug in the
refrigerator for the first time:
1. Set the Refrigerator Control to 4.
Refrigerator Control adjustments range
from 1 (warmest) to 8 (coldest).
2. Set the Freezer Control to C.
Freezer Control adjustments range from
A (coldest) to D (warmest).
3. Give the refrigerator time to cool down
completely before adding food. This may
take several hours.
The settings indicated above should be
correct for normal, household refrigerator
usage. The controls are set correctly
when milk or juice is as cold as you like
and when ice cream is firm. If you need to
adjust these settings, see “Changing the
control settings”on page 9.
REFRIGERATOR
FREEZER
8
Exterior moisture control
The Exteriir Moisture Control operates
electric heaters around the door openings.
These heaters help keep moisture from
forming on the outside of the refrigerator
cabinet.
l Use the OFF setting when humidity is low.
l Use the ON setting if moisture forms on
the outside of the refrigerator cabinet.
EXlERMWSTlRECONlROl
RECOMMENDED
CONDITION:
REASON:
CONTROL SETTINGS:
Refrigerator
section
too warm
l Door opened often
l Large amount of food added
l Room temperature too warm
Refrigerator 6
Freezer
D
Freezer
section
too warm
l Door opened often
l Large amount of food added
l Very cold room temperature
(can’t cycle often enough)
Refrigerator 4
Freezer
A
Changing the control settings
If you need to adjust temperatures in
l Adjust the Refrigerator Control first.
refrigerator or freezer, use the settings listed
in the chart below as a guide. If you have
l Wait at least 24 hours between adjust-
ments.
questions, call our toll-free number. (See
paw 23.)
l Then adjust the Freezer Control if needed.
Refrigerator
section
too cold
l Controls not set correctly
for your conditions
Refrigerator 2
Freezer A
Ice not
made fast
enough
Both
sections
too warm
l Heavy ice usage
l Very cold room temperature
(can’t cycle often enough)
l Door opened often
l Large amount of food added
l Very warm or very cold room
temperatures
Refrigerator 4
Freezer A
Refrigerator 6
Freezer
C
Removing the drop-in trim pieces
(on some models)
To remove the trim piece:
1.
Remove all items from the shelf.
2. Pull straight up on the trim piece at each
end.
To replace the trim piece:
1.
Locate each end of the trim piece above
the trim pocket opening.
2. Push the trim piece straight down until it
stops.
3. Replace items on the shelf.
Removing the snap-off door trim
(on some models)
To remove the trim piece:
1.
Remove all items from the shelf.
2. Pull out on the inside tab at each end of
the trim piece.
3. Pull trim piece straight out.
To replace the
trim
piece:
1.
Line up ends of the trim piece with the
button on the door liner wall.
2. Push trim piece straight back until it
snaps securely into place.
3. Replace items on the shelf.
10
Model RTl8DK and RTl8HD
The meat drawer and cover can be removed
for cleaning or moved to another shelf, if
desired. Remove the meat drawer first.
To remove the meat drawer:
1.
Slide the drawer straight out to the stop.
2. Lift the front.
3. Slide drawer out the rest of the way.
4. Replace in reverse order.
To remove the cover:
1.
Remove the meat drawer.
2. Tilt front of cover up.
3. Pull cover up and out.
To replace the cover:
1.
2.
3.
Fit bottom notches of cover over rear and
center cross bars of shelf.
Lower cover into place.
Replace the meat drawer.
Lift the front,
then
the back.
Pull out tx
stop, lift the front
and pull again.
Removing the crispers and crisper cover
To remove the crispers:
1.
Slide the crisper straight out to the stop.
2. Lii the front.
3. Slide out the rest of the way.
4. Replace in reverse order.
To remove the cover:
1. For some models:
Push up glass insert
from the bottom, then slide it out with both
hands.
2. Lift front of cover frame.
3. Pull cover frame up and out.
4. Remove metal cover support.
To replace the cover:
1.
Replace metal cover support on wall
supports in front section of cabinet.
2. Fit back corners of cover frame into notch
supports
on walls of refrigerator, then
lower
front onto metal cover support.
3.
For some models:
Slide back of glass
insert into cover frame. Then lower front
to level position.
Pull out to the
Remove the
Lift front
of
12
Removing the freezer shelf
To remove the shelf:
1. Lift front of shelf slightly.
2. Lift back of shelf off supports.
3. Replace in reverse order.
Using the ice cube trays
If you don’t use cubes, they may shrink. The
moving cold air starts a slow evaporation.
The longer you store cubes, the smaller they
get.
To remove ice:
1.
Hold tray at both ends.
2. Twist slightly.
Using the optional automatic ice maker
(Factory-installed on RT18BM)
If you have an automatic ice maker, or if you
plan to add one later, there are a few things
you will want to know:
l The ON/OFF lever is a wire signal arm.
DOWN to make ice automatically
UP to shut off the ice maker
IMPORTANT:
Do not turn ice maker on
until it is connected to the water supply.
Instructions for ice maker water supply
hook up are attached to the back of the
refrigerator cabinet.
l The dial or lever on the side of the ice
maker changes the size of the cubes.
l Good water quality is important for good
ice quality. Try to avoid connecting the ice
maker to a softened water supply. Water
softener chemicals, such as salt from a
malfunctioning softener, can damage the
ice maker mold and lead to poor ice
quality. If a softened water supply cannot
be avoided, make sure that the water
softener is well maintained and operating
properly.
Down to
start ice
maker.
13
Common ice maker problems
PROBLEM
Ice crescents
attached at
corners
Ice maker
won’t
make ice
Off-taste or
odor in ice
CAUSE SOLUTION
l This is normal l They break apart easily.
l Shake ice bin occasionally to keep cubes
separated.
l ON/OFF lever in the
l Move ON/OFF lever to the ON (down)
OFF (up) position position.
l Freezer not cold l Ice maker will not operate until freezer is
enough
cold enough to make ice. This could take
overnight.
l Ice attracts airborne l Dump old ice and make a new supply.
odors; old ice
Store excess ice in a covered container.
l Poor water quality l Water containing minerals (such as sulfur)
may require a filter. Try to avoid softened
water supplies.
l Foods not properly l Wrap food properly. See pages 20 and 21.
wrapped
l Ice bin and freezer l Clean freezer and ice bin. See cleaning
need cleaning
chart on pages 17 and 18.
l Plumbing to ice maker l Follow Installation Instructions for proper
ice maker water supply hookup. (See
back of refrigerator cabinet.) Try to avoid
softened water supply.
l New ice maker
l First few batches of ice from a new ice
maker may have an off-taste. Dump ice
and make a new supply.
14
Changing the light bulbs
Electrical Shock Hazard
Before removing a light bulb, either
unplug the refrigerator or disconnect the
electricity leading to the refrigerator at
the main power supply.
Failure to do so could result in electrical
1 shock or personal injury.
To change the refrigerator light:
1.
Disconnect refrigerator from power supply.
2. Reach behind the Control Panel to remove
bulb.
3. Replace with a 40-watt appliance bulb.
4. Reconnect refrigerator to power supply.
NOTE:
Not all commercial appliance bulbs will
fit your refrigerator. Be sure to replace
a
bulb
with one of the same size and shape.
Removing the base grille
To remove the grille:
1.
Open refrigerator door.
2. Pull base grille forward to release the
support tabs from the metal clips.
3.
Do not remove Tech Sheet
fastened
behind the grille.
To replace the grille:
1.
Line up grille support tabs with metal clips.
2. Push firmly to snap into place.
3. Close refrigerator door.
See cleaning instructions for defrost pan and
condenser coils on page 18.
15
PART
WHAT TO USE
HOW TO CLEAN
Door liners
and gaskets
Sponge, soft cloth
or paper towel with
mikf detergent and
warm water
l Wash, rinse and dry thoroughly.
DO NOT USE cleaning waxes, concen-
trated detergents, bleaches or cleaners
containing petroleum on plastic parts.
Plastic parts
(covers and
panels)
Soft, clean sponge
or soft, clean cloth
with mild detergent
and
warm water
l Wash, rinse and dry thoroughly.
DO NOT USE paper towels, window
sprays, scouring cleansers or flammable
fluids. These can scratch or damage
material. See “Important Safety Instruc-
tions” on page 3.
Defrost pan
Sponge or cloth
with miki detergent
and warm water
Condenser
coils
Vacuum cleaner
with extended
narrow
attachment
l Remove base grille. (See page 15.)
l To remove defrost pan, lift pan over wire
brace (remove tape; if any).
l Wash, rinse and dry thoroughly.
l Replace with notched corner to the rear.
Push it in all the way.
l Make sure defrost pan drain tube is
pointing into pan.
l Replace base grille.
l Remove base grille.
l Vacuum coils when dusty or dirty. Coils
may need to be cleaned as often as every
other month.
l Replace base grille.
Floor under
refrigerator
Floor cleaners
l Roll refrigerator out only as far as the water
supply line allows.
l Clean floor.
l Roll refrigerator back into place.
l Check to see if the refrigerator is level.
Vacation and moving care
Short vacations
No need to shut off the refrigerator if you will
be away for less than four weeks.
1.
Use up any perishables.
2. Freeze other items.
3. If your refrigerator has an automatic ice
maker:
l Raise signal arm to OFF (up) position.
l Shut off water supply to ice maker.
l Empty the ice bin.
18
Long vacations
If you will be gone a month or more:
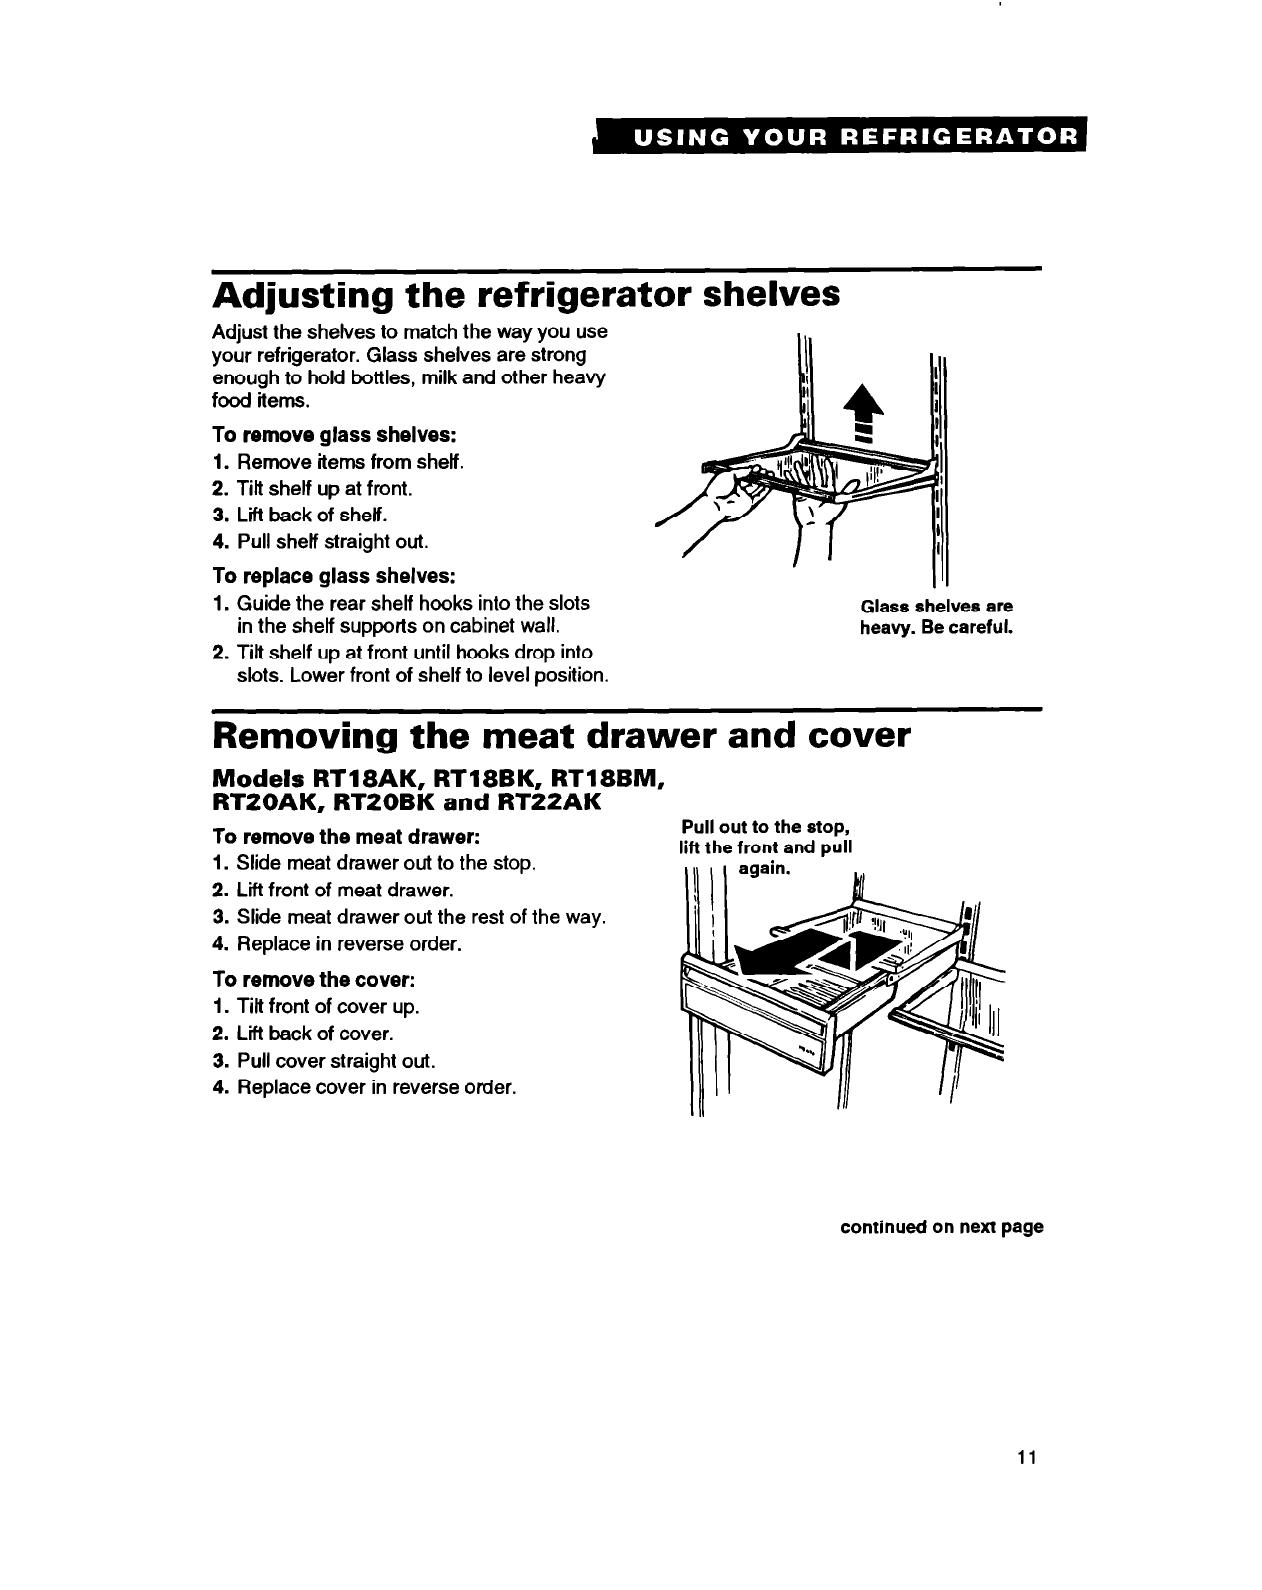
1.
Remove all food from the refrigerator.
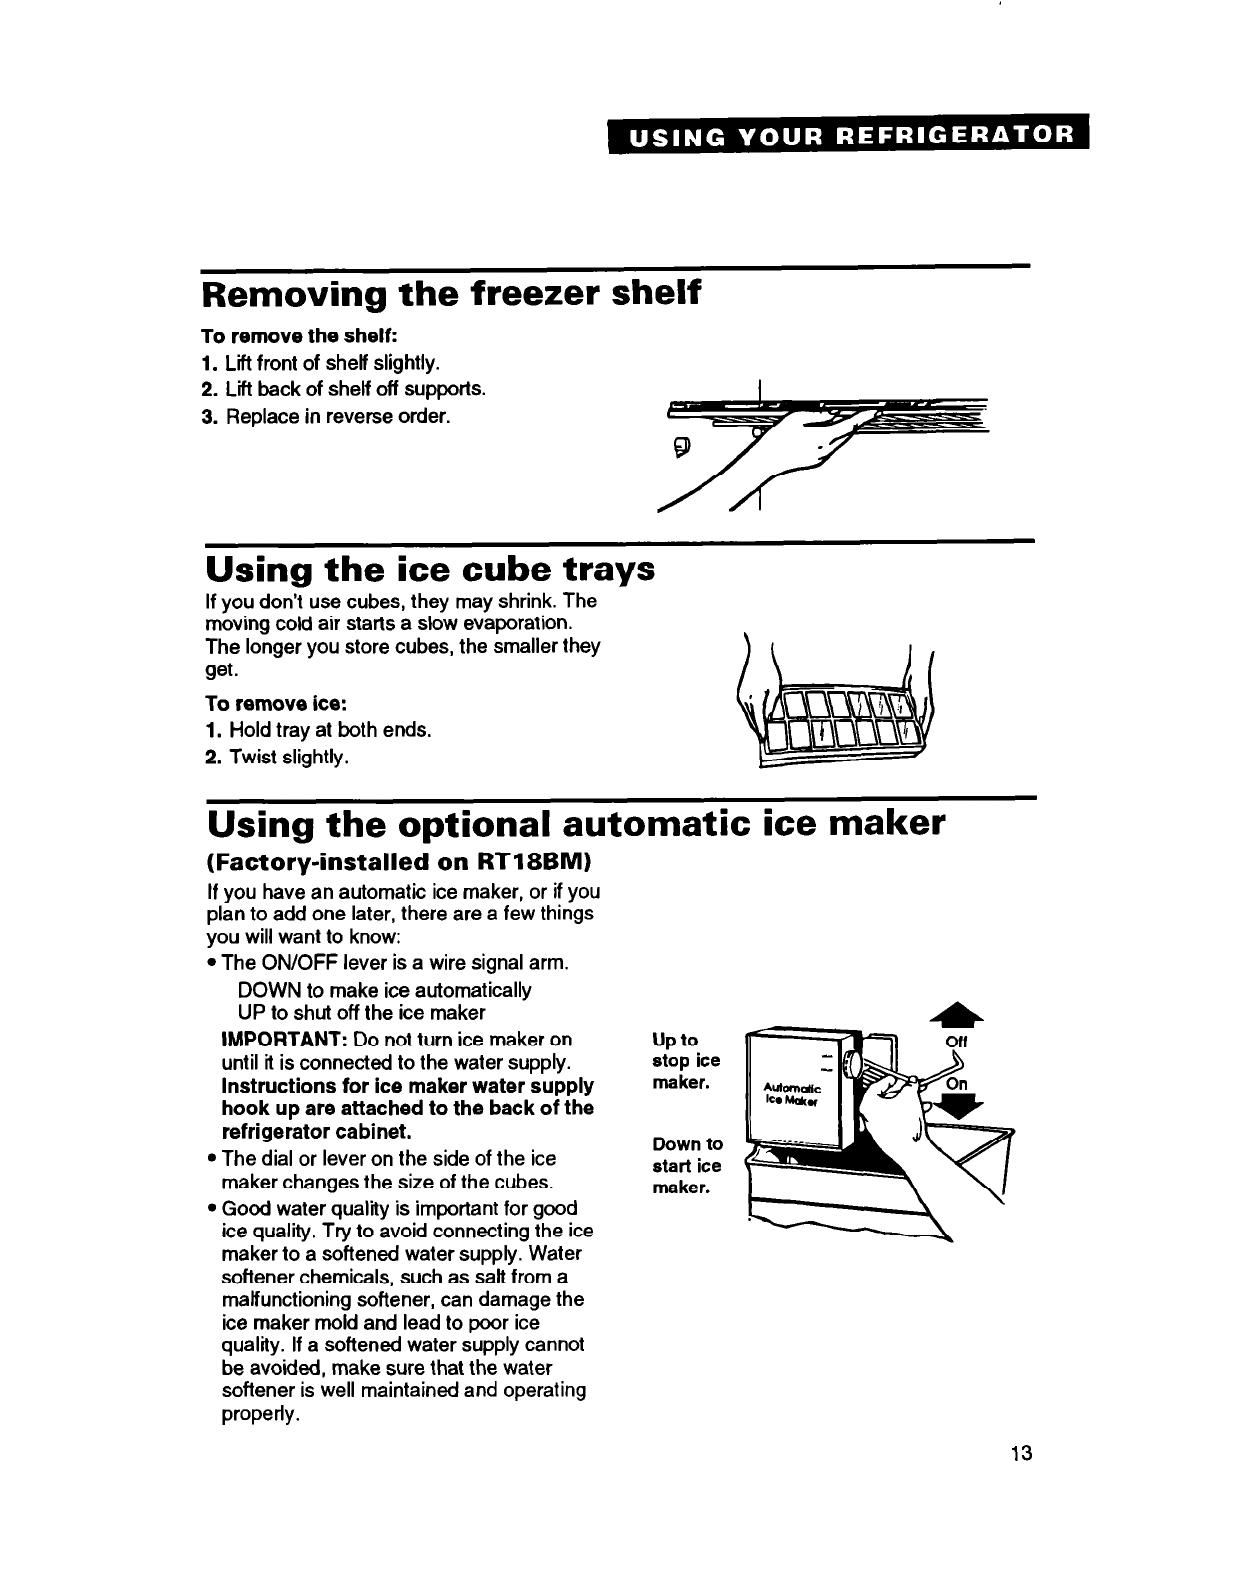
2. If your refrigerator has an automatic ice
maker:
l Turn off the water supply to the ice
maker at least one day ahead of time.
l When the last load of ice drops, turn off
the ice maker. Make sure all ice is dis-
pensed out of the ice maker mecha-
nism.
3. Unplug the refrigerator.
4. Clean it, rinse well and dry.
5. Tape rubber or wood blocks to the tops of
both doors to prop them open far enough
for air to get in. This stops odor and mold
from building up.
Personal Injury Hazard
Do not allow chiktren to climb on, play
near or climb inside the refrigerator
when the doors are blocked open.
They may become injured or trapped.
To restart refrigerator, see “Using Your
Refrigerator” on page 8.
Moving
When you are moving the refrigerator to a
new home:
1.
If your refrigerator has an automatic ice
maker:
l Turn off the water supply to the ice
maker at least one day ahead of time.
l Disconnect the water line.
l After the last load of ice drops, lift the
signal arm to the OFF (up) position.
2. Remove all food from the refrigerator.
3. Pack all frozen food in dry ice.
4. Unplug the refrigerator.
5. Clean it thoroughly. Rinse well and dry.
6. Take out all removable parts, wrap them
well, and tape them together so they don’t
shift and rattle.
7. Screw in the leveling rollers.
8. Tape the doors shut and tape the power
supply cord to the cabinet.
When you get to your new home, put
everything back and refer to page 6. Also, if
your refrigerator has an automatic ice
maker, remember to reconnect the water
supply line.
Power interruptions
If electricity goes off, call the power com-
pany. Ask how long power will be off.
1.
If service will be interrupted 24 hours or
less,
keep both doors closed.
This
helps food stay frozen.
2. If service will be interrupted longer than
24 hours:
(a) Remove all frozen food and store in a
frozen food locker.
OR
(b) Place 2 Ibs. (0.9 kg) of dry ice in
freezer for every cubic foot of freezer
space. This will keep food frozen for 2
to 4 days. Wear gloves to protect your
hands from dry ice burns.
OR
(c) If neither a food locker or dry ice is
available, use or can perishable food
at once.
3. A full freezer stays cold longer than a
partly filled one. A freezer full of meat
stays cold longer than a freezer full of
baked goods. If food contains ice crystals,
it may be safely refrozen, although the
quality and flavor may be affected. If the
condition of the food is poor, or if you feel
it is unsafe, dispose of ft.
Questions ?
Call our toll-free telephone number,
1-800-44-ROPER.
19
Food Storage Guide
There is a correct way to package and store refrigerated or frozen food. To keep food fresher,
longer, take the time to study these recommended steps.
Storing fresh food
Wrap or store food placed in the refrigerator
in airtight and moisture-proof material. This
prevents food odor and taste transfer
throughout the refrigerator. For dated
products, check code date to ensure fresh-
ness.
Leafy vegetables
Remove store wrapping and trim or tear off
bruised and discolored areas. Wash in cold
water and drain. Place in plastic bag or
plastic container and store in crisper.
Vegetables with skins
(carrots, peppers)
Store in crisper, plastic bags or plastic
container.
Fruit
Wash, let dry and store in refrigerator in
plastic bags or crisper. Do not wash or hull
berries until they are ready to use. Sort and
keep berries in their original container in a
crisper, or store in a loosely closed paper
bag on a refrigerator shelf.
Esw
Store without washing in the egg bin pro-
vided (on some models) or in the original
carton on interior shelf.
Milk
Wipe milk cartons. For best storage, place
milk on interior shelf.
Butter or margarine
Keep opened butter in covered dish or
closed compartment. When storing an extra
supply, wrap in freezer packaging and
freeze.
Cheese
Store in the original wrapping until you are
ready to use it. Once opened, rewrap tightly
in plastic wrap or aluminum foil.
Leftovers
Cover leftovers with plastic wrap or alumi-
num foil. Plastic containers with tight lids can
also be used.
Meat
Store most meat in original wrapping as long
as it is airtight and moisture-proof. Rewrap if
necessary. See the following chart for
storage times.
TYPE
APPROXIMATE TIME
(DAYS)
1 Chicken
1 to2
I
1 Ground beef
1 to 2
I
I Steaks and roasts 3 to 5
I
Variety meats
1 to2
*If storing meat longer than the times given,
follow the directions for freezing.
NOTE:
Use fresh fish and shellfish the same
day as purchased.
20
  • Page 1 1
  • Page 2 2
  • Page 3 3
  • Page 4 4
  • Page 5 5
  • Page 6 6
  • Page 7 7
  • Page 8 8
  • Page 9 9
  • Page 10 10
  • Page 11 11
  • Page 12 12
  • Page 13 13
  • Page 14 14
  • Page 15 15
  • Page 16 16
  • Page 17 17
  • Page 18 18
  • Page 19 19
  • Page 20 20
  • Page 21 21
  • Page 22 22
  • Page 23 23
  • Page 24 24

Roper RT18AK User manual

Category
Fridges
Type
User manual

Ask a question and I''ll find the answer in the document

Finding information in a document is now easier with AI