Page is loading ...

24
9.1.1 - DISPOSAL
Once the machine has been taken out of service, the machine can be safely
dismantled. To correctly dismantle the vegetable preparation machine, take it to a
Company which is competent to carry out this service in accordance with the
materials used for the various components (see 1.2.2).
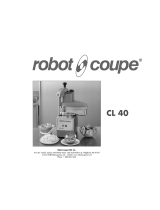
Kenwood Catering is a division of Kenwood Limited, New Lane, Havant,
Hampshire PO9 2NH, UK
www.kenwoodcatering.com
89013/2
1
Instruction Manual
Vegetable Preparation Machine
Model XVP001

2
CHAP.1 INFORMATION ON THE MACHINE
Page 5
1.1 GENERAL PRECAUTIONS
1.2 DESCRIPTION OF THE MACHINE
1.2.1 General description
1.2.2 Manufacturing characteristics (Materials used)
1.3 SAFETY MEASURES
1.3.1 General safety measures
1.3.2 Electrical safety
1.4 ACCESSORIES + DISCS
1.4.1 Accessories
1.4.1.1 Standard accessories
1.4.1.2 Non-standard accessories
1.4.2 Discs
CHAP. 2 TECHNICAL DATA
Page 13
2.1 VOLUME, WEIGHT, CHARACTERISTICS
CHAP. 3 RECEIPT OF THE MACHINE
Page 14
3.1 SHIPPING OF THE MACHINE
3.2 CHECKING THE PACKAGING AND ITS CONTENTS
ON RECEIPT
3.3 DISPOSAL OF THE PACKAGING
CHAP. 4 INSTALLATION
Page 15
4.1 CONNECTING THE MACHINE
4.1.1 Collecting bowl
4.1.2 Directing “chute"
4.2 ELECTRICAL CONNECTION
4.2.1 Single phase vegetable cutter (220-240 Volt, 50 Hz)
4.3 ELECTRICAL DIAGRAM FOR THE MACHINE
4.4 CHECKING OPERATION OF THE MACHINE
INTRODUCTION
• This manual is intended to supply the Client with all the necessary information
on the machine, the regulations which apply to it and the instructions for use
and maintenance.
• This manual should be given to the people who are to use and maintain the
machine.
TABLE OF CONTENTS
23
CHAP. 8 - SERVICE AND CUSTOMER CARE
8.1 - GENERAL
• If the cord is damaged it must, for safety reasons, be replaced by KENWOOD
or an authorised KENWOOD repairer.
UK and Eire
If you need help with:
• Using your machine
• Servicing or repairs (in or out of guarantee)
Call Kenwood Catering on 0121 772 7897 and ask for Customer Care.
Have your model number and serial number ready, they are on the back of the
vegetable preparation machine.
For further information contact:
Sales 02392 392 234
Spares 0870 241 3653
8.2 - GUARANTEE
If your machine goes wrong within one year from the date you bought it, we will
repair or replace it free of charge provided:
• You have not misused, neglected or damaged it;
• It has not been modified;
• It is not second-hand
• The machine has only previously been serviced by a Kenwood Authorised Re-
pairer
• You have not fitted a plug incorrectly;
• You have sent back the warranty registration card when the machine was
first purchased.
This guarantee does not affect your statutory rights.
CHAP. 9 - DISMANTLING
9.1 - TAKING OUT OF SERVICE
If, for any reason, you decide to take the machine out of service, ensure that it
cannot be used by anyone. Disconnect and remove the electrical connections.

22
The machine must not be cleaned with water jets. Tools, brushes and scrapers
which may cause damage to the surface of the appliance should not be used.
Sterilisation - Areas in contact with food should be cleaned regularly with a dilute
sterilising agent.
NB: do not put any component into the dishwasher
7.3 - PROCEDURE TO BE FOLLOWED
Unplug the machine from the power supply.
Lift the cover and remove any discs, the expulsion arm, the pusher, the bowl and/
or the chute. Wash the removable parts in hot soapy water and then dry
thoroughly.
Carefully clean the inside of the outlet, all the working areas and the spindle.
Also clean all the external surfaces of the machine.
Dry the machine with a cloth and put it back together.
Fig. No 27 - View of the machine dismantled for cleaning.
WARNING!!
3
CHAP. 5 USE OF THE MACHINE
Page 18
5.1 FITTING THE DISCS
5.2 LOADING AND CUTTING THE FOOD
CHAP. 6 MAINTENANCE AND PRACTICAL ADVICE
Page 20
6.1 GENERAL
6.1.1 Belt
6.1.2 Feet
6.1.3 Control Panel Label
6.1.4 Power cable
6.1.5 Discs
6.2 TROUBLESHOOTING
6.2.1 The disc lock is defective
6.2.2 The cover does not lock
6.2.3 The food is not cut properly
6.2.4 The cut food does not come out or is not properly cut
6.2.5 The machine stops operating
6.2.6 The microswitches on the pusher lever and the cover do
not work
6.2.7 The machine will not start
CHAP. 7 CLEANING THE MACHINE
Page 21
7.1 GENERAL
7.2 PRODUCTS TO BE USED
7.3 PROCEDURE TO BE FOLLOWED
CHAP.8 SERVICE AND CUSTOMER CARE
Page 23
8.1 GENERAL
8.2 GUARANTEE
CHAP. 9 DISMANTLING
Page 23
9.1 TAKING OUT OF SERVICE
9.2 DISPOSAL

4
TABLE OF FIGURES
Fig. No 1 General view of the Vegetable Preparation Machine
model “XVP001”
Page 6
Fig. No 2 Position of the electrical safety protection Page 8
Fig. No 3 Position of the mechanical safety protection Page 8
Fig. No 3A Position of the electrical safety measures Page 8
Fig. No 4 Position of the chute or the bowl to allow the machine to
be started.
Page 9
Fig. No 5 Machine on-off control. Page 9
Fig. No 6 Small pusher for pushing vegetables down Page 10
Fig. No 7 Bowl with magnetic sensor Page 10
Fig. No 8 Chute to direct the food Page 10
Fig. No 9 Expulsion arm Page 11
Fig. No 10 Disc rack Page 11
Fig. No 11 Discs for slicing Page 11
Fig. No 12 Discs for julienne Page 12
Fig. No 13 Discs for dicing Page 12
Fig. No 14 Discs for grating Page 12
Fig. No 15 Dimensions and weights Page 13
Fig. No 16 Description of the packaging Page 14
Fig. No 17 Collecting bowl Page 15
Fig. No 18 Directing “chute" Page 16
Fig. No 19 Technical plate – registration Page 16
Fig. No 20 Diagram of the single phase electrical equipment Page 17
Fig. No 21 Start and stop button. Page 17
Fig. No 22 Fitting the expulsion arm Page 18
Fig. No 23 Fitting the dicing – slicing combination Page 18
Fig. No 24 Correct operating position Page 19
Fig. No 25 Food added using the large feed tube Page 19
Fig. No 26 Food added using the small feed tube Page 19
Fig. No 27 View of the machine dismantled for cleaning Page 22
21
6.2 - TROUBLESHOOTING
6.2.1 - The disc lock is defective:
Check that the discs and the disc-holding spindle are clean.
6.2.2 - The cover does not lock:
Check that the cover is correctly closed and that it is clean.
6.2.3 - The food is not cut properly:
Check the state of wear of the cutters.
6.2.4 - The cut food does not come out or is not properly cut:
Check that the expulsion arm has been fitted except when dicing. Check that the
bowl is not full and the outlet is not blocked.
6.2.5 - The machine stops operating:
Check that the food to be cut is not frozen or too hard and that the voltage
supplied is in accordance with the voltage indicated on the technical plate (Fig.
No 19).
6.2.6 - The microswitches on the pusher lever and the cover do not work:
Check that they are not blocked by dirt or other materials.
6.2.7 - The machine will not start:
Check that all the safety devices are correctly positioned (Safety Chapter 1.3).
Check that the machine is plugged into the power supply and that all the relevant
switches in the work place are switched on.
CHAP. 7 - CLEANING THE MACHINE
7.1 - GENERAL
• The machine must be cleaned at least once a day or more often, if necessary.
• All parts of the Vegetable Preparation Machine which come into direct or
indirect contact with the food for cutting must be meticulously cleaned.
Before carrying out any operations it is necessary to:
• disconnect the plug from the power supply to completely insolate the machine
from the rest of the equipment.
Be careful of the residual risks from the cutting parts and / or associated
parts during cleaning or handling the discs.
7.2 - PRODUCTS TO BE USED
The machine must be wiped with normal detergents at room temperature, using a
damp cloth.

20
C To replace the disc and, therefore, change the cutting operation to be carried
out, carry out the steps described in point 5.1 “A”. (Use the grooves in the
sides of the disc to assist removal. Take care as the cutting edges are sharp).
After this operation, an electronic system will prevent the automatic start-up of
the machine and you will need to press the button “I” to start the machine
again.
D If the bowl is used, empty it after every 2 - 3 cutting cycles. Using the machine
when the bowl is too full could prevent the correct removal of the food from
the Vegetable Preparation Machine, causing defective cutting, blockage of the
machine or even failure of the motor.
CHAP. 6 - MAINTENANCE AND PRACTICAL ADVICE
All maintenance should be undertaken by a qualified or suitably trained person.
6.1 - GENERAL
Before carrying out any operations it is necessary to:
Disconnect the plug from the power supply to completely isolate the machine
from the rest of the equipment.
6.1.1 - BELT
The belt does not need any adjustment. In general, after 3 - 4 years it must be
replaced, if it breaks, call Kenwood Catering Customer Care.
6.1.2 - FEET
The feet will deteriorate over time and loose their elastic characteristics, reducing
the stability of the machine. They will, therefore, need to be replaced.
6.1.3 - CONTROL PANEL LABEL
The label could fade and / or develop holes with wear. In this case, call Kenwood
Catering Spares for a replacement.
6.1.4 - POWER CABLE
Regularly check the state of wear of the cable and call Kenwood Catering
Customer Care, if necessary, for its replacement.
6.1.5 - DISCS
The edge of the blade could deteriorate with use.
In the case of the grating and dicing discs you must purchase new ones.
In the case of the slicing and julienne discs the blade can be replaced. In this case,
call Kenwood Catering Spares specifying the exact code for the disc.
5
CHAP. 1 – INFORMATION ON THE MACHINE
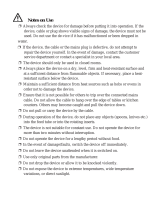
1.1 - GENERAL PRECAUTIONS
• The vegetable preparation machine must only be used by people who are fully
aware of the safety regulations contained in this manual.
• If new people are to use the machine, time must be allowed for training them.
• Even where safety devices are provided on the machine, avoid putting your
hands near moving parts.
• Before carrying out cleaning or maintenance operations, disconnect the
machine from the electrical supply.
• When carrying out maintenance or cleaning operations on the Vegetable
Preparation Machine carefully evaluate the risks involved.
• During maintenance or cleaning, remain focused on the operations in hand.
• Regularly check the state of the power cable; a worn cable or one that has
been damaged in any way represents a serious electrical danger.
• If the machine is presumed or shown to be malfunctioning in any way, we
recommend you stop using it and call the “Customer Care Department ”
details of which are given in this manual.
• Do not use the Vegetable Preparation Machine for frozen products, meat or
fish with bones or any non-food products.
• Do not carry out repairs yourself. Repairs must always be carried out by an
Authorised Repairer.
• Always use the pushers to push food onto the cutting discs.
• Never overfill the feed tube or bowl and never press too hard to avoid any type
of problem.
• The manufacturer shall be exempt from any responsibility in the following
cases:
• if the machine is tampered with by unauthorised personnel.
• if components are replaced with others which are not original and discs
which are not supplied by us.
• the instructions given in this manual are not followed carefully.
• the surfaces of the machine are treated with unsuitable products.

6
1.2.1 - GENERAL DESCRIPTION
The Vegetable Preparation Machine has been designed specifically for cutting
vegetables, fruit and mozzarella, to guarantee:
• maximum safety in use, cleaning and maintenance;
• maximum hygiene, obtained through a careful selection of the materials which
come into contact with foods and the design of the product to make it easy to
dismantle and clean;
• robustness and stability of all the components;
• it is as quiet as possible by using belt drives;
• easy handling.
Fig. No 1 - General view of the Vegetable Preparation Machine model “XVP001”
1.2 - DESCRIPTION OF THE MACHINE
SMALL
PUSHER
LARGE PUSHER
HANDLE
PUSHER LEVER
UPPER
BODY
MAIN BODY
CASING
POWER CABLE FEET
BASE
COVER
LOCKING LATCH
CONTROL PANEL
COVER
19
5.2 - LOADING AND CUTTING THE FOOD
During operation of the machine a correct position must be assumed to avoid
accidents. The body must always be perpendicular to the work surface (see Fig.
No 24). Do not stand so that parts of the body come into direct contact with
moving parts of the machine.
N.B. The food to be processed with the Vegetable Preparation Machine can only
be added when the motor is switched off.
The procedure is as follows:
A. Place the food into the feed tube (as shown in Fig. No 25). If the food is small
(such as carrots, courgettes, etc.) add it down the small feed tube on the pusher
lever (as shown in Fig. No 26). Start the machine and assist the cutting of the
product by applying light pressure on the small pusher, or large pusher handle
if you are using the larger feed tube. Make sure when using the large pusher
handle that the small pusher is locked into position.
B. Once the food has been completely cut, lift the pusher lever. A safety system
will prevent the machine from continuing to operate. Add some more food and
lower the lever and the machine will automatically start to work again.
Fig. No 24 - Correct operating position.
WARNING!
Fig. No 25 - Food added
using the larger feed tube.
Fig. No 26 - Food
added using the smaller
feed tube.

18
CHAP 5 - USING THE MACHINE
5.1 - FITTING THE DISCS
A. Choose a slicing, grating or julienne disc. After raising the aluminium
cover, fit the expulsion arm on the spindle (Fig No 22), then fit the disc on
top and twist clockwise to lock into position. Replace the cover and lock it
into place.
B FOR DICING
Choose the pair of discs AWXVP30010 and AWXVP10010 or AWXVP30014
and AWXVP10010. Insert the dicing disc first, with the indent facing right, with
the machine in front of you. Then fit the slicing disc on top. (see Fig. No 23).
N.B.: THE EXPULSION ARM SHOULD NOT BE FITTED WITH THE PAIR
OF DICING/SLICING DISCS.
Fig. No 23 - Fitting the slicing and dicing discs together
Fig. No 22 - Fitting the expulsion arm
Example of when the expulsion arm should not be fitted
7
1.2.2 - MANUFACTURING CHARACTERISTICS (Materials used)
The Vegetable Preparation Machine is manufactured using materials which are
highly resistant to mechanical wear, structural shocks and the corrosive agents
normally present in washing products.
In particular:
• The upper body, cover and base are made of anodised aluminium. This
guarantees contact with food will be hygienic and that there will be a high
resistance to acids, salts and rusting.
• The main body casing, pusher lever, collecting bowl and spindle are made of
AISI 304 and 430 grade stainless steel.
• The small pusher, large pusher handle, control panel case are made of highly
resistant plastic, suitable for contact with foods.
• The discs for cutting the food have an aluminium carrier and the blades are
made of AISI 420 grade stainless steel. These are NOT dishwasher safe.
1.3 - SAFETY MEASURES
1.3.1 - GENERAL SAFETY MEASURES
The Vegetable Preparation Machine described in this manual conforms to the
following European Directives, with regard to mechanical, electrical and hygiene
safety:
MECHANICAL SAFETY
: 98/37/EC.
ELECTRICAL SAFETY: 73/23/EEC; 89/336/EEC.
HYGIENE SAFETY
: 89/109/EEC.
STANDARDS: EN 60335-1; EN 55014.
Note:- The Vegetable Preparation Machine is fitted with the regulatory devices
for electrical and mechanical protection both in the operating phase and in the
maintenance and cleaning phases. However, there are RESIDUAL RISKS (EEC
93/87 Point 1.7.2) which cannot be totally eliminated, which are highlighted in
this manual under the heading WARNING.
These relate to the danger of cutting yourself when handling the discs during
replacement and / or cleaning.
1.3.2 - ELECTRICAL SAFETY
The Vegetable Preparation Machine is fitted with sensors:
A on the pusher lever. This will prevent operation of the machine if the lever is
lifted above the top of the feed tube and allow the machine to automatically
start again as soon as the dangerous condition mentioned above has been
removed (Fig. No 2).

8
B on the upper body. This will prevent operation of the machine if the cover is
lifted (e.g for replacement of the discs) (Fig. No 3A), and to only allow the
machine to be started manually (by pressing button “I”) if the cover is in the
closed position and locked in place.(Fig. No 3).
Fig. No 2 - Position of the electrical safety protection.
Fig. No 3 - Position of the mechanical safety protection.
Fig. No 3A - Position of the electrical safety measures.
17
4.3 - ELECTRICAL DIAGRAM FOR THE VEGETABLE CUTTER
Fig. No 20 - Diagram of the single phase 220-240 Volt electrical equipment.
4.4 - CHECKING OPERATION OF THE MACHINE
Test the operation daily before first use with the following procedure:
a) Press the “I” on button and the “O” off button and check that the
corresponding indicator lights go on and off (Fig. No 21).
b) Check that the motor stops and starts when the pusher handle is raised and
lowered.
c) Check that the machine stops when the cover is raised and that it can only be
started again by pressing the START “I” button after the cover has been
correctly secured.
d) Carry out the check as for point “c” with the bowl or the chute in place.
Fig. No 21 - Start and stop button.
START “I”
STOP “O”

16
4.1.2 - DIRECTING “CHUTE"
Install this directing chute under the food outlet. (Fig. No 18).
N.B. For correct assembly:
Put the screws through the holes on the chute and press down until they have been
fully engaged.
4.2 - ELECTRICAL CONNECTION
4.2.1 - SINGLE PHASE VEGETABLE CUTTER (220-240 Volt, 50 Hz)
Connect the Vegetable Preparation Machine to the single phase 220-240 Volt 50
Hz power supply. For additional safety we recommend the use of a residual
current device (RCD).
Also check that the data given on the technical registration plate (Fig. No 19)
corresponds to the data given in the delivery documents and accompanying
documents.
Fig. No 18 - Directing “chute”.
PUSHING
DIRECTION
Fig. No 19 - Technical plate – registration.
9
C on the main body. This prevents operation of the machine if the collecting
bowl or the chute are not correctly positioned on the outlet and it will only
allow the machine to be started manually (by pushing the button “I”) if the
bowl or chute are correctly positioned (Fig. No 4).
The Vegetable Preparation Machine is also fitted with a control device comprising
of:
D a low-voltage control panel protected to IP 54 with two contact buttons; “I” =
on “O” = off. (Fig. No 5).
E A power board protected to IP 34, composed of
a transformer and two approved relays, controlled by the control board and by
sensors placed on the bowl, chute and covers, to switch the machine on and
off.
The Vegetable Preparation Machine is fitted with an NVR device which will, in
the cases of a restoration of the voltage, after a fall in voltage, only allow the
machine to be started by pressing the “I” control button.
Fig. No 4 – Position of the chute or the bowl to allow the machine to be started.
Fig. No 5 - Machine on-off control.

10
1.4 - ACCESSORIES + DISCS
1.4.1 - ACCESSORIES
The Vegetable Preparation Machine is fitted with several accessories. Some of
these are supplied as standard and some are options supplied at the specific
request of the Client.
1.4.1.1 - STANDARD ACCESSORIES
Small Pusher:
made of non toxic polyethylene, to assist the cutting of small pieces
of food, introduced into the chute of the larger pusher (Fig. No 6).
Collecting bowl:
made of stainless steel, 1/3 “GASTRONORM” 200mm deep;
fitted with magnetic sensors (Fig. No 7).
Chute:
Made of AISI 304 stainless steel, to replace the bowl, directs the food into
a vessel, usually placed at the base of the worktable (Fig. No 8).
Fig. No 6 - small pusher for
pushing vegetables down
Fig. No 7 - Bowl with magnetic
sensor
Fig. No 8 - Chute to direct the food.
15
3.2 - CHECKING THE PACKAGING AND ITS CONTENTS ON RECEIPT
On receipt of the package containing the Vegetable Preparation Machine,
carefully examine the packaging to check that it has not suffered any serious
damage during transport.
If, on external examination, the packaging shows signs of maltreatment, blows or
dropping, show the damage to the courier and, immediatley inform Kenwood
Catering Customer Care. DO NOT TURN THE PACKAGING UPSIDE DOWN!
If you wish to move it, make sure you support it at the 4 main points (keeping it
parallel to the ground).
3.3 - DISPOSAL OF THE PACKAGING
The packaging components (cardboard, any pallet, plastic strips and polyurethane
foam) can be disposed of easily by adding to the refuse. If the machine is used in
countries where there are specific regulations, dispose of the packaging in
accordance with the regulations in force.
CHAP. 4 - INSTALLATION
4.1 - CONNECTING THE MACHINE
The surface on which the Vegetable Preparation Machine is to be placed must
take account of the dimensions indicated in Fig. No 15 (and therefore be large
enough); it must be level, dry, smooth, strong and stable at a height suitable for
the operator. The machine must also be placed in a salt-free environment with a
maximum humidity of 75% and a temperature of between + 5° C and + 35° C, i.e.
in an environment which will not cause it to malfunction.
4.1.1 - COLLECTING BOWL
Place the collecting bowl under the food outlet. Make sure that it covers the
whole outlet area, and that the magnetic sensor faces towards the inside of the
machine (Fig. No 17).
SENSOR
Fig. No 17 - Collecting bowl

14
CHAP. 3 - RECEIPT OF THE MACHINE
3.1 - SHIPPING THE MACHINE (see Fig. No 16)
The Vegetable Cutter will leave the warehouses correctly packaged. The
packaging is made of:
a) external box of sturdy cardboard; h) Warranty registration card
b) the machine; i) Usage warning label.
c) inserts to hold the machine steady;
d) bowl and exit chute;
e) pusher;
f) this manual;
g) CE certificate of conformity.
Fig. No 16 - Packaging.
a)
c)
b)
d)
e)
h)
f)
g)

12
DISCS FOR JULIENNE:
The carrier is made of aluminium and the blades are
made of AISI 420 grade stainless steel.
The following discs are available:
AWXVP20004 – 4mm thick
AWXVP20006 – 6mm thick
AWXVP20008 – 8mm thick
DISCS FOR DICING:
The carrier is made of aluminium and the blades are made of AISI 420 grade
stainless steel.
The following discs are available:
AWXVP30010 coupled with AWXVP10010 –
10x10x10mm
AWXVP30014 coupled with AWXVP10010 –
14x14x10mm
DISCS FOR GRATING:
The carrier is made of aluminium and the body of the disc is made of AISI 420
grade stainless steel.
The following discs are available:
AWXVP40099 for grating Parmesan
AWXVP40003 – 3mm diameter holes
AWXVP40004 – 4mm diameter holes
AWXVP40007 –7mm diameter holes
Fig. No 14 - Grating type discs.
Fig. No 12 - Julienne type
discs.
Fig. No 13 - Dicing type discs.
13
The electrical information for this machine can be found on a plate on the back of
the Vegetable Preparation Machine. Before connecting the machine see point 4.2
ELECTRICAL CONNECTION.
CHAP. 2 - TECHNICAL DATA
2.1 - CLEARANCE, WEIGHT, CHARACTERISTICS
Fig. No 15 - Dimensions and weights.
UNIT XVP001
Supply
Single phase
220-240 V / 50 Hz
Power
watt / Hp 515 / 0.7
Revs
rpm 300
Dimensions between feet
G x H x I
mm
225 x 180 x 255
Dimensions
mm
510 x 280 x 460
(A x E x C)
Max dim.
mm
510 x 535 x 790
(A x D x B)
Packaging dim.
mm 720 x 350 x 500
Product weight
kg 23
Packaged weight
kg 26
Noise level
dB ≤70
B
A
E
C
D
H
G
I
/