Kenmore 625.34846 User manual
- Category
- Water dispensers
- Type
- User manual
This manual is also suitable for

PRINTED IN U.S.A.
SAVE THIS MANUAL
Use plastic bag and tie provided, to hang manuals nearby
the softener for future reference.
microMAX Water Softener
◆ Warranty
◆ Start Up / Setting Timer
◆ How It Works
◆ Care Of
◆ Specifications
◆ Repair Parts
OWNER’S
MANUAL
MODEL NO.
625.348460
Caution:
Read and Follow
All Safety Rules and
Operating Instructions
Before First Use of
This Product.
If you have questions when
installing, operating or main-
taining your softener, and
when setting the timer, call
this toll–free number...
1–800–426–9345

WARRANTY
2
SEARS RESIDENTIAL WATER SOFTENER
FULL ONE YEAR WARRANTY ON WATER SOFTENER
For one year from the date of purchase, when this water softener is installed and maintained in
accordance with our instructions, Sears will repair, free of charge, defects in material or workman-
ship in this water softener.
FULL TEN YEAR WARRANTY AGAINST LEAKS
For ten years from the date of purchase, Sears will furnish and install a new current model water
softener tank or salt storage drum, free of charge, if either the tank or drum develop a leak.
TO OBTAIN WARRANTY SERVICE, SIMPLY CONTACT THE NEAREST SEARS SERVICE CEN-
TER THROUGHOUT THE UNITED STATES. This warranty applies only while this product is in use
in the United States.
This warranty gives you specific legal rights, and you may have other rights which vary from state
to state.
Sears, Roebuck and Co., D/817 WA, Hoffman Estates, IL 60179
&" $! &" $! ! & ! ! ! &" $
! "!& !! & "!' !
SEARS INSTALLATION POLICY
!! &
! $
$! & ! ! !(
"! !! & $!
$ "!
" ! !! " !(
! & " ! ! !&
! " !&
SEARS INSTALLATION WARRANTY
! ! & $!& %! ! &"
! ## $ $!&
!# ! ! !
! " ! $ &
!! # "!& $! &
$ " ! &" " " "!
! ! ! ! ! ! &"
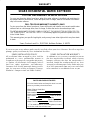
FACTS AND FIGURES TO KEEP
Fill in the blanks below and keep this book in a safe
place so you always have these facts.
Water Softener Model No.†
Serial Number
Date Installed
Water Hardness Grains Per Gallon
Iron Content Parts Per Million
*pH Taste And/Or Odor
Water Pressure Pounds/Square Inch
Water Flow Rate Gallons Per Minute
† The model number is on the rating decal, located
on the rim, under the salt hole cover.

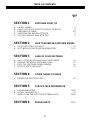
TABLE OF CONTENTS
3
PAGE
NO.
SECTION 1 SOFTENER START UP
A. SAFETY GUIDES 4
B. CHECK LIST OF STEP-BY-STEP GUIDES TO INSTALL 5
C. PROGRAM THE TIMER 6-7
D. SANITIZING THE WATER SOFTENER 8
E. FILL THE STORAGE TANK WITH SALT 9
SECTION 2 HOW YOUR WATER SOFTENER WORKS
A. FACE PLATE TIMER FEATURES 10
B. SOFT WATER SERVICE AND REGENERATION 11-13
SECTION 3 CARE OF YOUR SOFTENER
A. SALT…REFILLING STORAGE TANK, SALT BRIDGE 14
B. KEEPING THE WATER SOFTENER CLEAN 15
C. KEEP THE SOFTENER FROM FREEZING 16
D. HELPFUL HINTS CHECKLIST 17
SECTION 4 OTHER THINGS TO KNOW
A. DIMENSIONS/SPECIFICATIONS 18
SECTION 5 SERVICE TECH INFORMATION
A. TROUBLESHOOTING 19-22
B. ROTARY VALVE SERVICE 23
C. WATER FLOW THROUGH THE SOFTENER VALVE 24-26
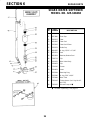
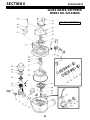
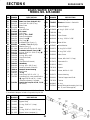
SECTION 6 REPAIR PARTS 29-31

WATER SOFTENER START-UP
SECTION 1
4
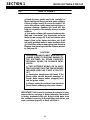
1A. SAFETY GUIDES
▲ Read all steps, guides and rules carefully be-
fore installing and using your new water softener.
Follow all steps exactly to correctly install. Fail-
ure to follow them could cause personal injury or
property damage. Reading this book will also
help you to get all of the benefits from your water
softener.
▲ Your water softener will remove hardness min-
erals and “clear water” iron from water, up to the
limits shown on page 18. It will not remove other
types of iron, acids, tastes and odors, etc. It will
not purify polluted water or make it safe to drink.
▲ Protect the softener and piping from freezing.
Damage from freezing voids the softener warran-
ty. See page 16.
CAUTIONS
PLEASE READ AND COMPLY WITH THE FOL-
LOWING GUIDES TO PREVENT DAMAGE TO
THE SOFTENER OR OTHER PROPERTY,
PERSONAL INJURY, OR POSSIBLE FATAL
SHOCK.
▲ THIS SOFTENER WORKS ON 24 VOLTS
ONLY. BE SURE TO USE THE TRANSFORMER
INCLUDED, AND PLUG IT INTO A 120V OUT-
LET.
▲ Unplug the transformer right away if the
power cable should become damaged or
frayed. Make repairs before plugging back
into the power outlet.
▲ Always unplug the softener from electrical
power before removing outer valve covers.
IMPORTANT: Salt is used to recharge the mineral in your
water softener...see page 9. Before shipping, the mineral
is factory pretreated with salt. B
efore using water from
this softener
, be sure to do the sanitizing procedures and
start a recharge (page 8), to flush salt from it.

WATER SOFTENER START-UP
SECTION 1
5
1B. CHECK LIST OF ALL STEP-BY-STEP GUIDES TO INSTALL
Refer to the Installation Manual, part no. 7141417,
for stepĆbyĆstep guides.
To be sure you have done all the steps to install the
softener, read the following list. Page numbers
referred to are in the
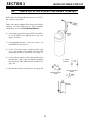
✔ Is the house water flow going INTO the softenĆ
er valve INLET? Trace piping to be sure. See
pages 10 and 11.
✔ Is the plumbing bypass valve (or 3 valves) set
for SERVICE? See page 18.
✔ Is the valve drain hose connected the right
way, and without sharp bends or kinks that
could stop or reduce water flow? See page 16.
✔ Is the softener power cable connected to the
transformer…and is the transformer plugged
into 120VĆ60Hz electrical outlet. See
page 20.
✔ Be sure to restart the water heater. See page 20.
BRASS BYPASS
VALVE
PLASTIC BYPASS
VALVE
3 – VALVE
BYPASS
WATER
HEATER

WATER SOFTENER START-UP
SECTION 1
6
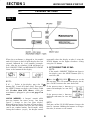
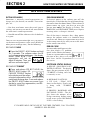
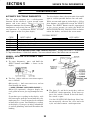
1C. PROGRAM THE TIMER
FIG. 1
When the transformer is plugged in, the model
code SC21 shows in the face plate display for a few
seconds, followed by a test number (example:
S4.0). After the test number, 12:00 AM begins to
flash. PRESENT TIME and RECHARGE TONIGHT
show at the bottom of the display.
NOTE:
If SC - - flashes in the display, press the UP
button (FIG. 1) until SC21 does show. Then press
the SELECT button to display the flashing 12:00
AM. If other than SC21 shows, when the
transformer is plugged in, please see page 17 to
reset.
SOUND BEEPER": A beeper" sounds while
pressing buttons for timer setĆup. One beep
signals a change in the face plate display.
Repeated beeps means the timer will not accept a
change from the button you have pressed, telling
you to use another button. For example, while
setting the hardness (step 2), the beeper sounds
repeatedly when the display reaches 1 using the
DOWN button, or the highest hardness setting
using the UP button.
1. SET PRESENT TIME OF DAY:
NOTE:
If the words…PRESENT TIME do not show in
the display, press the SELECT button (FIG. 1)
until they do.
■ Press the UP/DOWN buttons to set the
present time. Press UP to move the display ahead;
press DOWN to move the time backward.
If the present time is between
noon and midnight, be sure PM
shows.
If the present time is between
midnight and noon, be sure AM
shows.
NOTE:
Each press of the UP/DOWN buttons changes the
time by 1 minute. Holding the buttons in changes
the time 32 minutes each second.

WATER SOFTENER START-UP
SECTION 1
7
1C. PROGRAM THE TIMER
2.
SET WATER HARDNESS NUMBER:
■ Press the SELECT button once to display 15
(flashing) and HARDNESS.
The grains per gallon (gpg)
hardness of your water supply is
on your water analysis report. Be
sure to enter water test results on
page 2, for future reference.
NOTE:
If your water supply contains iron, compensate for
it by adding to the water hardness number. For
example, assume your water is 15 gpg hard and
contains 2 ppm iron. Add 5 to the hardness
number for each 1 ppm of iron. In this example,
you would use 25 for your hardness number.
15 gpg hardness
2 ppm iron x 5 = 10 +10
(times) 25 HARDNESS NUMBER
■ Press the UP/DOWN buttons to set your
water hardness number in the display. The
DOWN button moves the display to 1. The UP
button moves the display to the highest setting
(see maximum setting for your model in the
specifications).
NOTE:
Each press of the UP/DOWN button changes the
display by 1 between 1 and 25. Between 25 and
the highest number, the display changes 5 at a
time…25, 30, 35, etc. Continuous pressure on the
UP or DOWN button changes the display twice
each second.
3. SET RECHARGE (REGENERATION) TIME:
■ Press the SELECT button once to display 2:00
AM (flashing) and RECHARGE TIME.
At the 2:00 AM RECHARGE TIME
setting, the softener begins reĆ
generation (see pages 11 and 12)
at 2:00 AM, ending no later than
4:00 AM. This is a good time in most households
because water is not being used (see AUTOMATIC
BYPASS, page 13). If a different RECHARGE TIME
setting would be better for your household, do the
following.
■ Press the UP/DOWN buttons to set the
desired RECHARGE starting hour. Be sure to
observe the AMĆPM as you did when setting the
present time of day.
NOTE:
Each press of the UP/DOWN buttons changes the
display 1 hour. Continuous pressure on the
buttons changes the display twice each second.
■ Press the SELECT button once again, to
return the present time (steady) of day and
RECHARGE TONIGHT in the display.
4. SET ‘‘CLEAN’’ FEATURE:
Press the SELECT button again. The display
alternates between ``CLEAn'', and ``OFF'' (deĆ
fault).
When set to ``CLEAn''/``ON'', a backwash is asĆ
sured after every 500 gallons of water usage. BackĆ
wash is described on page 12. This cleaning backĆ
wash is in addition to the backwash during reĆ
charge. If you have iron in the water supply, or
higher amounts of sediments (sand, silt, dirt, etc.)
you should set this feature to ON.
To set to ON, or to turn off if already on, press
either the UP or DOWN button once. The length
of this extra backwash is 1 minute (default time
setting).
IF YOU NEED HELP PROGRAMMING THE TIMER, CALL TOLL FREE, NUMBER
1–800–426–9345. SEE PAGE 10 FOR OTHER FACE PLATE TIMER FEATURES.
IMPORTANT: Salt is used to recharge the mineral in your water softener...see page 9. Before
shipping, the mineral is factory pretreated with salt.
Before using water from this softener
, be
sure to do the sanitizing procedures and start a recharge (page 8), to flush salt from it.

WATER SOFTENER START-UP
SECTION 1
8
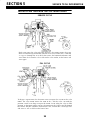
1D. SANITIZING THE WATER SOFTENER
Care is taken at the factory to keep your water
softener clean and sanitary. Materials used to
make the softener will not infect or contaminate
your water supply, and will not cause bacteria to
form or grow. However, during shipping, storage,
installing and operating, bacteria could get into
the softener. For this reason, sanitizing as follows
is suggested
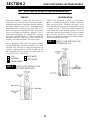
①
when installing.
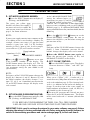
1. Lift the salt hole cover and use a pail or hose to
fill the salt storage tank with at least 1 gallon of
water.
2. Remove the brinewell cover (FIG. 2) and pour
about 3/4 ounce of common 5.25% household
bleach (Clorox, Linco, BoPeep, White Sail,
Eagle, etc.) in the softener brinewell.
3. Press the ON/OFFĆHOLD button and
to start a recharge. This first recharge
does several things.
Ċ It draws the bleach into and through the
softener to sanitize it.
Ċ It fills the salt tank to the water level
needed.
Ċ It gets all the air out of the resin tank.
Ċ It makes the resin bed (see page 11) ready
for service.
NOTES:
This recharge takes about 40 minutes.
You can sanitize the softener
salt in the storage tank.
①
Recommended by the Water Quality Association. On
some water supplies, the water softener may need pe-
riodic disinfecting. Sanitize either with or without salt in
the storage tank.
FIG. 2 ADD WATER
Water,
About 1 Gallon
Brinewell
Cover
(remove and add
about 3/4 oz. bleach)

WATER SOFTENER START-UP
SECTION 1
9
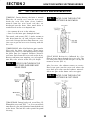
1E. FILL THE STORAGE TANK WITH SALT
Brine (salt dissolved in water) is needed for each
and every regeneration. The water for making
brine is metered into the salt storage tank by the
softener. However, you must keep the tank filled
with salt.
Fill the tank with NUGGET or PELLET water
softener salt. DO NOT use rock salts, as they have
dirt and sediments that will stop the softener from
working.
Before filling, be sure the brinewell cover is in
place on the top of the brinewell. Salt storage
capacity is shown on page 18.
NOTE:
In humid areas, it is best to fill the storage tank
halfĆfull, and to refill it more often. Salt bridging
(see page 14) occurs more often when conditions
are humid.
WATER SOFTENING SALT WITH IRON REMOVĆ
ING ADDITIVES Ċ Some salts have an additive to
help the softener handle iron in the water supply.
Although this additive may help to keep the
softener resin clean, it may also release corrosive
fumes that will weaken and shorten the life of
some softener parts.
FIG. 3 ADD SALT
SODIUM INFORMATION: Water softeners using
sodium chloride for regeneration add sodium to
the water. Persons who are on sodium restricted
diets should consider the added sodium as part of
their overall sodium intake.
For example, if your water supply is 15 grains
hard, you would have to drink 3 quarts of softened
water to consume 335 milligrams of sodium. That
is equivalent to eating 2Ć1/2 slices of white bread.
Persons who are concerned about their drinking
water should consider a Sears Drinking Water
System that will remove or reduce in excess of
90% of the sodium and other drinking water
contaminants.
YOU HAVE NOW FINISHED THE WATER SOFTENER START-UP. AFTER THE SANITIZING RE-
CHARGE, ON PAGE 8, THE SOFTENER WILL BE GIVING YOU SOFT WATER.

HOW YOUR WATER SOFTENER WORKS
SECTION 2
10
2A. FACE PLATE TIMER FEATURES
EXTRA RECHARGE
Sometimes, a manually started regeneration (reĆ
charge) may be desired, or needed. Two examĆ
ples are:
-- You have used more water than usual (guests
visiting) and you may run out of soft water before
the next timer started regeneration.
-- You did not refill the softener with salt before it
was gone.
You can start a regeneration right away, or you can
set the timer to regenerate at the next 2:00 AM (or
other preset recharge time). Do the following.
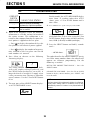
RECHARGE NOW
Press the ON/OFF–HOLD button and
hold
for 3 seconds.
The softener enters the fill
cycle of regeneration right away. . .the display
shows ‘‘FillinG NOW’’. This
regeneration will last for
about 40 minutes. Then, you
will have soft water again.
RECHARGE TONIGHT
■ Press and release (DO NOT HOLD) the
ON/OFF-HOLD button. RE-
CHARGE TONIGHT flashes
in the display, and the soften-
er begins regeneration at the
next preset recharge time. Press and release
the ON/OFF-HOLD button once more if you
decide to cancel the regeneration, and RE-
CHARGE TONIGHT.
PROGRAM MEMORY
If electrical power to the softener goes off, the
time display is blank but the face plate timer keeps
the correct time for about 6 hours. When electrical
power comes on again, you have to reset the
present time if the display is flashing. The
HARDNESS and RECHARGE TIME never require
resetting unless a change is desired.
Even if the timer is incorrect after a long power
outage, the softener works as it should to keep
you water soft. However, regenerations may occur
at the wrong time of day until you reset the timer
to the correct time of day.
ERROR CODE
An error code could appear in the
face plate display if a problem
occurs in the softener electronics.
If you see an error code instead of
the time of day, please call you
local Sears Service Department
for service.
SOFTENER STATUS DISPLAY
SERVICE ( PROVIDING SOFT
WATER) POSITION: The display
shows the present time of day. If
``TURBINE'' is flashing, soft water
is currently in use.
RECHARGE POSITIONS:
Fill Cycle - FillinG NOW
shows in the display. If soft water
is being used, ``TURBINE''
flashes.
BRINING, BACKWASH AND
FAST RINSE CYCLES - The disĆ
play shows the minutes of reĆ
charge remaining before return
to soft water service. RECHARGE
NOW is also flashing.
IF YOU NEED HELP ON THE USE OF THE TIMER FEATURES, CALL TOLL FREE,
NUMBER 1–800–426–9345.
NOW
PM
TURBINE
.
.
NOW
TURBINE
.
.
RECHARGE NOW

HOW YOUR WATER SOFTENER WORKS
SECTION 2
11
2A. SOFT WATER SERVICE AND REGENERATION
SERVICE
When the softener is giving you soft water, it is
called Service". During service, hard water comes
from the house main water pipe into the softener.
Inside the softener resin tank is a bed made up of
thousands of tiny, plastic resin beads (FIG. 4). As
hard water passes through the bed, each bead
attracts and holds the hardness minerals. This is
called ionĆexchanging. It is much like a magnet
attracting and holding metals. Water without the
hardness minerals (soft water) flows out of the
softener and into the house soft water pipes.
After a period of time, the resin beads become
coated with hardness minerals and they have to be
cleaned. This cleaning is called regeneration or
recharge. Regeneration is started at 2:00 a.m. by
the electronic timer (see page 13). It takes place in
5 stages or cycles. These are:
FILL
BRINING
BRINE RINSE
BACKWASH
FAST RINSE
1
2
3
4
5
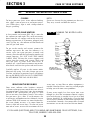
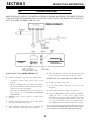
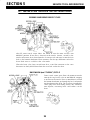
FIG. 4 WATER FLOW THROUGH THE
SOFTENER IN SERVICE
REGENERATION
FILL: Salt, dissolved in water, is called brine.
Brine is needed to clean the hardness minerals
from the resin beads. To make the brine, water
flows into the salt storage area during the fill stage
as shown in FIG. 5. Fill cycle length depends on
how much soft water making capacity you have
used since the last regeneration. As you use more
water, fill time increases so more brine is made.
The greater amount of brine cleans more hardness
minerals from the resin bed.
FIG. 5 WATER FLOW THROUGH THE
SOFTENER IN FILL

HOW YOUR WATER SOFTENER WORKS
SECTION 2
12
2B. SOFT WATER SERVICE AND REGENERATION
BRINING: During brining, the brine is moved
from the salt storage area, into the resin tank.
Inside the resin tank, brine cleans hardness
minerals from the resin beads and they are
discharged out the drain. How much brine is
needed to clean the resin depends on:
-- the amount of resin in the softener,
-- how fast the brine goes through the bed.
The nozzle and venturi (FIG. 6) make suction to
take brine from the salt tank and put it into the
resin tank. It keeps the brine flow down to a very
slow rate to get the best resin cleaning with the
least salt.
BRINE RINSE: After all of the brine goes into the
resin tank, the brine valve closes. Water keeps
flowing the same way it did during brining except
the brine flow has stopped. Hardness minerals
and brine flush from the resin tank to the drain.
Brining and brine rinse together vary in length of
time they take, relative to the fill cycle length.
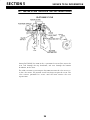
FIG. 6 WATER FLOW THROUGH THE
SOFTENER IN BRINING AND
BRINE RINSE
BACKWASH: During backwash, water flows UP
through the resin tank (FIG. 7) at a fast rate to flush
iron minerals, dirt and sediments from the bed and
to the drain. The bed lifts and expands for good
cleaning.
FIG. 7 WATER FLOW THROUGH THE
SOFTENER IN BACKWASH
FAST RINSE: Backwash is followed by a fast
flow of water down through the resin tank. The
fast flow packs the resin bed and gets it ready for
return to service (FIG. 8).
After fast rinse, the softener returns to service.
Hard water goes into the resin tank where the
resin bed again takes out the hardness minerals.
Soft water goes to the house soft water pipes.
FIG. 8 WATER FLOW THROUGH THE
SOFTENER IN FAST RINSE

HOW YOUR WATER SOFTENER WORKS
SECTION 2
13
2B. SOFT WATER SERVICE AND REGENERATION
AUTOMATIC BYPASS
During the brining, brine rinse and backwash
cycles of regeneration, HARD water goes through
the softener valve and to the house pipes. If a
faucet is opened, hard water is there for your
needs. However, you should not use HOT water, if
possible, because the water heater will refill with
hard water. The softener regenerates from 2:00
AM to about 2:40 AM, (you can change this time. .
.see page 7), a time when water is usually not in
use.
If you get up early in the morning and you can
hear the softener regenerating, change the time
setting. Set the recharge time to 12:00 AM or 1:00
AM. Then regeneration will start and end that
much earlier and your water heater will not refill
with hard water if a hot faucet is opened.
ELECTRONICS
Two main parts of the softener's electronics are
a WATER METER, and a COMPUTER.
WATER METER Ċ The water meter is in the
softener valve outlet. As water flows through the
meter, it sends electric pulses to the computer. The
computer changes the pulses to a measure in
gallons of water.
COMPUTER Ċ The computer is part of the
circuit board. It is programmed to know the
softener's capacity (how many grains of hardness
minerals it will take out of the water before a
regeneration is needed). When starting the
softener on page 7, you set it for the grains per
gallon (gpg) hardness of the water.
To find a regeneration pattern best for your needs,
the computer uses, (1) water usage from the
meter, (2) hardness setting, (3) softener capacity,
and (4) time since the last regeneration. The
computer always adjusts this pattern to your water
using habits. It works to provide you with soft
water for the longest time and the most efficient
salt usage.
Softening capacity is used as hard water goes
through the softener and hardness minerals are
removed. When the computer determines that
only enough capacity remains to provide soft
water up to the next regeneration starting time
(2:00 AM, or as otherwise set), it will schedule a
regeneration. RECHARGE TONIGHT displays until
the regeneration begins. When the regeneration
begins, the recharge cycle status displays show.
See page 10.

CARE OF YOUR SOFTENER
SECTION 3
14
3A.
SALT…REFILLING STORAGE TANK/BREAKING A SALT BRIDGE
WHEN TO REFILL WITH SALT: Check the salt
level a few weeks after you install the softener and
every week after that. Refill when the storage
tank is about 1/3 full. Never let the softener use
all the salt before refilling. Without salt, you will
soon have hard water.
IMPORTANT:
You will have a loss in softening capacity and
may get partly hard water if less than 10
inches of salt is in the storage tank.
PLEASE SEE PAGE 9 FOR SALT FILLING DIRECTIONS.
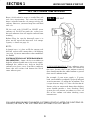
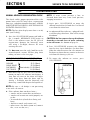
SALT BRIDGE
Sometimes, a hard crust or salt bridge forms in the
salt storage tank. It is usually caused by high
humidity or the wrong kind of salt. When the salt
bridges, an empty space forms between the water
and salt. Then salt will not dissolve (melt) in the
water to make brine. Without brine, the resin bed
does not regenerate and you will have hard water.
If the storage tank is full of salt, it is hard to tell if
you have a salt bridge. Salt is loose on top, but the
bridge is under it. The following is the best way to
check for a salt bridge.
Salt should be loose all the way to the bottom of
the tank. Hold a broom handle, or like tool, up to
the softener as shown in FIG. 9. Make a pencil
mark on the handle, 1″ or 2″ below the top height
of the rim. Then, carefully push it straight down
into the salt. If a hard object is felt before the pencil
mark gets to the top of the tank, it's most likely a
salt bridge. Carefully push into the bridge in a few
places to break it. DO NOT TRY TO BREAK THE
SALT BRIDGE BY POUNDING ON THE OUTSIDE
OF THE SALT TANK. YOU MAY DAMAGE IT.
If the wrong kind of salt made the bridge, take it
out. Then fill the tank with nugget or pellet salt
only.
FIG. 9 SALT BRIDGE
Broom Handle

CARE OF YOUR SOFTENER
SECTION 3
15
3D. KEEPING THE WATER SOFTENER CLEAN
COVERS
To keep your new Sears water softener looking
nice, apply a coat of paste wax and repeat once a
year. When dusty, wipe it with a damp cloth to
keep it sparkling.
NOTE:
Never use cleaners having ammonia or abrasives.
They may scratch and dull the surface.
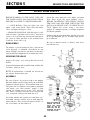
NOZZLE AND VENTURI
A clean nozzle and venturi (FIG. 10) is a must for
the softener to work right. This small unit moves
brine from the salt storage tank to the resin tank
during regeneration. If it becomes plugged with
sand, silt, dirt, etc., the softener will not work and
you will get hard water.
To get to the nozzle and venturi, remove the
softener top cover. Be sure the softener is in
service cycle (no water pressure at nozzle and
venturi), then turn off the cap from the nozzle and
venturi housing. DO NOT LOSE THE LARGE
OĆRING SEAL. Lift out the screen support and
screen, then the nozzle and venturi. Wash and
rinse the parts in warm water until clean. If
needed, use a small brush to remove iron or dirt.
Also check and clean the gasket and small screen.
Carefully replace all parts in the correct order.
Lubricate the oĆring seal with silicone grease or
Vaseline and place in position. Install and tighten
the cap, BY HAND ONLY. DO NOT OVERĆTIGHTĆ
EN AND BREAK THE CAP OR HOUSING.
FIG. 10 CLEANING THE NOZZLE & VEN-
TURI
*INSTALL WITH
NUMBERED SIDE UP,
CONCAVE SIDE DOWN.
Screen
IRON FROM THE RESIN BED
Your water softener takes hardness minerals
(calcium and magnesium) out of the water. Also, it
can control some clear water" iron. See maximum
allowed in the specifications on page 18. With
clear water iron, water from a faucet is clear when
first put into a glass. After 15 to 30 minutes, the
water begins to cloud or turn rust colored. A water
softener WILL NOT remove any iron which makes
the water cloudy or rusty as it comes from the
faucet (called red water iron). To take red water
iron out of water, or over the maximum of clear
water iron, an iron filter or other equipment is
needed. Your local Sears store has trained people
to help you with iron water problems.
If your water supply has clear water iron, even
though less than the maximum allowed, regular
resin bed cleaning is needed. Sears has resin bed
cleaner, Stock No. 42Ć34426 for this. Clean the bed
at least every 6 months. If iron shows up in the soft
water before 6 months, clean more often. Printed
instructions are on the resin bed cleaner bottle.
IF YOU HAVE QUESTIONS ABOUT CLEANING AND MAINTAINING YOUR SOFTENER, CALL
TOLL FREE, NUMBER 1–800–426–9345

CARE OF YOUR SOFTENER
SECTION 3
16
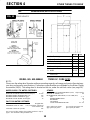
3D. KEEP THE SOFTENER FROM FREEZING
If the softener is installed where it could freeze
(summer cabin, lake home, etc.), you must drain
all water from it to stop possible freeze damage.
To drain the softener:
Close the shutĆoff valve on the house main
water pipe, near the water meter or pressure
tank.
Open a faucet in the soft water pipes to vent
pressure in the softener.
If a single bypass valve is installed, move the
stem into See FIG. 12 on page 18. In a
3Ćvalve bypass system, close the inlet and
outlet valve and open the bypass valve. If you
want water in the house pipes again, reopen
the shutĆoff valve on the main water pipe.
Unplug the transformer at the wall outlet.
Remove the salt hole cover and the main
cover. Take off both drain hoses.
Carefully remove the large holding clips at the
softener inlet and outlet (see Key No. 61, on
page 30). Separate the softener from the
adaptors or bypass valve.
Remove the brinewell cover and disconnect
the brine valve tubing at the nozzle and venturi
assembly (see page 23). Lift the brine valve out
of the brinewell. Tip the brine valve upside
down to drain out water.
FIG. 11 DRAIN WATER FROM THE
SOFTENER
Looking at FIG. 11, lay a piece of 2 inch thick
board near the floor drain. Move the softener
close to the drain. SLOWLY and CAREFULLY
tip it over until the rim rests on the wood block
with the inlet and outlet over the drain. DO
NOT ALLOW THE SOFTENER'S WEIGHT TO
REST ON THE INLET AND OUTLET FITTINGS
OR THEY WILL BREAK.
Tip the bottom of the softener up a few inches
and hold until all water has drained. Leave the
softener laying like this until you are ready to
use it. Plug the inlet and outlet with rags to
keep dirt, bugs, etc. out.

CARE OF YOUR SOFTENER
SECTION 3
17
3D. HELPFUL HINTS CHECKLIST
... TO HELP YOU SAVE MONEY
If your water softener fails to work, make the following easy checks. Often, you will find what's wrong
yourself and you won't have to call and wait for service. If, after making the checks, your softener still does
not work right, call your Sears Service Department, or call toll free, number 1-800-426-9345 for telephone
assistance.
NOTE:
Also read ERROR CODE, page 10. If an error code dispIayed, press and the SELECT button until
(example:000 Ć Ć) shows in the display. Then press SELECT again and until an SC code appears. It
must show SC21. If any other SC number shows, the softener computer is working on incorrect input and
would probably be the cause of the problem. To set SC21, press either the UP or DOWN button.
Then, press select to return a flashing 12:00 AM display, and reset the timer, page 6.
PROBLEM CAUSE CORRECTION
WATER HAS SALTY
TASTE
Softener not recharged immediately
after installation.
See IMPORTANT note, pages 4 and 7. Use the RE-
CHARGE NOW feature to start an immediate recharge,
and open soft water faucets to purge salt taste.
Lost electric power during a re-
charge.
Restore power, reset timer if needed, and open soft water
faucets to purge salt taste.
NO SOFT WATER No salt in storage tank, or salt
bridged.
Refill with salt, or break the salt bridge (page 14). Use the
RECHARGE NOW feature to start a recharge.
Transfomer unplugged at the wall
outlet, or power cable leads loose,
fuse blown, circuit breaker popped, or
circuit switched off.
Check for loss of power due to any of these and correct.
With the power back on, look at the time display and read
PROGRAM MEMORY, page 10.
Manual bypass valve(s) in bypass
position.
Look at FIG. 12 on page 18. Move the stem in a single
valve to service. In a 3-valve bypass, open the inlet and
outlet valves, and be sure to fully close the bypass valve.
Dirty, plugged or damaged nozzle &
venturi.
Take apart and clean or replace damaged parts (see
page 15).
Valve drain hose plugged. The drain hose must not have kinks, sharp bends, or be
raised too high above the softener (see page 16 in your
installation manual).
WATER HARD SOME-
TIMES
Hardness number setting too low. Press and release the SELECT button until HARDNESS
shows in the display. Read the hardness number in the
display and be sure the same grains per gallon number
is shown on your water analysis report. See page 7 to re-
set. Press and release the SELECT button until the pres-
ent time shows in the display.
Using hot water when softener is re-
generating.
Avoid using hot water during this time because the water
heater refills with hard water (see Automatic Bypass,
page 13).
Increase in the grains of hardness in
your water supply.
Ask your Sears retail store for a new water analysis.
Then make a new hardness number setting (page 7).

OTHER THINGS TO KNOW
SECTION 4
18
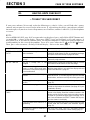
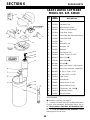
4A. DIMENSIONS/SPECIFICATIONS
FIG. 12
BYPASS VALVES
INCHES CM
A Salt Tank Height 21–3/4 55.2
B Resin Tank Diameter (nominal) 10 25.4
C Resin Tank Height (nominal) 21 53.3
D Inlet-Outlet Height 22-1/2 57.2
E Overall Height 27–1/2 69.9
F
1
Length 19-1/2 49.5
F
2
Width 16-1/2 41.9
— Distance between inlet-outlet
center lines
3-3/8 8.6
MODEL NO. 625.348460 TIMER SC CODE SC21
NOTE:
Please see the rating decal for water softener operating capacity, salt usage and service flow rate/pres-
sure loss performance specifications. Performance specifications are validated by the Water Quality
Association (WQA). The rating decal is located on the rim, under the salt hole cover (see page 28).
WATER SUPPLY TO WATER SOFTENER
MINIMUM WATER SYSTEM FLOW (gpm) 3
MINIMUM–MAXIMUM WATER PRESSURE (psi) 20-120
MAXIMUM WATER TEMPERATURE (°F) 120
MAXIMUM WATER HARDNESS (gpg) 70*
MAXMUM “CLEAR WATER” IRON (ppm) 10
SALT FOR WATER SOFTENER
TYPE OF SALT NEEDED Nugget/Pellet
ALTERNATE TYPE OF SALT Pure, evaporated, compacted
water softener salt
STORAGE CAPACITY (pounds) 125
*Do not exceed this number when setting hardness in step 2,
page 7. The maximum setting available is 95.
OTHERS
TYPE OF ION EXCHANGE MATERIAL (resin) High Capacity
AMOUNT OF RESIN (cu.ft.) .60
REGENERATION (RECHARGE) CYCLE TIME (min.)
FILL 1 – 5
BRINING/BRINE RINSE 28
BACKWASH 1
FAST RINSE 1
TOTAL REGENERATION TIME 31 – 35
gpm = gallons per minute psi = pounds per square inch
gpg = grains per gallon ppm = parts per million

SERVICE TECH. INFORMATION
SECTION 5
19
5A. TROUBLESHOOTING
KEEP THIS MANUAL WITH YOUR WATER SOFTENER. IF REPAIRS ARE NEEDED, THE SERVICE TECHNIĆ
CIAN MUST HAVE THE INFORMATION ON THE FOLLOWING PAGES. FOR TELEPHONE ASSISTANCE,
CALL TOLL FREE, NUMBER 1-800-426-9345.
ALWAYS MAKE THESE INITIAL CHECKS FIRST
Does the time display show the correct time of day?
-- If display is blank, check power source to the
softener.
-- If time is flashing, power was off for over 6 hours.
The softener resumes normal operation but regenĆ
erations occur at the wrong time.
-- If an error code (Example: Err 03) shows in the face
plate display, go to AUTOMATIC ELECTRONIC
DIAGNOSTICS.
Plumbing bypass valve(s) must be in Full Service
position.
The inlet and outlet pipes must connect to the softener
valve inlet and outlet respectively.
Is the transformer plugged into a live", grounded wall
outlet, and is the power cable fastened securely?
The valve drain hose must be free of kinks and sharp
bends, and not elevated over 8 ft. above the floor.
REMOVE THE TOP COVER AND SALT TANK COVER
Is there salt in the storage tank?
Is the brine tubing connected? (See water flow
diagrams).
Is the brine valve float set right? (See page 22).
Press the SELECT button 2 times to display the hardness
setting. Be sure it is the correct setting for the
household's water supply. (Make a hardness test of the
raw water and compare with the hardness setting. Also
test a soft water sample to verify if a problem exists.)
Press SELECT 3 times to return the time of day display.
If you do not find the problem after making initial checks,
do the MANUAL INITIATED ELECTRONIC DIAGNOSTICS,
and the MANUAL ADVANCE REGENERATION CHECK.

SERVICE TECH. INFORMATION
SECTION 5
20
5A. TROUBLESHOOTING
AUTOMATIC ELECTRONIC DIAGNOSTICS
The face plate computer has a selfĆdiagnostic
function for the electrical system (except input
power and water meter). The
computer monitors the electronic
components and circuits for corĆ
rect operation. If a malfunction occurs, an error
code appears in the face plate display.
The chart below shows the error codes that could
appear, and the possible defects for each code.
While an error code appears in the display, all face
plate buttons are inoperable except the SELECT
button. The SELECT button remains operational
so the service person can make the MANUAL
INITIATE ELECTRONIC DIAGNOSTICS to further
isolate the defect, and check the water meter.
CODE
POSSIBLE DEFECT
MOST LIKELY LESS LIKELY
Err 01 motor inoperative / wiring harness or connection to switch / position switch / face plate
Err 02 face plate
Err 03 motor inoperative / face plate
Err 04 face plate / position switch
Err 05 face plate
PROCEDURE FOR REMOVING ERROR CODE FROM FACE PLATE: 1. Unplug transformer 2. Correct defect
3. Plug-in transformer 4. Wait for 6 minutes. The error code will return if the defect was not corrected.
MANUAL INITIATED ELECTRONICS DIAG-
NOSTICS
1. To enter diagnostics, press and hold the
SELECT button until 000 - - shows in the
display.
A. The first 3 digits indicate water meter operaĆ
tion as follows:
000 (steady) = Soft water not in use, and no
flow through the meter.
Ċ OPEN A NEARBY SOFT WATER FAUCET Ċ
000 to 199 (continual) = Repeats display for
each gallon of water passing through the meĆ
ter.
If you don't get a reading in the display, with
the faucet open, pull the sensor from the valve
outlet port. Pass a small magnet back and forth
in front of the sensor. You should get a reading
in the display. If you get a reading, unhook the
and plumbing and check the turbine for
binding.
B. The letter (P) and dash (or dashes) indicate
POSITION switch operation. If the letter apĆ
pears, the switch is closed. If the dash shows,
the switch is open.
Use the ON/OFFĆHOLD (Recharge Now) butĆ
ton to manually advance the valve into each
cycle and check correct switch operation.
Page is loading ...
Page is loading ...
Page is loading ...
Page is loading ...
Page is loading ...
Page is loading ...
Page is loading ...
Page is loading ...
Page is loading ...
Page is loading ...
Page is loading ...
Page is loading ...
-
 1
1
-
 2
2
-
 3
3
-
 4
4
-
 5
5
-
 6
6
-
 7
7
-
 8
8
-
 9
9
-
 10
10
-
 11
11
-
 12
12
-
 13
13
-
 14
14
-
 15
15
-
 16
16
-
 17
17
-
 18
18
-
 19
19
-
 20
20
-
 21
21
-
 22
22
-
 23
23
-
 24
24
-
 25
25
-
 26
26
-
 27
27
-
 28
28
-
 29
29
-
 30
30
-
 31
31
-
 32
32


Kenmore 625.34846 User manual
- Category
- Water dispensers
- Type
- User manual
- This manual is also suitable for
Ask a question and I''ll find the answer in the document
Finding information in a document is now easier with AI
Related papers
-
Sears 625.348420 User manual
-
Kenmore 625348350 Owner's manual
-
-
-
Sears KENMORE 625.34845 User manual
-
Sears 625.34855 User manual
-
-
-
Kenmore 625348460 User manual
-
Other documents
-
GE GXSF23Z01 User manual
-
-
-
GE PNSF39Z01 User manual
-
WaterWorks Waterworks WS 2000 Installation guide
-
-
-
-
CSI MS24V-S3 Installation & Operation Manual
-
CSI RS1 Installation & Operation Manual