
User’s guide
Models
HSB
HSB P
www.teka.com
ES Guía de Uso
PT Guia de Utilização
EN User’s guide
FR Guide d’Utilisation
DE Bedienanleitun
www.teka.com

2
Guía de Uso
ESPAÑOL
Por favor, antes de utilizar su horno por primera vez, lea atentamente las instrucciones de
instalación y mantenimiento incluidas en su horno.
Dependiendo del modelo, los accesorios incluidos en su horno pueden variar respecto
a los mostrados en las imágenes.
PORTUGUÊS
Antes de utilizar o forno pela primeira vez, leia atentamente as instruções de instalação e
manutenção fornecidas juntamente com o forno.
Dependendo do modelo, os acessórios incluídos no forno podem variar em relação às
imagens apresentadas.
ENGLISH
Before using your oven for the first time, please carefully read the installation and
maintenance instructions that come with it.
Depending on the model, the accessories included in your oven may vary from those
shown in the pictures.
FRANÇAIS
Avant la première utilisation de votre four, veuillez lire attentivement les instructions
d’installation et d’entretien fournies avec votre four.
Selon les modèles, il est possible que les accessoires fournis avec votre four soient
différents de ceux indiqués sur les images.
DEUTSCH
Bevor Sie den Backofen zum ersten Mal verwenden, lesen Sie bitte die zu Ihrem Backofen
gehörenden Einbau- und Wartungsanweisungen aufmerksam durch.
Je nach Modell können die Zubehörteile Ihres Backofens von den auf den Abbildungen
dargestellten Teilen abweichen.

3
Guía de Uso
Español
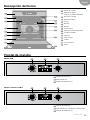
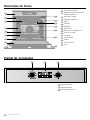
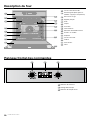
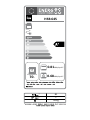
Descripción del horno
1
Frente de mandos
2
Bloqueo de puerta
(solo para modelos pirolíticos)
3
Resistencia de grill
4
Soporte bandejas
5
Parrilla
6
Bandeja
7
Bisagra
8
Cristal interior
9
Salida de aire de refrigeración
10
Fijación al mueble
11
Lámpara
12
Panel trasero
13
Turbina
14
Junta de horno
15
Puerta
1
10
12
13
14
15
5
6
7
8
3
2
4
9
11
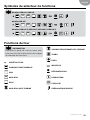
Frontal de mandos
1
Selector de funciones
2
Reloj electrónico
3
Selector de temperaturas
1
Selector de funciones
2
Reloj electrónico / Temperatura seleccionada
3
Selector de temperaturas
1 2 3
Modelo HSB
min
MAX
1 2 3
Modelos Pirolíticos HSB P

4
Guía de Uso
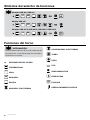
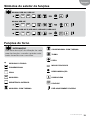
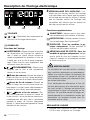
Símbolos del selector de funciones
Modelos HSB 630, HSB 635
Modelo HSB 645
Modelos HSB 625 P, HSB 620 P, HSB 635 P, HSB 630 P
Funciones del horno
DESCONEXIÓN DEL HORNO
CONVENCIONAL
GRILL
MAXIGRILL
SOLERA
MAXIGRILL CON TURBINA
CONVENCIONAL CON TURBINA
TURBO
PIZZA
ECO
DESCONGELACIÓN
HYDROCLEAN
PIROLISIS
PRECALENTAMIENTO RÁPIDO
INFORMACIÓN
Para una descripción de uso de cada una de
las funciones, consulte la guía de cocinados
incluida en su horno.
Page is loading ...
Page is loading ...
Page is loading ...
Page is loading ...
Page is loading ...
Page is loading ...
Page is loading ...

12
Guia de Utilização
Descrição do forno
1
Painel de comandos
2
Bloqueio da porta (apenas para
modelos pirolíticos)
3
Resistência do grill
4
Apoio dos tabuleiros
5
Grelha
6
Tabuleiro
7
Dobradiça
8
Vidro interior
9
Saída de ar de refrigeração
10
Fixação ao móvel
11
Lâmpada
12
Painel traseiro
13
Turbina
14
Junta de forno
15
Porta
1
10
12
13
14
15
5
6
7
8
3
2
4
9
11
Painel de comandos
1
Seletor de funções
2
Relógio eletrónico
3
Seletor de temperatura
1 2 3

13
Guia de Utilização
Português
Símbolos do seletor de funções
Modelos HSB 630, HSB 635
Modelo HSB 645
Modelos HSB 625 P, HSB 620 P, HSB 635 P, HSB 630 P
Funções do forno
DESLIGAR O FORNO
CONVENCIONAL
GRILL
MAXIGRILL
RESISTÊNCIA INFERIOR
MAXIGRILL COM TURBINA
CONVENCIONAL COM TURBINA
TURBO
PIZZA
MODO ECOLÓGICO
DESCONGELAÇÃO
HYDROCLEAN
PIRÓLISE
PRÉ-AQUECIMENTO RÁPIDO
INFORMAÇÃO
Para uma descrição da utilização de cada
uma das funções, consulte o guia de cozin-
hados fornecido com o seu forno.
Page is loading ...
Page is loading ...
Page is loading ...
Page is loading ...
Page is loading ...
Page is loading ...
Page is loading ...

21
English
User’s Guide
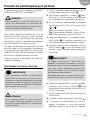
Description of the oven
1
Control panel
2
Door lock (only for
pyrolytic models)
3
Grill element
4
Tray supports
5
Grid shelf
6
Tray
7
Hinge
8
Inner Glass
9
Air cooling outlet
10
Unit mounting
11
Lamp
12
Back Wall Panel
13
Fan
14
Oven Seal
15
Door
1
10
12
13
14
15
5
6
7
8
3
2
4
9
11
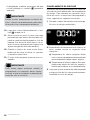
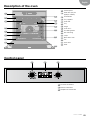
Control panel
1
Function control dial
2
Electric clock/timer
3
Temperature control dial
1 2 3

22
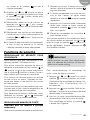
User’s Guide
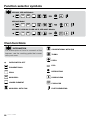
Function selector symbols
HSB 630, HSB 635 Models
HSB 645 Model
HSB 625 P, HSB 620 P, HSB 635 P, HSB 630 P Models
Oven functions
OVEN SWITCH-OFF
CONVENTIONAL
GRILL
MAXIGRILL
LOWER ELEMENT
MAXIGRILL WITH FAN
INFORMATION
For a description of how to use each of the
features, see the cooking guide that comes
with your oven.
CONVENTIONAL WITH FAN
TURBO
PIZZA
ECO
DEFROSTING
HYDROCLEAN
PYROLYSIS
FAST PREHEATING

23
English
User’s Guide
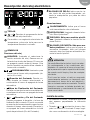
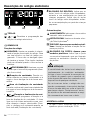
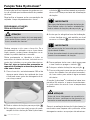
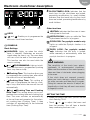
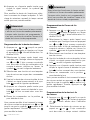
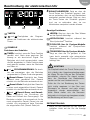
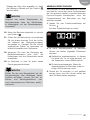
Electronic clock/timer description
1
KEYS
, and : Enable you to programme the
electronic clock/timer functions.
2
SYMBOLS
Clock Settings
AVISADOR: Lights up when the clock/
timer is selected. Generates an acoustic
signal when the time is up. The oven does
not turn off at the end of the timer period.
This function can also be used while the
oven is cooking.
and PROGRAMMING: Light up to indi-
cate that the oven is programmed (cooking
time, stop time or total).
•
Cooking Time: This function allows you
to programme the cooking time, after which
the oven will turn off automatically.
•
Cooking Stop Time: This setting al-
lows you to programme the time for cook-
ing to stop, after which the oven will turn off
automatically.
•
and Cooking Time and Cooking
Stop Time: This setting allows you to pro-
gramme the cooking time and cooking stop
time. The oven switches on automatically
at the set time and operates for the select-
ed cooking time (Cooking Time). It then
switches off automatically at the indicated
time (Cooking Stop Time).
CLOCK/TIMER LOCK: Indicates that the
touch keys for the clock/timer are locked,
preventing modifications by small children.
Indicates that the touch keys for the clock/
timer are locked, preventing modifications by
small children.
Other functions
HEATING: Indicates that the oven is trans-
mitting heat to the food.
HYDROCLEAN: Lights up while the Teka
Hydroclean
®
function is in progress.
PYROLYSIS: For pyrolytic models only.
Lights up while the Pyrolytic function is in
progress.
DOOR LOCK: For pyrolytic models
only. Indicates that the door is locked,
either manually or automatically while the
pyrolytic function is in progress.
WARNING
The sensitivity of the touch keys adapts
continually to environmental conditions.
Make sure the surface of the control panel is
clean and free of obstacles when plugging
in the oven.
If the clock does not respond correctly
when you touch the keys, unplug the oven
for a few seconds and then plug it in again.
Doing this causes the sensors to adjust au-
tomatically so that they will react once more
to fingertip control.
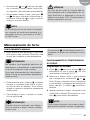
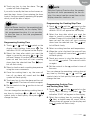
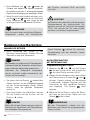
SETTING THE TIME
• When you plug in the oven, you will see the
clock flashing 12:00.
• Touch
or to adjust the hours and
then the minutes. You will hear a double
beep confirming the time is set.
2 1 2

24
User’s Guide
• If you wish to modify the time, touch or
until the time starts flashing. Touch
and and follow the instructions in the previ-
ous point.
NOTE
The clock light has a night mode so the display
light will dim between 00:00 and 6:00 hours.
WARNING
In the event of a power failure, your elec-
tronic clock/timer settings will be erased
and 12:00 will flash on the clock display.
Reset it and programme again.
Oven use
Press to cycle the display between cook
time and current time.
OVEN TIMER OPERATION
Programming the Buzzer
1. Touch
or until the symbol on the
display starts flashing, then press
. The
indication ‘00:00’ will appear on the display.
2. Select the time after which you want the
alarm to sound by pressing
or . You
will hear 2 beeps to confirm that the time has
been set and the clock will start counting
down from the selected time. The
sym-
bol will flash slowly.
3. Once the time has expired, an acoustic sig-
nal will sound for 90 seconds and the
symbol will flash quickly.
NOTE
With the Buzzer function, the oven will not
turn off when the time expires.
MANUAL OPERATION
• After setting the clock, the oven is ready for
use. Select a cooking function and tempera-
ture.
INFORMATION
In models with an electronic temperature
control, when the selector switch is turned,
the clock display will show the temperature.
After selecting the temperature, the clock
display will automatically reappear.
• You will notice that the
symbol lights up
during cooking to indicate that heat is being
transmitted to the food. This symbol disap-
pears when the selected temperature has
been reached.
• Set the controls to
to turn off the oven.
INFORMATION
When a cooking cycle begins, the oven will
automatically display the total time for the
cycle in progress.

25
English
User’s Guide
4. Touch any key to stop the alarm. The
symbol will then disappear.
If you wish to modify the time on the buzzer, re-
peat the steps shown. Upon entering the timer
control, the time currently remaining will appear,
which you will be able to adjust.
NOTE
With the Buzzer function, the remaining time
will show permanently on the display. With
this programmed function, it is not possible
to view the time or the total programmed
cooking time.
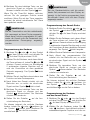
Programming Cooking Time
1. Touch
or until the symbol on the
display starts flashing, then press
. The
indication ‘00:00’ will appear on the display.
2. Select the time after which you want the
alarm to sound by pressing
or . You
will hear 2 beeps to confirm that the time has
been set and the clock will start counting
down from the selected time.The
sym-
bol will flash slowly.
3. Select a function and a cooking temperature
using the oven commands.
4. Once the cooking time is up, the oven will
turn off, an alarm will sound and the
symbol will flash quickly.
5. Touch any key to stop the alarm and turn off
the
symbol. The oven will switch on again.
6. Set the controls to the
position to turn off
the oven.
You can change the remaining cooking time at
any time by touching
or until the
symbol starts to flash quickly. Now press
to
change the time.
NOTE
With the Cooking Time function, the remain-
ing time will show permanently on the dis-
play. You cannot see the current time on the
display when this function is set.
Programming the Cooking Stop Time
1. Touch
or until the symbol on the
display starts to flash and press
. The in-
dication ‘00:00’ will appear on the display.
2. Select the time after which you want the
alarm to sound by pressing
or . You
will hear 2 beeps to confirm that the time has
been set and the clock will start counting
down from the selected time. The
sym-
bol will flash slowly.
3. Select a cooking function and temperature.
4. When the cycle is finished, the oven will turn
itself off, a buzzer will sound and
symbol
will flash quickly.
5. Touch any sensor to stop the alarm and to
turn off the
, symbol. The oven will switch
on again.
6. Set the controls to the
position to turn off
the oven.
You can change the remaining cooking time at
any time by touching
or until the
symbol starts to flash quickly. Now press
to
change the time.
Programming Cooking Time
and Cooking Stop Time
1. Touch
or until the symbol on the
display starts flashing, then press
. The
indication ‘00:00’ will appear on the display.
2. Select the cooking time by touching
or
. Next, a double beep will sound, the re-
maining time will appear on the display and
the
symbol will flash slowly.

26
User’s Guide
3. Touch or until the symbol on the
display starts flashing, then press
. The
indication ‘00:00’ will appear on the display.
4. Select the cooking end time by touching
or
. Next, a double beep will sound and the
current time will be displayed on the display.
5. Select a cooking function and temperature.
The oven will remain disconnected with the
and symbols lit up. The oven is now
programmed.
6. When it is time to start cooking, the oven will
turn on and will operate for the programmed
cooking time.
7. While cooking, the cooking time remaining
will be displayed and the
symbol will
flash slowly.
8. When the cooking time is up, the oven will
turn off, a buzzer will sound, and the
symbol will flash quickly.
9. Touch any sensor to stop the buzzer and
turn off the
symbol. The oven will
switch on again.
10. Set the controls to the
position to turn
off the oven.
You can change the remaining cooking time at
any time by touching
or until the
symbol starts to flash quickly. Now press
to
change the time.
Safety instructions
SAFETY CHILD LOCK
This function can be selected at any time while
using the oven.
To activate the function, touch and hold the
and keys at the same time for sever-
al seconds until you hear a beep and the
symbol appears on the display. The clock/
timer is locked.
If the oven is off and you activate the child
safety function, the oven will not work even if a
cooking function is selected.
If this function is activated while you are cooking,
it will only lock the electronic clock/timer settings.
To disable the function, press the
and
keys at the same time for several seconds until
you hear a beep.
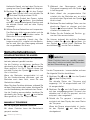
MANUAL DOOR LOCK
Available in pyrolytic models only.
This function allows the oven door to be locked.
IMPORTANT
This function can only be selected when the
oven command functions are set to the rest
position
.
To activate/deactivate the door lock, follow
these steps:
1. Touch
or until the symbol on the
display starts flashing.
The current door lock status will be displayed:
“On” if it is active and “Off” if deactivated.
2. Touch
, and the status of the lock will be
inverted: if the door is unlocked, it will lock
and vice versa.
3. Once the door has been locked/unlocked,
the new locking status of the door will ap-
pear on the display.
In the event that the locking system is ac-
tive, the
symbol will appear constantly lit
on the display.

27
English
User’s Guide
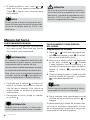
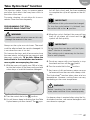
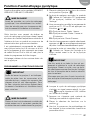
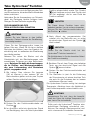
Teka Hydroclean
®
function
This function makes it easy to remove grease
and other food debris that may have stuck to
the sides of the oven.
For easier cleaning, do not allow dirt to accu-
mulate. Clean the oven frequently.
PROGRAMMING THE TEKA
HYDROCLEAN® FUNCTION
®
WARNING
Do not pour water into a hot oven as this can
damage the enamel of the oven.
Always run the cycle on a cold oven. The result
could be affected and the varnish damaged if it
is run when the oven is too hot.
First remove the trays and all accessories from
the oven interior, including the tray supports and
telescopic guide rails. To do this, follow the
instructions in the installation and mainte-
nance guide accompanying the oven.
1. With the oven cold, gently pour 250 ml of wa-
ter into the bottom of the oven cavity and add
a few drops of a mild dishwasher detergent.
bol will flash slowly and the time remaining
to complete the cycle will appear on the dis-
play.
IMPORTANT
The duration of this cycle cannot be changed.
To stop the cycle before it is finished, turn
the control dial to the
position.
4. When the cycle is finished, the oven will turn
itself off, an alarm will sound and the
symbol will flash quickly.
IMPORTANT
Do not open the oven door until the Hydro-
clean
®
function is complete.
The cooling cycle is necessary for the func-
tion to work properly.
5. Touch any sensor with your fingertip to stop
the alarm and turn off the
symbol.
6. Turn the control dial to the
position.
7. Any traces of dirt and excess water can now
be removed from the oven with a damp cloth.
The Hydroclean
®
function takes place at a low
temperature. However, cooling times can vary
depending on the room temperature.
WARNING
Before touching the inside surface of the
oven, make sure that it has cooled properly.
If a deeper clean is required after using the Hy-
droclean
®
function, use neutral detergents and
non-abrasive sponges.
2. Turn the control dial to the position.
3. You will hear a beep indicating that the Teka
Hydroclean
®
cycle has started. The sym-

28
User’s Guide
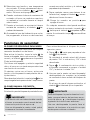
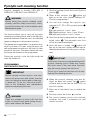
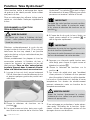
Pyrolytic self-cleaning function
Function available in models HSB 620 P,
HSB 625 P, HSB 630 P and HSB 635 P.
WARNING
Before setting the pyrolytic cleaning cycle,
carefully read the safety instructions, which
you will find at the start of the Installation and
Maintenance guide.
This function allows you to carry out a pyrolytic
cleaning cycle during which, due to the high tem-
peratures reached inside the oven, accumulated
grease undergoes a carbonisation process.
The general recommendation is to perform a py-
rolytic cycle every 4-5 uses, using the most suit-
able programme according to the level of stains
present in the oven. The more stained the oven,
the longer the duration of the programme.
During the pyrolytic cycle the light inside the
oven will remain off.
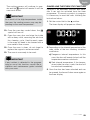
PROGRAMMING
THE PYROLYTIC FUNCTION
IMPORTANT
Before carrying out the pyrolysis, you must
remove all accessories and dishes from the
oven, including the shelves and/or telescop-
ic guide rails. To do this, follow the instruc-
tions in the installation and maintenance
guide accompanying the oven.
WARNING
Clean any spillages or excess dirt from the
inside, as these could ignite during the py-
rolysis and create a fire hazard.
1. Turn the cooking control dial to the Pyrolysis
position
.
2. TAfter a few seconds, the
symbol will
light up on the clock display, reading ‘P2’
(Pyrolysis programme 2.
3. You can now change the pyrolysis pro-
gramme to P1, P2 or P3 by pressing the
or
keys:
P1: Light pyrolysis. Lasts 1 hour.
P2: Regular pyrolysis. Lasts 1 hour 30 min.
P3: Intensive pyrolysis. Lasts 2 hours.
4. Once the desired programme has been se-
lected, press . The automatic door lock
will be activated immediately.
5. Once the door is locked, the
symbol will
light up on the clock display and the time re-
maining before the end of the pyrolysis will ap-
pear.
IMPORTANT
At this point, the oven is programmed and the
pyrolytic cleaning cycle is under way. During
the cycle, none of the oven timer functions
may be chosen (except the child lock).
Do not try to open the oven door as this may
interrupt the cleaning process.
6. When the pyrolytic cleaning cycle has fin-
ished, an alarm will sound, the
symbol
will flash and you will see the time ‘0:00’ on
the clock display.
7. Press any of the timer’s keys to disable the
alarm.
8. Turn the control dial to the
position.
9. The oven’s heating process has finished.
However, the oven is extremely hot and
cannot be used.

29
English
User’s Guide
The cooling process will continue to oper-
ate and the
symbol will remain lit until the
oven cools down.
IMPORTANT
As a result of the high temperatures inside
the oven, the cooling process may vary de-
pending on the room temperature..
10. Once the oven has cooled down, the
symbol will turn off.
11. Open the oven door and wipe the inside
with a damp cloth, removing the ash from
the cleaning cycle. Hard-to-reach areas
in the oven will need to be cleaned with a
non-metallic fibre scourer.
12. Once the oven is clean, do not forget to
replace the supports and accessories.
13. The oven is now ready to be used.
IMPORTANT
If any incident is detected in the program-
ming or use of this function, consult the in-
stallation and maintenance guide included
with your oven.
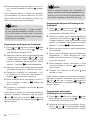
CANCELLING THE PYROLYTIC FUNCTION
Pyrolysis is an automatic function and there-
fore it can only be activated from the timer
programme. To cancel a pyrolysis in progress
it is necessary to reset the oven, following the
instructions below:
1. Set the control dial to the
position.
The timer display will appear as follows
2. Depending on the internal temperature of the
oven, either of the two following situations
could arise:
a) Dangerous internal temperature: In this
case, the door will remain locked until the
temperature reaches safe levels.
b) Safe internal temperature: If the temper-
ature inside the oven is safe, the door will
be unlocked immediately.
3. Once the door has been unlocked and can
be opened, the time will show once again on
the timer display.
Page is loading ...

31
Guide d’utilisation
Français
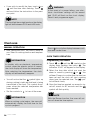
Symboles du sélecteur de fonctions
Modèles HSB 630, HSB 635
Modèle HSB 645
Modèles HSB 625 P, HSB 620 P, HSB 635 P, HSB 630 P
Fonctions du four
ARRÊT DU FOUR
CUISSON TRADITIONNELLE
GRIL
MAXI GRIL
SOLE
MAXI GRIL AVEC TURBINE
CUISSON TRADITIONNELLE À TURBINE
TURBO
PIZZA
MODE ECO
DÉCONGÉLATION
HYDROCLEAN
®
PYROLYSE
PRÉCHAUFFAGE RAPIDE
INFORMATION
Consultez le guide de cuisson fourni avec
votre four pour lire la description des usages
de chacune des fonctions.
Page is loading ...
Page is loading ...
Page is loading ...
Page is loading ...
Page is loading ...
Page is loading ...
Page is loading ...

39
Bedienungsanleitung
Deutsch
Backofenbeschreibung
1
Bedienblende
2
Türsperre
(nur für Pyrolyse-Modelle)
3
Grillwiderstand
4
Blechhalterungen
5
Rost
6
Backblech
7
Scharnier
8
Innenscheibe
9
Kühlluftaustritt
10
Befestigung am Einbauschrank
11
Lampe
12
Rückwand
13
Umluft
14
Backofendichtung
15
Tür
1
10
12
13
14
15
5
6
7
8
3
2
4
9
11
Bedienfeld
1
Funktionswahlschalter
2
Elektronische Uhr
3
Temperaturwahlschalter
1 2 3

40
Funktionswahlschaltersymbole
Modelle HSB 630, HSB 635
Modell HSB 645
Modelle HSB 625 P, HSB 620 P, HSB 635 P, HSB 630 P
Backofenfunktionen
AUSSCHALTEN DES BACKOFENS
NORMAL
GRILL
MAXIGRILL
UNTERHITZE
MAXIGRILL MIT UMLUFT
NORMAL MIT UMLUFT
TURBO
PIZZA
ECO
AUFTAUEN
HYDROCLEAN
PYROLYSE
SCHNELLAUFHEIZUNG
HINWEIS
In der zu Ihrem Backofen gehörenden
Anleitung zum Garen finden Sie eine Be-
schreibung der einzelnen Funktionen.
Bedienungsanleitung
Page is loading ...
Page is loading ...
Page is loading ...
Page is loading ...
Page is loading ...
Page is loading ...
Page is loading ...


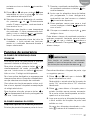
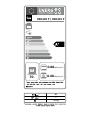
kWh/cycle*
kWh/cycle*
L
*
*
0.68
0.86
70
81
1
26 kg
HSB 635 / HSB 630
Page is loading ...
Page is loading ...
Page is loading ...
-
 1
1
-
 2
2
-
 3
3
-
 4
4
-
 5
5
-
 6
6
-
 7
7
-
 8
8
-
 9
9
-
 10
10
-
 11
11
-
 12
12
-
 13
13
-
 14
14
-
 15
15
-
 16
16
-
 17
17
-
 18
18
-
 19
19
-
 20
20
-
 21
21
-
 22
22
-
 23
23
-
 24
24
-
 25
25
-
 26
26
-
 27
27
-
 28
28
-
 29
29
-
 30
30
-
 31
31
-
 32
32
-
 33
33
-
 34
34
-
 35
35
-
 36
36
-
 37
37
-
 38
38
-
 39
39
-
 40
40
-
 41
41
-
 42
42
-
 43
43
-
 44
44
-
 45
45
-
 46
46
-
 47
47
-
 48
48
-
 49
49
-
 50
50
-
 51
51
-
 52
52


Ask a question and I''ll find the answer in the document
Finding information in a document is now easier with AI
in other languages
- français: Teka HSB 645 Le manuel du propriétaire
- español: Teka HSB 645 El manual del propietario
- Deutsch: Teka HSB 645 Bedienungsanleitung
- português: Teka HSB 645 Manual do proprietário
Related papers
Other documents
-
Kuppersberg FH 611 Series BUILT-IN ELECTRIC OVEN User guide
-
Küppersbusch CBM6330.0S User manual
-
Foster 7144 044 Specification
-
Prima PRSO204 Features List
-
Bertazzoni F45 CON XT User manual
-
Foster FL-F90 MTL Quick start guide
-
-
Foster KE multifunzione 9F Specification
-
Foster KE60 MTL INOX Features List
-
 Porter & Charles SOPS60TC User manual
