Page is loading ...

IMPORTANT: KEEP THIS INSTRUCTION BOOKLET IN
THE PLACE PROVIDED ON THE CHILD RESTRAINT
INSTRUCTIONS FOR USE
NWL0000658116D 11/17
©2017 baby joer®
babyjoer.com
Model 8JA#####AU

1
DO NOT USE THIS CHILD RESTRAINT UNTIL YOU HAVE
READ AND UNDERSTOOD THE INSTRUCTIONS IN THIS
USER GUIDE AND IN YOUR VEHICLE OWNERS MANUAL

2
CONTENTS
Quick Reference ……………………………………………………………..
3 & 4
WARNINGS …………………………………………………………………………
5
Additional warnins ………………………………………………………..
6 - 8
Features ………………………………………………………………………..
9 - 12
Adjustin the carry handle …………………………………………………….
13
Canopy ………………………………………………………………………………
14
Attachin and removin the restraint ……………………………………..
15
Adjustin the recline level ……………………………………………………..
16
Correct recline level ……………………………………………………………..
17
Where to install the restraint ………………………………………………….
18
Base installation - vehicle belts ……………………………………… 19 - 22
Base installation - ISOFIX compatible connectors ……………
23 - 27
Installation in an aircraft ………………………………………………..
28 - 31
WARNINGS top tether ………………………………………………………..
32
Tether strap use …………………………………………………………..
33 - 34
Installation - tether anchorae ………………………………………. 35 - 36
Use - correct shoulder strap position ……………………………………. 37
Use - two position crotch strap …………………………………………….. 38
Use - securin child in the restraint …………………………………
39 - 41
Use - shoulder heiht level label …………………………………………..
42
Removin the cover ……………………………………………………………
43
Cleanin and maintenance ……………………………………………
44 - 45
Accessories ……………………………………………………………………….. 46

3
Quick Reference - Restraint and Base
Read the whole of these instructions carefully and if there
is any doubt about the method of installation, consult the
child restraint manufacturer or aent, or a child restraint
fittin station authorized by the relevant transport
authority, or in New Zealand an aent for the vehicle.
Vehicle Belt or ISOFIX
compatible connectors
- must always be
secure and pulled
tiht.
See paes 21 & 25
Carry Handle - must always be
locked into position.
See pae 8
Tether Strap - must always be used
when the restraint is installed in a
vehicle.
See paes 33 - 34
Base Recline adjustment -
base must be reclined
correctly
See pae 16
Secure latchin -
restraint must be
securely latched
into base.
See pae 15
IMPORTANT: After readin this Quick Reference
read the followin instructions carefully

4
Quick Reference - Use
This Child Restraint is suitable for children up to approximately
12 months of ae. See pae 6 for more detailed information.
IMPORTANT: After readin this Quick Reference
read the followin instructions carefully
Shoulder Straps - must always be
at correct heiht and pulled tiht.
See paes 37 & 41
Harness Straps -
must not be
twisted.
See pae 41
Harness Buckle -
must always be
securely fastened.
See pae 41
Suitable clothin - child's clothin must
not interfere with the harness
See pae 39
Harness Tension -
pull harness tiht.
See pae 41
Body Support - only use for
smaller children who require
more support.
See pae 8
Child position - child must
be in full contact with back
of restraint.
See pae 40
Shoulder Heiht -
shoulders must
not be above
the marker line
See pae 42

5
• Use the restraint exactly as shown in the instructions.
• Supervision of children is needed because they may be able to undo buckles.
• To ensure that baby's back is evenly supported, do not put more than one nappy
on the baby and make sure the nappy is not folded thickly at the back.
• Do not allow the restraint to come into contact with polishes, oils, bleach and
other chemicals.
• Destroy the restraint if it has been in a severe crash, even if no damae is visible.
• Repairs must only be done by the manufacturer or aent.
• Fit the harness firmly to the child.
• A loose harness or restraint is danerous.
• Fit the restraint firmly to the car seat.
• Do not alter or modify this restraint.
• Do not harness an infant wrapped in a blanket or swaddled. Any
blanket or wrap must only be placed over the harness and infant.
• DO NOT USE THIS RESTRAINT WITHOUT THE SEAT COVER.
• DO NOT USE A REAR FACING CHILD RESTRAINT WHERE AN AIRBAG IS FIT-
TED IN FRONT OF THE SEATING POSITION.
• DO NOT LEAVE CHILDREN UNATTENDED IN THE CAR
NOTE: The warnins on these two paes are those required by the
Australian and New Zealand Standard AS/NZS 1754 for this type of
child restraint. Other warnins specific to this child restraint will be
found on the followin paes and throuhout these instructions.
WARNINGS

6
This Child Restraint is:
To be used only in a rearward-facin position until the infant's shoulders reach
the shoulder heiht marker (approximately 12 months of ae). Continue to use this
infant restraint until the child reaches this limit. Infants are at risk of serious injury if
they face forward too early.
TO BE USED WITH A LAP-SASH/LAP ONLY SEATBELT OR ISOFIX LOW
ANCHORAGES IN THE BACK OF MOST CARS WITH FORWARD FACING SEATS.
This restraint is 690 mm lon, 450 mm wide and 520 mm hih (with the handle
down). Check the measurement between the front of the seat back of the rear seat
and all front seats in the car in which the restraint is intended to be used to ensure the
space available is sucient.
Ensure that children have adequate ventilation and shade when in the vehicle.
Seat belt extenders are not recommended if the car seat belt is too short to secure
the child restraint.
If the car seat belt is too short et advice from a child restraint fitter reardin use
of these.
Read carefully the whole of the instructions for the installation, and in the event of
doubt about the method of installation, consult the child restraint manufacturer or
aent, or a child restraint fittin station authorized by the relevant transport authority,
or in New Zealand, consult the aent for the vehicle.
ADDITIONAL WARNINGS
IMPORTANT
Do not attach the lower attachment connectors of two separate child
restraints to the same ISOFIX low anchorae in your car.
Always attach the top tether strap to the child restraint upper anchorae
in your car.
Child restraint lower attachment connectors and the ISOFIX low
anchoraes in your car are desined to withstand only those loads
imposed by a correctly fitted child restraint.

7
ADDITIONAL WARNINGS
• Failure to completely follow these instructions as well as the labels on the
restraint can result in SERIOUS INJURY OR DEATH.
• If other carers use this restraint they must also read these instructions.
• If the restraint is to be used with a pre-term or very small baby first seek
medical advice reardin the suitability of the restraint for that child.
• This restraint is not a toy. DO NOT allow other children to play with it.
• If left in the sun some parts of the restraint may become hot enouh to
burn a child. Always cover the restraint if it is exposed to direct sun.
• DO NOT use the restraint if any part of it is damaed, broken or missin.
USE AS A CARRIER:
• FALL HAZARD: be aware that the child's activity may move the carrier.
NEVER place the carrier on a table or hih surface.
• SUFFOCATION HAZARD: the carrier can roll over if placed on a bed or
other soft surface. NEVER place the restraint in such positions.
• STRANGULATION HAZARD: Children have stranled in loose of partially
buckled harness straps. Always secure the harness correctly.
• Always use the harness, even when the restraint is not in the vehicle. A
child fallin out of a restraint when for example bein carried may sustain
serious injury.
• Do not use the restraint on shoppin trolleys.

8
Travel System use - only use
this child restraint with strollers
that are compatible.
Before liftin the restraint always check
that the carry handle is securely locked
into the upriht position. An unlocked
handle may result in the carrier tippin
causin serious injury to the child.
Never install the Child Restraint in a
seat with a front airba. DEATH or
SERIOUS INJURY may occur. Refer
to your vehicle Owners Manual for
airba warnins and information.
The Body Support is intended for
use with smaller babies. Remove
it when the child is bier.
Use of the harness shoulder pads
and buckle pad are optional. They
are not required for safety.
ADDITIONAL WARNINGS

9
Features - Child Restraint
1 Carry Handle
2 Movin Headrest
3 Shoulder Pads
4 Body Support
5 Harness Quick Release
Buckle
6 Harness Adjuster Button
7 Harness Adjuster Strap
8 Canopy
9 Harness Straps
10 Carry Handle Lock
11 Seat Cover
1
2
3
4
5
6
7
10
9
8
11

10
Features - Child Restraint
12 Top Tether Guides
13 Movin Headrest Heiht Adjustment
14 Rear Base Latchin
15 Harness Straps
16 Crotch Strap Anchor
12
16
13
12
15
14

11
Features - Base
1 Tether Strap
2 Level Indicators
3 Tether Strap Anchorage
4 Tether Storage Bag
5 Vehicle Belt Lock -O
6 ISOFIX connector strap
1
2
3
5
6
2
4

12
Crotch Strap Position
Features - Base
7
11
9
8
7 Recline Adjustment
8 ISOFIX strap adjustors
9 ISOFIX compatible connector
10
ISOFIX compatible connector anchorage
11
Instruction Manual Storage
10
8
9

13
Adjustin the Carry Handle
There are four carry handle positions:
A. Carry position
B & C. Middle positions
D. Stationary position. This position
stops the restraint from rockin which
can be useful for feedin the child.
Any position can be used in a vehicle.
To rotate the handle squeeze both
release buttons on the handle hubs at
the same time. Rotate the handle.
IMPORTANT: check the release buttons
have enaed fully and the handle is
locked into position.
A
B
C
D

14
Canopy
To attach the canopy insert the canopy
bow into the canopy mount brackets on
both sides of the seat.
Ensure the bow clicks into place.
To remove, press the release tabs and
withdraw the bow.

15
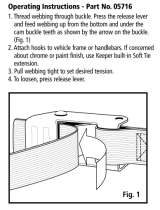
Securin child in the restraint
Attachin and Removin the Restraint
1. TO FIT: lower the restraint into the
base until the latches "click".
Lift the restraint upwards to ensure it
is securely latched.
IMPORTANT
The restraint must always be
securely latched into the base.
2. TO REMOVE: pull the release lever at
the back of the restraint upwards then
lift the restraint upwards.
Note: if the top tether is fitted, remove
it first.
2
1

16
Adjustin the Recline Level
IMPORTANT: for your child's safety the
restraint must be correctly reclined.
1. The Base has 6 recline positions. To
select one of these use the rotatin
knob at the front of the base.
2. To increase the recline anle rotate
the knob anti-clockwise to extend
the foot.
3. To decrease the recline anle rotate
the knob clockwise.
1
2
3

17
Correct Recline Level
The base has two recline level indicators
- one on each side.
Set the recline level so that the bubble is
between the blue lines.
Note: if the recline anle is set before
the baby is placed in the restraint, the
anle may then chane with the extra
weiht.
Always recheck the recline anle after
baby is placed in the restraint.
Bubble between
the blue lines

18
Where to Install the Child Restraint?
Failure to place the restraint in a correct
seatin position increases the risk of
serious injury or death.
This Child Restraint must be installed
in the back seat unless the vehicle does
not have a back seat.
DO NOT place this child restraint on a
front seat with an airba. If the airba
activates DEATH or SERIOUS injury can
occur.
Owners of vehicles with airbas should
refer to the vehicles Owners Manual for
additional Child Restraint installation
information.
DO NOT install the Child Restraint in a
sideways or rearward facin seat.
DO NOT install the Child Restraint
sideways or rearward facin.
This Child Restraint can be installed on
a vehicle seat usin the vehicle belts, or
(if fitted) usin the vehicle ISOFIX low
anchoraes.

19
Base Installation - Vehicle Belts
These instructions apply to both Lap
only and Lap/Sash vehicle belts.
Before installin the base make sure the
vehicle is on level round.
Place the base on the rear seat.
Use the Belt Path labels as a uide
for correct belt placement.
Adjust the recline anle if
necessary.
REARWARD FACING
BELT PATH
/