Page is loading ...

Ergonomic Chair User Guide
Ph: 1800 788 755

Please read the guide carefully before using
Pull and release,
help you relax
We adopt the design concept of the gear shifting paddles of the
Formula One into the operating switches of our ergonomic chairs
on the lower side of armrests.It makes the function operation of
our ergonomic chairs 8 times faster than operating the normal
ones and it’s even more convenient for users to adjust in an
easier and quicker way without changing the sitting position.
Paddle Shift Armrests:
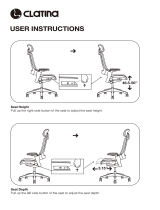
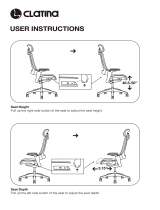
Seat Height Adjustment
Pressing up on the lever under the right armrest will adjust the
height of the seat.
Adjustment Instruction:

01
01
02
03
05
06
06
General
Introduction
Construction
Structure &
Technical Features
User Guide
Maintenance
Tips for Analysis&
Elimination of Problems
Quality Guarantee &
After Service
Backrest Tilt Adjustment
Pressing up on the lever under the left armrest will adjust the backrest
angle. Lift the lever up, release and lean back to engage the backrest
tilt with body weight pressure, when hearing the sound of “click” , the
backrest will be locked. Pressing up again on the lever, releasing and
when hearing the sound of “click”, leaning back with body weight
pressure will unlock the backrest; allowing it to become
free.(Considering the users’ using safety, we designed the special safe
tiling lock which need users’ body weight pressure to unlock the
backrest.)
Attention: Please release the paddle shift after lifting it to avoid the
function being affected.
Adjustment Instruction
Pull and release,
help you relax
07
Assembling Instruction
Reflex User Guide

General Information
Construction
Structure & Technical Features
Headrest
Seat Height
Adjustment Lever
Base
Casters
Backrest Frame
Armrest Height
Adjustment
Backrest Angle
Adjustment Button
Lumbar Support
1.Application
It is applied for the Reflex chair series.
2.Application
Ergonomic chair, designed for any office space and environment.
3.Applicable Scope
Indoor use only. Not for open air or moist environments.
4.Quality Standard
The Standard of the office chairANSI/BIFMA X5.1-2013
5.Quality grade: Qualified Product
Note
The upgrade of the chair will not be informed separately. All
right reserved by GTCHAIR. All divergences will be referred to
the Chinese Edition.
Seat Depth
Adjustment
Backrest Tilting Tension
Adjustment Knob
Backrest Tilting
Adjustment Lever
1.Mesh Backrest: nylon reinforced with fiberglass frame, with
woven terylene and acrylic fiber and visco backing.
2.Back Bar: Die-cas t aluminum alloy.
3.Foam: High density, elastics foam.
4.Mechanism: Die-cast aluminum alloy.
5.Base: Die-cast aluminum alloy.
6.Casters: Black dual wheel casters made of nylon reinforced with
fiberglass.
7.Mesh/Fabric:
Mesh: Made of high quality Polyester.
Leather: High quality leather.
8.Backrest frame: Die-cast aluminum alloy.

Seat Adjustment
Backrest Adjustment
Armrest Adjustment
Adjustable Lumbar Support
Introduction of Paddle Shift Armrests Control
1. Pressing up on the lever under the right
armrest will adjust the height of the seat.
Pressing up on the lever with your body weight
will cause the seat to lower. Release the lever
when you have reach the desired position.
Pressing up on the lever when there is no weight
on the seat will allow it to rise.
1. Pressing up on the lever under the left
armrest will adjust the backrest angle. Lift the
lever up, release and lean back to engage the
backrest tilt with body weight pressure , the
backrest will be locked. Pressing up again on
the lever, releasing and leaning back with body
weight pressure will unlock the backrest;
allowing it to become free.
Attention: Please release the paddle shift after
lifting it to avoid the function being affected.
2. Pull the tension knob found on
the lower right of the seat and turn
clockwise to increase back tilting
tension, counter clockwise to
decrease back tilting tension.
3.Pressing the buttons on both sides
of the backrest and moving inwards
and outwards can adjust the angle of
the backrest.
1. Lift the armrest up to raise the arm
height, once the armrest has reached
its highest point it will then return to its
original position.
2. The arm pads can easily pivot.
Pull up on the lumbar pad to raise the
lumbar support, and push down to
lower it.
2.Pressing the button on the left side of the seat
will unlock seat. Slide the seat forwards and
backwards with your body weight, release the
button to lock it when you have found your
desired position.
Note: This only applied to model GT07-35 series.
3.Pulling out the knob on the left side of the
seat will unlock seat. Slide the seat
forwards and backwards with your body
weight, release the knob to lock it when
you have found your desired position.
Note: This only applied to model GT07-
38/GT07-39 series.

Headrest Adjustment
Pushing the headrest forwards and
backwards or pulling it vertically
will change its height and angle.
Problem
Caused Solution
Unable to raise
seat height
Was there any weight on
the seat when you adjusted it?
Warranty and Terms & Conditions
This product is offered 1 year quality warranty and 5 years usage warranty
One-year
quality warranty
GTCHAIR will be responsible for the quality issue within 1
years, and repair free of charge.
Only increase seat height when
there is no weight on the seat.
Was the seat already at
its highest height?
Please sit down on the seat and
lower seat height to ensure you
are not already at the highest height.
Unable to lower the
seat height
Were you sitting on the
front of the seat?
Center your weight on the
seat and try again.
Unable to lower the seat height?
Please choose a seat height
between the highest
and lowest position.
Seat depth
can not be adjusted
forwards
or backwards
Was the lever under the
left side of the seat
in the lock position?
Please lift the lever and try again.
Was the tension knob
turned completed clockwise?
Please lower tension and
try it again.
Was there any dirty or other
debris caught in the casters?
Please clean the caster or
change the caster.
Please contact the distributor.
The casters can
not moved freely
Noise during use
Five-year
usage warranty
Beside of previous warranty, all office chairs offered by
GTCHAIR would be in 5 years warranty. GTCHAIR will offer
repairing service and replacement with reasonable charge.
Avoid the use of acute objects or blades.
Avoid direct sunlight and strong light.
Regularly check the kinetic parts and screws. If there are
any issues, fix them accordingly.
During Use:
-Cover with a dustproof cloth.
- Avoid direct sunlight.
-Do not keep in damp or humid environments
Storage:
During Use: Daily Maintenance: Remove dust off mesh with
soft brush .
Deep Clearance: Please ask for professional staff for help.
Mesh:
Care and Maintenance

Assembling Instruction
Part list
Caster x5 Base x1
Gaslift x1
Office Chair x1 Optional Headrest x1
Assembling Steps
Step one: Step two: Step three:
Insert the casters into
the base caster hole.
Put the gas lift into
the base.
Insert the upper end
of the gas lift into the
mechanism hole.
Step four: (Opcional)
Chair Assembly is
completed.
Use the screws to fasten the
headrest to the chair back.
/


