Page is loading ...

IT-9800
User Manual

External Structure
Internal Structure
Your Chair
Headrest Pillow
Backrest Flap
LCD Controller
Seat
Remote Controller Holder
Left Armrest
Right Armrest
Footrest
Main Power Switch Box
Power Switch
AC Power Cord
Back Cover
Caster

Welcome to
Thank you and congratulations on purchasing an Infinity Massage Chair - you’ve
made a great choice.
With over a decade of experience designing, building and servicing massage
chairs, Infinity takes pride in every chair sold, including yours. We are here for you.
The US-based Customer Care team can be reached at (603) 910-5000 or visit us
online at www.infinitymassagechairs.com and find valuable self service resources
under the SUPPORT tab, including electronic copies of all documents.
Inside this manual, you will find everything you need to setup and safely enjoy your
chair. Please review the entire manual before assembling or using your chair.
Get ready to sit back, Relax and enjoy the Ultimate Massage Experience.
We know you can’t wait to sit in your new Infinity Massage chair!
Take a picture of you enjoying the ultimate massage experience
and make sure to tag us on social media with the hashtag
#lovemyinfinitychair
Register your product at www.infinitymassagechairs.com/
warranty to ensure it is in our system. This will simplify the
warranty process should you ever need it.
Alternatively, scan the QR code to go directly to the URL above.
THE ULTIMATE MASSAGE EXPERIENCE
@infinitymassagechairs@infinitymassagechairs
@infinity_chairs@infinity_chairs
@infinitymassagechairs@infinitymassagechairs
SCAN CODE

Chair Features
Body Scanning Zero Gravity Lumbar heatManual Massage
Customization
See page 14 See page 15See page 9
See page 15
Specifications
Model
Fuse
Power Consumption
Safety Standards
W
Type 1
”
Dimension of Main Body (in)
Necessary Clearance to Wall (in)
Net Weight (lbs)
Shipping Weight (lbs)
Max. User Weight (lbs)
Voltage
20
IT-9800 & IT-9800TS
170
211
350
120-240V 50/60Hz
5 AMP
60~100
38 x 45 x 46 (L x W x H)
Product Warranty
For the most current Warranty information please visit:
www.infinitymassagechairs.com/warranty
Alternatively, scan the QR code to go directly to the URL ab
ove
.
SCAN CODE

Table of Contents
Before Getting Started
Chair Setup
Chair Assembly
Installation Site
Clearance Space for the Chair
Floor Protection
Move Methods
Connect to Power
6
6
6
7
7
Getting Comfortable
Main Power Switch
Adjust Pillow
Body Scanning
Getting Out Of The Chair
8
8
8
9
9
Assembly Instructions 10
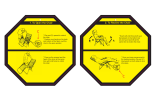
Icon Descriptions
Trouble Shooting
ACU Points
Remote Control
Method of Operation
12
19
12
13
16
Staying Safe
LCD Features
Operation
Fixing Issues
17

6
- 20” clearance for the recline of the backrest; 8” clearance for the extension of footrest and
sliding forward of the chair.
- Keep it 3 feet away from the TV, radio or other audio & video appliance to avoid signal
interference.
Clearance Space for the Chair
Installation Site
Before Getting Started
CAUTION
- Keep the distance between the power socket and power switch within 60” to avoid damage of power cord
while massage chair sliding forward.
- Straighten the power cord while in use to avoid tangle or damage.
- When the massage chair sliding forwards or back, please check to make sure there is no children, pets or
other obstacles around to avoid accident.
We recommend to place a piece of thin carpet or soft mat underneath it to avoid damaging
the floor.
Floor Protection
- Do not use the massage chair in high moisture environment such as near swimming pool or bathroom to
prevent electric shock accident.
- Please keep the massage chair away from heated surfaces to prevent fire hazard or damage to the product.
WARNING
Massage chair
Floor
Carpet
20” 8”

7
- Apply pressure to the back of the massage chair from behind to pivot on the Castors.
Have a second person up front to guide the Footrest until in the correct position. Maintain
clearances as mentioned above. Gently lower into place. Do not pull on the side arms.
Move Methods
Connect to Power
CAUTION
- Do not move the chair when there is user inside.
- To carry this product, do not lift by the footrest or armrest, hold the chassis and steady the backrest (have 4
or more people to carry the product).
- Ensure there is no damage to the supply cord before switching on the massage chair.
- Ensure that the main power switch is turned off before connecting to power
Plug into a 110V grounded outlet.
This product must be grounded. If it should malfunction or breakdown, grounding
provides a path of least resistance for electric current to reduce the risk of electric
shock. This product is equipped with a cord having an equipment-grounding
conductor and a grounding plug. The plug must be plugged into an appropriate
outlet that is properly installed and grounded in accordance with all local codes
and ordinances.
CAUTION

8
To power up the chair, flip the main power switch located on the right side of the chair back
to ON.
Main Power Switch
Getting Comfortable
Chair Setup
CAUTION
- Children should be supervised to ensure that they do not play with the chair or touch the power box.
- Always unplug the massage chair from the electrical outlet immediately after use.
- Unplug from outlet during thunder or lightening storms, and before putting on or taking off parts.
- Turn off the power switch and unplug the massage chair from the electrical outlet while not in use to avoid
children power on the massage chair accidentally.
- When not in use for a long period of time,we recommend that the chair be covered, the power cord be coiled
and that the unit be placed in an environment free of dust and moisture.
Take a seat in the chair and take note of where the neck pillow rests on your neck. Adjust
the pillow so that it rests comfortably in the arch of your neck. Do this by removing it from
the velcro, aligning it, and then reattaching to the velcro once it is in the desired position.
Adjust Pillow
Main
Power Switch
Power
Cord Input
Fuse Location

9
Select any of the 6 auto programs. The chair will automatically begin scanning your body,
mapping your back, shoulders, and neck. During this process its is importing to remain
seated back into the chair without lifting your head.
Body Scanning
Smart tip: To increase intensity in the neck
and shoulder region, flip the pillow or the
pillow and pillow pad up so you lay directly
on the seat backpad.
10min
10min
To easily exit the chair at any time, press the STOP button on the remote control to restore
the chair to the upright position.
Getting out of the Chair
KINGKING
To make the massage less intense you can fold down the pillow to provide more cushioning
between you and the massage mechanism in the seat back.
Reduce the Intensity of your Massage - Manually

10
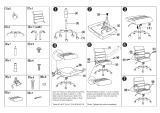
Chair Assembly
Take out the chair from the box.
Pull back the backrest until you hear a
“click” sound. Flip the backrest flap on the
front of the chair and affix it to the Velcro
on the seat board.
Connect the wire of Seat cushion with same
color(Black) connector underneath the chair
seat. Connect the wires of both arms with
same color (Green) connectors underneath
the chair seat. Then, tighten the three
screws for both left and right armrests to
the chair seat frame.
Step 1
Step 2
Step 3
Assembly Instructions
Large Pillow
Backrest
Seat Cushion

11
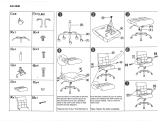
Put the seatrest cushion firmly on the seat
board. Then, zip up the zipper of the front seat
cushion.
Place the large headrest pillow to the backrest
flap and attach it to the Velcro on the back of
the chair.
Place the small headrest pillow on top of the
large headrest pillow, and attach it to the Velcro
on the back of the chair. Install the remote
holder, loosen the pre-screwed screws from
the right armrest, and then install the holder
with the existing two screws using Philips
Screwdriver. Plug the wire connector of remote
control into the power switch box, and put the
remote controller into the holder.
Check again to make sure all steps are done
properly. The chair is ready for use.
Plug in power cord to chair and wall outlet.
The foot extension length can be adjusted to 7 cm, 8 cm or 10 cm. Lift up the footrest,
and use Long Nose Pliers to take out the E type clip. Remove the bolt to set the hole in
preferred length. Then, put back in the bolt and lock in the E type clip.
Step 4
Step 5
Step 6
Adjusting The Legrest Position
Step 7

12
ACU Points
Operation
LCD Features
SPEED
KNEADING
TAPPING
SHIATSU
WIDTH
TIMER
AUTO
VIBRATION
HEAT
Icon Descriptions
CALF
MASSAGE

13
Remote Control
ROCKING
STOP Button
Press this button to stop the massage program. The chair (chair back
and footrest) will return to its full upright position. The roller will return
to the storage area of the chair back.
Users can press the AUTO buttons to select from 6 programmed mas-
sages for different areas of the body. Each preset time is 15 minutes.
Before the massage program, the roller will automatically detect the
length from the shoulders to the waist and remember the acupres-
sure points of the user. This provides a customized and comfortable
massage based on the user’s height. When the massage program is
finished, the chair (chair back and footrest) will return to its full upright
position. The rollers will return to the storage area of the chair back.
The AUTO massage programs are preset and the speed and width
of the rollers automatically adjusts for each user. The FOOT MAS-
SAGE, VIBRATION and HEAT functions can be operated separately.
These functions can be used in conjunction with STRETCH, ROCKING,
RESTORE/LIE DOWN, ROTATE UP/DOWN, BACKREST UP/DOWN and
FOOTREST UP/DOWN buttons.
Auto 1 - Full body massage
Auto 2 - Regional massage - User can use the manual button UPWARD
and DOWNWARD to move the rollers to the desired point.
The massage program will work on the area that the user
desires to focus on.
Auto 3 - Fixed Point massage - User can use the manual button UP-
WARD and DOWNWARD to move the rollers to the desired
point. The massage program will be the fixed point that the
user desires.
Auto 4 - Head to neck massage
Auto 5 - Upper back massage
Auto 6 - Lower back massage
AUTO Button

14
Operation
RELAX Button
Press the RELAX button for 38 / 30 / 15 / 10 / 6 minutes. Each of these
settings has different recline angles with pre-programmed massage
functions. Before the massage program starts, the rollers will auto-
matically detect the body length from the shoulder to the waist and
remember the acupressure points of the user. The chair will automati-
cally adjust to the most comfortable massage angle. The 10/6 minutes
programs cannot work with other massage functions.
Press this button to automatically raise the chair to the full upright
position. This function cannot work with RELAX 10 and 6 minutes
programs.
Press this button to automatically recline. This function cannot work
with RELAX 10 and 6 minutes programs.
Press UP or DOWN button to rotate the chair to the desired angle.
This function cannot work with RELAX 10 and 6 minutes programs.
E1: Zero Gravity for the most comfortable sitting angle
E2: V angle for victory stretch
E3: angle for lumbar stretch
E4: Inversion stretch for elevating the feet above the head to release
the pressure from the legs and, to stimulate the blood flow from
the feet to the heart.
E5: Stops the E1, E2, E3 and E4 functions, and restores the chair to the
upright position.
Press this button to select different reclining programs.
d1: Deep recline (no rocking function) The chair will automatically
adjust to the deep recline angle. This function can be used with
AUTO and manual programs. When the massage program is
finished, the chair (chair back and footrest) will return to its full
upright position. The rollers will return to the storage area of the
chair back.
d2: Medium recline(with rocking feature) The chair will automatically
adjust to the medium recline angle and the chair will automatically
rock back and forth. This function can work with AUTO and man-
ual programs. When the massage program is finished, the chair
(chair back and footrest) will return to its full upright position. The
roller will return to the storage area of the chair back.
d3: Deep recline (with rocking feature) The chair will automatically
adjust the deep recline angle and will automatically rock back and
forth. This function can work with AUTO and manual programs.
d0: Fixed recline The chair will stay in its current position when you are
in the function of d1, d2 or d3 reclining programs.
STRETCH Button
V
ROCKING Button
ROCKING
RESTORE Button
LIE DOWN Button
ROTATE UP/
DOWN Button

15
Press Up or DOWN button to adjust the backrest to rise or recline.
This function cannot work with RELAX 10 and 6 minutes programs.
Press UP or DOWN button to adjust the footrest to rise or recline.
This function cannot work with RELAX 10 and 6 minutes programs.
To start any manual function, press this button to set massage time
for 5 / 10 / 20 / 30 minutes. User can choose the preferred massage
functions - Kneading, Tapping, Multiple or Shiatsu. The massage for
foot or seat is also capable with this function.
Press this button to turn on/off the warmer in the backrest.
H1: 5 Minutes H2: 10 Minutes H3: 15 Minutes H0: Off
Press this button to select the different vibration cycles for the seat
cushion and armrests. There are four different cycles of vibration.
Press this button to turn on/off the kneading function. This function
can work with other manual functions except the WIDTH button. The
Kneading is preset at speed one. User can press SPEED button to
adjust to the preferred speed.
BACKREST UP/
DOWN Button
FOOTREST UP/
DOWN Button
MANUAL/TIME
Button (5/10/20
/30 minutes)
HEAT Button
VIBRATION Button
KNEADING Button
Press this button once to turn on Tapping (A1), press twice for
Flapping (A2), press third time for Knocking (A3) and continuously.
This function can be used with other manual functions. The Tapping
and Flapping are preset at speed one. User can press SPEED button
to adjust to the preferred speed and press WIDTH button to adjust to
the preferred width. There is only 3-speed adjustment for Flapping
function. The Knocking function is not capable to work with SPEED.
TAPPING Button
Press this button to turn on/off kneading and tapping dual function.
This function can work with other manual functions except the WIDTH
button. The kneading and tapping dual functions is preset at speed
one. User can press the SPEED button to adjust to the preferred
speed.
Press this button to select a programmed shiatsu massage function
for the whole back.
MULTIPLE Button
SHIATSU Button
Press this button for 6 selections to massage at Fixed point, Area,
Full body, Head to neck, Upper back and Lower back. Then press the
other manual massage buttons: KNEADING, TAPPING, MULTIPLE and
SHIATSU for back massage.
Only in Area and Fixed point massage functions, can you use the UP
and DOWN buttons to move the rollers to the desired point.
CON./REP. Button

16
Operation
Press this button to adjust the width for the TAPPING function. Users
can select either wide/medium/ or narrow. This function cannot work
with KNEADING, MULTIPLE and SHIATSU functions.
Press this button for 6 different speeds. You can use this function with
KNEADING, TAPPING and MULTIPLE functions. When running the
AUTO and RELAX functions, the speed changes to follow the intensity
of programmed massage. This function cannot be used to adjust the
speed for SHIATSU.
1. Plug in the power cord, and then turn on the power switch (on the right side of the back of the chair).
2. Set the massage time or select from the automatic functions: AUTO or RELAX
Manual functions:
- Press the manual button to set the desired time, then choose from the KNEADING, TAPPING,
MULTIPLE or SHIASTU massage functions.
- When using the KNEADING, TAPPING or MULTIPLE massage functions, you can adjust the massage
strength by pressing the SPEED button. When using the TAPPING function, you can also press
the WIDTH button to adjust the width of the rollers. You can press the UPWARD or DOWNWARD
buttons to adjust the desired massage location when running the Area or Fixed point massage.
Automatic functions:
- For automatic functions, choose from the AUTO (6 programs) and RELAX (5 programs) functions
for fully automatic massage settings.
3. Special functions selection: The VIBRATION and HEAT button can be operated separately to work with
AUTO, RELAX and MANUAL programs. If you do not want to have the foot or seat massage while in
the auto programs (AUTO and RELAX), you can press the VIBRATION or FOOT MASSAGE button to
turn off these function.
4. Stop: Press the STOP button to stop the massage program. The massage rollers will automatically
return to the storage position of the backrest, and the chair will return to its full upright position.
5. When finished, turn off the power and unplug the power cord.
6. The chair comes with paddings that you can put in the backrest flap of the chair to adjust the intensity
of the massage.
7. Use a surge protector to protect your chair from current fluctuations.
WIDTH Button
SPEED Button
Press this UPWARD or DOWNWARD button to adjust the rollers to
the desired position. This function only can work with Area and Fixed
point massage.
Press this button to start/stop kneading massage for feet/calves.
There are three speeds F1, F2, F3 and F0 to stop.
Press this button to start/stop swing massage for foot. There are
three speeds F1 (slowest), F2, F3 (fastest) and F0 to stop.
Press this button to start(FA)/stop(F0) auto program for feet/calves
massage.
UPWARD/
DOWNWARD
Button
FOOT KNEADING
Button
FOOT SWING
Button
FOOT AUTO
Button
Method of Operation

17
Precautions listed below will help to ensure proper use of this appliance.
Read all instructions before using this appliance.
Safety Precautions
Staying Safe
- No Disassemble.
- Improper operation may cause severe personal injury or substantial property damage.
- Improper operation may cause personal injury or product damage.
- Prohibited.
WARNING
CAUTION
Not Suitable For Below Persons
Control Buttons Precautions
Best Circumstances
We recommend those with any of the following conditions consult your physician before using.
- Those who are using electronic medical instruments embedded in the body, such as a cardiac pacemaker.
- Those undergoing treatment, especially those who are not feeling well.
- Those with malignant tumors or malignant abscesses. (Need to be supervised)
- Women who are pregnant.
- Those with osteoporosis or a fractured spine.
- Those with skin diseases or those wwith skin injuries.
- Those with a high fever.
- Close supervision is necessary when this product is used by, on, or near children, invalids, or disabled persons.
- The appliance has a heated surface. Persons insensitive to heat must be careful when using the appliance.
- This appliance can be used by children aged 8 years and above and persons with reduced physical, sensory, or
mental capabilities, or lack of experience and knowledge, if they have been given supervision or instruction
concerning the use of the appliance in a safe way and understand the hazards involved.
- Children shall not play with the appliance.
- Cleaning and user maintenance shall not be made by children without supervision.
WARNING
- Do not operate the control buttons with wet hands.
- Do not spill water or other liquids onto the control buttons to avoid fault.
- Do not lay heavy objects on the controller.
WARNING
- Do not operate under blanket or pillow. Excessive heating can occur and cause fire, electric shock,
or injury to persons.
- Do not use this appliance when ambient temperature is over 40 C.
- Women who are pregnant should not use this chair.
- Do not use this appliance in humid or dusty environment, or when any part of the body is in contact
with plumbing or any similar ground.
- Never operate the appliance with the air openings blocked. Keep the air openings free of lint, hair,
and the like.
- Do not use outdoors.
- Do not operate where aerosol (spray) products are being used or where oxygen is being administered.
- Please place the product on a flat level floor.
- Do not store near heat or open flame.
- Connect this unit to a properly grounded outlet only. See Grounding Instructions.
CAUTION

18
Staying Safe
- Always unplug this appliance from the electrical outlet immediately after using and before cleaning.
- An appliance should never be left unattended when plugged in. Unplug from outlet when not in use.
- Unplug from outlet during thunder or lightening storms, and before putting on or taking off parts.
- Check that the power voltage stated on the rating label corresponds to your local electricity supply.
- Do not use a damp hand to unplug the cord to avoid electric shock
- Do not drag the cord, reach to the front plastic end to unplug it.
- Do not squeeze, over bend, pull hard, or twist the cord.
- Keep the cord away from heated surfaces.
- Do not carry this appliance by supply cord or use cord as a handle.
- Never operate this appliance if it has a damaged cord or plug, if it is not working properly, if it has been dropped
or damaged, or dropped into water. Return the appliance to a service center for examination and repair.
- To disconnect, turn all controls to the off position, then remove plug from outlet
- The appliance is only to be used with the power supply unit provided with the appliance.
- It must only be supplied at safety extra low voltage corresponding to the marking on the appliance.
- If the supply cord is damaged, it must be replaced by the manufacturer or its service agent or a similarly qualified
person in order to avoid a hazard.
CAUTION
- Only for users who weigh below 300 lbs.
- Use this product only for its intended use as described in this manual. Do not use attachments not
recommended by the manufacturer.
- Appliance should only be used by one person, do not use by two or more persons at the same
time to avoid damage to the product.
- Do not use the product right after a meal, it may cause discomfort.
- Remove personal accessories from arms and empty pockets while using the massage services.
- Check the upholstery under the cushions and other spots, if any damages are present, do not
use it and refer to a qualified service professional for servicing.
- If you feel any abnormal discomfort during the operation of this product, turn off the power
immediately and do not use the product.
- Use of the appliance for 20 minutes each time is highly recommended.
- Make sure there are no obstacles behind the chair and there is enough clearance before adjusting
the backrest or legrest angle.
- Make sure there is no other excessive load pressed on the backrest or legrest besides the user.
- Make sure there are no children, pets or other objects under the backrest or legrest.
- Please be seated properly while using the product.
- Do not drag or push the chair or roll on its caster on wood floor or carpet to avoid damage
CAUTION
- Do not stand on or stack heavy objects on the footrest.
- Do not fall asleep while the product is operating.
- Avoid using the product under the influence of alcohol.
- Never drop or insert any object into any openings.
- If there is any smoke or unusual smell while using, stop using immediately, and unplug the power cord.
- Do not disassemble this product yourself to avoid failure.
- Do not dismantle, fix or modify the product yourself. Please contact authorized dealer or service agent.
Cautions Regarding the Adapters and Cord
Best Practices for Safe Use

19
Fixing Issues
Trouble Shooting
Problem Possible Cause
No power.
No Display on
Remote, but chair
does respond
to commands/
buttons pressed.
When reclining,
you can hear a
squeaking noise.
1. Make sure power switch is on, the line icon (–) should
be pushed in – Test chair, continue to next step if
needed.
2. Check each end of the power cord (where the power cord
plugs into the chair, and where it plugs into the wall outlet)
and make sure each end is securely plugged in– Test chair,
continue to next step if needed.
3. Test wall outlet with another appliance – Test chair, continue
to next step if needed.
4. Change fuse near power switch (7 AMP)(Reference page 13)
- Test Chair.
1. Turn off power switch, the circle icon (O) should be pushed in.
2. Unplug the power cord (for 10 seconds)
3. Plug back in the power cord.
4. Turn back on power on the switch, the line icon (–) should
be pushed in– Test chair remote, continue to next step if
needed.
5. Check the each end of the wire which connects the remote
control to the chair, you will need to open up the remote
control (5 screws) to check these connection inside the
remote control – Test Chair.
1. Determine which recline function is making the squeaking
noise by testing each of the reclining motors (Footrest,
Backrest, and Rotate).
2. Once you determine which motor/s are making the
squeaking noise, lubricate where the motor travels in and out
of its housing (underneath the chair) with either WD-40 or 3
in 1 Oil – Test Chair, continue to next step if needed.
3. Use either WD-40 or 3 in 1 Oil to lubricate the side bolts
on the chair (which connects the backrest to the chair seat
frame). These bolts are located in between the chair’s
armrest and each side of the backrest – Test Chair.

20
72 Stard Road, Seabrook, NH
03874
(603) 910-5000
www.infinitymassagechairs.com
Version 2.3
/