Paxar 3R 9430R User manual
- Category
- Label printers
- Type
- User manual
This manual is also suitable for
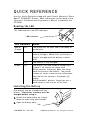
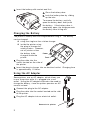
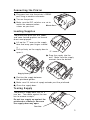
Paxar 3R 9430R allows you to print text, bar codes, and some limited graphics on thermal direct receipt paper. It features an LED display to indicate its status, a battery that can be charged using a single or four-station charger or inside the printer using the plug-in charger, and an AC adapter that allows you to use the printer while it is plugged into a wall outlet. The printer has a duty cycle that may be exceeded in high-temperature environments, so it is recommended to pause the printer for one minute after every four inches printed.
Paxar 3R 9430R allows you to print text, bar codes, and some limited graphics on thermal direct receipt paper. It features an LED display to indicate its status, a battery that can be charged using a single or four-station charger or inside the printer using the plug-in charger, and an AC adapter that allows you to use the printer while it is plugged into a wall outlet. The printer has a duty cycle that may be exceeded in high-temperature environments, so it is recommended to pause the printer for one minute after every four inches printed.


-
 1
1
-
 2
2
-
 3
3
-
 4
4


Paxar 3R 9430R User manual
- Category
- Label printers
- Type
- User manual
- This manual is also suitable for
Paxar 3R 9430R allows you to print text, bar codes, and some limited graphics on thermal direct receipt paper. It features an LED display to indicate its status, a battery that can be charged using a single or four-station charger or inside the printer using the plug-in charger, and an AC adapter that allows you to use the printer while it is plugged into a wall outlet. The printer has a duty cycle that may be exceeded in high-temperature environments, so it is recommended to pause the printer for one minute after every four inches printed.
Ask a question and I''ll find the answer in the document
Finding information in a document is now easier with AI
Related papers
-
Paxar Monarch Sierra Sport 3R 9430R User manual
-
-
-
-
-
-
-
-
-
Other documents
-
Monarch 9430RX Quick Reference Manual
-
Avery Dennison 9433 Operating instructions
-
-
-
Monarch 9855 Reference guide
-
-
-
-
-